How to Safely Drill Through Glass Tile: Step-by-Step Guide

Drilling through glass tile can be a tricky task if not done correctly. However, with the right tools and techniques, you can safely and easily drill through glass tile without cracking or damaging it. Whether you’re installing a new shower, backsplash, or mirror, follow this step-by-step guide to drill through glass tile like a pro.
Gather the right tools: Before you begin, make sure you have all the necessary tools. This includes a drill with a diamond-tipped bit, masking tape, a spray bottle filled with water, a ruler or tape measure, and safety goggles. The diamond-tipped bit is essential for drilling through glass without causing cracks or fractures.
Measure and mark: Use a ruler or tape measure to determine the exact spot where you want to drill. Use a pencil or marker to mark this spot on the glass tile. This will help you drill with precision and avoid any mistakes.
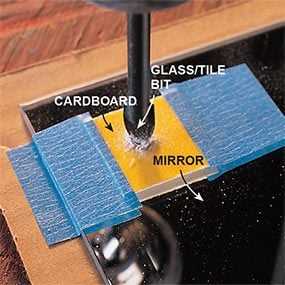
Prepare the area: Use the masking tape to create a boundary around the marked spot. This will help protect the surrounding area from any accidental damage. Additionally, spraying the marked spot with water will keep the glass tile cool and prevent it from cracking due to heat generated during drilling.
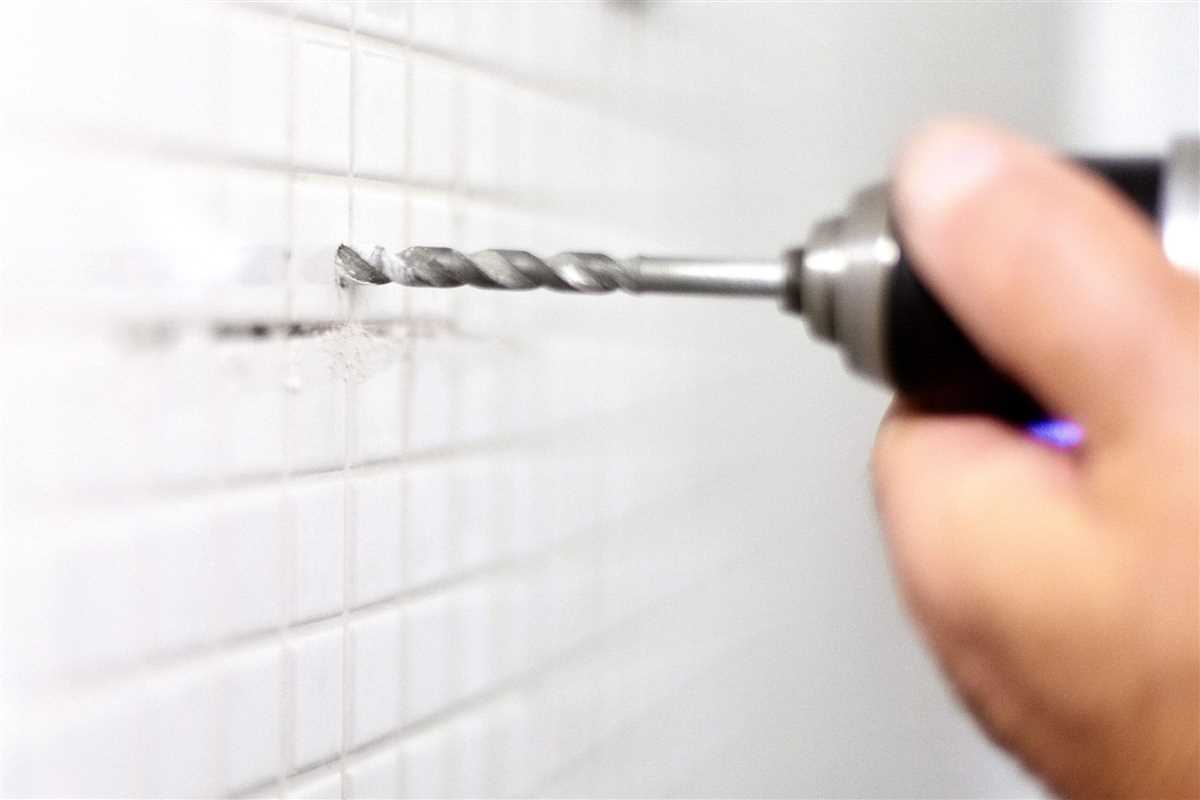
Drill with caution: Put on your safety goggles and hold the drill perpendicular to the marked spot on the glass tile. Start drilling at a slow speed, applying gentle pressure. Let the drill bit do the work and avoid forcing it through the tile. Remember to keep the drill bit and the tile lubricated with water to reduce heat and prevent cracking.

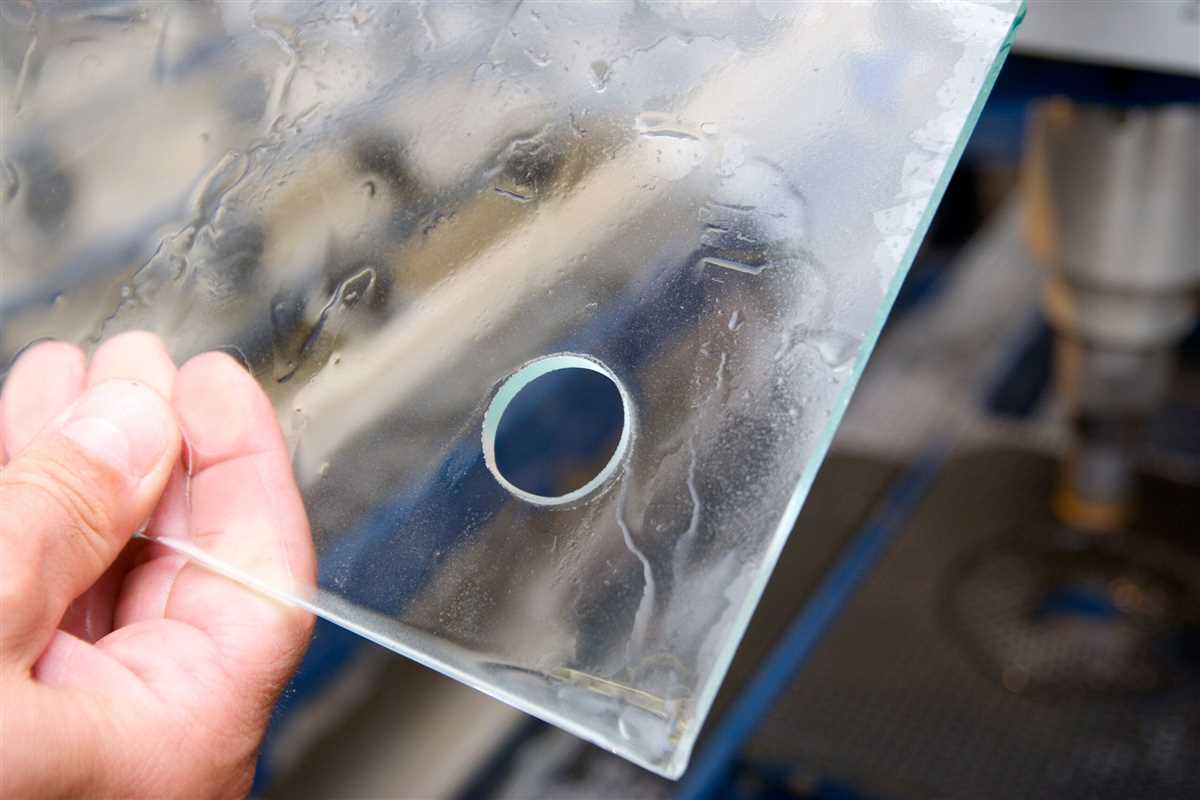
Clean up and inspect: Once you’ve successfully drilled through the glass tile, remove the masking tape and wipe away any excess water. Inspect the hole to ensure it’s smooth and without any cracks or damages. If you notice any issues, you may need to start over or seek professional help.
By following these step-by-step instructions, you can safely and effectively drill through glass tile without causing any damage. Remember to take your time, use the right tools, and proceed with caution to achieve the best results.
Choosing the right drill bit
One of the most important factors in safely drilling through glass tile is using the correct drill bit. Using the wrong drill bit can cause the glass tile to crack or shatter, and it can also damage your drill or dull the bit.
When choosing a drill bit for glass tile, it’s important to look for one specifically designed for drilling through glass or tile. These drill bits are typically made from carbide or diamond, which are hard and durable materials that can withstand the high heat generated during drilling.
There are several types of drill bits that are suitable for drilling through glass tile:

- Carbide-tipped drill bits: These drill bits have a carbide tip that is fused to the steel body. They are designed to drill through hard materials like glass and tile, and they can provide smooth, clean holes.
- Diamond-coated drill bits: These drill bits have a thin layer of diamond coating that provides extra durability and cutting power. They are especially effective for drilling through hard surfaces like glass and tile.
- Spear-point drill bits: Also known as glass and tile drill bits, spear-point bits have a unique tip that helps prevent the bit from slipping or skidding on the smooth surface of the glass tile.
- Tile spade drill bits: These drill bits have a flat, paddle-like tip that is designed to create large, clean holes in tile and glass. They are especially useful for drilling holes for plumbing or electrical wiring.
When selecting a drill bit, consider the size of the hole you need to drill and the material of your glass tile. Choose a drill bit that is the appropriate size for your desired hole and ensure that it is designed for drilling through glass.
It’s also a good idea to have a few extra drill bits on hand, as drilling through glass tile can be a delicate process and the drill bits may break or become dull over time.
Preparing the glass tile
Before you start drilling through the glass tile, it is important to properly prepare it to minimize the risk of cracking or shattering. Follow the steps below to ensure that your glass tile is ready for drilling:
1. Gather the necessary tools
Make sure you have all the tools and materials you need for the drilling process. This includes:

- Safety goggles
- Masking tape or painter’s tape
- Water or drilling lubricant
- Carbide-tipped drill bit designed for glass or tile
- Drill with variable speed settings
2. Choose the right location
Select the exact spot where you want to drill through the glass tile. Mark it with a pencil or use masking tape to create a guide for drilling.
3. Protect the glass tile
To prevent the glass from cracking or chipping, place a piece of scrap wood or a firm surface underneath the tile. This will provide support and distribute the pressure during the drilling process.
4. Apply masking tape
Cover the area where you will be drilling with masking tape or painter’s tape. This will protect the surface of the glass tile and also helps to reduce the risk of the drill bit slipping.
5. Use lubrication
It is important to keep the glass tile and the drill bit cool during drilling to avoid overheating and damaging the tile. Add a few drops of water or drilling lubricant to the drilling area to act as a coolant. This will also help to flush away any debris.
6. Select the right drill bit size and speed

Choose the appropriate size of the carbide-tipped drill bit for your project. Set the drill to a low or medium speed setting to control the drilling process and reduce the risk of cracking the glass tile.
7. Start drilling
Position the drill bit on the marked spot and apply gentle pressure. Start drilling slowly at a low speed, gradually increasing the speed as you progress. Make sure to maintain a steady and even pressure throughout the drilling process.
8. Clean the drilling area
After you have successfully drilled through the glass tile, remove the masking tape and clean the area. Wipe away any debris or residue left from the drilling process.
Following these steps will help you prepare the glass tile properly for drilling and minimize the risk of damage. Remember to always wear safety goggles and proceed with caution when working with glass.

Marking the drilling point
- Before you start drilling, it is important to accurately mark the spot where you want to drill the hole in the glass tile. This will ensure that you drill in the correct location and prevent any unwanted damage.
- Use a marker or a pencil to make a small dot on the surface of the tile where you want the hole to be.
- Take your time to measure and mark the spot accurately, as any errors can cause the glass tile to crack or break.
- If you are drilling multiple holes, make sure to mark each spot separately to avoid confusion.
Using a diamond drill bit
When it comes to drilling through glass tile, using a diamond drill bit is essential. Diamond drill bits are specifically designed for drilling through hard materials like glass, porcelain, and ceramic. Here’s a step-by-step guide on how to use a diamond drill bit to drill through glass tile:
- Gather your materials: Before you start, make sure you have all the necessary materials. This includes a diamond drill bit, a power drill, a spray bottle filled with water, masking tape, and a safety mask and goggles.
- Prepare the glass tile: Use masking tape to create a guide on the glass tile. This will help prevent the drill bit from slipping. Place the tape over the area where you want to drill the hole.
- Wear safety gear: Safety should always be a priority. Put on a safety mask and goggles to protect your eyes and lungs from any potential debris or glass shards.
- Start drilling: Set your drill to a low speed and apply gentle pressure to the glass tile. Begin drilling at a 45-degree angle until the drill bit creates a small groove. This will help prevent the drill bit from slipping and provide better stability.
- Add water: While drilling, it’s important to keep the drill bit cool and lubricated. Spray a small amount of water onto the drill bit and the glass tile every few seconds. This will help prevent overheating and prolong the life of the drill bit.
- Continue drilling: Once the groove is created, gradually increase the drilling angle to 90 degrees. Apply even pressure and continue to spray water as needed. Take small breaks if the drill bit gets too hot to touch.
- Finish drilling: Once you’ve drilled through the glass tile, remove the masking tape and clean the area. Be careful when removing the tape to avoid damaging the tile.
Remember to work slowly and carefully when using a diamond drill bit on glass tile. Take breaks if necessary and always prioritize your safety. With the right tools and technique, you can successfully drill through glass tile without any cracks or damage.
Applying steady pressure
Once you have marked the desired drilling spot on the glass tile, it’s important to apply steady pressure while drilling. This will help prevent the tile from cracking or breaking. Here are some tips for applying steady pressure:
- Hold the drill perpendicular to the tile: Make sure the drill is held straight and not at an angle. This will ensure that the pressure is evenly distributed and minimize the risk of tile damage.
- Start at a slow speed: Begin drilling at a slow speed to prevent the drill bit from jumping around on the tile surface. As you gain more control and feel more comfortable, you can gradually increase the speed.
- Use a lubricant: Applying a lubricant, such as water or cutting oil, can help reduce friction and heat buildup while drilling. This will make the drilling process smoother and safer.
- Apply firm but gentle pressure: Use your non-dominant hand to hold the tile steady and apply downward pressure while drilling. Avoid exerting too much force, as this can lead to tile damage. Instead, maintain a consistent and gentle pressure throughout the drilling process.
- Take breaks when needed: Drilling through glass tile can be a slow and delicate process. If you feel that the drill bit is overheating or the pressure is becoming too difficult to maintain, take breaks to allow the drill bit to cool down and yourself to rest.
By applying steady pressure and following these tips, you can ensure a smooth and safe drilling experience when working with glass tile.
Drilling at a slow speed
When drilling through glass tile, it is important to use a slow and steady speed. This helps to prevent cracking or shattering of the tile. Follow these steps for drilling at a slow speed:
- Prepare the drill bit: Choose a drill bit specifically designed for drilling through glass and tile. Make sure it is sharp and in good condition. A diamond-tipped bit is recommended for glass tile.
- Set the drill to a low speed: Most drills have a variable speed setting. Adjust the speed to the lowest setting before starting.
- Apply light pressure: Press the drill bit gently but firmly against the glass tile. Do not apply too much pressure as it can cause the tile to crack or shatter.
- Start drilling: Turn on the drill and begin drilling into the tile at a slow and consistent speed. Let the drill do the work and avoid forcing it.
- Use a lubricant: Applying a lubricant, such as water or oil, can help to cool down the drill bit and reduce friction. This can prevent the glass tile from overheating and cracking.
- Monitor the progress: As you drill, periodically check the depth and progress of the hole. This will help you avoid drilling too far and damaging the underlying surface.
By drilling at a slow speed, you can safely create holes in glass tile without risking damage or breakage. Remember to take your time and be patient throughout the drilling process to achieve the best results.
Using water as a lubricant
When drilling through glass tile, using water as a lubricant can help prevent cracks and fractures. Water helps to keep the drill bit cool and reduces the friction between the drill bit and the glass, making the drilling process smoother.
Here is a step-by-step guide on how to use water as a lubricant when drilling through glass tile:
- Prepare the work area: Clear the work area and make sure it is clean and dry. This will help prevent any additional debris from scratching the glass tile.
- Mark the drilling spot: Use a marker or masking tape to mark the exact spot where you want to drill the hole. This will help guide your drill bit and prevent any slipping.
- Secure the glass tile: Place the glass tile on a stable surface or secure it in a vice grip to prevent it from moving during the drilling process.
- Select the right drill bit: Choose a diamond-tipped or carbide-tipped drill bit specifically designed for drilling through glass and tile. These types of drill bits are more effective and can handle the hardness of glass without cracking or breaking.
- Add water: Before you start drilling, pour a small amount of water onto the drilling spot. This can be done using a spray bottle or by dripping water from a sponge. The water will act as a lubricant and keep the drill bit cool during the drilling process.
- Start drilling: Hold the drill perpendicular to the glass tile and apply steady pressure as you begin drilling. Make sure to start slowly and gradually increase the speed. The water will help keep the drill bit cool and prevent any excessive heat buildup.
- Continue adding water: As you drill, continue adding water to keep the drill bit lubricated. This will help prevent any damage to the glass tile and ensure a smoother drilling experience.
- Drill until complete: Keep drilling until you have reached the desired depth. Once you have drilled through the glass tile, you can stop adding water and remove the drill bit.
- Clean up: After drilling, wipe away any excess water and debris from the glass tile. This will help prevent any staining or damage to the tile’s surface.
By using water as a lubricant when drilling through glass tile, you can minimize the risk of cracking or damaging the tile. Remember to always wear safety goggles and work slowly and carefully to ensure a smooth and successful drilling process.
Cleaning and finishing the hole
Once you have successfully drilled the hole through the glass tile, it’s important to clean the area around the hole and give it a finished look. Follow these steps to clean and finish the hole:
- Remove any debris: Use a small brush or cloth to remove any debris or glass shards from the hole. Be gentle to avoid scratching the glass tile.
- Clean the area: Dampen a cloth with mild soapy water and gently clean around the hole to remove any dust or dirt. Avoid using harsh chemicals or abrasive cleaners that can damage the glass tile.
- Finishing options: Depending on your preference and the aesthetic you want to achieve, you have a few options to finish the hole:
- Glass filler: If you want to fill the hole completely, you can use a glass filler specifically designed for this purpose. Apply the filler to the hole using a spatula or putty knife, and smooth it out evenly with the surface of the tile. Allow the filler to dry completely before continuing.
- Clear silicone: Another option is to use clear silicone to seal the hole. Apply a small amount of silicone around the edges of the hole and smooth it out with a finger or a caulk smoothing tool. This will create a watertight seal and give the hole a more finished appearance.
- Decorator caps: For a decorative touch, you can use decorator caps designed specifically for drilling through glass tiles. These caps are available in various finishes and designs, and they simply fit over the hole, giving it a polished look.
- Allow for drying time: Whichever finishing option you choose, make sure to allow enough time for it to dry or set completely before using or installing the glass tile. Follow the manufacturer’s instructions for drying or curing times.
By cleaning and finishing the hole properly, you can ensure a professional and polished look for your glass tile project.
FAQ:
What tools do I need to safely drill through glass tile?
To safely drill through glass tile, you will need the following tools: a diamond drill bit, water, a power drill, a marker, masking tape, safety glasses, and a towel.
Can I use a regular drill bit to drill through glass tile?
No, you cannot use a regular drill bit to drill through glass tile. Glass tile requires a diamond drill bit specifically designed for drilling through hard materials like glass and ceramic.
How do I prevent the drill bit from slipping on the glass tile?
To prevent the drill bit from slipping on the glass tile, you can place a small piece of masking tape on the tile and mark the spot you want to drill. This will provide a guide for the drill bit and help prevent slipping.
Is it necessary to use water while drilling through glass tile?
Yes, it is necessary to use water while drilling through glass tile. Water helps to cool down the drill bit and lubricate the area being drilled, which reduces the risk of cracking or shattering the glass tile.
Video:


Meet Harrison Clayton, a distinguished author and home remodeling enthusiast whose expertise in the realm of renovation is second to none. With a passion for transforming houses into inviting homes, Harrison's writing at https://thehuts-eastbourne.co.uk/ brings a breath of fresh inspiration to the world of home improvement. Whether you're looking to revamp a small corner of your abode or embark on a complete home transformation, Harrison's articles provide the essential expertise and creative flair to turn your visions into reality. So, dive into the captivating world of home remodeling with Harrison Clayton and unlock the full potential of your living space with every word he writes.


