How to Safely Drill into a Fiberglass Boat

When it comes to drilling into a fiberglass boat, it’s important to take proper precautions to avoid damaging the material and compromising the integrity of your vessel. Fiberglass is a lightweight and durable material often used in boats, but it can be fragile if not properly handled.
Before you begin drilling, it’s crucial to plan ahead and make sure you have the necessary tools and equipment. You’ll need a high-quality drill, preferably with a variable speed setting, along with the appropriate drill bits for fiberglass. It’s also a good idea to have a backup plan in case something goes wrong, such as a patching kit or expert assistance.
One of the most important steps in drilling into a fiberglass boat is determining the appropriate location. It’s essential to avoid drilling near any structural elements or areas with electrical wiring or plumbing. It’s recommended to consult the boat’s manual or seek professional advice to identify safe drilling locations.
Once you’ve identified the drilling location, it’s time to carefully mark the spot. Use a pencil or a painter’s tape to mark the exact point where you want to drill. This will help ensure accuracy and prevent any accidental slips that may damage the fiberglass. Additionally, it’s a good idea to start with a small pilot hole before moving on to the desired size, as this will minimize the risk of cracking the fiberglass.
Preparation for Drilling
Before you start drilling into your fiberglass boat, it is important to take some necessary precautions to ensure a safe and successful drilling process. Here are some steps you should follow when preparing to drill into a fiberglass boat:

- Identify the drilling location: Determine the exact spot where you want to drill the hole. Make sure to select a location that is suitable for your needs and will not compromise the structural integrity of the boat.
- Prepare the drilling area: Clean the area around the drilling location to remove any dirt, debris, or loose particles. This will ensure a clean surface for drilling and prevent any contamination that could affect the drilling process.
- Mark the drilling spot: Once you have identified the drilling location, use a marker or pencil to mark the exact spot where the hole will be drilled. This will serve as a guide during the drilling process and help you maintain accuracy.
- Gather necessary equipment: Collect all the essential tools and equipment needed for the drilling process. This may include a drill, drill bits, safety glasses, a mask, gloves, and a vacuum cleaner to clean up any debris.
- Protect yourself: Before you start drilling, ensure that you are wearing appropriate safety gear such as safety glasses and gloves. Fiberglass dust can be harmful if inhaled or if it comes in contact with your skin, so it is important to take necessary precautions.
- Secure the boat: To prevent the boat from moving or shifting during the drilling process, make sure it is securely anchored or use clamps to hold it in place. This will ensure stability and accuracy while drilling.
- Select the right drill bit: Choosing the correct drill bit is essential for drilling into fiberglass. A carbide-tipped or diamond-coated drill bit is recommended for fiberglass, as it will minimize the risk of chipping or cracking the material.
- Start with a pilot hole: It is recommended to start with a small pilot hole before drilling the final hole. This will help prevent any slippage or damage to the fiberglass. Once the pilot hole is established, you can then proceed to drill the final hole to the required size.
By following these preparatory steps, you will be better equipped to safely drill into your fiberglass boat without damaging the material or compromising the structural integrity of the boat.
Selecting the Right Equipment
When it comes to drilling into a fiberglass boat, it’s important to have the right equipment to ensure a safe and successful job. Here are some key tools and materials you should consider:
1. Drill
Choose a drill that is suitable for the size of the hole you need to create. For smaller holes, a handheld power drill should suffice. However, for larger holes, you may need a more powerful drill or a specialized hole saw attachment.
2. Drill Bits
Use drill bits specifically designed for fiberglass or other composite materials. These drill bits are usually made from carbide or diamond coatings to ensure clean and precise cuts without damaging the fiberglass.

3. Tape
Apply masking tape or painter’s tape around the area where you plan to drill. This will help protect the gelcoat or paint finish on the fiberglass and prevent any potential chipping or cracking.
4. Lubricant
Applying a lubricant such as cutting oil or water to the drill bit can help reduce friction and heat buildup, ensuring a smoother drilling process. This is especially important when drilling into thick fiberglass or when working with larger holes.
5. Safety Gear
Always wear appropriate safety gear, including safety glasses or goggles to protect your eyes from any flying debris. Additionally, wear gloves to protect your hands while handling the drill and other tools.
6. Backing Material
Depending on the purpose of the hole, you may need to install backing material behind the fiberglass to provide support. This is often the case when installing hardware or mounting brackets. Common backing materials include marine-grade plywood or epoxy-filled holes.
By selecting the right equipment for the job, you can ensure a safe and successful drilling experience on your fiberglass boat.

Choosing the Proper Location
When it comes to drilling into a fiberglass boat, choosing the proper location is crucial to ensure the integrity of the hull. Here are some key factors to consider when selecting a location:
1. Reinforced Areas
- Look for areas in the boat where the fiberglass is reinforced. These areas are typically stronger and can better support the weight and stress of the drilling.
- Common reinforced areas include bulkheads, stringers, and other structural supports.
- Inspect the boat’s blueprints or consult with an expert if necessary to identify these reinforced areas.
2. Aesthetics
- Consider the aesthetic aspect of your drilling location.
- If possible, choose a location that is not highly visible or easily noticeable.
- Take into account the boat’s design and any potential negative impact drilling might have on its appearance.
3. Accessibility
- Ensure that the area you choose is easily accessible for drilling.
- Consider factors such as the size of the drill and the length of the drill bit.
- Avoid areas that are obstructed or difficult to reach, as this may increase the risk of damaging the boat or injuring yourself.
4. Plumbing and Wiring
- Be aware of any existing plumbing or wiring that may be hidden beneath the surface of the fiberglass.
- Consult the boat’s manual or seek professional advice to identify potential hidden obstacles.
- Drilling into these areas can cause serious damage to the boat’s systems.
5. Safety First
- Prioritize safety when selecting the location.
- Avoid areas that are close to fuel tanks, engine compartments, or other potential hazards.
- Ensure that the chosen location allows for proper clearance and adequate ventilation.
- Consider wearing protective gear and taking necessary precautions to minimize the risk of accidents.
By carefully considering these factors, you can choose the proper location to drill into your fiberglass boat, ensuring a successful and safe project.
Drilling Process
1. Gather the necessary tools
Before starting the drilling process, gather all the necessary tools such as a drill, drill bits, tape measure, pencil, and safety goggles. Make sure the drill bits are suitable for drilling into fiberglass.
2. Determine the drilling location
Carefully select the location where you want to drill the hole. Ensure that there are no critical structural elements, electrical wirings, or plumbing behind the intended drilling point. Use a tape measure and pencil to mark the drilling spot accurately.
3. Prepare the area
Protect the surrounding area by covering it with a drop cloth or masking tape to prevent any accidental damage to the boat’s finish. This will also help with easy cleanup after drilling.

4. Put on safety goggles
Always prioritize safety when working with power tools. Wear safety goggles to protect your eyes from any flying debris or fiberglass particles that may be produced during the drilling process.
5. Start with a small pilot hole
Begin drilling by using a small pilot hole drill bit. This will help guide the larger drill bits and prevent the fiberglass from splintering or cracking. Apply light pressure and maintain a slow and steady drilling speed.
6. Gradually increase drill bit size
After the pilot hole is established, gradually increase the drill bit size to achieve the desired hole diameter. It is important to apply even pressure and avoid pushing too hard, as this can cause damage to the fiberglass.

7. Use a backer board
If drilling into a thin or flexible fiberglass surface, use a backer board behind the drilling area. This will provide support and prevent the fiberglass from flexing or cracking under pressure.
8. Keep the drill steady
While drilling, it is crucial to keep the drill steady and maintain a straight drilling angle. This will help prevent any accidental slips or damage to the surrounding area.
9. Remove any debris
During the drilling process, periodically stop and remove any debris from the hole. This will ensure that the drill continues to make clean and efficient cuts.
10. Clean and finish the hole
After drilling the hole, clean any leftover debris and smooth the edges with sandpaper if necessary. This will help prevent any sharp edges that could potentially cause injury.
11. Test fit and install
Before installing any hardware, test fit it in the drilled hole to ensure a proper fit. Once satisfied, install the hardware securely according to the manufacturer’s instructions.
12. Clean up
After completing the drilling process, remove the drop cloth or masking tape used to protect the surrounding area. Clean up any debris and store the tools in their appropriate places.
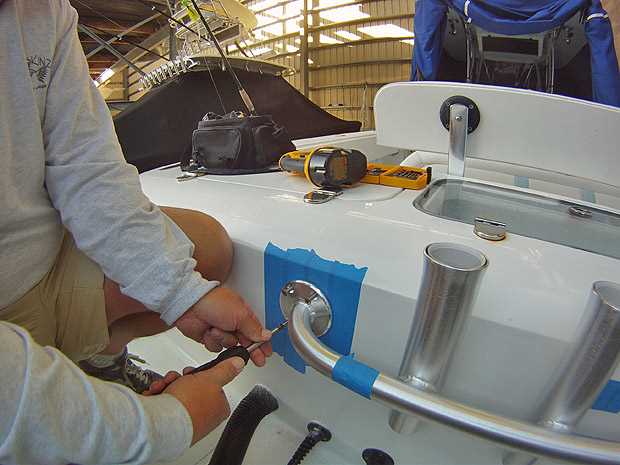
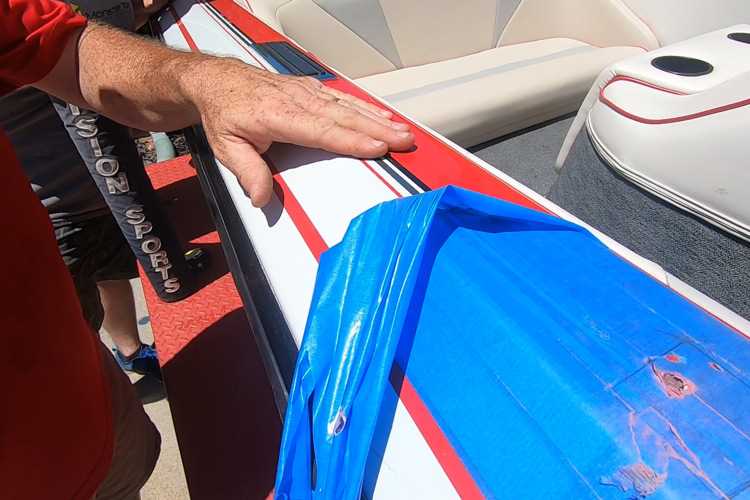
Marking the Spot
Before you start drilling into your fiberglass boat, it is crucial to mark the exact spot where you want to drill. This will help ensure accuracy and prevent any unnecessary damage to the surrounding area.
Here is a step-by-step guide on how to properly mark the spot:
- Plan and measure: Decide where you want to drill your hole and measure the dimensions of the hole. This will help you determine the correct size of the drill bit to use.
- Clean the area: Use a clean cloth or a mild solvent to clean the area where you will be drilling. This will remove any dirt, grime, or wax that could interfere with the drilling process.
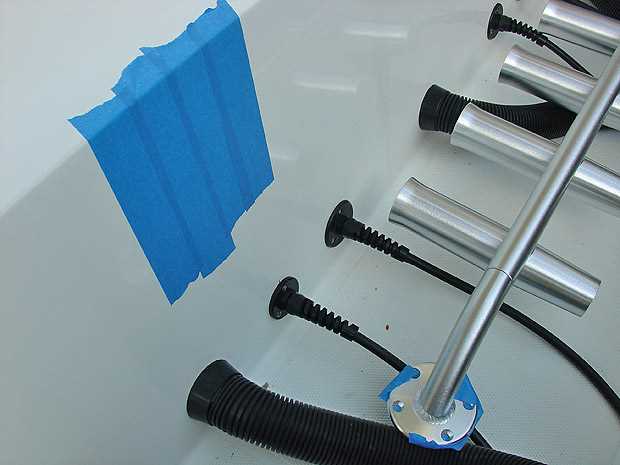
- Use masking tape: Apply a strip of masking tape over the spot where you want to drill. This will act as a protective layer, preventing the gelcoat from cracking or splintering during the drilling process.
- Mark the center: Use a pencil or a marker to mark the exact center of the hole on the masking tape. Double-check your measurements to ensure accuracy.
Following these steps will help you mark the spot accurately and ensure that your drilling process goes smoothly. Remember to take your time and be patient during this process to avoid any mistakes or damage to your fiberglass boat.
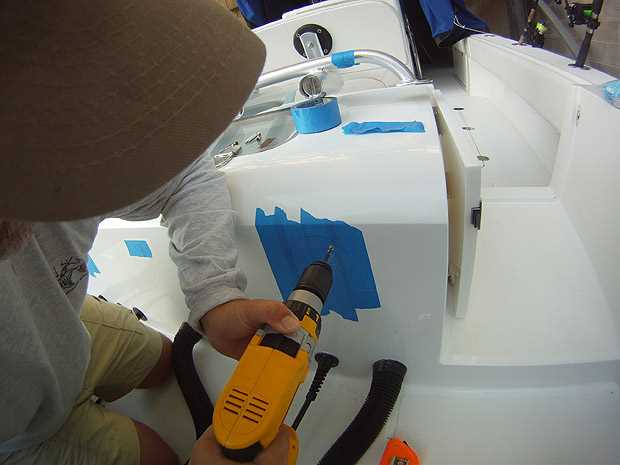
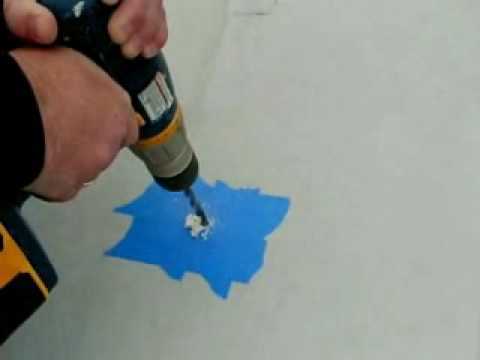
Using a Pilot Hole
A pilot hole is a small hole that you drill before drilling the final hole. It serves as a guide for the drill bit and helps prevent the fiberglass from chipping or cracking. Here’s how to use a pilot hole when drilling into a fiberglass boat:
- Choose the right drill bit: Use a drill bit that is appropriate for the size of the final hole you want to make. It should be sharp and in good condition.
- Mark the location: Use a pencil or marker to mark the exact spot where you want to drill the hole on the fiberglass surface. Take measurements and ensure the placement is correct.
- Start with a small pilot hole: Start by drilling a small pilot hole using the drill bit. This hole should be smaller than the final hole you want to make. Apply steady pressure and be careful not to apply too much force that can damage the fiberglass.
- Increase the hole size: Once you have drilled the pilot hole, you can then switch to a larger drill bit that matches the desired size of the final hole. Place the larger drill bit into the pilot hole and drill through the fiberglass.
- Drill at a low speed: Drill at a slower speed while drilling through the fiberglass to prevent excessive heat buildup, which can damage the surrounding area. A slower speed also provides better control and reduces the risk of the drill bit grabbing and causing accidental damage.
Using a pilot hole when drilling into a fiberglass boat is important to ensure a clean and precise final hole. It helps minimize the risk of damaging the fiberglass and maintains the structural integrity of the boat.
Drilling Techniques
When drilling into a fiberglass boat, it is important to use the correct techniques to avoid damaging the material or compromising the structure of the boat. Here are some key tips to follow when drilling into fiberglass:
- Choose the right drill bit: It is essential to use a drill bit specifically designed for drilling into fiberglass. These bits have a special design that helps prevent cracking and chipping of the material. Carbide-tipped or diamond-coated bits are typically the best choice.
- Mark the drilling location: Before drilling, mark the exact location where you want to drill. Use a pencil or a piece of tape to ensure accuracy.
- Start with a small pilot hole: To prevent the bit from slipping or causing damage, start by drilling a small pilot hole. This will help guide the larger drill bit and reduce the risk of cracking or splintering the fiberglass.
- Use a low drill speed: Fiberglass is a delicate material, so it is important to use a low drill speed to avoid generating excessive heat that can cause damage. Slow and steady is the key.
- Apply a cutting lubricant: Applying a cutting lubricant, such as water or cutting oil, on the drill bit will help keep it cool and prevent it from overheating.
- Use light pressure: When drilling, apply only light pressure to avoid exerting too much force on the fiberglass. Let the drill bit do the work and allow it to gradually penetrate the material.
- Clean the drill hole: After drilling, clean the hole with a brush or compressed air to remove any fiberglass debris and ensure a clean and smooth surface.
- Seal the drilled hole: To prevent water intrusion and maintain the integrity of the hull, it is important to seal the drilled hole. Use a marine-grade sealant or epoxy to create a watertight seal.
Following these drilling techniques will help you safely and effectively drill into a fiberglass boat without causing any damage. Remember to always exercise caution and take your time when working with fiberglass.
Applying Consistent Pressure
To safely drill into a fiberglass boat, it is important to apply consistent pressure to avoid damaging the material. Here are some tips on how to accomplish this:
1. Start with a pilot hole
Before drilling the full-size hole, it is recommended to start with a pilot hole. This smaller hole will guide the drill bit and make it easier to maintain consistent pressure. Use a drill bit of appropriate size for the job.
2. Use a clamp
If possible, secure the area to be drilled with a clamp. This will help stabilize the fiberglass and prevent it from moving during the drilling process. Make sure the clamp is firmly attached and does not interfere with the area where you are drilling.
3. Choose the right drill speed
When drilling into fiberglass, it is important to use a low to medium drill speed. High speeds can generate excessive heat, which can damage the fiberglass. Start with a slow speed and gradually increase if necessary, while being mindful of the pressure you are applying.
4. Use a sharp drill bit
A dull drill bit can cause more friction and require more pressure, increasing the risk of damaging the fiberglass. Ensure you are using a sharp drill bit suitable for drilling fiberglass. If necessary, replace the drill bit with a new one to maintain optimal performance.
5. Maintain a steady hand
To maintain consistent pressure, it is important to have a steady hand while drilling. Avoid pushing too hard or applying uneven pressure. Use both hands to hold the drill if possible, with one hand on the handle and the other supporting the back of the drill to provide stability.
6. Take breaks if needed
Drilling into fiberglass can be a tedious process, especially if you are working on a large project. If you feel your hand or the drill motor getting hot, take a short break to allow them to cool down. This will help prevent overheating and ensure better control of the drilling process.
By following these tips and taking your time, you can safely drill into a fiberglass boat without causing damage. Remember to always wear appropriate safety gear and consult a professional if you are unsure about any aspect of the drilling process.
Using the Correct Drill Bit
- Choose the right drill bit: When drilling into fiberglass, it’s important to use the right drill bit to avoid damaging the material. A carbide-tipped drill bit or a high-speed steel drill bit with a sharp point is recommended for drilling through fiberglass.
- Avoid using regular masonry or metal drill bits: Masonry drill bits are designed for drilling into concrete and stone, while metal drill bits are meant for drilling into metal surfaces. Using these types of drill bits on fiberglass can cause splintering and cracking, so it’s best to avoid them.
- Consider using a brad point or pilot point drill bit: These types of drill bits have a small point at the tip, which helps to keep the drill bit centered on the surface. This can prevent the drill bit from wandering and potentially causing damage to the fiberglass.
- Use a bit with a diameter appropriate for the hole size: The size of the hole you need to drill will determine the diameter of the drill bit you should use. Measure the diameter of the hole you want to create, and choose a drill bit that matches that size.
Remember to always wear safety goggles and gloves when using power tools, and proceed with caution to prevent any injuries or damage to the fiberglass. Following these guidelines will help you safely drill into a fiberglass boat and achieve the desired results.
Post-Drilling Steps
- Inspect the drilled area: After drilling into a fiberglass boat, it is important to carefully inspect the drilled area for any signs of damage or cracking. Look for any frayed or splintered edges around the hole and check for any visible damage to the surrounding fiberglass.
- Clean the drilled area: Use a clean cloth or sponge to wipe away any debris or dust from the drilled hole and the surrounding area. This will ensure a clean surface for the next step.
- Apply a sealant: To prevent water from seeping into the drilled hole and causing damage, it is recommended to apply a marine-grade sealant. Choose a sealant that is specifically designed for use on fiberglass boats. Carefully follow the instructions on the sealant packaging for the best results.
- Let the sealant dry: Allow the sealant to dry completely before moving on to the next step. The drying time may vary depending on the specific sealant used, so refer to the instructions for guidance.
- Test for water tightness: Once the sealant has dried, it is important to test the drilled area for water tightness. Use a hose or bucket of water to gently pour water over the newly drilled hole and observe if any water leaks through. If water does leak, additional sealant may be required to ensure a proper seal.
- Reinstall any removed components: If any components were removed before drilling, such as a bracket or fitting, now is the time to reattach them using appropriate screws or fasteners. Ensure that all screws or fasteners are tightened securely.
Following these post-drilling steps will help ensure the integrity of your fiberglass boat and minimize the risk of any further damage or water ingress.
FAQ:
What is the best way to safely drill into a fiberglass boat?
The best way to safely drill into a fiberglass boat is by using a pilot hole and gradually increasing the size of the drill bit. This helps to prevent cracking or splintering of the fiberglass. It’s also important to use a sharp drill bit and to apply a steady, even pressure while drilling.
Are there any special tools or equipment required for drilling into a fiberglass boat?
No special tools or equipment are required for drilling into a fiberglass boat. However, it’s important to use a sharp drill bit specifically designed for use on fiberglass, as using a dull or incorrect drill bit can cause damage to the fiberglass surface.
What precautions should I take before drilling into a fiberglass boat?
Before drilling into a fiberglass boat, it’s important to identify any existing structural elements or electrical wires that may be in the area where you plan to drill. You should also clean the surface of the boat to remove any dirt or debris that could interfere with drilling. Additionally, it’s a good idea to use masking tape to mark the location where you plan to drill.
What should I do if I accidentally drill into a structural element of my fiberglass boat?
If you accidentally drill into a structural element of your fiberglass boat, it’s important to stop drilling immediately. Depending on the extent of the damage, you may need to consult a professional for repairs. It’s always best to err on the side of caution and seek professional help if you’re unsure about the extent of the damage.
Video:


Meet Harrison Clayton, a distinguished author and home remodeling enthusiast whose expertise in the realm of renovation is second to none. With a passion for transforming houses into inviting homes, Harrison's writing at https://thehuts-eastbourne.co.uk/ brings a breath of fresh inspiration to the world of home improvement. Whether you're looking to revamp a small corner of your abode or embark on a complete home transformation, Harrison's articles provide the essential expertise and creative flair to turn your visions into reality. So, dive into the captivating world of home remodeling with Harrison Clayton and unlock the full potential of your living space with every word he writes.


