How to Safely Destroy a Hard Drive Using a Drill

When it comes to disposing of an old hard drive, simply throwing it away is not enough. Hard drives store a wealth of sensitive and personal information, and if it falls into the wrong hands, it can lead to identity theft or other security breaches. To ensure that your data is completely destroyed and unrecoverable, one effective method is to use a drill. In this article, we will guide you through the process of safely destroying a hard drive using a drill.
Before beginning, it is important to back up any data that you may still need from the hard drive. Once it is destroyed, there will be no way to retrieve the information. Additionally, make sure to wear safety goggles and protective gloves to prevent any injuries during the process.
To start, locate a suitable area where you can set up your work station. It is recommended to choose an outdoor space or a well-ventilated area to avoid inhaling any potentially harmful fumes. Place the hard drive on a sturdy surface, such as a workbench or a piece of wood, to provide stability.
Note: Keep in mind that this method should only be used as a last resort, as it permanently destroys the hard drive. If you are planning to donate or sell your device, there are other methods, such as software wiping or degaussing, that can effectively erase the data without damaging the hardware.
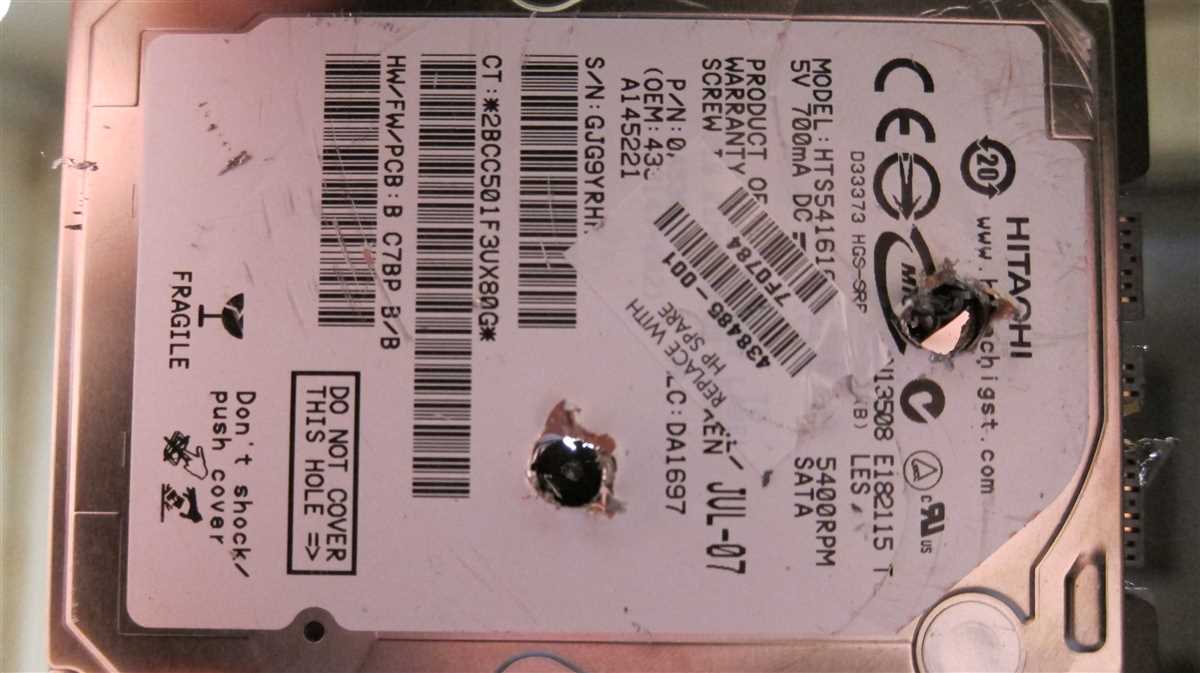
Next, using a drill with a drill bit that is suitable for metal, position the drill bit in the center of the hard drive’s casing. Apply pressure and start drilling through the casing, making sure to keep a steady hand. Once the drill bit has penetrated the casing, continue to drill through the surface of the hard drive, creating multiple holes. This will ensure that the internal components of the hard drive are irreparably damaged.
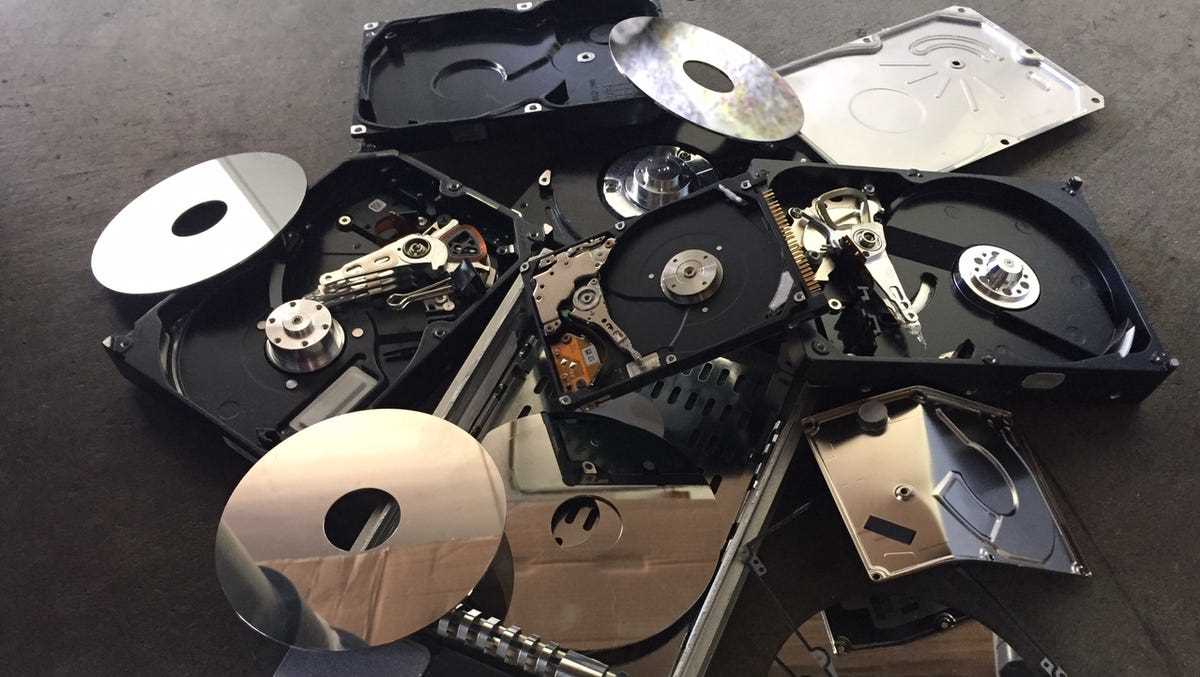
After you have finished drilling, it is recommended to further ensure the destruction of the hard drive by disposing of the pieces in separate locations. This will make it even more difficult for anyone to reconstruct the drive or retrieve any data. Consider recycling the broken pieces at a certified electronic waste disposal facility for proper disposal.

By following these steps, you can safely destroy a hard drive using a drill and ensure that your data remains secure. Remember to always take precautions when handling hardware and disposing of electronic devices to protect your personal information.
Importance of Proper Hard Drive Disposal
Proper hard drive disposal is essential for maintaining data security and protecting sensitive information from falling into the wrong hands. When a hard drive is no longer in use, simply throwing it away or recycling it without taking proper precautions can leave your personal and confidential data vulnerable to theft.
Data Security Risks
- Data Breaches: Improper disposal can result in data breaches where unauthorized individuals gain access to personal or confidential information.
- Identity Theft: Discarded hard drives can contain personal identifiable information such as names, addresses, and social security numbers, which can be used for identity theft.
- Business Espionage: Companies that do not properly dispose of their hard drives risk exposing trade secrets and confidential business information, which can be used by competitors or malicious actors.
Environmental Concerns
In addition to the security risks, improper hard drive disposal also creates environmental concerns:
- Electronic Waste: Improperly disposed hard drives contribute to electronic waste, which can harm the environment due to toxic substances contained in the electronics.
- Resource Depletion: Hard drive disposal without recycling leads to the loss of valuable resources such as metals and minerals that can be recovered and reused.
Proper Hard Drive Disposal Methods
There are several methods for properly disposing of a hard drive:
- Physical Destruction: Physically destroying the hard drive by drilling through it or using a hammer or shredder ensures that the data cannot be easily recovered.
- Professional Data Destruction: Hiring a professional data destruction service can provide a secure and efficient solution, as they have the equipment and expertise to ensure proper disposal.
- Secure Recycling: Choosing a reputable electronics recycling center that follows environmentally responsible practices ensures that the hard drive is properly recycled and any data is destroyed.
- Wiping and Degaussing: Software tools can be used to wipe the hard drive clean of data or degaussing can be performed to demagnetize it, making the data unrecoverable.
Conclusion
In conclusion, proper hard drive disposal is crucial to maintain data security and protect personal and confidential information. By following the appropriate methods for disposal, individuals and businesses can mitigate the risks of data breaches, identity theft, and environmental harm.

Why Use a Drill to Destroy a Hard Drive
When it comes to disposing of old or defective hard drives, it is important to ensure that the sensitive data stored on them is completely and irretrievably destroyed. One effective method for achieving this is by using a drill to physically destroy the hard drive. There are several reasons why using a drill is a popular and practical choice for this purpose.
Data Security
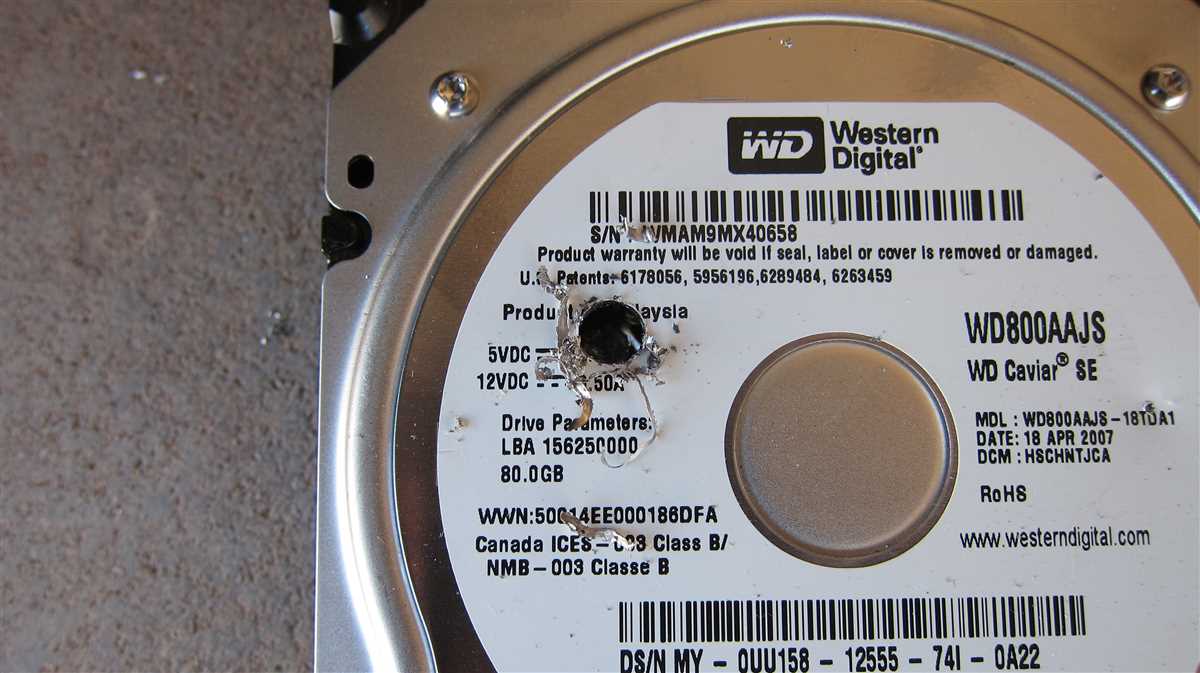
The primary reason for using a drill to destroy a hard drive is to ensure the security of the data stored on it. Hard drives store sensitive information, including personal and financial data, business secrets, and confidential documents. Simply deleting files or even formatting the drive may not be enough to guarantee that the data cannot be recovered. Drilling through the hard drive platters renders them unreadable and virtually impossible to recover.
Accessibility and Ease of Use
Using a drill to destroy a hard drive is a straightforward and accessible method that does not require expensive equipment or extensive technical knowledge. Most people have access to a basic power drill, making it a convenient choice for individuals and small businesses looking to dispose of their old drives securely.

Cost-Effective Solution
Compared to other methods, such as using a specialized shredder or degausser, drilling a hard drive is a cost-effective solution. Shredders and degaussers can be expensive to purchase or rent, making them less accessible for individuals or smaller organizations. Drilling, on the other hand, only requires a drill bit, which is a relatively inexpensive tool.
Potential for Physical Destruction
Using a drill provides the opportunity for physical destruction of the hard drive. Depending on the drilling technique and power, the hard drive can be damaged beyond repair, further ensuring that the data cannot be recovered. This physical destruction acts as an additional layer of security, making it even more difficult for anyone to retrieve sensitive information from the drive.
Flexibility
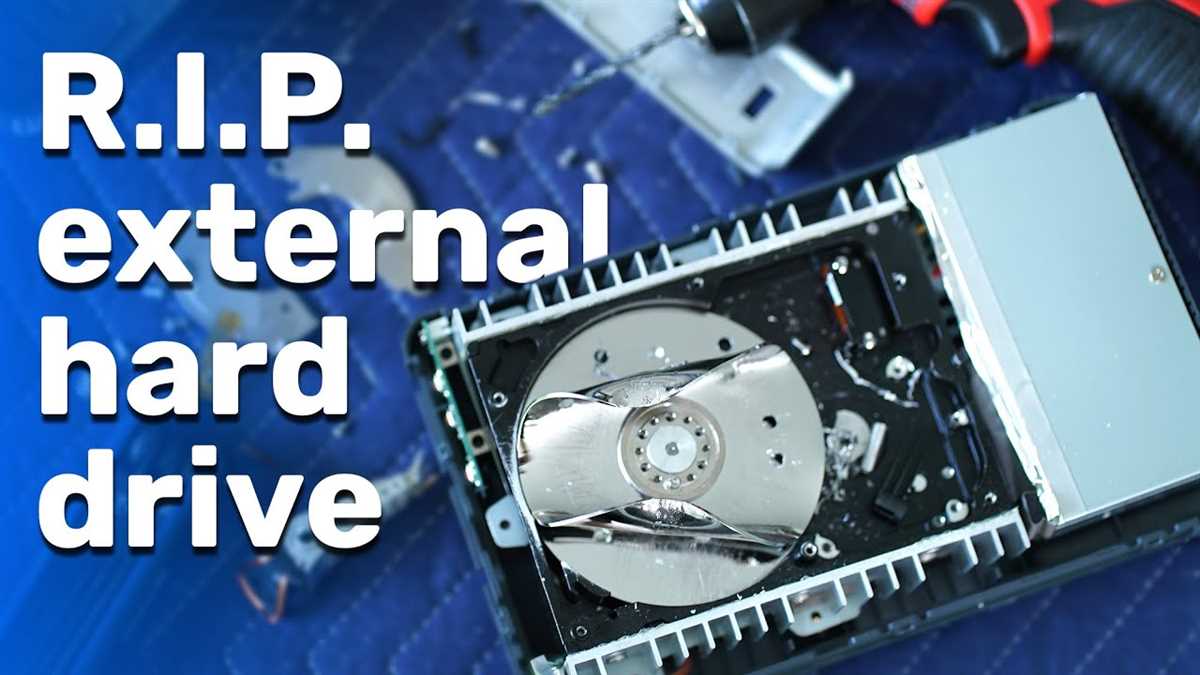
A drill can be used on any type of hard drive, regardless of its size or age. Whether you have a traditional hard disk drive (HDD) or a solid-state drive (SSD), a drill can effectively destroy both types. This flexibility makes the drill a versatile tool for securely disposing of any type of hard drive.
| Benefits of using a drill to destroy a hard drive: |
|
Materials Needed for Hard Drive Destruction
When it comes to safely destroying a hard drive using a drill, there are a few essential materials that you will need. These materials will help you effectively and securely destroy the hard drive, ensuring that the data cannot be recovered.
1. Power Drill
The most crucial tool you will need for hard drive destruction is a power drill. Choose a drill with enough power to pierce through the hard drive casing and the platters inside.

2. Drill Bits
You will also need suitable drill bits that can penetrate the hard drive’s metal casing and platters. It is recommended to use strong and durable drill bits, such as titanium-coated or cobalt drill bits.
3. Work Gloves
Wearing work gloves is essential to protect your hands during the hard drive destruction process. Opt for gloves made of thick and durable material, such as leather or a cut-resistant fabric.
4. Safety Goggles
To protect your eyes from any potential debris or shards that may fly off during the drilling process, it is crucial to wear safety goggles. Look for goggles that provide a secure fit and have impact-resistant lenses.
5. Workbench or Stable Surface
A sturdy workbench or stable surface is necessary to securely hold the hard drive while drilling. Make sure the surface is flat and provides enough stability so that the hard drive doesn’t move or wobble during the destruction process.

6. Trash Bag
After the hard drive is completely destroyed, you will need a trash bag to dispose of the shattered pieces securely. Choose a heavy-duty trash bag that can handle sharp materials without tearing.
7. Permanent Marker
Using a permanent marker, label the shredded hard drive as “destroyed” to prevent accidental use or confusion later on. This step ensures that no one mistakenly tries to use the destroyed hard drive.
8. Protective Mask
While not absolutely necessary, wearing a protective mask can be helpful to reduce inhalation of potential dust or particles that may be released during the destruction process.
9. Optional: Drill Press Vise
If you want to enhance stability during the drilling process, you can consider using a drill press vise to securely grip the hard drive while drilling. However, this is an optional tool and not necessary for hard drive destruction.
By having these materials ready, you will be well-equipped to safely and effectively destroy a hard drive using a drill.
Step 1: Preparation
Before starting the process of safely destroying a hard drive using a drill, it is important to take the necessary precautions and gather the required materials. This step will ensure that you are well-prepared and minimize any potential risks.
Materials needed:
- A drill (preferably with adjustable speed settings)
- Protective gloves
- Safety goggles
- Secure work surface
- Hard drive to be destroyed
- Masking tape or marker
Precautions:
Take the following precautions to ensure your safety during the process:
- Choose a well-ventilated area or work outside to avoid inhaling any dust particles from the hard drive.
- Wear protective gloves to prevent any injuries or cuts to your hands.
- Put on safety goggles to protect your eyes from flying debris.
- Place the hard drive on a secure work surface, such as a sturdy table or workbench.
- Make sure the drill is in good working condition and has adjustable speed settings.
- Keep a fire extinguisher nearby in case of any accidents.
Labeling:
To ensure that you do not mistakenly use the hard drive again, it is important to label it clearly as “destroyed” or “not in use.” This can be done using masking tape or a marker. This step will help prevent any accidental use or data recovery attempts.
| Step | Preparation |
|---|---|
| 1 | Gather the necessary materials |
| 2 | Take necessary precautions |
| 3 | Secure the work surface |
| 4 | Label the hard drive |
Step 2: Connect the Drill
Once you have gathered all the necessary materials and put on your safety gear, it’s time to connect the drill to the hard drive. Follow these steps:
- Make sure the drill is turned off before connecting it.
- Locate the power cable that came with the drill.
- Plug one end of the power cable into a power outlet.
- Connect the other end of the power cable to the drill.
- Make sure the power cable is securely connected to both the power outlet and the drill.
- Double-check that the drill is in the off position.
By following these steps, you will ensure that the drill is properly connected and ready to be used for destroying the hard drive.
Step 3: Positioning the Hard Drive
Before starting the drilling process, it is important to position the hard drive in a secure and stable manner. This will ensure that the drilling is done accurately and safely.
Follow these steps to properly position the hard drive:
- Prepare a work surface: Find a flat and stable work surface where you can securely place the hard drive. It is recommended to use a sturdy table or workbench.
- Clean the work surface: Ensure that the work surface is free from any debris or objects that may interfere with the drilling process.
- Place the hard drive: Carefully place the hard drive on the work surface, making sure it is positioned securely and will not move during the drilling process.
- Secure the hard drive: Use clamps or other secure means to hold the hard drive in place. This will prevent it from slipping or moving while drilling.
By following these steps and ensuring that the hard drive is properly positioned, you can proceed with the next steps of the process knowing that the drilling will be done safely and effectively.
Step 4: Begin Drilling
Now that you have taken all necessary precautions and prepared the area, it is time to begin drilling into the hard drive. Follow these steps:
- Put on your protective gear, including gloves and safety goggles.
- Position the hard drive securely on a stable surface, such as a workbench or the ground.
- Hold the drill firmly with both hands, positioning yourself in a comfortable and balanced stance.
- Align the drill bit with the center of the hard drive.
- Press the drill against the hard drive, applying steady and even pressure.
- Turn on the drill and start drilling.
- Apply constant pressure while drilling into the hard drive in a controlled manner.
- Continue drilling until the drill bit has penetrated through the hard drive and reached the other side.
- Once the drilling is complete, turn off the drill and set it aside.
Remember to take breaks if needed and pace yourself throughout the drilling process. It is important to remain cautious and focused to prevent any accidents or injuries.
Step 5: Repeat if Necessary
If you still have concerns about the data on your hard drive not being completely destroyed, you can repeat the process. Simply follow Steps 1-4 again and drill additional holes in different areas of the hard drive.
By drilling multiple holes in various locations, you can ensure that the data on the hard drive is thoroughly damaged and irretrievable. Remember to use a strong drill bit and apply steady pressure to break through the metal casing and damage the internal components.
It’s important to note that repeating the process multiple times may not be necessary for most situations. The combination of Step 3 (drilling through the platters) and Step 4 (shredding the platters) should be sufficient to render the data on the hard drive unreadable.
However, if you have particularly sensitive information or high-security concerns, repeating the process can provide added peace of mind.
Once you have finished repeating the process, you can safely dispose of the hard drive. Make sure to follow local regulations for electronic waste disposal and recycling.
FAQ:
What is the most secure way to destroy a hard drive?
The most secure way to destroy a hard drive is by physically destroying it. One of the methods you can use is drilling holes into the drive.
Can I just format a hard drive to erase all the data?
Formatting a hard drive will delete the file system, but it does not completely erase the data. It is still possible for someone to recover the data using specialized software. Physically destroying the drive is the best way to ensure the data is permanently gone.
Is drilling holes in a hard drive really effective in destroying the data?
Drilling holes in a hard drive is an effective method of destroying the data. By drilling through the platters, which store the data, you make it extremely difficult for anyone to recover the information.
Is it necessary to remove the hard drive from the computer before drilling holes?
Yes, it is necessary to remove the hard drive from the computer before drilling holes. This ensures that you don’t damage any other components in the process. Make sure to disconnect the drive from power and any data cables before proceeding.
Video:


Meet Harrison Clayton, a distinguished author and home remodeling enthusiast whose expertise in the realm of renovation is second to none. With a passion for transforming houses into inviting homes, Harrison's writing at https://thehuts-eastbourne.co.uk/ brings a breath of fresh inspiration to the world of home improvement. Whether you're looking to revamp a small corner of your abode or embark on a complete home transformation, Harrison's articles provide the essential expertise and creative flair to turn your visions into reality. So, dive into the captivating world of home remodeling with Harrison Clayton and unlock the full potential of your living space with every word he writes.


