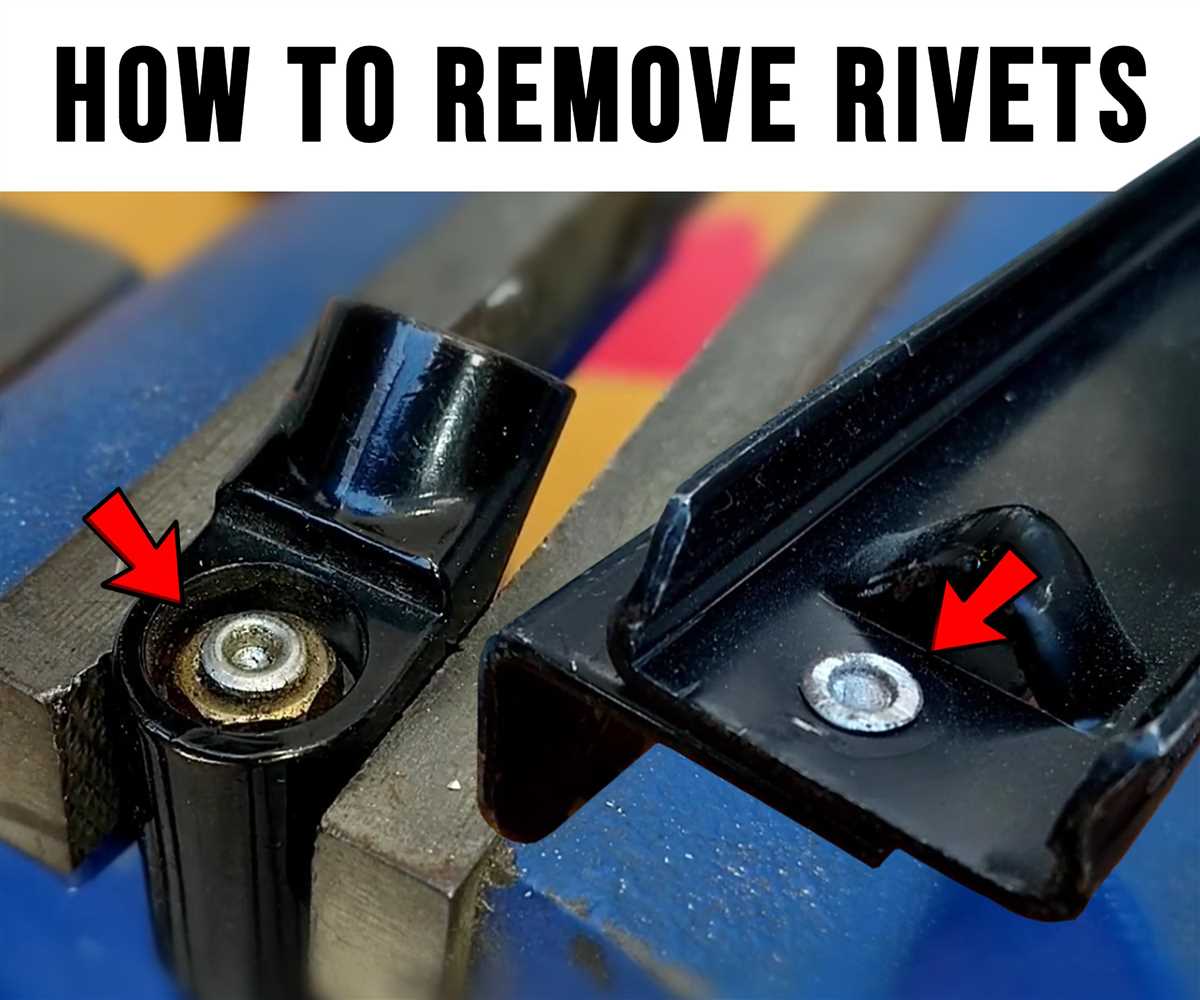
How to Remove Rivets with a Drill: A Step-by-Step Guide

If you’re tackling a project that involves removing rivets, having the right tools and techniques can make the job much easier. One of the most effective methods for removing rivets is using a drill. In this step-by-step guide, we will walk you through the process of removing rivets with a drill, so you can successfully complete your project.
Step 1: Gather Your Materials
Before you begin, it’s important to gather all the necessary materials. You will need a drill with a drill bit that matches the size of the rivet head, safety goggles to protect your eyes, and a pair of pliers. Additionally, make sure you have a sturdy work surface to secure the material you are working on.
Step 2: Mark the Rivet
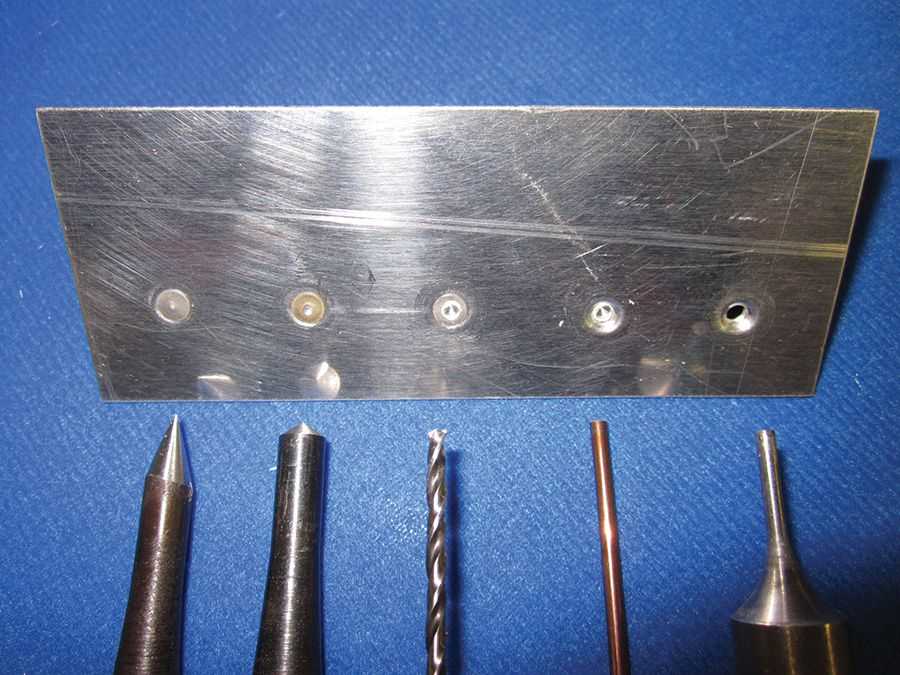
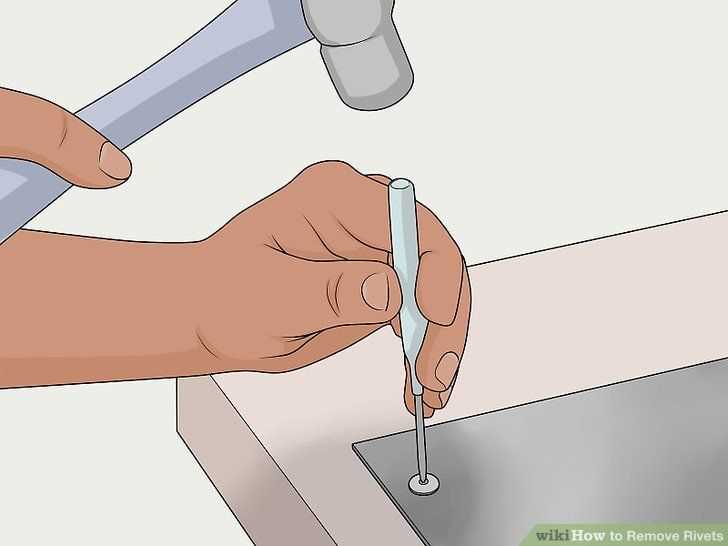
Once you have your materials ready, mark the center of the rivet you want to remove. This will help you position the drill bit accurately and prevent any slippage. Use a small awl or a center punch to create a small indentation at the center point.

Step 3: Start Drilling
Put on your safety goggles and secure the material you are working on to a stable surface. Insert the drill bit into the center indentation and start drilling slowly and steadily. Apply moderate pressure and rotate the drill bit in a clockwise motion. The goal is to drill through the rivet head without damaging the surrounding material.
Step 4: Remove the Rivet
Once the drill bit has gone through the rivet head, stop drilling and remove the drill from the material. Take your pliers and grip the exposed end of the rivet. Gently twist and pull the rivet out of the material. If the rivet is stubborn, you may need to use the pliers to wiggle it loose or cut it off.
Step 5: Clean Up

After removing the rivet, inspect the surrounding area for any remaining pieces or rough edges. Use sandpaper or a file to smooth out any rough surfaces. This will ensure a clean finish and prevent any snags or injuries.
Remember, safety is crucial when working with power tools. Always wear safety goggles and work in a well-ventilated area. Take your time, follow the steps carefully, and soon you’ll be able to remove rivets with ease using a drill.
By following this step-by-step guide, you can confidently remove rivets with a drill and tackle your project with ease. Whether you’re working on a DIY project or making repairs, this technique will come in handy. Happy drilling!
What are Rivets and Why Remove Them
Rivets are fasteners that are used to join two or more pieces of material together. They consist of a smooth cylindrical shaft called a “shank” and a head on one end. Rivets can be made of various materials such as steel, aluminum, or copper, depending on the application.
Rivets are commonly used in industries such as construction, automotive, and aerospace, where a strong and durable joint is required. They are often used in situations where welding or screwing may not be feasible or practical.
There are several reasons why you might need to remove rivets:

- Replacing damaged or worn-out parts: When a riveted joint becomes weak or fails, it may be necessary to remove the rivets to replace the damaged parts.
- Modifying or repairing a structure: Sometimes, you may need to modify or repair a structure that has been previously riveted. Removing the rivets allows you to make the necessary changes.
- Disassembling for maintenance or upgrades: If you need to perform maintenance or upgrade certain components of a structure, removing the rivets is often necessary to gain access to the parts.
Removing rivets can be a challenging task, especially if you don’t have the right tools or techniques. However, with the proper knowledge and tools, it can be a relatively straightforward process. One common method of removing rivets is using a drill, which allows for quick and efficient removal.
In the following sections, we will guide you through the step-by-step process of removing rivets with a drill, ensuring that you can successfully disassemble any riveted joint.
Step 1: Gather the Necessary Tools and Materials
Before you begin removing rivets with a drill, it’s important to gather all the necessary tools and materials. This will ensure that the process goes smoothly and efficiently.
Here is a list of tools and materials you will need:

- A cordless drill
- A drill bit suitable for metal
- A center punch
- A hammer
- Safety glasses
- A flathead screwdriver or chisel
- A marker or pen
- A drill press (optional, but can be helpful for precision work)
- A workbench or sturdy surface to work on
- Gloves (optional, but recommended for added safety)
Make sure your cordless drill is charged and the drill bit is securely inserted. It’s also a good idea to double-check that you have all the necessary tools before you start, as running back and forth to gather missing items can be frustrating and time-consuming.
What You’ll Need
- A power drill
- A drill bit
- A punch or center punch
- Safety goggles
- Gloves
- Rivet removal tool or drill bit slightly larger than the rivet head
- Clamps or a vice
- A hammer
- A flat head screwdriver or chisel
- A deburring tool or sandpaper
- A vacuum or brush for clean-up
Preparing Your Work Area
Before you begin removing rivets with a drill, it’s important to properly prepare your work area. Taking the time to set up your work area will help ensure your safety and the success of the project. Here are some steps to follow:
1. Gather your tools

Start by gathering all the necessary tools for removing rivets. This typically includes a drill with the appropriate drill bit, a hammer, pliers, a screwdriver, and safety goggles. Having all the tools within reach will make the process more efficient and prevent delays.
2. Find a suitable work surface
Select a sturdy work surface where you can safely perform the rivet removal. A solid workbench or table is ideal, as it will provide stability and support for your project. Avoid working on unstable surfaces that may cause accidents or damage to your materials.
3. Clear the work area
Remove any unnecessary items or clutter from your work area to create a clean working space. This will help prevent any accidents or obstructions that may interfere with the rivet removal process. It’s also important to have sufficient lighting in your work area to see clearly.
4. Wear appropriate safety gear
Always prioritize your safety when working with tools and machinery. Wear safety goggles to protect your eyes from flying debris or metal shavings. Additionally, consider wearing gloves to protect your hands and hearing protection if necessary.
5. Take necessary precautions
Before starting the rivet removal process, ensure that you are familiar with the specific precautions for the materials you are working with. For example, if you are removing rivets from a painted surface, take extra care to avoid damaging the paint. It’s also a good idea to practice on a scrap piece of material before working on your actual project.
By following these steps to prepare your work area, you will create a safe and efficient environment for removing rivets with a drill. Taking the time to set up properly will help ensure the success of your project and prevent any accidents or damage.
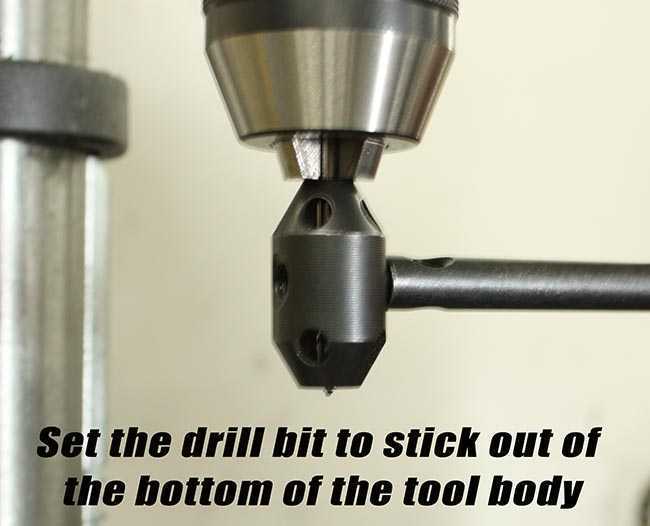
Step 2: Choose the Right Drill Bit

Once you have gathered all the necessary materials and tools, the next step is to choose the right drill bit for the job. The drill bit you choose will depend on the materials you are working with, as well as the size of the rivets you are trying to remove.
When it comes to drilling out rivets, it is important to use a drill bit that is slightly larger than the hole in the center of the rivet. This will allow you to drill out the rivet without damaging the surrounding material.
There are several types of drill bits that can be used to remove rivets. The most common types include:
- HSS (High-Speed Steel) Drill Bit: This type of drill bit is suitable for most rivet removal jobs and can easily drill through aluminum, steel, and other commonly used materials.
- Cobalt Drill Bit: Cobalt drill bits are harder and more durable than HSS bits, making them a good choice for heavy-duty rivet removal tasks.
- Carbide Drill Bit: Carbide drill bits are extremely hard and can easily drill through tough materials like stainless steel. They are a good choice for rivets that are made of hardened or high-strength materials.
Before you start drilling, make sure that the drill bit you have chosen is sharp and in good condition. Dull or worn-out drill bits can cause the rivet to spin or slip, making it difficult to remove.
| Rivet Diameter | Drill Bit Size |
|---|---|
| 1/8 inch (3.2 mm) | 9/64 inch (3.6 mm) |
| 5/32 inch (4 mm) | 11/64 inch (4.4 mm) |
| 3/16 inch (4.8 mm) | 13/64 inch (5.2 mm) |
| 1/4 inch (6.4 mm) | 7/32 inch (5.6 mm) |
| 5/16 inch (7.9 mm) | 17/64 inch (6.7 mm) |
Refer to the above table for a general guide on drill bit sizes for rivet removal. However, it is always recommended to measure the diameter of the rivet to ensure that you are using the correct drill bit size.
Once you have chosen the right drill bit and verified its size, you are ready to move on to the next step: drilling out the rivets.
Understanding Rivet Types and Drill Bit Selection
Before attempting to remove rivets with a drill, it’s important to understand the different types of rivets and the corresponding drill bit sizes needed for each type.
Rivet Types
Rivets come in various types, but the three most common ones are:
- Blind Rivets: These rivets are used when access to the back of the material is limited. They consist of a mandrel and a body with a hollow center. Blind rivets commonly have a protruding head on one side.
- Solid Rivets: These rivets are made of a single piece of metal and require access to both sides of the material to install or remove. Solid rivets have a flat head on one side and a rounded head on the other, which is created by hammering or clinching.
- Pop Rivets: Also known as “blind rivets with a break stem,” these rivets are similar to blind rivets but have a stem that breaks off once the rivet is installed. Pop rivets are commonly used in fastening thin materials together.
Drill Bit Selection
The right drill bit size is crucial for effectively removing rivets. Depending on the rivet type, you’ll need different drill bit sizes. The general rule of thumb is to choose a drill bit that is slightly smaller than the rivet body’s diameter.
Here are some commonly used drill bit sizes for different rivet types:
| Rivet Type | Drill Bit Size (inches) |
|---|---|
| Blind Rivets | 1/8″ or 3/32″ |
| Solid Rivets | Equal to or slightly smaller than the rivet body’s diameter |
| Pop Rivets | 1/8″ or 3/32″ |
Always refer to the manufacturer’s guidelines or consult an expert if you are unsure about the appropriate drill bit size for a specific rivet.
By understanding the different rivet types and selecting the right drill bit size, you’ll be equipped to effectively remove rivets with a drill.
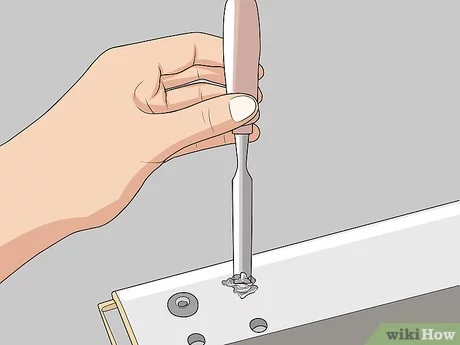
Step 3: Secure the Rivet
Before you start drilling, it’s important to secure the rivet to prevent it from spinning or moving around. This will ensure that the drill bit stays in place and prevents any accidents or damage to the surrounding material.
Tools and materials you’ll need:
- One or two pairs of locking pliers or vise grips
To secure the rivet, follow these steps:
- Put on a pair of work gloves to protect your hands.
- Use a pair of locking pliers or vise grips to firmly grip the head of the rivet.
- Apply steady pressure to hold the rivet in place.
- Ensure that the pliers or vise grips are securely locked onto the rivet head.
By locking the pliers or vise grips onto the rivet head, you create a stable anchor point that will prevent the rivet from spinning or moving while you drill.
Note: If you’re working with a large rivet or a stubborn one that is difficult to grip with one set of pliers, you may need to use two sets of pliers or vise grips to secure it properly.
Warning: Always ensure that the pliers or vise grips are securely locked onto the rivet head before you start drilling. Failure to do so may result in injury or damage to your tools or surroundings.
Clamp the Rivet
Before you begin removing the rivet, it’s vital to secure it in place to prevent any accidental movements or slipping. To do this, you’ll need to clamp the rivet firmly. Here’s how you can do it:
- Select an appropriate clamp based on the size and type of rivet you are working with. Make sure the clamp is capable of providing a strong grip without damaging the rivet or surrounding materials.
- Position the clamp jaws around the head of the rivet, ensuring a snug fit.
- Tighten the clamp by turning the handle or using any provided mechanisms until the rivet is secure and unable to move. Take care not to overtighten and cause damage.
Once the rivet is clamped securely, you can proceed with removing it using a drill. The clamp will help stabilize the rivet and prevent any damage or accidents during the removal process.
Position Yourself
Before you begin removing rivets with a drill, it is important to position yourself properly to ensure safety and efficiency.
1. Safety First: Make sure to wear appropriate safety gear such as safety goggles, gloves, and ear protection. This will protect you from any debris or noise that may occur during the process.
2. Secure the Material: Place the material you are working on securely in a vise or clamp. This will prevent it from moving or slipping while you are drilling.
3. Find a Stable Surface: Work on a stable surface such as a workbench or sturdy table. This will provide a solid base for your drilling and reduce the risk of accidents.
4. Create a Work Area: Clear the area around you, removing any objects or obstacles that could interfere with your work. This will give you enough space to maneuver the drill and prevent any accidents.
5. Position Yourself: Stand or sit in a comfortable and stable position, ensuring that you have a clear line of sight to the rivets you are about to remove. This will allow you to work with precision and accuracy.
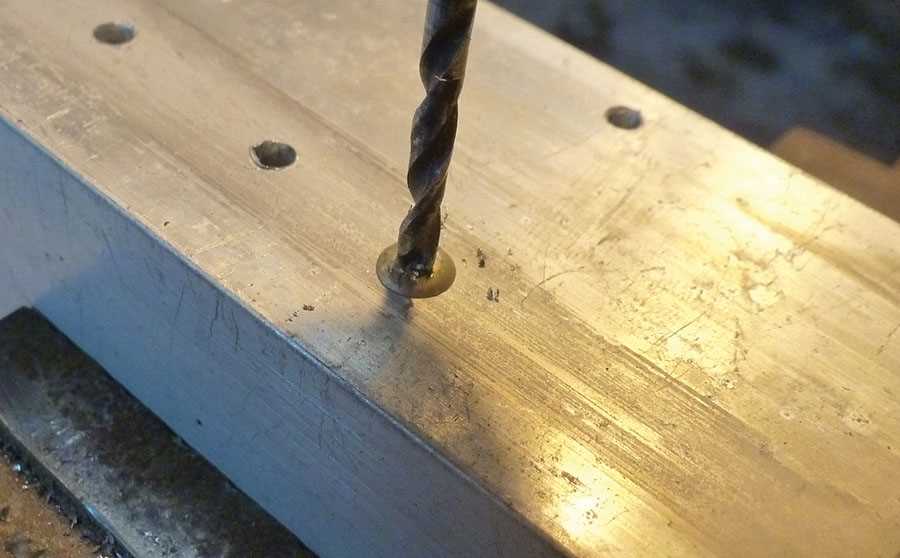
Step 4: Drilling the Rivet
Now that you have marked the center of the rivet and positioned your drill bit, it’s time to start drilling. Follow these steps to drill the rivet:
- Hold the drill firmly using both hands for stability.
- Place the drill bit at the center mark on the rivet.
- Ensure that the drill is set to rotate in a clockwise direction.
- Activate the drill and start drilling slowly.
- Apply steady pressure while drilling until the rivet head is completely removed.
- Be aware of the drill bit penetrating through the rivet and into the material behind it.
- Continue drilling until the rivet is completely detached.
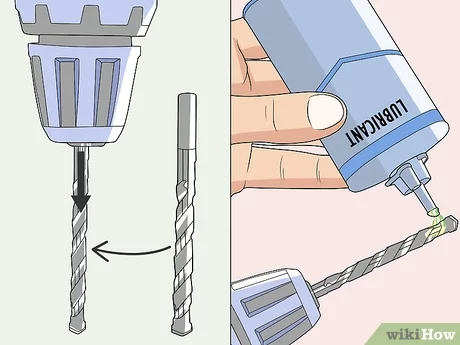
It’s important to note that drilling rivets can create a lot of heat and friction. To prevent overheating, consider using a lubricant such as cutting oil. Apply a small amount of cutting oil to the drill bit before drilling, and it will help to cool down the drill bit as it works through the rivet.
Remember to wear safety goggles and gloves during this process to protect yourself from flying debris and sharp edges.
FAQ:
What tools do I need to remove rivets with a drill?
To remove rivets with a drill, you will need a drill with a bit suitable for the size of the rivet, a drill bit for drilling holes, a punch or nail, a hammer, pliers, and safety glasses.
Can I remove rivets without using a drill?
Yes, you can remove rivets without using a drill. One method is to use a hammer and chisel to shear off the rivet head, then use pliers to grip the remaining shank and pull it out. Another method is to use a grinder or rotary tool to cut off the rivet head, then punch out the remaining shank.
Are there any safety precautions I should take when removing rivets with a drill?
Yes, it is important to wear safety glasses to protect your eyes from debris. Additionally, make sure to secure the material you are working on to prevent it from moving unexpectedly. Take care not to apply too much pressure with the drill, as this can cause the bit to slip and potentially cause injury.
How do I choose the right drill bit for removing rivets?
When choosing a drill bit for removing rivets, you should select a bit that matches the size of the rivet. It is important to choose a bit that is slightly larger than the rivet to ensure easy removal. If in doubt, start with a smaller bit and gradually increase the size until you find the right fit.
Video:


Meet Harrison Clayton, a distinguished author and home remodeling enthusiast whose expertise in the realm of renovation is second to none. With a passion for transforming houses into inviting homes, Harrison's writing at https://thehuts-eastbourne.co.uk/ brings a breath of fresh inspiration to the world of home improvement. Whether you're looking to revamp a small corner of your abode or embark on a complete home transformation, Harrison's articles provide the essential expertise and creative flair to turn your visions into reality. So, dive into the captivating world of home remodeling with Harrison Clayton and unlock the full potential of your living space with every word he writes.