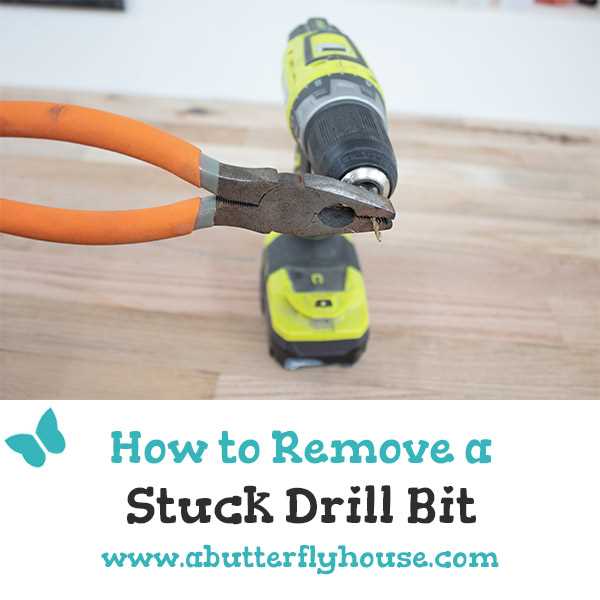
How to Remove a Stuck Drill Bit from a Keyless Chuck

When using a drill, sometimes the drill bit gets stuck in the keyless chuck and becomes difficult to remove. This can happen for a variety of reasons, such as excessive force or debris in the chuck. If you find yourself in this predicament, it can be frustrating and time-consuming to try and remove the stuck drill bit.
Fortunately, there are a few methods you can try to remove a stuck drill bit from a keyless chuck. One option is to use pliers or a wrench to grip the drill bit and turn it counterclockwise. Another method is to tap the chuck gently with a hammer to loosen the grip on the drill bit.
It is important to be careful when attempting to remove a stuck drill bit, as excessive force or the use of improper tools can damage the chuck or the drill bit. In some cases, it may be necessary to seek professional assistance or replace the chuck if it cannot be loosened.
In summary, removing a stuck drill bit from a keyless chuck can be a frustrating experience, but with a little patience and the proper technique, it can be accomplished. By using pliers, a wrench, or tapping the chuck gently with a hammer, you can loosen the grip and remove the stuck drill bit. Remember to use caution and avoid excessive force to prevent any damage to the chuck or the drill bit.
Overview of the Problem
When working with a drill, it is not uncommon to encounter a stuck drill bit in the keyless chuck. This can happen for a variety of reasons, such as the bit becoming lodged or jammed in the chuck, or the chuck itself getting stuck due to wear or debris. Regardless of the cause, this can be a frustrating problem for anyone trying to complete a drilling task.

Removing a stuck drill bit requires some patience and the use of a few simple tools. It is important to approach the problem with care to avoid damaging the drill or causing injury to yourself. By following the steps outlined in this guide, you can safely and effectively remove a stuck drill bit from a keyless chuck and get back to work.
Common Reasons for a Stuck Drill Bit

There are several common reasons why a drill bit becomes stuck in a keyless chuck. Understanding these reasons can help you troubleshoot and prevent future incidents.
1. Rust
Rust is one of the most common causes of a stuck drill bit. When moisture comes into contact with metal parts, it can cause corrosion and rust to form. This can make it difficult to remove the drill bit from the chuck.
2. Over-Tightening

Another common reason for a stuck drill bit is over-tightening. If you tighten the chuck too much, it can compress the jaws of the chuck around the drill bit, making it difficult to remove.
3. Debris
Debris such as wood shavings, dust, or metal shavings can accumulate in the chuck over time. This build-up can cause the drill bit to become stuck as it gets wedged between the chuck and the bit.
4. Worn Chuck Jaws
If the jaws of the chuck are worn or damaged, they may not grip the drill bit properly. This can result in the bit becoming stuck in the chuck and difficult to remove.
5. Incorrect Chuck Size
Using a drill bit that is not compatible with the chuck size can lead to the bit becoming stuck. The chuck may not be able to securely grip the bit, causing it to become jammed in the chuck.
6. Binding
In some cases, the drill bit may become stuck due to binding. Binding can occur when the bit gets stuck in the material being drilled, causing it to become jammed and difficult to remove from the chuck.
7. Lack of Lubrication
If the chuck does not have sufficient lubrication, the drill bit may become stuck. Lubrication helps to reduce friction between the drill bit and the chuck, making it easier to remove the bit.
By understanding these common reasons for a stuck drill bit, you can take steps to prevent it from happening and troubleshoot any issues that do arise.
Preparation Before Removing the Drill Bit
Before attempting to remove a stuck drill bit from a keyless chuck, it is important to take certain precautions and gather the necessary materials. These preparations will help ensure a safe and successful removal process.
Gather the Tools
Before starting, gather the following tools:
- Adjustable wrench or chuck key
- Soft cloth or rag
- Penetrating oil, such as WD-40
Having these tools on hand will make it easier to remove the stuck drill bit and minimize any potential damage to the chuck.
Ensure Safety
Before beginning, it is important to ensure your safety. Follow these steps:
- Disconnect the power source or remove the battery from the drill.
- Wear protective gloves to prevent any injury.
- Place the drill on a stable surface or secure it in a vice to prevent it from moving during the removal process.
By taking these safety precautions, you can minimize the risk of injury while working with the drill and chuck.
Clean the Chuck
Before attempting to remove the stuck drill bit, it is important to clean the chuck and remove any debris or dust buildup. Follow these steps:
- Use a soft cloth or rag to wipe away any dirt or debris from the exterior of the chuck.
- If there is visible rust or corrosion on the chuck, apply a small amount of penetrating oil to help loosen it.
By cleaning the chuck and removing any obstructions, you can improve the efficiency of the drill bit removal process.
Methods to Remove a Stuck Drill Bit
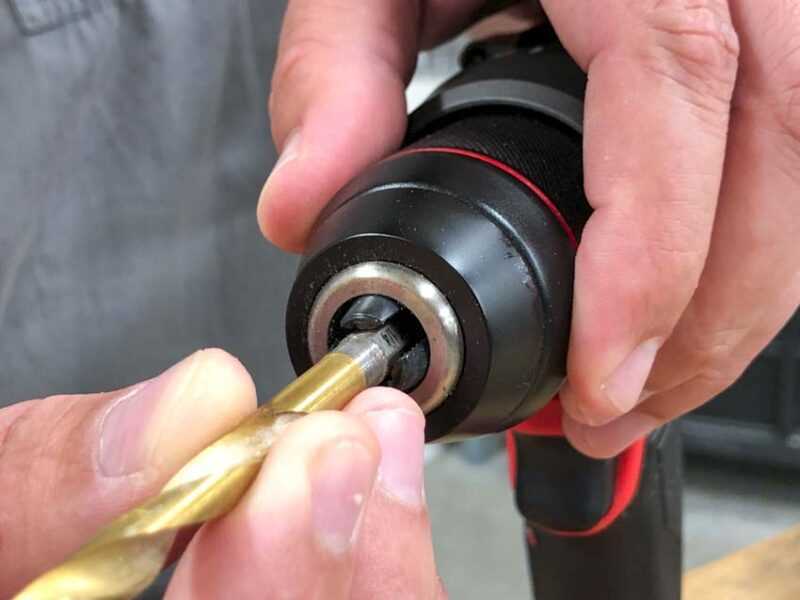
- Using pliers: If the drill bit is stuck in the chuck, you can try using a pair of pliers to grip the bit and turn it counterclockwise to loosen it. Make sure to use a pair of pliers that have a good grip to avoid slipping and damaging the bit or chuck.
- Using a hammer: If the drill bit is stuck due to rust or debris buildup, you can try tapping the back end of the bit with a hammer. This may help to loosen the bit and make it easier to remove.
- Using heat: If the drill bit is stuck due to adhesive or glue, you can try heating up the chuck using a heat gun or hairdryer. The heat can help soften the adhesive, making it easier to remove the bit. Be careful not to overheat the chuck, as it may damage the drill.
- Using a lubricant: Applying a lubricant, such as WD-40, to the chuck can help loosen a stuck drill bit. Spray the lubricant onto the chuck and let it sit for a few minutes before attempting to remove the bit.
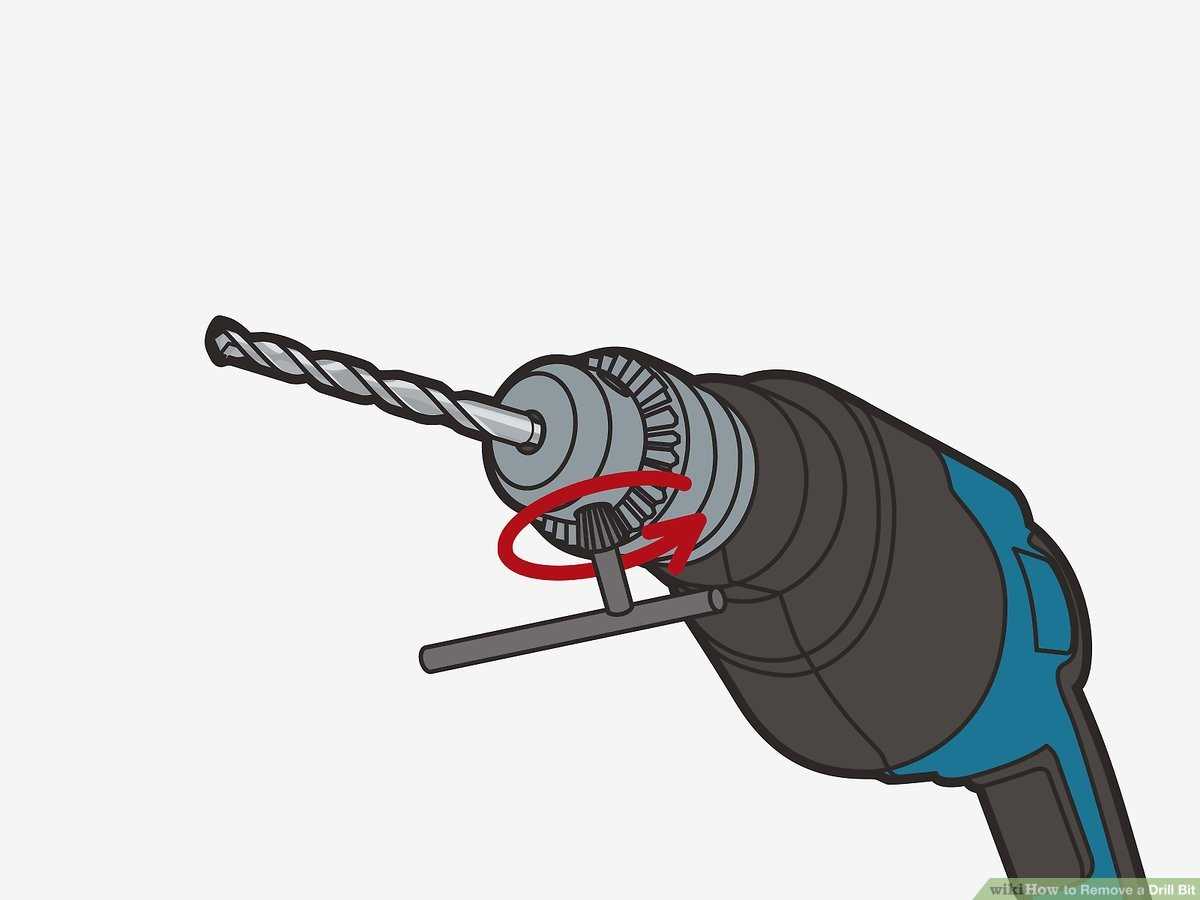
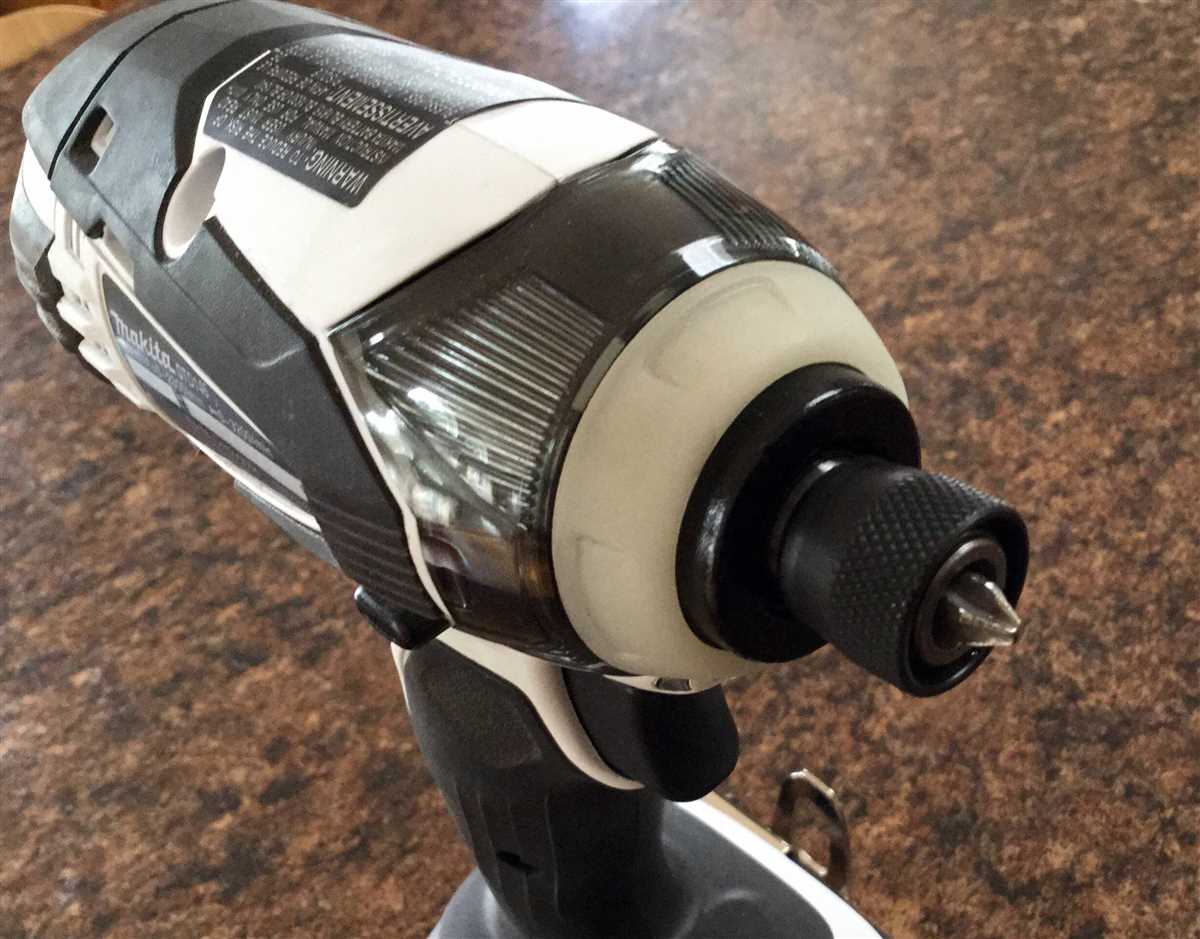
- Using a chuck key: If your drill has a chuck key, insert it into the chuck and rotate it counterclockwise to release the bit. Make sure to use the correct size chuck key for your drill.
- Using a drill press: If none of the above methods work, you can try using a drill press to remove the stuck drill bit. Secure the chuck in the drill press and lower the drill bit into a block of wood. Use the drill press to turn the chuck counterclockwise and loosen the bit.
Using a Non-Conventional Method
Step 1: Assess the Situation
Before attempting a non-conventional method to remove the stuck drill bit, make sure to assess the situation. Determine the cause of the jammed bit and evaluate its severity. This will help you decide if a non-conventional method is necessary.
Step 2: Gather Required Materials
For this unconventional method, you will need:
- Pliers
- Heat source (such as a blowtorch or heat gun)
Step 3: Apply Heat to the Chuck
Using the heat source, carefully apply heat to the chuck area surrounding the stuck drill bit. Be cautious not to overheat the chuck or any nearby components, as this may cause damage. Heat helps to expand the metal and may loosen the tight grip on the drill bit.
Step 4: Grip the Drill Bit with Pliers
Once the chuck has been heated, use a pair of pliers to grip the exposed part of the drill bit firmly. Make sure the pliers have a strong grip to effectively turn and pull the stuck drill bit out of the chuck.
Step 5: Twist and Pull to Remove the Bit
With a secure grip on the drill bit, twist it counterclockwise while applying a moderate amount of pulling force. The combination of turning and pulling should help dislodge the stuck drill bit from the chuck.
Step 6: Inspect and Clean
After successfully removing the stuck drill bit, thoroughly inspect the chuck for any damage or debris. Clean the chuck using a brush or compressed air to remove any remaining particles or dust.
Step 7: Test and Lubricate
Before using the drill again, perform a test run to ensure the chuck is working properly. If needed, apply a small amount of lubricant to the chuck to prevent future sticking or jamming.
Note: This non-conventional method should only be used as a last resort when traditional methods fail. It requires caution and should be done with care to avoid any accidents or damage to the drill.
Tips and Safety Precautions
1. Safety Glasses and Gloves
Always wear safety glasses and gloves when working with power tools, including drills. This will protect your eyes from debris and your hands from potential injury.
2. Power Off
Before attempting to remove a stuck drill bit from a keyless chuck, make sure the power is turned off, and the drill is unplugged. This will prevent any accidental activation of the drill, which could lead to injury.
3. Firm Grip
When trying to remove a stuck drill bit, make sure you have a firm grip on the drill. This will help you maintain control and prevent the drill from slipping or falling while attempting to remove the bit.
4. Use Proper Tools

Use the appropriate tools for the job. In this case, you may need a pair of pliers or a chuck key to remove a stuck drill bit from a keyless chuck. Using the wrong tool can lead to damage to the chuck or injury to yourself.
5. Apply Lubricant
If the drill bit is stuck due to rust or corrosion, applying a lubricant, such as WD-40, can help loosen it. Let the lubricant sit for a few minutes before attempting to remove the bit.
6. Tap Gently
If the drill bit is still stuck, you can try gently tapping the chuck with a rubber mallet or a block of wood. This may help dislodge the bit and make it easier to remove.
7. Seek Professional Help
If you are unable to remove the stuck drill bit using the above methods, or if you are unsure about how to proceed, it’s best to seek professional help. A qualified technician or repair specialist will have the necessary tools and expertise to safely remove the bit without causing further damage.
8. Preventive Maintenance
To avoid future issues with stuck drill bits, it’s important to regularly clean and inspect your drill and chuck. Remove any debris, lubricate moving parts, and check for signs of wear or damage. This will help ensure smooth operation and prevent future frustrations.
Note: Always refer to the manufacturer’s instructions and guidelines when working with power tools.
FAQ:
What should I do if my drill bit gets stuck in a keyless chuck?
If your drill bit gets stuck in a keyless chuck, there are a few steps you can try to remove it. First, make sure the drill is in the reverse position. Then, hold onto the chuck tightly and run the drill in reverse while applying pressure to remove the bit. If that doesn’t work, you can try using pliers or a wrench to grip the bit and twist it out. If all else fails, you may need to disassemble the chuck to remove the stuck bit.
Is it common for drill bits to get stuck in a keyless chuck?
It can happen occasionally, especially if the chuck is dirty or damaged, or if the bit is not properly inserted. However, with proper maintenance and care, it is not a common occurrence.
What are some common causes of a drill bit getting stuck in a keyless chuck?
There are a few common causes of a drill bit getting stuck in a keyless chuck. One is if the chuck is dirty or filled with debris, which can prevent the bit from being inserted or removed smoothly. Another cause can be a damaged chuck, where the jaws do not properly grip the bit. Lastly, if the bit is not fully inserted into the chuck, it can become stuck during use.
Can I use lubrication to help remove a stuck drill bit from a keyless chuck?
Yes, using lubrication can sometimes help loosen a stuck drill bit from a keyless chuck. You can try applying a small amount of lubricant, such as WD-40, to the chuck and then running the drill in reverse while trying to remove the bit. However, be cautious not to use too much lubricant, as it can attract dirt and debris and make matters worse.
What tools do I need to remove a stuck drill bit from a keyless chuck?
To remove a stuck drill bit from a keyless chuck, you may need a few tools. First, try using your hands and a firm grip on the chuck to twist and remove the bit. If that doesn’t work, you can try using pliers or a wrench to get a better grip on the bit and twist it out. In some cases, you may need to disassemble the chuck using a screwdriver or allen wrench to fully remove the stuck bit.
Can I damage my drill or keyless chuck if I try to force a stuck drill bit out?
Yes, you can potentially damage your drill or keyless chuck if you try to force a stuck drill bit out. It’s important to proceed with caution and try different methods before resorting to excessive force. Applying too much pressure or using improper tools can cause damage to the chuck jaws, the drill motor, or other internal components.
Should I seek professional help if I can’t remove a stuck drill bit from a keyless chuck?
If you are unable to remove a stuck drill bit from a keyless chuck after trying various methods, it may be wise to seek professional help. A professional can have the expertise and specialized tools to safely remove the stuck bit without causing any damage to the drill or chuck. They can also inspect the chuck for any underlying issues or damage that may have contributed to the drill bit getting stuck.
Video:

Meet Harrison Clayton, a distinguished author and home remodeling enthusiast whose expertise in the realm of renovation is second to none. With a passion for transforming houses into inviting homes, Harrison's writing at https://thehuts-eastbourne.co.uk/ brings a breath of fresh inspiration to the world of home improvement. Whether you're looking to revamp a small corner of your abode or embark on a complete home transformation, Harrison's articles provide the essential expertise and creative flair to turn your visions into reality. So, dive into the captivating world of home remodeling with Harrison Clayton and unlock the full potential of your living space with every word he writes.


