How to Remove a Screw Without an Extractor: Step-by-Step Guide

Removing a stubborn screw without the proper tools can be frustrating, but it is possible with the right techniques. Whether you don’t have access to a screw extractor or simply don’t want to purchase one, there are several methods you can use to remove a screw from its place. In this step-by-step guide, we will walk you through the process of removing a screw without an extractor.
Step 1: Assess the situation
Before you begin, take a moment to assess the situation. Consider the type of screw you are dealing with, as well as its condition. Is it stripped or rusty? Understanding these factors will help you choose the most appropriate method for removal.
Step 2: Gather your materials
Next, gather the necessary materials for the removal process. These may include a screwdriver, pliers, a drill, or a hammer. Depending on the method you choose, you may also need lubricant, a heat source, or a small hacksaw.

Step 3: Apply lubricant
If the screw is stuck due to rust or corrosion, applying a lubricant can help loosen it. Use a penetrating oil or a multipurpose oil and apply it to the screw’s threads. Allow the lubricant to sit for a few minutes and then attempt to turn the screw using a screwdriver.
Step 4: Use pliers or a wrench
If the screw’s head is stripped, you can try using a pair of pliers or a wrench to grip it and turn it counterclockwise. Be sure to choose a pliers or wrench that fits securely around the screw head to avoid causing further damage.
Step 5: Create a new groove
If all else fails, you can create a new groove for your screwdriver. Using a small hacksaw or a drill with the appropriate bit, carefully create a new groove in the screw’s head. Once the groove is deep enough, you should be able to use a screwdriver to turn the screw and remove it.
By following these steps and using the appropriate tools and techniques, you can successfully remove a stubborn screw without an extractor. Remember to proceed with caution and take your time to avoid causing any further damage to the surrounding materials.
Step 1: Gather the necessary tools
Before you begin removing a screw without an extractor, make sure you have the following tools on hand:
- Flat-head screwdriver: This tool will be used to create a small gap or space for a grip.
- Pliers or locking pliers: These tools will be used to grip and turn the screw.
- Hammer: A hammer can help provide additional force when using the screwdriver or pliers.
- Drill (optional): If the screw is deeply embedded or stuck, a drill with a suitable screwdriver bit can be used to provide more power.
- Heat source (optional): In some cases, applying heat to the screw can help loosen it.
Having these tools ready will ensure that you have everything you need to successfully remove a screw without an extractor.
Step 2: Prepare the screw
- Before attempting to remove the screw, it’s important to prepare it properly.
- Inspect the screw for any signs of damage, such as stripped threads or a corroded head.
- If the screw is rusted, apply a penetrating oil, such as WD-40, to loosen it. Let the oil sit for a few minutes to allow it to penetrate and break up any rust or corrosion.
- If the screw is stuck due to stripped threads, try using a rubber band. Place a rubber band over the screw head and press it down firmly. Then, place the screwdriver on top of the rubber band and try to loosen the screw by turning it counterclockwise.
- If the screw head is damaged or stripped, you can try using pliers to grip the head and turn it counterclockwise. Make sure to use pliers with a firm and secure grip to avoid slipping and causing more damage.
- For screws with a hexagonal or square head, you can use an adjustable wrench or a socket wrench to attempt removal. Select the appropriate size socket or wrench to fit the screw head and turn it counterclockwise.
By properly preparing the screw, you increase the chances of successful removal without the use of an extractor tool. However, keep in mind that some screws may be too damaged or stuck to remove without an extractor, in which case you may need to consider alternative methods or seek professional assistance.
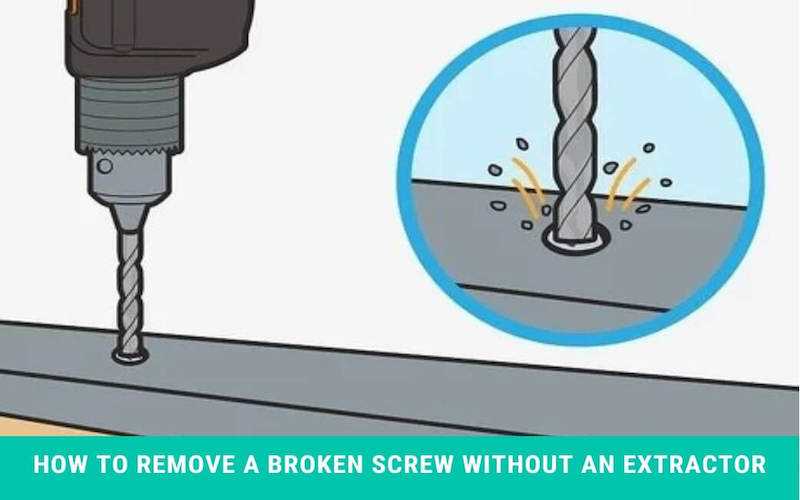
Step 3: Create a pilot hole
Creating a pilot hole can make it easier to remove a screw without an extractor. A pilot hole is a small hole drilled into the center of the screw head, which allows for better grip and control when removing the screw.
Here are the steps to create a pilot hole:
- Choose a drill bit that is slightly smaller than the diameter of the screw head.
- Insert the drill bit into the chuck of a power drill or a hand drill.
- Hold the drill perpendicular to the screw head.
- Pilot hole should be centered on the screw head.
- Gently press the drill bit into the center of the screw head.
- Apply steady pressure and slowly drill a hole into the screw head. Be careful not to drill too deep.
- Continue drilling until the pilot hole is deep enough to provide a good grip for the removal tool.
- Remove the drill bit from the hole and clean any debris.
Creating a pilot hole will make it easier to remove the screw using the next steps in this guide.
Step 4: Use a rubber band
If the screw head is stripped and you are unable to grip it with pliers or a screwdriver, you can try using a rubber band to gain traction.
- Take a rubber band that is wide enough to cover the screw head.
- Place the rubber band over the screw, ensuring that it is centered on the head.
- Press down firmly on the rubber band with your screwdriver or drill bit.
- Apply steady pressure while turning the screwdriver counterclockwise.
- The rubber band will provide extra grip and help turn the screw out.
If the rubber band slips, try using a larger or thicker rubber band for a better grip. Alternatively, you can double up on rubber bands for added traction.
This method can be especially effective for smaller screws or screws with shallow heads.
If the rubber band method still does not work, do not force the screw as it may cause further damage. Instead, move on to the next step for an alternative method.
Step 5: Try using pliers

If the screw still won’t turn with the wrench or the screwdriver, you can try using a pair of pliers to grip the head of the screw and turn it counterclockwise.
Here’s how to remove a screw using pliers:
- Choose a pair of pliers that have a narrow tip to fit into the screw head.
- Position the pliers around the head of the screw, ensuring a firm grip.
- Hold the pliers firmly and try turning the screw counterclockwise.
- Apply steady pressure while turning to avoid slipping and damaging the screw head.
- If the screw starts to turn, continue unscrewing it with the pliers until it is fully removed.
If the screw is stuck or the head is stripped, you may need to apply additional force or try an alternative method to remove it.
Note: Using pliers to remove a screw can sometimes damage the surrounding surface, so be cautious and use this method as a last resort.
Step 6: Apply heat
Applying heat to the stuck screw can sometimes help loosen it by expanding the metal and breaking the bond between the screw and the material it is stuck in. Follow these steps to effectively apply heat:
- Plug in a heat gun or a hairdryer and set it to a medium heat level.
- Hold the heat gun or hairdryer about 2-3 inches away from the stuck screw.
- Move the heat source back and forth to evenly distribute the heat on and around the screw.
- Continue heating the screw for about 1-2 minutes, or until it feels warm to the touch.
- Use a pair of heat-resistant gloves or a cloth to grip the warm screw head or exposed part of the screw.
- Try turning the screw counterclockwise with a screwdriver or a pair of pliers.
If the screw still doesn’t budge, repeat the heating process a few more times. However, be cautious not to overheat the surrounding material as it may cause damage or weaken it.
Tip: If the stuck screw is in a delicate or heat-sensitive material, such as plastic or electronics, be extra careful while applying heat and consider using a heat sink or a heat-absorbing gel to protect the surrounding area.
Step 7: Use a left-handed drill bit
If the other methods have not been successful in removing the screw, you can try using a left-handed drill bit. Left-handed drill bits rotate in the opposite direction of a normal drill bit. The idea is that as the drill bit rotates, it creates torque to loosen the screw.
- Start by selecting a left-handed drill bit that is slightly smaller than the size of the screw.
- Attach the left-handed drill bit to your drill, making sure it is securely in place.
- Place the drill bit at the center of the screw head.
- Set your drill to reverse, as left-handed drill bits are designed to be used in reverse.
- Apply steady pressure as you start up the drill.
- Slowly increase the speed of the drill as you continue to apply pressure.
- As the drill bit bites into the screw, it may create enough torque to loosen the screw and allow you to remove it.
If the left-handed drill bit is successful in loosening the screw, you can continue turning the drill in reverse until the screw is completely removed. If the screw is still stuck after using the left-handed drill bit, you may need to consider more advanced methods such as drilling out the screw or using a screw extractor tool.
Step 8: Use a hammer and chisel
If all else fails and the screw still won’t budge, you can try using a hammer and chisel to remove it. This method should be used as a last resort, as it can be more difficult and run the risk of damaging the surrounding area.
Here’s how to use a hammer and chisel to remove a stubborn screw:
- Step 1: Position the chisel on one side of the screw head, making sure the edge of the chisel is flush against the screw.
- Step 2: Hold the chisel firmly in place with one hand.
- Step 3: With the other hand, tap the end of the chisel gently with a hammer. The idea is to create a turning force on the screw that will help loosen it.
- Step 4: Continue tapping the chisel in a counterclockwise direction to try and loosen the screw.
- Step 5: If the screw starts to turn, use a screwdriver or pliers to finish removing it.
- Step 6: If the screw doesn’t turn, reposition the chisel to a different angle and repeat the process.
Remember to use caution when using a hammer and chisel, as they can cause damage if not used properly. It’s also a good idea to protect the surrounding area with a cloth or masking tape to prevent any potential damage.
FAQ:
What is a screw extractor?
A screw extractor is a specialized tool used to remove stripped or broken screws.
Can I remove a screw without using a screw extractor?
Yes, there are alternative methods to remove a screw without using a screw extractor.
What are some alternative methods to remove a screw without using a screw extractor?
Some alternative methods include using pliers or a rubber band, creating a new groove for a screwdriver, or using a rotary tool.
Is it difficult to remove a screw without an extractor?
Removing a screw without an extractor can be challenging, but with the right tools and techniques, it can be done.
Video:

How to use lush shower jelly

Meet Harrison Clayton, a distinguished author and home remodeling enthusiast whose expertise in the realm of renovation is second to none. With a passion for transforming houses into inviting homes, Harrison's writing at https://thehuts-eastbourne.co.uk/ brings a breath of fresh inspiration to the world of home improvement. Whether you're looking to revamp a small corner of your abode or embark on a complete home transformation, Harrison's articles provide the essential expertise and creative flair to turn your visions into reality. So, dive into the captivating world of home remodeling with Harrison Clayton and unlock the full potential of your living space with every word he writes.


