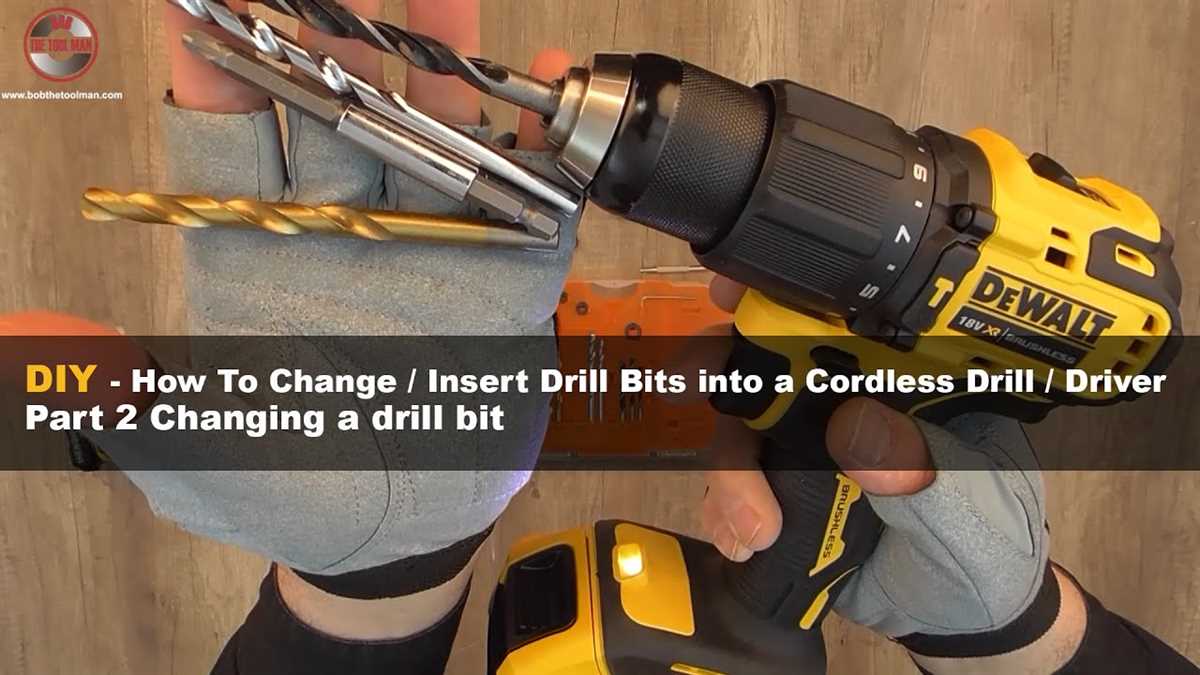
How to properly insert a bit into a hammer drill

If you’re new to working with power tools, it can be a bit intimidating to figure out how to properly insert a bit into a hammer drill. But with a few simple steps, you’ll be able to do it in no time! Whether you’re drilling into concrete, wood, or metal, the process is relatively the same.
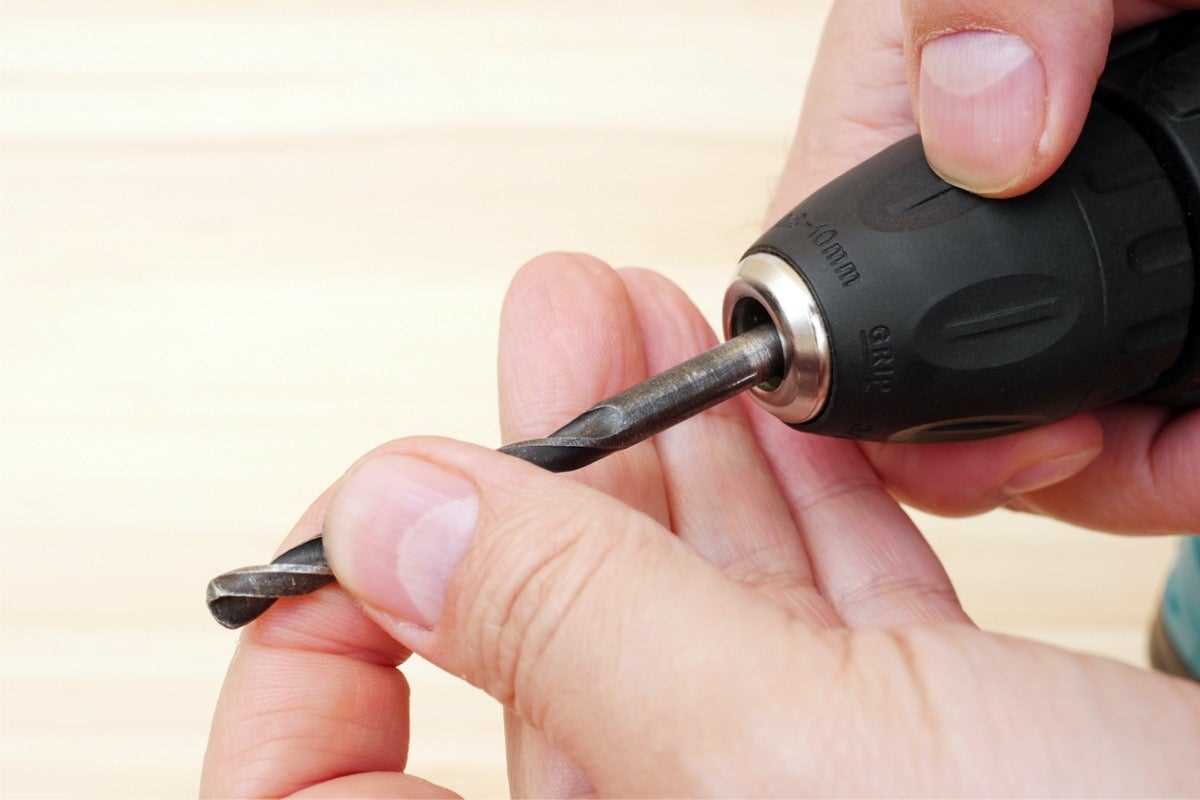
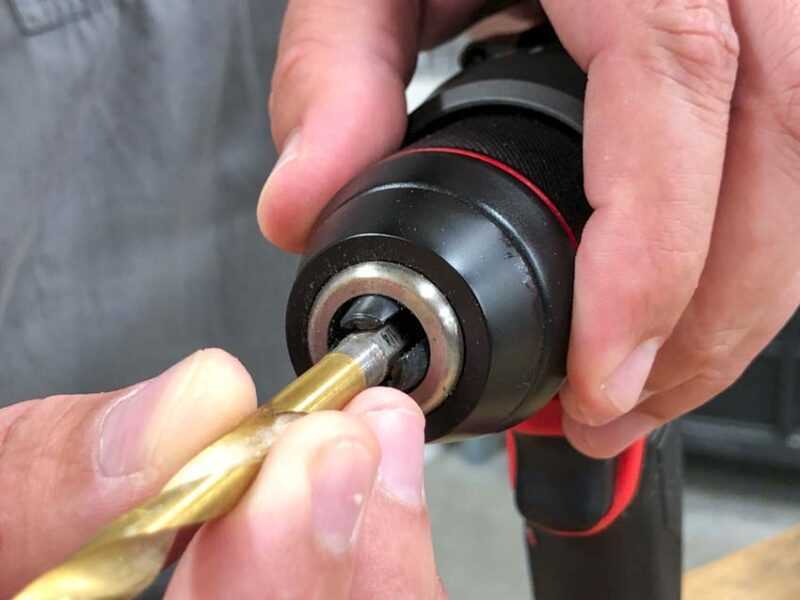
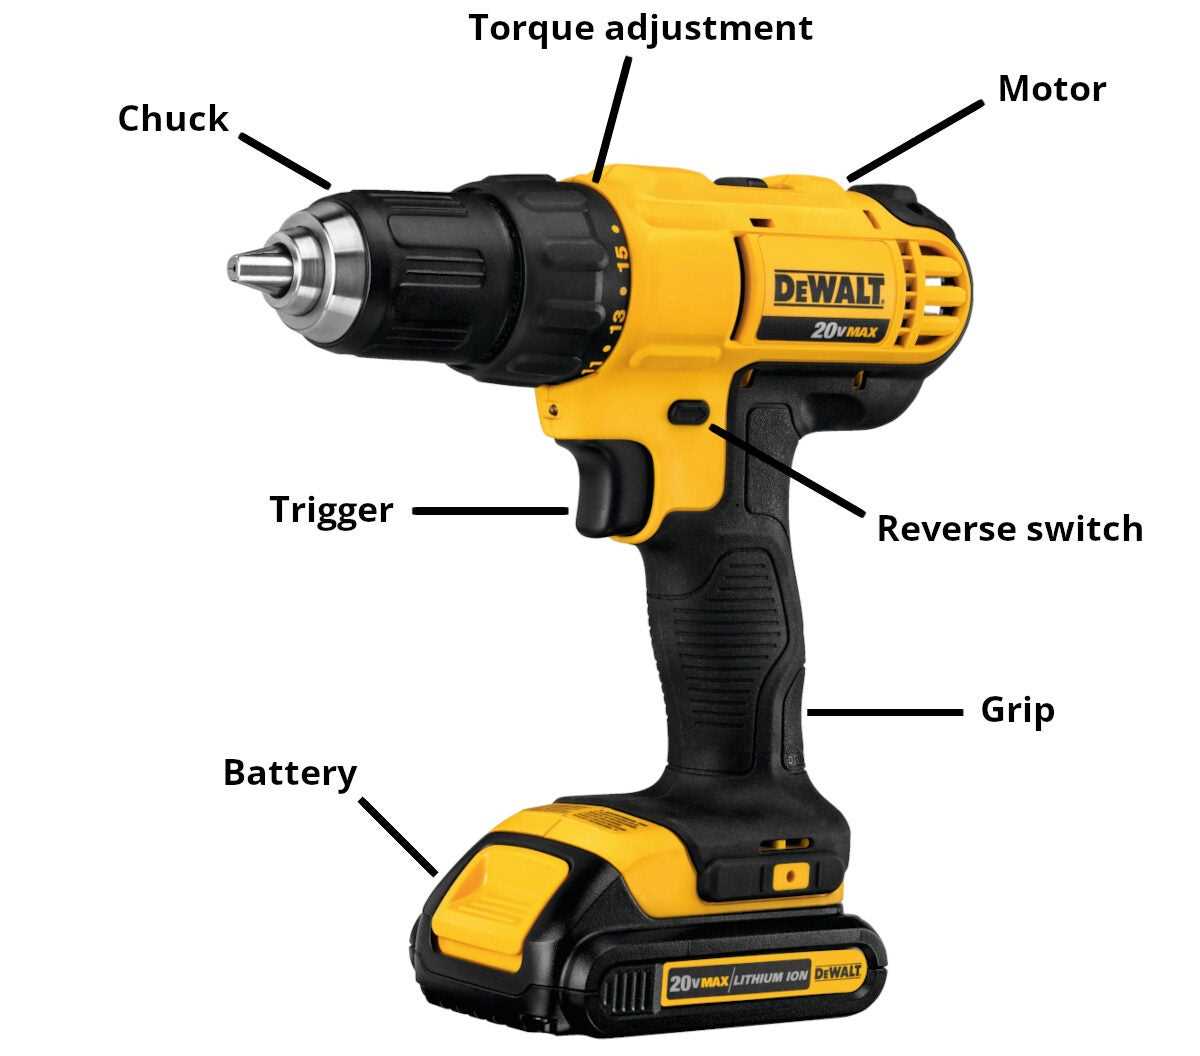
First, make sure your hammer drill is turned off and unplugged. This is a crucial safety step that should never be overlooked. Once you’ve ensured the drill is powered off, locate the chuck, which is the part of the drill where the bit will be inserted. Most hammer drills have a keyless chuck, making it easy to insert and remove bits without the need for any additional tools.
To insert the bit, hold the drill with one hand and rotate the chuck counterclockwise with your other hand. This will open the chuck, allowing you to insert the bit. Make sure the bit is properly aligned with the jaws of the chuck, and then rotate the chuck clockwise to tighten it and secure the bit in place. Give it a firm twist to make sure it’s secured tightly.
Before you start drilling, double-check that the bit is securely in place by giving it a gentle tug. If it doesn’t move, you’re good to go. If it does move, it’s likely that the chuck wasn’t tightened enough. Simply repeat the steps to tighten it properly. Remember, proper bit insertion is essential for safety and effective drilling, so take the extra time to make sure it’s done correctly.
Importance of Using Hammer Drill Bits Properly
1. Safety
Using hammer drill bits properly is essential to ensure the safety of both the user and the surrounding environment. When a hammer drill bit is not inserted correctly, it can lead to accidents and injuries. A loose or improperly inserted bit can become dislodged during operation, causing it to fly off and potentially hit someone or damage nearby objects.

2. Efficient Drilling
Properly inserting a hammer drill bit ensures efficient drilling. When a bit is not securely fastened, it may wobble or move during operation, reducing its drilling efficiency. This can result in uneven and inaccurate holes, which can be problematic, especially in construction or woodworking projects where precision is crucial.
3. Durability of Drill Bits
Using hammer drill bits properly helps to prolong their lifespan. When a bit is inserted correctly and secured tightly in the drill chuck, it experiences less stress and wear during operation. On the other hand, an improperly inserted bit may be subjected to excessive vibrations and movement, leading to premature damage or breakage of the bit.
4. Compatibility
Using hammer drill bits properly ensures compatibility with the specific type of hammer drill being used. Different hammer drills require different types of bits, and using the wrong type of bit can result in poor performance and potential damage to the drill or the bit itself. Properly inserting the correct bit ensures that it fits securely and can deliver the intended drilling action.
5. Cost-Effectiveness
By using hammer drill bits properly, you can save money in the long run. When bits are inserted correctly and securely, they are less likely to incur damage or breakage during operation. This reduces the need for frequent bit replacements, saving you money on purchasing new bits frequently.

6. Professional Results
Properly using hammer drill bits contributes to achieving professional results. Whether you are drilling holes for construction, renovation, or woodworking purposes, having properly inserted bits ensures that the holes are accurate, clean, and consistent. This is essential for producing high-quality work and avoiding the need for rework or corrections.
| Summary |
|---|
| Properly using hammer drill bits is crucial for safety, efficiency, durability, compatibility, cost-effectiveness, and achieving professional results. It helps prevent accidents and injuries, ensures efficient drilling, prolongs the lifespan of drill bits, maintains compatibility, saves money, and produces high-quality work. Take the time to properly insert and secure hammer drill bits before each use. |
Understanding the Different Types of Hammer Drill Bits
Hammer drills are a versatile tool used for drilling holes in concrete, brick, and other hard surfaces. To ensure efficient and effective drilling, it is important to use the right type of bit for the job. There are different types of hammer drill bits available, each designed for specific applications. Understanding these different types can help you choose the best bit for your drilling needs.
Masonry Bits
Masonry bits are the most commonly used type of hammer drill bit. They are designed to drill holes in materials such as concrete, brick, stone, and masonry. These bits have a carbide tip that provides excellent drilling performance and durability. Masonry bits are available in various sizes to accommodate different hole diameters.
SDS Bits

SDS (Special Direct System) bits are commonly used in rotary hammer drills. These bits are designed to provide faster drilling speed and higher performance compared to standard masonry bits. SDS bits feature a special groove and slot design, allowing them to slide easily into the drill chuck for quick and secure bit changes.
Tile Bits
Tile bits are used specifically for drilling holes in ceramic or porcelain tiles. These bits have a carbide tip that is specifically designed to withstand the hardness of tile materials without causing any cracking or chipping. Tile bits usually have a spear-pointed tip for precise drilling.
Wood Bits
Wood bits are designed for drilling holes in wood and other softer materials. They typically have a pointed tip and are often made of high-speed steel (HSS). Wood bits can also be used for drilling through drywall and plastic materials.
Concrete Bits
Concrete bits, also known as rock-hard bits, are designed for drilling through hard materials like reinforced concrete and granite. These bits have a unique carbide tip and often feature a fluted design to quickly remove debris while drilling. Concrete bits are usually heavy-duty and suitable for demanding drilling applications.
Auger Bits
Auger bits are commonly used for drilling large holes in wood and are often used for tasks like drilling fence posts or making holes for plumbing lines. These bits have a spiral shape with a screw-like thread that helps to pull the bit into the wood, providing efficient drilling.

Step Bits
Step bits, also known as cone bits or unibits, are used for drilling multiple hole sizes with a single bit. These bits have a stepped design, with each step providing a different hole diameter. Step bits are commonly used in electrical installations or when working with sheet metal.
Countersink Bits
Countersink bits are designed to create a conical recess in a material to accommodate the head of a screw. These bits have a straight shank and a conical cutting tip. Countersink bits are commonly used in woodworking projects to ensure that the screw heads are flush with the surface of the material.
Twist Bits
Twist bits, also known as high-speed steel (HSS) bits, are the most common type of drill bits used with a hammer drill in general drilling applications. These bits have a cylindrical shape with a spiral fluted design that helps to remove debris while drilling. Twist bits are available in various sizes and can be used for drilling holes in a wide range of materials.
By understanding the different types of hammer drill bits and their specific uses, you can select the appropriate bit for your drilling needs. Whether you are working with concrete, wood, tile, or other materials, using the right bit can make a significant difference in the outcome of your drilling project.
Tips for Selecting the Right Hammer Drill Bit
Selecting the right hammer drill bit is crucial for achieving optimal performance and ensuring the success of your drilling project. Here are some tips to help you choose the right hammer drill bit:

1. Consider the Material
The type of material you are drilling into should be the primary factor in selecting a hammer drill bit. Different materials require different hardness, sharpness, and durability. For example:
- For masonry and concrete, a carbide-tipped hammer drill bit is ideal.
- For wood and plastic, a regular high-speed steel drill bit will suffice.
- For metal, a cobalt or titanium-coated drill bit is recommended for better heat resistance and durability.
2. Size and Diameter
The size and diameter of the hole you need to drill will determine the size of the hammer drill bit you should choose. Consider the specifications of your project and select a bit that matches the required hole diameter.
3. Length
The length of the hammer drill bit should be sufficient to drill the required depth without causing any strain or difficulty. Ensure that the selected bit’s length is compatible with the depth you need to drill.
4. Shank Type
There are various shank types available for hammer drill bits, including SDS-plus, SDS-max, and round shank. Make sure the shank type of the bit you choose is compatible with your hammer drill’s chuck.
5. Budget
Consider your budget when selecting a hammer drill bit. While high-quality bits may be more expensive, they often provide better performance, durability, and precision. Investing in a good-quality bit can save you money in the long run by minimizing the need for replacements.
6. Brand Reputation
Choosing a hammer drill bit from a reputable brand ensures that you are purchasing a reliable product. Research and read reviews about different brands to determine their reputation for producing high-quality drill bits.
7. Specialized Bits
Depending on your specific drilling needs, you may require specialized hammer drill bits. These include multi-purpose bits, spade bits, auger bits, tile bits, and more. Determine if your project requires any specialized bits and select accordingly.
By considering the material, size, diameter, length, shank type, budget, brand reputation, and any need for specialized bits, you can choose the right hammer drill bit that will ensure efficient and successful drilling.
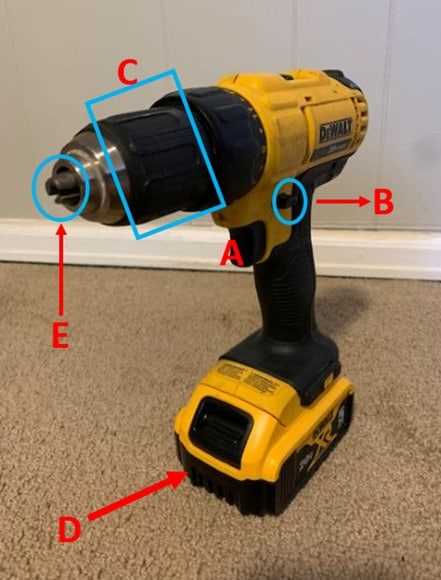
Preparing the Hammer Drill for Bit Insertion
Step 1: Gather the Necessary Tools
Before you begin, make sure you have all the necessary tools and materials:
- A hammer drill
- A drill bit
- A chuck key (if required)
- Safety goggles
- Gloves
Step 2: Power off the Drill
Prior to inserting a bit into the hammer drill, it is important to ensure the tool is turned off and unplugged. This step is crucial for your safety and helps prevent any accidental injuries.
Step 3: Inspect the Drill Chuck
Take a close look at the drill chuck to ensure it is clean and free from any debris. Remove any dirt or obstructions that may hinder proper bit insertion.
Step 4: Check the Chuck Type
Determine the type of chuck on your hammer drill – keyless or keyed. A keyless chuck does not require a chuck key for bit insertion, while a keyed chuck does.
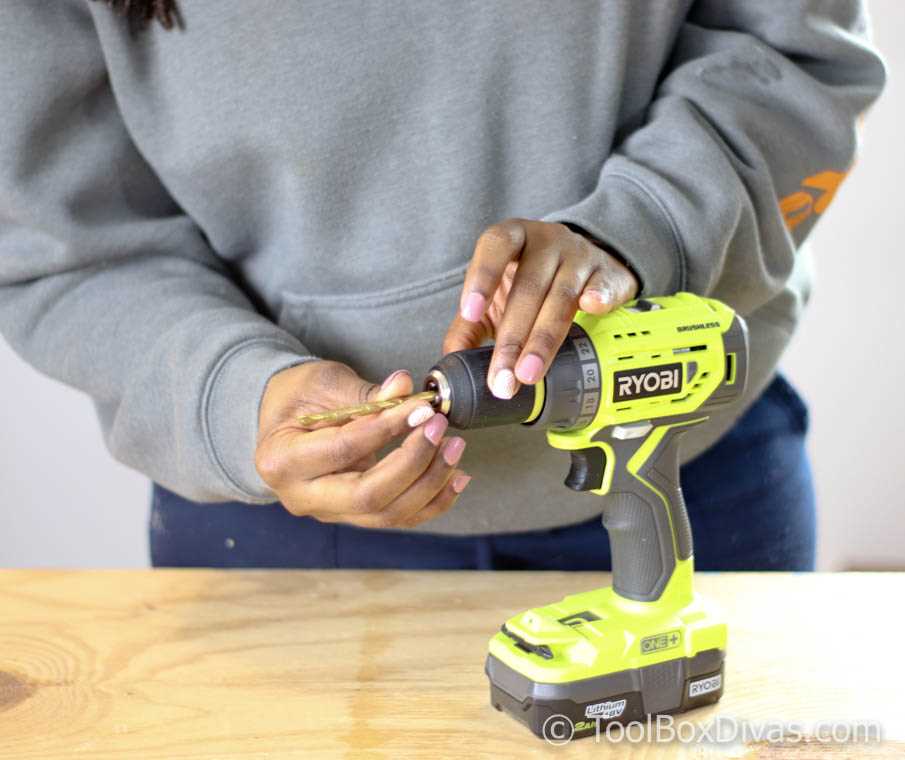
Step 5: Inserting a Bit into a Keyless Chuck
If you have a keyless chuck, follow these steps to insert the bit:
- Hold the drill with one hand and rotate the chuck sleeve counterclockwise to loosen it.
- Insert the bit into the chuck up to the desired depth.
- Tighten the chuck sleeve by rotating it clockwise until it is securely fastened.
Step 6: Inserting a Bit into a Keyed Chuck
If you have a keyed chuck, follow these steps to insert the bit:
- Locate the chuck key that matches the holes on the chuck.
- Insert the key into the holes on the chuck and turn it counterclockwise to loosen the jaws.
- Place the bit into the chuck and align it with the jaws.
- Use the chuck key to turn it clockwise and tighten the jaws around the bit.
- Remove the chuck key from the chuck.
Step 7: Perform a Test Run
Before you start drilling, it is recommended to perform a quick test run to ensure the bit is securely inserted. Hold the drill firmly, turn it on for a short moment, and check if the bit remains in place without wobbling or moving.
Step 8: Put on Safety Gear
Before you proceed with using the hammer drill, make sure to put on your safety goggles and gloves to protect your eyes and hands from any potential hazards.
By following these steps, you will be able to prepare your hammer drill for bit insertion and ensure safe and effective drilling. Remember to always prioritize your safety by following proper procedures and wearing the necessary protective gear.
Step-by-Step Guide to Inserting a Bit into a Hammer Drill
Step 1: Gather the necessary tools and safety equipment
Before you begin, make sure you have the following:
- A hammer drill
- The appropriate drill bit for your project
- Protective eyewear
- Gloves
Step 2: Turn off the hammer drill
Before inserting the bit, ensure that the hammer drill is turned off and unplugged from the power source. This will prevent accidental injury while handling the drill.
Step 3: Examine the chuck
Take a look at the chuck of the hammer drill. The chuck is the part of the drill where you will be inserting the bit. Make sure it is clean and free of any debris or obstructions.
Step 4: Choose the right drill bit
Select the appropriate drill bit for your project. Consider factors such as the material you will be drilling into and the size hole you need to create. Choose a bit that matches your specific requirements.
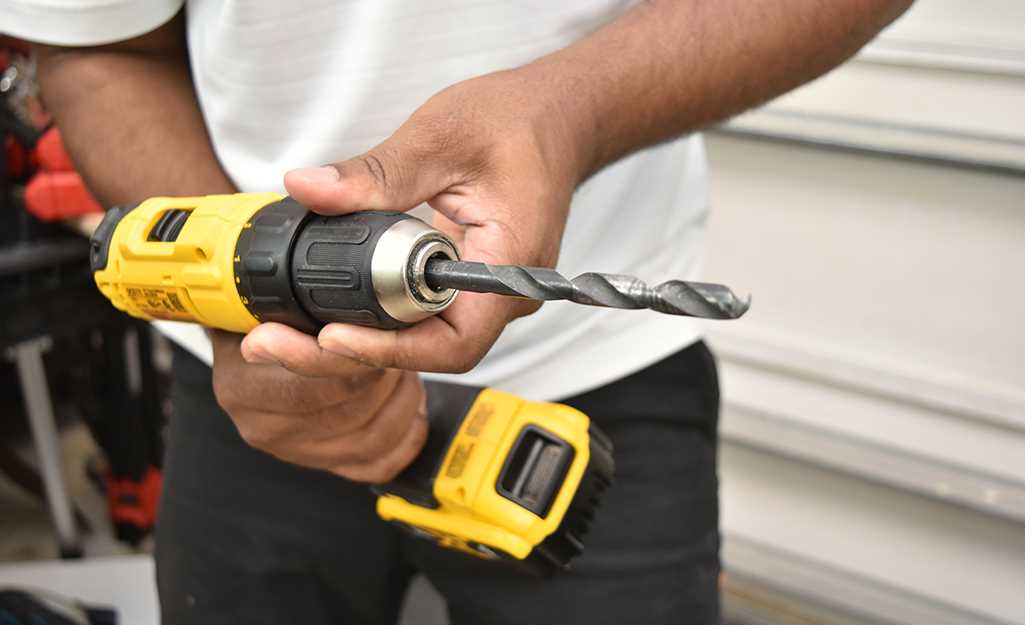
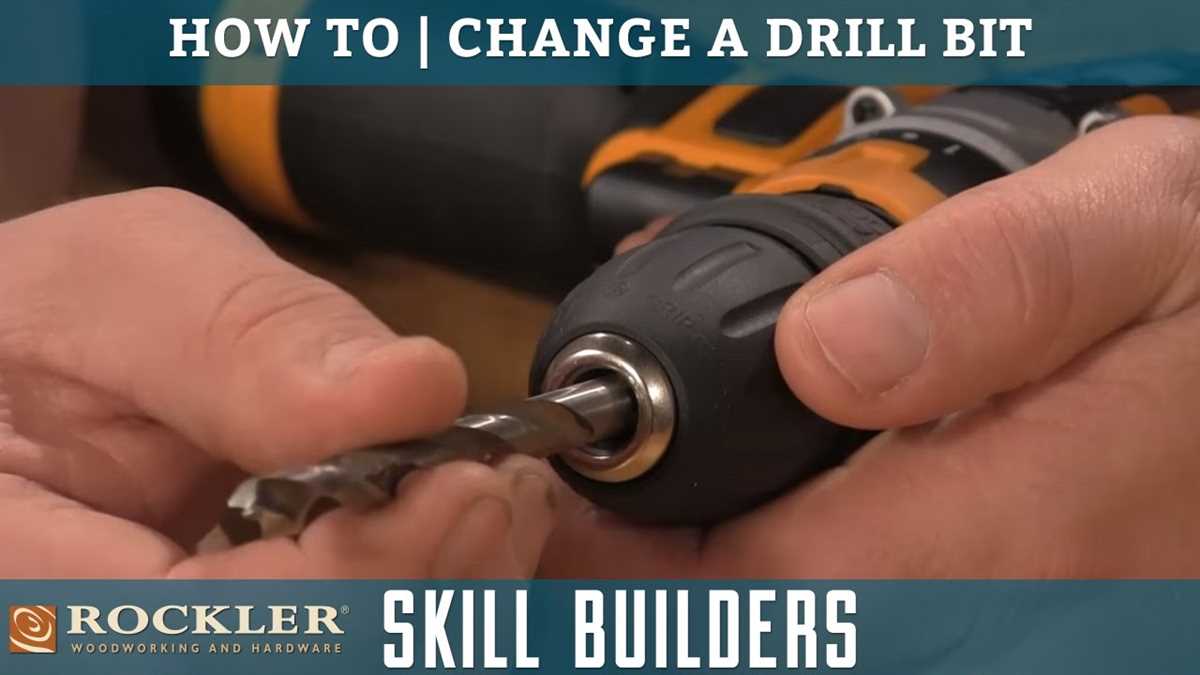
Step 5: Open the chuck
Most hammer drills have a keyless chuck that allows for easy bit changes. To open the chuck, simply hold onto the drill’s body and twist the chuck counterclockwise. This will loosen the chuck jaws and create space to insert the bit.
Step 6: Insert the bit
Hold the drill bit by the shank, which is the non-cutting end of the bit. Align the bit with the chuck jaws and insert it firmly into the chuck. Make sure the bit is inserted straight and fully into the chuck to ensure a secure grip.
Step 7: Tighten the chuck
To secure the bit in place, twist the chuck clockwise until it is tight. Use your hand strength to tighten the chuck as much as possible, ensuring the bit doesn’t move during operation. If you have a keyless chuck, there is no need for any additional tools.
Step 8: Test the bit
Before you start using the hammer drill, give the bit a gentle tug to ensure it is securely held in the chuck. It should not move or come loose. If the bit wiggles or falls out, repeat steps 5-7 to properly secure it.
Step 9: Put on safety gear and power on the drill
Now that the bit is securely inserted, put on your protective eyewear and gloves. Then, plug the hammer drill back into the power source and power it on. You are now ready to use the hammer drill with the inserted bit.
Step 10: Safely remove the bit
Once you have finished using the hammer drill, turn it off and unplug it from the power source. To remove the bit, follow the steps in reverse order. Open the chuck, loosen it by twisting counterclockwise, and then remove the bit from the chuck.
Final Thoughts
Inserting a bit into a hammer drill is a simple and important step to ensure the success of your drilling project. By following this step-by-step guide, you can safely and properly insert a bit into a hammer drill, allowing you to efficiently complete your drilling tasks.
Ensuring Proper Installation of the Drill Bit
Before using a hammer drill, it is crucial to correctly insert the drill bit. Improper installation can lead to accidents, damage to the drill or workpiece, and decreased drilling efficiency. Follow these steps to ensure proper installation of the drill bit:
Step 1: Choose the Correct Drill Bit
Choose a drill bit that is suitable for the material you are drilling into. Different bits are designed for different materials such as wood, metal, concrete, or masonry. Using the wrong type of bit may result in poor drilling performance or even damage to the bit or drill.
Step 2: Check the Compatibility
Make sure that the drill bit is compatible with your hammer drill. Read the drill’s instruction manual or consult the manufacturer’s specifications to ensure that the chosen bit is compatible with your specific drill model.
Step 3: Inspect the Drill Bit
Inspect the drill bit for any signs of damage or wear. Look for chips, cracks, or any other signs that may compromise the integrity of the bit. If the bit is damaged, replace it before attempting to use it.
Step 4: Insert the Bit
Hold the drill bit firmly and align it with the chuck of the hammer drill. Insert the bit into the chuck and ensure that it is straight and centered. Depending on the type of chuck, tighten it using either the drill’s chuck key or by hand tightening.
Step 5: Secure the Bit
Once the bit is inserted into the drill, make sure it is securely fastened. Give it a gentle tug to ensure that it does not come loose. A loose bit can lead to poor drilling performance or even become a safety hazard during use.
Step 6: Adjust the Bit Depth
Before starting your drilling operation, adjust the desired drilling depth on the drill’s depth adjustment mechanism if applicable. This will prevent over-drilling or under-drilling.
Step 7: Test the Bit
Prior to using the hammer drill on the workpiece, do a test run on a scrap piece of material to ensure that the drill bit is properly installed and functioning correctly. This will allow you to make any necessary adjustments before starting your actual project.
By following these steps, you can ensure that the drill bit is properly installed in your hammer drill, leading to more efficient and safe drilling operations.
Best Practices for Adjusting the Hammer Drill Settings
1. Selecting the Right Drill Bit
Before adjusting the settings on your hammer drill, it’s essential to choose the right drill bit for your specific task. Different materials require different types of drill bits, so make sure to select the appropriate one.
2. Adjusting the Speed and Impact Settings
Most hammer drills come with adjustable speed and impact settings to suit various drilling applications. Here’s how to adjust these settings:
- Refer to the user manual of your hammer drill to locate the speed and impact adjustment controls.
- Turn the speed control dial to increase or decrease the drilling speed. Lower speeds are typically recommended for harder materials.
- Adjust the impact control dial to increase or decrease the force of the hammering action. Higher impact settings are suitable for tougher materials.
3. Proper Clutch Adjustment
Many hammer drills feature a clutch mechanism that allows you to control the torque applied to the screw or fastener. To adjust the clutch:
- Locate the clutch adjustment ring or collar on your hammer drill.
- Rotate the clutch adjustment ring to the desired torque setting. Higher numbers indicate higher torque.
4. Other Considerations
Consider the following tips when adjusting your hammer drill settings:
- Use the correct power supply to ensure optimal performance. Check the voltage requirements and use a stable power source.
- Wear appropriate safety gear, such as safety goggles and gloves, to protect yourself during drilling.
- Start with lower settings and gradually increase as needed to prevent damage to the drill bit or workpiece.
5. Consult the User Manual
If you are unsure about adjusting the settings on your hammer drill or need specific guidance, always refer to the user manual provided by the manufacturer. It will provide detailed instructions tailor-made for the particular model of the hammer drill you are using.
| Step | Action |
|---|---|
| 1 | Select the right drill bit for the material. |
| 2 | Adjust the speed and impact settings on the drill. |
| 3 | Properly adjust the clutch mechanism if applicable. |
| 4 | Consider other factors like power supply and safety precautions. |
| 5 | Consult the user manual for specific instructions. |
Important Safety Precautions to Follow While Using a Hammer Drill
Using a hammer drill can be a very effective way to drill holes in various materials, but it is important to follow safety precautions to ensure your well-being and the safety of others. Here are some important safety tips to keep in mind:
- Read the manual: Before using a hammer drill, carefully read the instruction manual provided by the manufacturer. Familiarize yourself with the operation of the drill and understand any specific safety guidelines.
- Wear protective gear: Always wear appropriate personal protective equipment (PPE) such as safety goggles, ear protection, a dust mask, and gloves to protect yourself from flying debris and loud noise. Additionally, wear non-slip footwear and avoid loose clothing or jewelry that could get caught in the drill.
- Inspect the drill: Before using the hammer drill, inspect it for any visible damage or defects. Ensure that the cord and plug are in good condition and that there are no loose screws or parts. If you notice any issues, do not use the drill and have it inspected or repaired by a professional.
- Secure the workpiece: When drilling, always make sure the workpiece is securely clamped or held in place to prevent it from moving or spinning during drilling. This will reduce the risk of accidents or injuries.
- Choose the right drill bit: Select a drill bit that is appropriate for the material you are drilling into. Using the wrong type of bit can result in damage to the drill or the workpiece. Always use sharp bits and replace them when they become dull.
- Start slowly: When starting the drill, begin at a low speed and gradually increase it to the desired level. This will help you maintain control over the drill and prevent it from slipping or causing damage.
- Use the hammer function wisely: If your drill has a hammer function, use it only when drilling into masonry or other hard materials. Avoid using the hammer function unnecessarily, as it can cause unnecessary wear and tear on the drill and increase the risk of accidents.
- Keep a firm grip: Hold the drill with a firm, two-handed grip, keeping your hands away from the drilling area. This will provide stability and control while drilling.
- Work in a well-ventilated area: If you are drilling into materials that produce dust or fumes, ensure that you are working in a well-ventilated area to avoid inhaling potentially harmful substances. If necessary, wear a dust mask to protect your respiratory system.
- Disconnect power when not in use: When not using the hammer drill, always unplug it from the power source. This will prevent accidental starts and reduce the risk of electric shock.
By following these safety precautions, you can ensure a safe and productive experience while using a hammer drill. Always prioritize safety and take the necessary steps to protect yourself and others.
Maintaining and Storing Hammer Drill Bits Correctly
Proper maintenance and storage of hammer drill bits is essential to ensure their longevity and optimal performance. Here are some tips on how to maintain and store your hammer drill bits correctly:
Cleaning After Use
After using your hammer drill bits, it is important to clean them thoroughly to remove any dirt, debris, or excess material. Use a brush, such as a wire brush or a toothbrush, to remove any built-up residue. Make sure to clean both the cutting edges and the shank of the bit. Wipe the bits clean with a dry cloth to remove any moisture.
Inspecting for Damage
Regularly inspect your hammer drill bits for any signs of damage or wear. Check for any chipped or dull cutting edges, as these can affect the performance of the bit. If you notice any damage, it is best to replace the bit to ensure the safety and efficiency of your drilling tasks.
Sharpening or Replacing Worn Bits
If you have dull or chipped cutting edges on your hammer drill bits, you can try sharpening them using a bench grinder or a dedicated bit sharpener. Make sure to follow the manufacturer’s instructions and take proper safety precautions when sharpening. However, if the damage is significant or the bit is worn out, it is advisable to replace it with a new one for better drilling results.
Proper Storage
When not in use, it is important to store your hammer drill bits properly to protect them from damage and corrosion. Here are some storage tips:
- Store the bits in a dry and clean location to prevent moisture and rust.
- Keep the bits organized and separated to avoid any potential friction or damage.
- Consider using a dedicated bit case or a tool bag with individual compartments to keep the bits safe and easily accessible.
- Avoid storing the bits in direct sunlight or near heat sources, as this can cause them to become brittle.
Labeling and Identification
To make it easier to identify and select the right hammer drill bit for your drilling needs, consider labeling them appropriately. You can use a permanent marker or labels to mark the size and type of each bit. This will save you time and ensure that you are using the correct bit for each task.
Regular Maintenance
Lastly, make regular maintenance of your hammer drill bits a part of your routine. This includes cleaning them after each use, inspecting for damage, and sharpening or replacing worn bits. By taking proper care of your hammer drill bits, you can prolong their lifespan and ensure consistent performance.
Following these tips for maintaining and storing your hammer drill bits correctly will help you get the most out of your tools and ensure safe and efficient drilling operations.
FAQ:
What is a hammer drill?
A hammer drill is a power tool that combines rotary drilling with a hammering action to create holes in hard materials like concrete or masonry.
Why is it important to properly insert a bit into a hammer drill?
Properly inserting a bit into a hammer drill ensures safety and optimal drilling performance. Incorrect insertion can lead to accidents, damage to the drill or the bit, and inefficient drilling.
Is there a specific type of bit that is compatible with a hammer drill?
Yes, there are hammer drill bits specifically designed for use with hammer drills. These bits have a unique tip and design that can withstand the hammering action of the drill.
What should I do if the bit keeps falling out of the drill while drilling?
If the bit keeps falling out of the drill while drilling, you should check if the chuck is properly tightened. If the chuck is loose, tighten it securely. If the problem persists, check if the bit is damaged or worn out and replace it if necessary.
Can I use a regular drill bit in a hammer drill?
No, regular drill bits are not designed to withstand the hammering action of a hammer drill. Using a regular drill bit in a hammer drill can result in damage to the bit and inefficient drilling. It is important to use hammer drill bits specifically designed for use with hammer drills.
Video:


Meet Harrison Clayton, a distinguished author and home remodeling enthusiast whose expertise in the realm of renovation is second to none. With a passion for transforming houses into inviting homes, Harrison's writing at https://thehuts-eastbourne.co.uk/ brings a breath of fresh inspiration to the world of home improvement. Whether you're looking to revamp a small corner of your abode or embark on a complete home transformation, Harrison's articles provide the essential expertise and creative flair to turn your visions into reality. So, dive into the captivating world of home remodeling with Harrison Clayton and unlock the full potential of your living space with every word he writes.


