How to Measure Drill Bit Size: A Step-by-Step Guide

Drill bits are essential tools for any DIY enthusiast or professional, but it can be confusing to determine their size. Knowing the size of your drill bit is crucial for selecting the right drill for a specific task or finding a replacement bit.
In this step-by-step guide, we will walk you through the process of measuring drill bit size accurately. Whether you need to measure a twist bit, spade bit, or hole saw, these instructions will help you determine the size with ease.
Step 1: Gather your materials. To measure your drill bit size, you will need a ruler or tape measure, a drill bit gauge, and calipers (optional but recommended for precise measurements).
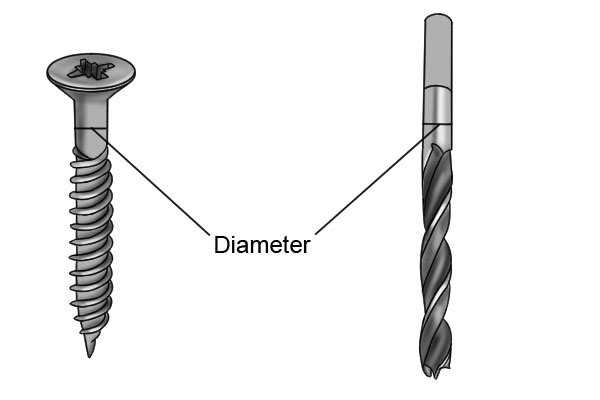
Step 2: Identify the shank of the drill bit. The shank is the part of the bit that fits into the drill’s chuck. It can be round or hexagonal in shape. Measure the diameter of the shank using your ruler or tape measure.
Step 3: Measure the flute length. The flute is the spiraled groove that runs along the length of the drill bit. It helps to remove debris and allows for efficient drilling. Measure the length of the flute from the tip of the drill bit to the point where the flute ends.

Step 4: Determine the bit type. Different types of drill bits have different measurements to consider. For example, twist bits are measured by their point angle and cutting diameter, while spade bits are measured by their width.
Step 5: Use a drill bit gauge or calipers (if available) to obtain precise measurements. The drill bit gauge has a series of holes that correspond to standard drill bit sizes. Simply insert your bit into the appropriate hole to determine its size. Calipers can provide more accurate measurements by measuring the diameter directly.
By following these step-by-step instructions, you will be able to measure your drill bit size accurately and confidently. With this knowledge, you can select the right drill bit for any project and ensure optimal performance and safety.
Note: It is important to note that the size markings on drill bits may wear off over time or be obscured by debris. Always confirm the size of your drill bit through direct measurement rather than relying solely on the markings.
The Importance of Measuring Drill Bit Size
Measuring drill bit size is essential for a variety of reasons. Whether you are a professional or a DIY enthusiast, having accurate measurements ensures that you are using the right-size drill bit for your project. Here are a few reasons why measuring drill bit size is important:
1. Precision and Efficiency

Using the correct drill bit size allows for precise and efficient drilling. A drill bit that is too small may not create a hole large enough for the intended purpose, while a drill bit that is too large may cause the hole to be too big and compromise the integrity of the material being drilled.
2. Safety
Using the right drill bit size reduces the risk of accidents. When a drill bit is not the appropriate size, it can easily slip, causing damage to the material or even injury to the user. By measuring the drill bit size accurately, you can ensure a secure and stable drilling experience.
3. Compatibility
Various drill bits are designed for specific tasks and materials. Measuring the drill bit size ensures compatibility with the drill chuck and the material being drilled. Using an incompatible drill bit size can lead to damage to the drill or the material, as well as poor drilling performance.
4. Consistency
When working on a project that requires multiple holes, it is important to have consistency in the size of the holes. Measuring the drill bit size allows you to create holes of the same diameter, ensuring that everything fits together as intended. This is particularly important for woodworking and construction projects.

5. Versatility
Measuring drill bit size opens up possibilities for versatility in your projects. By knowing the size of your drill bit, you can easily determine what materials it can be used on and what types of projects it is suitable for. This knowledge gives you the freedom to explore different types of materials and designs.
6. Choosing the Right Accessories
Knowing the drill bit size also helps you choose the appropriate accessories, such as drill guides or countersinks. These accessories often have specific size requirements and selecting the correct size ensures proper functionality and optimal results.
Overall, measuring drill bit size is a fundamental step in any drilling project. It ensures precision, safety, compatibility, consistency, versatility, and the ability to choose the right accessories. So remember to always measure your drill bit size before starting any drilling task.
Gathering the Necessary Tools
Before you can measure the size of a drill bit, you’ll need a few tools:

- A ruler or tape measure: This will be used to measure the length and diameter of the drill bit.
- Calipers: These are used to measure the diameter of the drill bit more accurately.
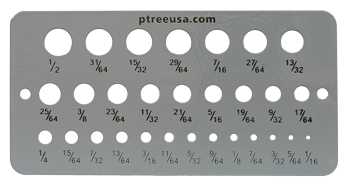
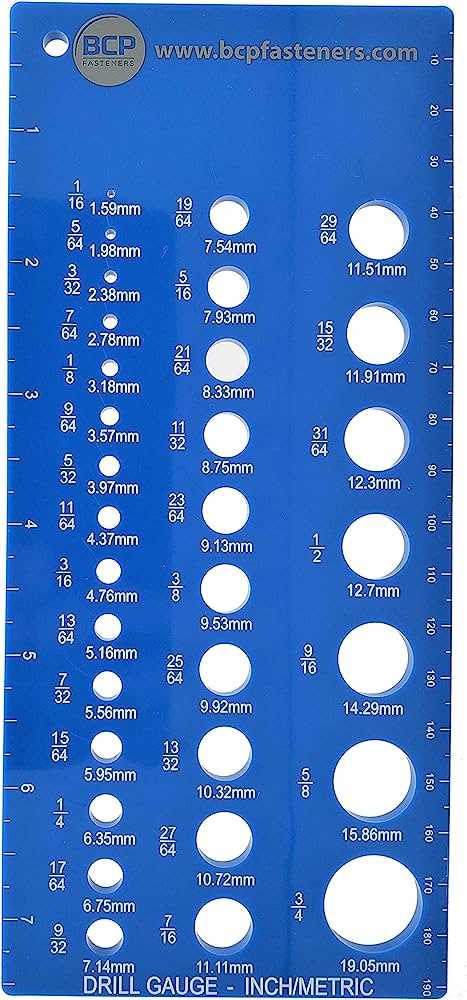
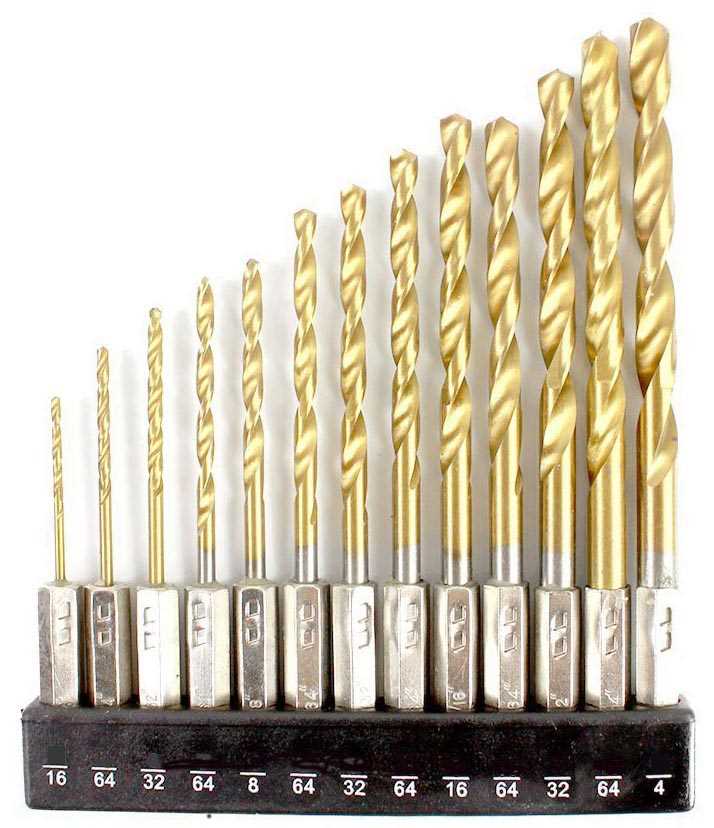
- Drill bit gauge: This tool has various holes of different sizes that can be used to determine the size of the drill bit.
- Drill bit size chart: This is a reference chart that provides information on the standard sizes of drill bits.
Having these tools on hand will make it easier and more accurate to measure the size of your drill bits.
Step 1: Cleaning the Drill Bit
Before measuring the size of the drill bit, it is important to clean it thoroughly to ensure accurate measurements. Cleaning the drill bit eliminates any debris or material that may affect the measurements. Follow these steps to clean the drill bit:
- Gather the necessary tools: Prepare a clean cloth or paper towel, a small brush (such as a toothbrush), and some isopropyl alcohol.
- Inspect the drill bit: Examine the drill bit for any visible dirt, chips, or excess material. If there are any, use the brush to gently remove them.
- Apply isopropyl alcohol: Moisten the cloth or paper towel with isopropyl alcohol. Gently wipe the entire surface of the drill bit to remove any remaining debris or residue.
- Inspect again: After cleaning, inspect the drill bit once more to ensure it is free from any dirt or material.
By thoroughly cleaning the drill bit, you can ensure accurate measurements when determining its size. This will help you select the appropriate drill bit for your specific task.
Step 2: Measuring the Shank Diameter


After measuring the overall length of the drill bit, the next step is to measure the shank diameter. The shank diameter is the thickness of the part of the drill bit that is inserted into the drill chuck or collet.
To measure the shank diameter, you will need a caliper or a ruler with a millimeter scale. Follow these steps to measure the shank diameter:
- Choose a drill bit whose shank you want to measure.
- Make sure the drill bit is clean and free from any debris or dirt.
- Hold the caliper or ruler against the flat side of the shank. Ensure that the measuring instrument is perpendicular to the shank.
- Close the caliper or read the measurement on the ruler where the shank ends. This measurement will be the shank diameter.
- Record the measurement in millimeters.
It is important to ensure that you are measuring the shank diameter and not the overall diameter of the drill bit. The shank diameter is typically smaller than the overall diameter.
If you do not have a caliper or ruler with a millimeter scale, you can also use a drill bit size gauge to measure the shank diameter. A drill bit size gauge has holes of different sizes that can be used to determine the diameter of a drill bit.
Once you have measured the shank diameter, you can proceed to the next step of measuring the flutes or cutting edges of the drill bit.
Step 3: Measuring the Flute Length
The flute length of a drill bit refers to the length of the spiraled groove on the bit. This measurement is important because it determines how deep the drill can go into the material.
To measure the flute length of a drill bit, follow these steps:
- Place the drill bit on a flat surface, with the cutting edge facing up.
- Use a ruler or a tape measure to carefully measure the length of the flute from the tip of the bit to the base of the spiral.
- Make sure to measure only the length of the spiral groove, excluding any portion of the shank or the tip.
- Record the measurement in inches or millimeters.
It is important to note that the flute length may vary depending on the type and size of the drill bit. Some longer bits may have a longer flute length, while shorter bits may have a shorter flute length.
Knowing the flute length of a drill bit is crucial for determining the appropriate drilling depth. It ensures that the drill bit can reach the desired depth without causing any damage to the material or the drill itself.
It is recommended to measure the flute length of a drill bit before using it to ensure accurate and effective drilling.
Step 4: Measuring the Point Angle
Measuring the point angle of a drill bit is important because it determines the type of material the bit is best suited for. Different point angles are designed for specific materials to ensure optimal drilling performance.
To measure the point angle, you will need a protractor or a special tool called a drill gauge, which is specifically designed for measuring drill bit angles.
Here’s how to measure the point angle:
- Select the drill bit you want to measure.
- Place the drill bit into the drill gauge or hold it against the protractor.
- Align the center point of the drill bit with the center hole or zero line on the gauge or protractor.
- Observe the angle measure where the cutting edges of the drill bit intersect with the gauge or protractor.
- Read the measurement to determine the point angle of the drill bit.
- Record the point angle measurement for future reference.
It is important to note that point angles can vary between different drill bit manufacturers. Common point angle measurements for twist drill bits range from 118 degrees to 135 degrees, with 118 degrees being the most common for general-purpose drilling.
By accurately measuring the point angle of your drill bit, you can ensure that you are using it in the appropriate materials and achieve optimal drilling results.
Step 5: Determining the Drill Bit Size
Once you have measured the shank size and the fluted length of your drill bit, you can now determine the drill bit size. There are a few different methods you can use to do this.
Method 1: Drill Bit Gauge
One of the easiest ways to determine the drill bit size is by using a drill bit gauge. This handy tool has a series of different size holes that you can test your drill bit against. Simply insert your drill bit into the hole that it fits snugly into, and read the size displayed next to it. This will be the drill bit size.
Method 2: Drill Bit Size Chart

If you don’t have a drill bit gauge, you can also use a drill bit size chart. These charts list the corresponding sizes for different measurement systems, such as fraction sizes, number sizes, and letter sizes. To determine the size of your drill bit, find the measurement system that matches the measurement you obtained for your drill bit and read the corresponding size from the chart.
Method 3: Micrometer or Caliper Measurement
If you have access to a micrometer or caliper, you can also measure the diameter of your drill bit directly. Simply open the jaws of the tool, place your drill bit between them, and close the jaws until they are snugly around the bit. Take a reading from the tool’s display, and this will be the diameter of your drill bit.
Using any of these methods, you can easily determine the size of your drill bit. Remember to always measure the shank size, the fluted length, and use the appropriate method for accurate results.
Tips for Accurate Measurement
- Use a caliper or micrometer to measure the drill bit diameter. These tools provide precise measurements and can help you determine the exact size of the bit.
- Make sure the drill bit is clean and free of any debris before measuring. Dirt or chip build-up can affect the accuracy of your measurements.
- Measure the diameter at the widest point of the bit. This is usually near the tip or cutting edge.
- If you don’t have a caliper or micrometer, you can use a ruler or tape measure to measure the length and width of the bit, and then compare it to a size chart to determine the size.
- Take multiple measurements and calculate the average to ensure accuracy. Some drill bits can have slight variations in size.
- Always refer to the manufacturer’s specifications or size markings on the drill bit for accurate measurements. These markings can indicate the size in both metric and imperial units.
- Be gentle when measuring the drill bit to avoid damaging the cutting edges or affecting the accuracy of your measurements.
- If you’re unsure about the size of a drill bit, it’s always better to go slightly larger than smaller. You can always make a hole bigger, but you can’t make it smaller.
FAQ:
What is a drill bit?
A drill bit is a cutting tool that is used with a power drill to create holes in various materials such as wood, metal, or plastic.
Why is it important to measure drill bit size?
Measuring drill bit size is important because it helps you determine the appropriate drill bit to use for a specific project or application. Using the wrong drill bit size can result in an improperly sized hole or damage to the material you are drilling into.
How do I measure the size of a drill bit?
To measure the size of a drill bit, you can use a drill bit gauge or a set of calipers. Simply insert the drill bit into the gauge or caliper jaws and read the measurement that corresponds to the diameter of the bit.
What are some common drill bit sizes?
Some common drill bit sizes include 1/16 inch, 1/8 inch, 1/4 inch, 3/8 inch, and 1/2 inch. These sizes are commonly used for drilling holes in various materials and are readily available at most hardware stores.
Video:


Meet Harrison Clayton, a distinguished author and home remodeling enthusiast whose expertise in the realm of renovation is second to none. With a passion for transforming houses into inviting homes, Harrison's writing at https://thehuts-eastbourne.co.uk/ brings a breath of fresh inspiration to the world of home improvement. Whether you're looking to revamp a small corner of your abode or embark on a complete home transformation, Harrison's articles provide the essential expertise and creative flair to turn your visions into reality. So, dive into the captivating world of home remodeling with Harrison Clayton and unlock the full potential of your living space with every word he writes.


