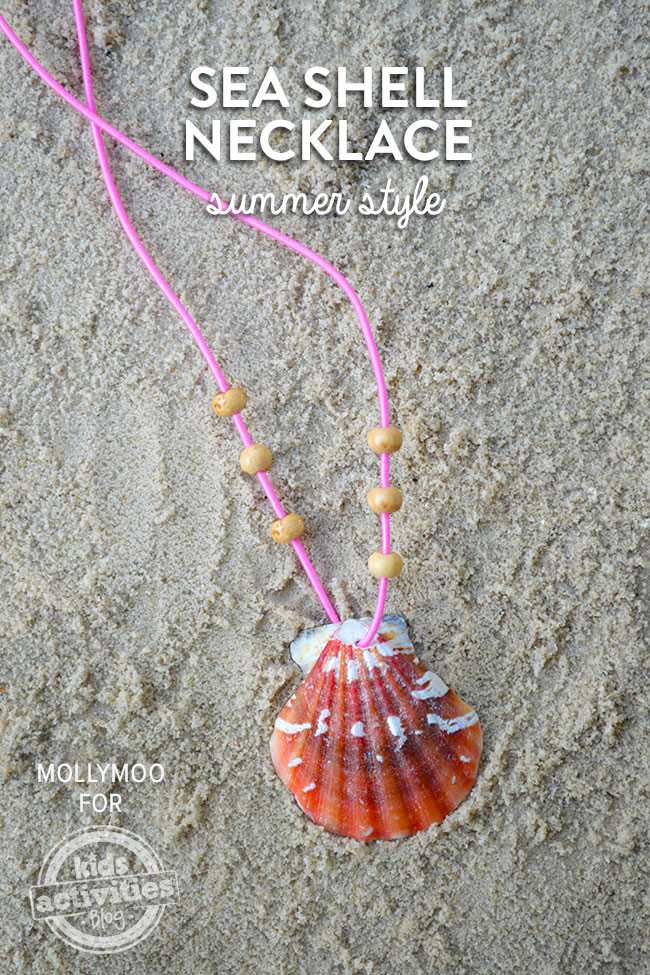
How to Make a Seashell Necklace without a Drill

If you love the beach and collecting seashells, you may have wondered how to turn those beautiful shells into wearable jewelry. One popular option is to make a seashell necklace. However, many tutorials online require the use of a drill to create holes in the shells. If you don’t have access to a drill or simply prefer not to use one, don’t worry – you can still make a stunning seashell necklace without a drill!
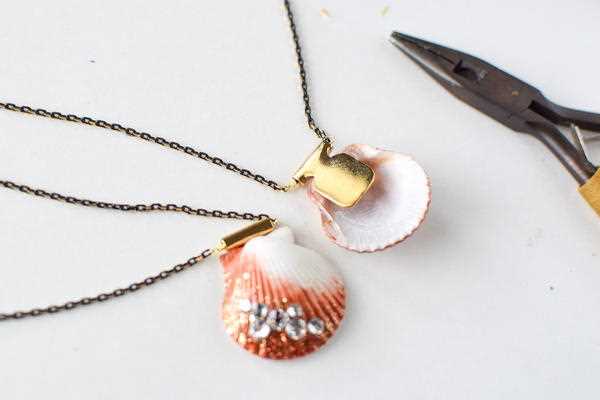
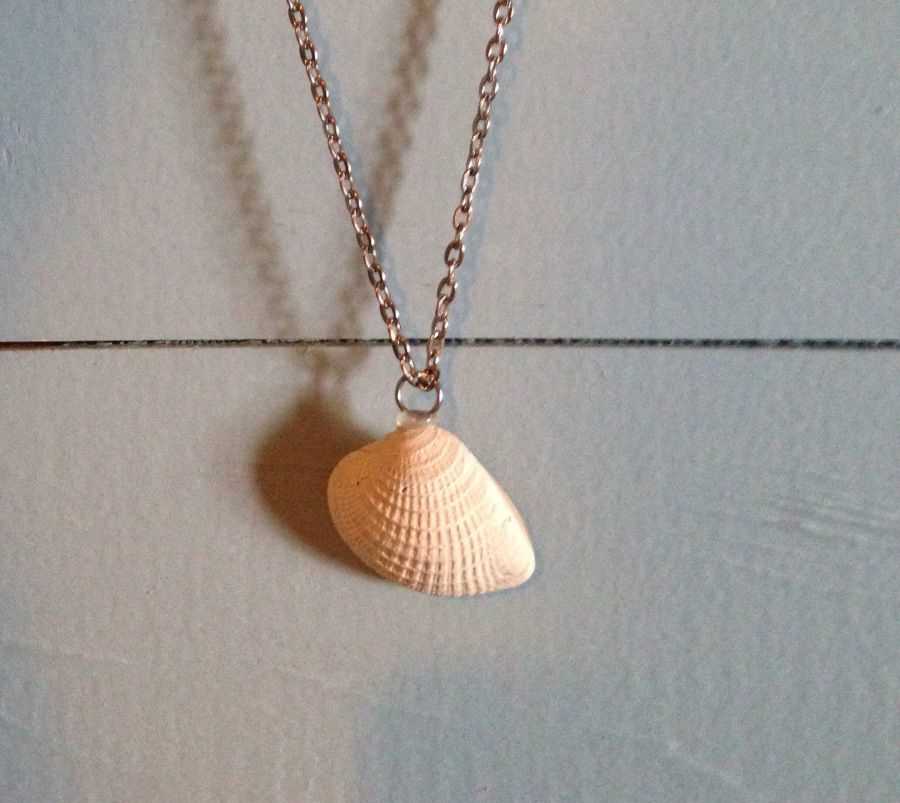
Instead of drilling holes in the shells, you can use alternative methods to attach them to a necklace chain. One option is to use a strong adhesive, such as epoxy or super glue, to attach a jump ring or bail directly to the shell. This will allow you to easily thread a chain through the attachment and create a necklace.
Another method is to wrap the shells in wire. You can use thin gauge wire to create a loop around the shell or create a coil that attaches to the shell. This not only provides a way to connect the shell to the necklace chain, but also adds a decorative element to your jewelry.
By using these alternative methods, you can create a seashell necklace that showcases your love for the beach and adds a unique touch to your style. With a few simple materials and a little creativity, you can make a stunning necklace that will be a conversation piece wherever you go.
Tools and Materials for Making a Seashell Necklace
Creating a seashell necklace without a drill requires a few basic tools and materials. Here is a list of what you will need:

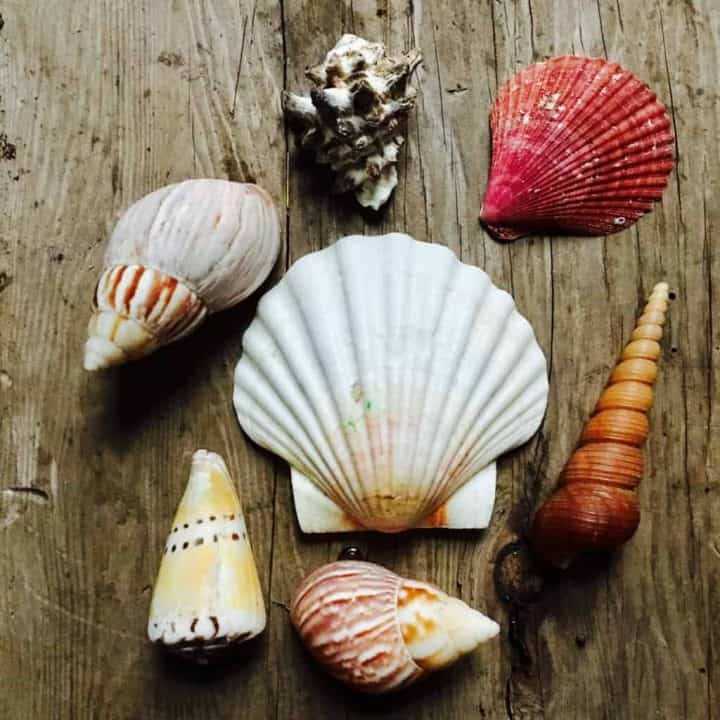
- Seashells: Choose a variety of seashells in different shapes, sizes, and colors. Look for shells that have natural holes or gaps where you can connect them.
- Necklace Chain: Select a chain that suits your personal style. You can choose a delicate chain for a dainty look or a thicker chain for a more bold statement. Make sure the chain is long enough to fit around your neck comfortably.
- Jewelry Wire: This will be used to attach the seashells to the necklace chain. Choose a wire that is thin enough to fit through the holes in the shells, but strong enough to hold them securely.
- Wire Cutters: These are necessary for cutting the jewelry wire to the desired length. Make sure to use dedicated wire cutters to avoid damaging your other tools.
- Pliers: Pliers are useful for bending and manipulating the jewelry wire. Choose a pair with a comfortable grip that allows you to work with precision.
- Jump Rings: Jump rings are small rings that are used to connect the seashells to the necklace chain. Make sure to choose jump rings that match the color and material of your necklace chain for a cohesive look.
- Clasp: A clasp is needed to secure the ends of the necklace chain together. You can choose from various types of clasps such as lobster claw clasps, spring ring clasps, or toggle clasps.
With these tools and materials, you will have everything you need to create a beautiful seashell necklace without a drill. Get creative with your shell selection and design a unique accessory that will remind you of the beach wherever you go!
Gather Everything You Need
To make a seashell necklace without a drill, you will need the following materials:
- Seashells
- String or cord
- Scissors
- Needle
- Thread
- Beads (optional)
- Clasp or closure
The first item you will need is seashells. You can collect seashells from the beach or purchase them at a craft store. Make sure to select shells that have a hole already or have a natural opening that you can thread the string through.
Next, you will need string or cord to act as the necklace chain. Choose a material that is sturdy and compatible with your seashells. Some popular options include leather cord, waxed cotton cord, or nylon thread.
Scissors are essential for cutting the string or cord to the desired length. Make sure they are sharp and easy to handle to get accurate cuts.

A needle is necessary for threading the string through the seashells. Choose a needle that is thin enough to fit through the holes or openings in your shells. You can use a regular sewing needle or a beading needle.
Thread is also necessary for attaching the seashells to the necklace chain. Choose a thread that matches the color of your string or cord for a seamless look.
If desired, you can add beads to your seashell necklace for additional decoration. Select beads that complement the colors and style of your seashells. Make sure the beads have large enough holes to fit your string or cord.
Finally, you will need a clasp or closure to secure the ends of your necklace chain. There are various types of clasps available, including lobster clasps, spring ring clasps, or toggle clasps. Choose one that is easy to operate and complements your overall design.
Once you have gathered all the necessary materials, you can start creating your seashell necklace without a drill.

Selecting the Right Seashells for Your Necklace
When making a seashell necklace without a drill, it is important to choose the right seashells that are suitable for stringing. Here are a few factors to consider when selecting seashells for your necklace:
Size
The size of the seashells you choose can greatly affect the overall look and design of your necklace. If you prefer a delicate and dainty necklace, opt for smaller seashells. On the other hand, if you want a statement piece, larger seashells will work best. Consider the proportion of your necklace and the desired aesthetic before making your selection.
Shape
The shape of your seashells can also play a role in the overall design. Some seashells are perfect for creating focal points, such as large, spiral-shaped shells or unique, irregular shapes. Others may be better suited for creating a pattern or texture, such as small, round shells or elongated shells. Think about the design you want to achieve and select seashells accordingly.
Color
The color of the seashells can add visual interest and complement your personal style. Natural seashells come in a variety of colors, ranging from white and beige to vibrant blues, greens, and pinks. Consider the color scheme you want for your necklace and choose seashells that align with your desired palette.
Condition
Ensure that the seashells you select are in good condition and free from any cracks, chips, or damage. Examine each shell carefully to ensure they are sturdy and suitable for stringing. Avoid selecting shells that are too fragile or delicate as they may break during the necklace-making process or while being worn.

By considering these factors when selecting seashells for your necklace, you can create a beautiful and unique piece of jewelry that reflects your personal style and love for the beach. Remember to have fun and experiment with different seashells to achieve the desired look!
Finding the Perfect Shells
When making a seashell necklace without a drill, the first step is to find the perfect shells to use. Here are some tips to help you find shells that will work well for your necklace:
1. Beachcombing
One of the best ways to find seashells is by beachcombing. Take a walk along the shore and keep an eye out for shells that catch your attention. Look for shells that are intact, without any cracks or missing parts.
2. Look for Shells in the Right Size
When choosing shells for your necklace, consider their size. Small to medium-sized shells work best for necklaces, as they are lightweight and comfortable to wear. Look for shells that are about the size of a quarter or smaller.
3. Consider the Shape and Texture

The shape and texture of the shells you choose can add visual interest to your necklace. Look for shells with unique shapes, such as spirals or ridges. Also, pay attention to the texture of the shell’s surface. Some shells may have a smooth, glossy finish, while others may have a rough or bumpy texture.
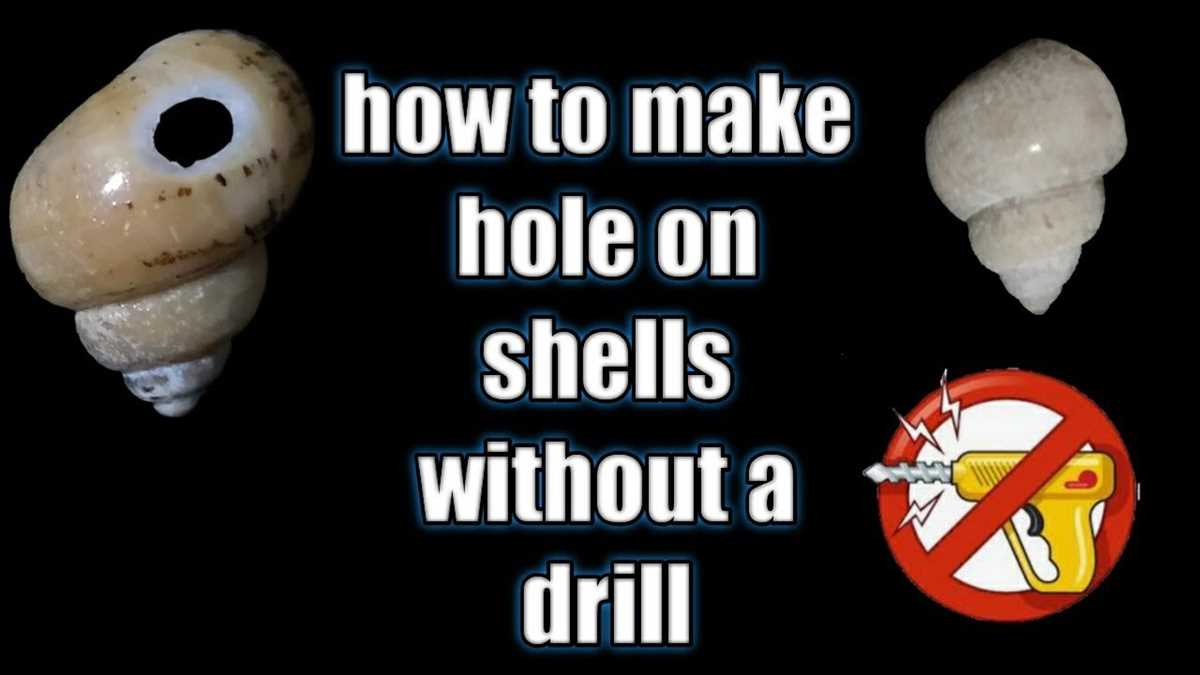
4. Check for Holes
Since you won’t be drilling holes in the shells, it’s important to find shells that already have natural holes. Look for shells with a small hole near the top, as this is where you will thread the string or cord for your necklace.
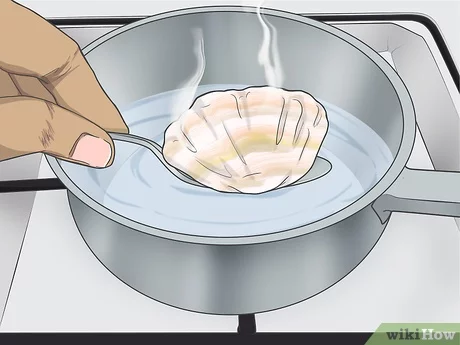
5. Clean and Sanitize the Shells
Before using the shells for your necklace, it’s important to clean and sanitize them to remove any bacteria or dirt. Rinse the shells with water and then soak them in a mixture of water and bleach for a few minutes. Rinse them thoroughly again and let them dry completely before using.
By following these tips, you’ll be able to find the perfect shells for your seashell necklace without the need for a drill. Once you have your shells, you can move on to the next steps of creating your beautiful necklace.
Cleaning and Preparing Your Shells
Before you start making your seashell necklace, it’s important to properly clean and prepare your shells. This will ensure that they are free from dirt, debris, and any unwanted odors.
1. Gather your shells
Start by collecting seashells from the beach or buying them from a store. Look for shells that are intact and have interesting shapes, sizes, and colors. Keep in mind that smaller shells with holes or flat surfaces are easier to work with for making necklaces.
2. Rinse your shells
Once you have your shells, rinse them under running water to remove any loose sand, dirt, or salt. Gently rub the shells with your fingers to help loosen any stubborn dirt. Avoid using harsh chemicals or soaps, as they can damage the shells.
3. Soak your shells
After rinsing, fill a bowl with warm water and add a few drops of mild dish soap. Place your shells in the soapy water and let them soak for about 10-15 minutes. This will help to further loosen any dirt or debris.
4. Scrub your shells
Using a soft brush or toothbrush, gently scrub the shells to remove any remaining dirt or debris. Be careful not to scrub too hard, as this can damage the shells. Pay extra attention to any crevices or textured areas where dirt may be trapped.
5. Rinse and dry your shells
Once you’ve finished scrubbing, rinse the shells again under running water to remove any soapy residue. After rinsing, pat the shells dry with a clean towel and allow them to air dry completely. This may take several hours or overnight.
6. Optional: bleach your shells

If you want to achieve a brighter, more uniform color for your shells, you can use a diluted bleach solution. Mix one part bleach with three parts water and let your shells soak in this solution for a few minutes. Keep a close eye on them, as bleach can quickly damage the shells if left for too long. Rinse the shells thoroughly after bleaching and allow them to dry.
Now that your shells are clean and prepared, you’re ready to start making your seashell necklace! Follow the next steps in the article to learn how to string and arrange the shells to create a beautiful piece of jewelry.
Choosing the Right String or Cord for Your Necklace
1. Consider the Material
When choosing the string or cord for your seashell necklace, it’s important to consider the material. The string should be strong enough to hold the weight of the seashells, but also flexible enough to be tied into knots.
Some popular options for seashell necklaces include:
- Cotton: Cotton string is a common choice for seashell necklaces. It is soft, flexible, and easy to work with. However, it may not be as durable as other materials.
- Nylon: Nylon cord is a strong and durable option for seashell necklaces. It is resistant to fraying and can withstand some stretching. However, nylon cord can be slippery, making it difficult to tie knots.
- Leather: Leather cord is a popular choice for rustic or bohemian-style seashell necklaces. It is strong, durable, and adds a natural touch to the design. However, leather can be more expensive than other options.
2. Consider the Thickness
The thickness of the string or cord is another important factor to consider when making a seashell necklace. A thicker string will be more visible and may be better suited for larger seashells, while a thinner string can be used for smaller, delicate shells.
3. Consider the Color
The color of the string or cord can also enhance the overall design of your seashell necklace. You can choose a string color that complements the colors of the seashells or opt for a contrasting color to create a bold statement.
4. Consider the Texture
The texture of the string or cord can add an interesting element to your seashell necklace. You can choose a smooth and sleek string for a modern look, or opt for a textured cord to create a more organic and natural feel.
5. Consider Additional Features

Depending on your design preferences, you may also want to consider additional features such as clasps or adjustable closures for your seashell necklace. These features can make it easier to put on and take off the necklace, as well as adjust the length to your liking.
By considering these factors, you can choose the right string or cord for your seashell necklace that not only looks beautiful, but also ensures durability and functionality. Happy crafting!
Exploring Different Options
If you don’t have a drill, there are still plenty of creative ways to make a seashell necklace. Here are a few different options you can try:
1. Using glue
If you have a strong adhesive glue, this can be a great option for attaching seashells to a necklace. Simply apply a small amount of glue to the back of the seashell and press it firmly onto the necklace string or chain. Be sure to let the glue dry completely before wearing the necklace.
2. Wire wrapping
Wire wrapping is another popular technique that can be used to create beautiful seashell necklaces. Take a thin wire and thread it through a small hole in the seashell. Then, wrap the wire tightly around the necklace string or chain, securing the seashell in place. This method not only adds a decorative touch but also ensures that the seashell stays securely on the necklace.
3. Beading
If you enjoy beading, you can incorporate seashells into your necklace design by stringing them onto the necklace along with other beads. Simply choose beads and seashells that have holes big enough to accommodate the string or thread you’re using. Then, thread the string through the holes and arrange the beads and seashells in a pattern that you like. This method allows for endless creative possibilities and can result in a unique and personalized seashell necklace.
4. Using jump rings
Jump rings are small metal rings that can be used to connect different components of a necklace together. If your seashells have small holes, you can attach them to a chain or necklace string using jump rings. Simply thread the jump ring through the hole in the seashell and then attach it to the necklace. This method allows for easy removal and replacement of seashells, giving you the freedom to change up the design of your necklace whenever you like.
Remember, always use caution and appropriate tools when working with seashells and jewelry-making materials. Experiment with different techniques to find the one that works best for you and have fun creating your own unique seashell necklace!
Considering Factors for Durability
Type of Seashell
The type of seashell you choose for your necklace will play a significant role in its durability. Some seashells, like mussel shells or oyster shells, are more fragile and prone to breakage. On the other hand, seashells with thicker and sturdier structures, such as larger scallop shells or conch shells, are more durable and less likely to crack or chip.
Shell Thickness
The thickness of the seashell is another important factor to consider for durability. Thicker shells provide better support and are less likely to break under pressure or upon impact. When collecting seashells for your necklace, look for ones with a thicker overall structure.
Seashell Fragility
Not all seashells can withstand the same amount of wear and tear. Some seashells are inherently more delicate and prone to breakage, while others are more resistant. When selecting seashells for your necklace, consider the fragility of each shell. Avoid using seashells that are chipped, cracked, or have thin areas that may easily break.
Shell Coating
The coating on the seashell’s surface can impact its durability. Many seashells have a natural protective coating that helps to strengthen and preserve the shell. However, over time, this coating may wear off or become damaged. If possible, choose seashells with intact and well-preserved coatings for a more durable necklace.
String or Cord Material
The material used for the string or cord in your seashell necklace can affect its overall durability. Opt for strong and durable materials such as nylon or waxed cotton cord, as these are less likely to break or fray. Avoid using thin or weak strings that may not withstand the weight or pressure of the seashells.
Secure Knots and Clasps

Proper knotting techniques and secure clasps are essential for ensuring the durability of your seashell necklace. Make sure to tie strong knots that can withstand tension, and use sturdy clasps that won’t easily come undone. Regularly check the knots and clasps to ensure they remain tight and secure.
Proper Storage
To maintain the durability of your seashell necklace, it’s important to store it properly when not in use. Avoid exposing it to excessive heat, moisture, or direct sunlight, as these factors can weaken the shells and cause them to deteriorate. Store the necklace in a cool, dry place, preferably in a jewelry box or pouch to protect it from potential damage.
Regular Maintenance
To keep your seashell necklace in good condition, perform regular maintenance. Gently clean the shells with a soft cloth or brush to remove any dirt or debris. Avoid using harsh chemicals or abrasive materials that may damage the shells. If any shells become loose or damaged, replace them promptly to prevent further deterioration.
Assembling Your Seashell Necklace
Now that you have gathered all the necessary materials and prepared your seashells, it’s time to assemble your seashell necklace. Follow these simple steps to complete your beautiful piece of jewelry:
- Layout your seashells: Start by laying out your seashells in the order you would like them to appear on the necklace. This will give you an idea of the overall design and help you plan the arrangement.
- String the seashells: Take a piece of string or jewelry wire and thread it through the holes in the seashells. If your seashells don’t have holes, you can use a hot needle or small drill bit to create holes.
- Tie a knot: Once you have threaded all the seashells onto the string or wire, tie a knot at both ends to secure them in place. Make sure the knot is tight and won’t come undone.
- Add additional beads (optional): If you want to add some beads to your necklace for extra color and texture, now is the time to do so. Simply thread the beads onto the string or wire, alternating between beads and seashells.
- Add a clasp (optional): If you prefer a necklace with a clasp, you can add one at this stage. Attach the clasp to the ends of the string or wire, making sure it is secure.
Once you have completed these steps, your seashell necklace is ready to wear or gift to someone special. Remember to handle the necklace with care to avoid any damage to the seashells or beads.
Enjoy your unique and beautiful seashell necklace, and embrace the natural beauty of the seashells you have collected.
Arranging Your Shells
Once you have gathered your seashells, it’s time to start arranging them for your necklace. The way you arrange your shells will affect the overall look and style of your necklace.
Here are some different ways to arrange your seashells:
- Color: Group together shells that have similar colors to create a visually pleasing arrangement. This can create a cohesive look for your necklace.
- Size: Arrange your shells in order of size, starting with the largest shell in the center and gradually decreasing in size towards the ends of the necklace. This can create a balanced and symmetrical design.
- Pattern: Create a pattern with your shells, alternating between different types of shells or arranging them in a specific sequence. This can add visual interest and uniqueness to your necklace.
- Random: If you prefer a more organic and natural look, you can simply arrange your shells in a random order. This can create a relaxed and casual style for your necklace.
You can experiment with different arrangements and see which one you like best. Remember to lay out your shells on a flat surface before attaching them to the necklace to get a better idea of how they will look.
FAQ:
What materials do I need to make a seashell necklace without a drill?
To make a seashell necklace without a drill, you will need seashells, jewelry glue, a chain or cord, jump rings, and a clasp.
Can I use any type of seashell to make a necklace without a drill?
Yes, you can use any type of seashell to make a necklace without a drill. Just make sure the seashells are large enough to be used as focal beads, or you can use smaller seashells as charms.
What is the process of making a seashell necklace without a drill?
The process of making a seashell necklace without a drill involves cleaning and preparing the seashells, applying jewelry glue to the back of the seashells, attaching jump rings to the seashells, and connecting the seashells to a chain or cord using jump rings. Finally, you will add a clasp to complete the necklace.
Are there any alternative methods to make a seashell necklace without a drill?
Yes, there are alternative methods to make a seashell necklace without a drill. Some other methods include using a hot glue gun to attach a bail to the back of the seashell, using jewelry wire to wrap around the seashell and create a loop, or using resin to encase the seashell and create a pendant.
Video:

How to grow chard
Harrison Clayton
Meet Harrison Clayton, a distinguished author and home remodeling enthusiast whose expertise in the realm of renovation is second to none. With a passion for transforming houses into inviting homes, Harrison's writing at https://thehuts-eastbourne.co.uk/ brings a breath of fresh inspiration to the world of home improvement. Whether you're looking to revamp a small corner of your abode or embark on a complete home transformation, Harrison's articles provide the essential expertise and creative flair to turn your visions into reality. So, dive into the captivating world of home remodeling with Harrison Clayton and unlock the full potential of your living space with every word he writes.


