How to Make a Hole in a Mason Jar Lid Without a Drill

Mason jars are incredibly versatile and can be used for various purposes, from storing homemade jams to creating beautiful DIY decorations. One common challenge when working with these jars is making a small hole in the lid to accommodate a straw or allow airflow. If you don’t have a drill on hand, don’t worry! There are several creative ways to make a hole in a mason jar lid without using a drill.
One method involves using a hammer and nail. Start by placing the lid on a sturdy surface, such as a wooden cutting board or a block of wood. Position the nail where you want the hole to be and lightly tap it with the hammer to create a small indentation. Once the nail is secure, use the hammer to gently tap it through the lid, creating a hole.
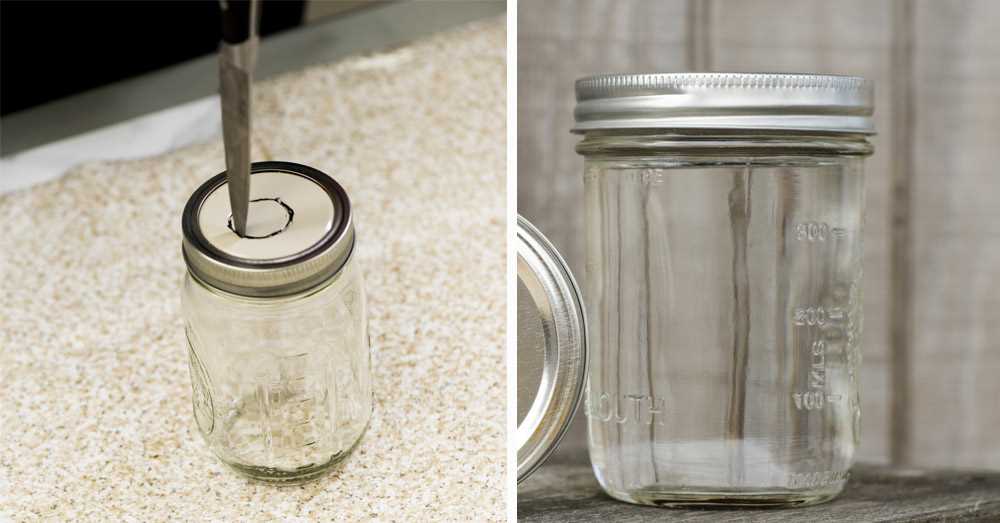
Another technique is to use a heated object like a screwdriver or a metal rod. Heat the object by holding it over an open flame, such as a gas stove, for a few minutes until it becomes hot. Place the heated object on the lid where you want the hole to be and apply pressure. The heat will help melt through the lid, creating a clean and precise hole.
If you prefer a less manual approach, you can also try using a power drill attachment called a hole saw. This tool attaches to a handheld power drill and can create a hole of any size in the lid. Simply choose the appropriate size hole saw, attach it to the drill, and carefully drill through the lid, applying gentle but steady pressure. Be sure to wear protective goggles and follow all safety instructions when using power tools.
No matter which method you choose, always remember to take necessary safety precautions and work in a well-ventilated area. Making a hole in a mason jar lid without a drill can be an easy and fun DIY project for anyone looking to customize their jars or add functionality to them.
Why Use a Mason Jar Lid?
When it comes to storing food or liquids, using a Mason jar can be a versatile and convenient option. Mason jars are made of glass, which is non-reactive and does not leach any chemicals into the contents. This makes them a safe choice for storing food and beverages.

One of the key advantages of using a Mason jar lid is its airtight seal. The lid forms a tight seal around the jar, preventing air from entering and bacteria from contaminating the contents. This makes Mason jars ideal for canning and preserving food for longer periods.
Mason jar lids are also reusable and durable, making them an eco-friendly option. Unlike plastic lids that can crack or warp over time, Mason jar lids are made of metal and can withstand repeated use. This makes them a cost-effective choice as well.
Not only are Mason jar lids practical for storage and preservation, but they are also versatile for various purposes. The lids can be used in DIY projects, such as making homemade candles, soap dispensers, or even as a base for creating a salt or pepper shaker.
Another reason for using a Mason jar lid is its aesthetic appeal. The timeless design of Mason jar lids adds a rustic and charming touch to any space. They can be used for decorative purposes, such as creating centerpieces or displaying flowers.
In conclusion, using a Mason jar lid offers several benefits. They provide an airtight seal, are reusable and durable, and can be used for various purposes. Their timeless design and aesthetic appeal make them a popular choice for storage, decoration, and DIY projects.

Tools Needed
To make a hole in a mason jar lid without a drill, you will need the following tools:
- A hammer
- A nail or awl
- A piece of scrap wood
- A marker or pencil
- A tape measure or ruler
Note: Make sure to use caution when working with these tools, as they can be sharp or cause injury if not used properly. Always wear safety glasses and work in a well-ventilated area.
Alternative Methods
1. Nail and Hammer
One alternative method for making a hole in a mason jar lid is to use a nail and a hammer. Here are the steps:
- Place the mason jar lid on a sturdy surface.
- Position the nail on the lid where you want the hole to be.
- Hold the nail in place with one hand.
- Using the hammer, gently tap the nail into the lid until it goes through.
- Remove the nail and test the hole by fitting the desired object into it.
2. Hot Needle
Another method that can be used is using a hot needle. Follow these steps:

- Heat the tip of a needle over a flame until it becomes hot.
- Place the mason jar lid on a heat-resistant surface.
- Position the hot needle on the lid where you want the hole to be.
- Apply slight pressure to the needle and twist it gently until it goes through the lid.
- Allow the lid to cool down before handling it.
3. Bottle Cap Punch
If you have a bottle cap punch tool, you can also use it to make a hole in the mason jar lid. Here’s how:
- Place the mason jar lid on a sturdy surface.
- Position the bottle cap punch tool on the lid where you want the hole to be.
- Press down on the tool firmly to punch a hole through the lid.
- Remove the tool and check the hole.
4. Awl or Screwdriver
Using an awl or a screwdriver is another alternative method. Follow these steps:
- Place the mason jar lid on a sturdy surface.
- Position the awl or screwdriver on the lid where you want the hole to be.
- Apply downward pressure to the awl or screwdriver and twist it gently until it goes through the lid.
- Check the hole to ensure it is the desired size.
5. Tubing Cutter
If you have a tubing cutter, it can also be used to make a hole in a mason jar lid. Here are the steps:
- Place the mason jar lid on a sturdy surface.
- Position the tubing cutter on the lid where you want the hole to be.
- Rotate the tubing cutter around the lid, applying steady pressure, until it cuts a hole through the lid.
- Remove the tubing cutter and check the hole.
6. Dremel or Rotary Tool
Using a Dremel or rotary tool is an effective method for making holes in mason jar lids. Follow these steps:

- Place the mason jar lid on a sturdy surface.
- Attach a small drill bit to the Dremel or rotary tool.
- Position the drill bit on the lid where you want the hole to be.
- Turn on the tool and apply gentle pressure as you guide the drill bit through the lid.
- Remove the tool and check the hole.
| Method | Tools Needed |
|---|---|
| Nail and Hammer | Nail, Hammer |
| Hot Needle | Needle, Flame |
| Bottle Cap Punch | Bottle Cap Punch Tool |
| Awl or Screwdriver | Awl or Screwdriver |
| Tubing Cutter | Tubing Cutter |
| Dremel or Rotary Tool | Dremel or Rotary Tool, Drill Bit |
Method 1: Nail and Hammer

If you don’t have access to a drill, you can still make a hole in a mason jar lid using a nail and hammer. Follow these steps:
- Gather your materials: a mason jar lid, a nail, a hammer, and a block of wood.
- Place the mason jar lid on top of the block of wood. This will provide support and prevent the lid from bending or warping.
- Choose a spot on the lid where you want the hole to be and position the nail upright at that spot.
- Hold the nail firmly with one hand and use the hammer to strike the nail in a downward motion. Apply enough force to penetrate the lid but be careful not to strike too hard and damage the lid.
- Continue to hammer the nail until it goes all the way through the lid. You may need to reposition the nail and hammer in order to make the hole even and centered.
- Once the hole is made, remove the nail from the lid.
- Inspect the hole to ensure it is large enough for your desired use. If needed, you can use a larger nail or drill bit to widen the hole.
Remember to always exercise caution when using a nail and hammer. Wear safety goggles to protect your eyes and work in a well-ventilated area.
Step-by-Step Instructions

- Start by gathering all the necessary materials and tools, including a mason jar lid, a nail, a hammer, a block of scrap wood, sandpaper, a marker, and a pair of gloves.
- Put on the gloves to protect your hands.
- Place the mason jar lid on the block of scrap wood to provide a sturdy surface for hammering.
- Select the desired size for the hole and mark its location on the lid using the marker. Make sure to center the mark.
- Hold the nail firmly with the pliers to prevent it from slipping and causing injury.
- Position the nail on the marked spot on the lid and gently tap it with the hammer to create a small indentation. This will act as a starter hole.
- Continue hitting the nail with the hammer while applying steady pressure. Rotate the nail slightly after each hit to create a clean and precise hole.
- If necessary, use sandpaper to smooth the edges of the hole and remove any sharp or rough edges.
- Clean the lid with water and soap to remove any metal shavings or debris.
- Your mason jar lid with a hole is now ready to use for various crafts or projects.
Method 2: Hot Nail
This method involves using a nail and heat to create a hole in the mason jar lid. Here’s how you can do it:
- Choose a nail that is slightly smaller than the size of the hole you want to create. A nail with a pointed tip will work best.
- Heat the nail using a heat source such as a lighter or a candle flame. Hold the nail with a pair of pliers to protect your fingers from the heat.
- Once the nail is hot, carefully press it against the mason jar lid at the spot where you want the hole to be. Apply gentle pressure and rotate the nail in a circular motion to create the hole.
- Be cautious while handling the hot nail and make sure to perform this method in a well-ventilated area.
Using a hot nail method requires a steady hand and patience. Take your time to avoid any accidents and ensure that the hole is the desired size. Remember to let the jar lid cool down before handling it.
Step-by-Step Instructions
- Gather your materials: You will need a mason jar lid, a hammer, a nail, and a wooden block or surface to work on.
- Prepare your working area: Place the wooden block or surface on a stable and flat surface. This will provide a stable base for the lid and help protect your underlying surface.
- Position the lid: Place the mason jar lid on top of the wooden block or surface with the side you want to make the hole in facing up.
- Mark the center: Use a pen or marker to make a small dot in the center of the lid. This will serve as a guide for where to aim the nail.
- Start punching the hole: Hold the nail firmly with one hand and position it on the marked dot. Use your other hand to hold the hammer. Gently tap the nail with the hammer to create a small indentation in the lid.
- Continue punching the hole: Once the indentation is created, increase the force of your hits with the hammer. Aim the nail directly at the center of the lid and keep striking it until it pierces through the lid.
- Check the size of the hole: After the nail has pierced through the lid, check the size of the hole. If the hole is not big enough, you can continue enlarging it by gently tapping the nail around the edges of the hole.
- Smooth any rough edges: Once you have achieved the desired hole size, check the edges of the hole for any rough or sharp edges. Use a nail file or sandpaper to gently smooth out any roughness.
- Clean up: After you have finished making the hole, clean off any metal shavings or debris from the lid. You can wash the lid with soap and water before using it if necessary.
Method 3: Knife
If you don’t have access to a drill, another method you can use is a knife. While this method may be a little more challenging and time-consuming, it can still get the job done.
Step 1: Mark the Spot


Start by deciding where you want the hole to be on the mason jar lid. Use a marker or pen to mark the spot.
Step 2: Create a Pilot Hole
Using a small nail or another sharp object, carefully create a pilot hole at the marked spot. This will help guide your knife as you begin cutting.
Step 3: Cut the Hole
Take a sharp knife and slowly start cutting around the pilot hole, following the marked spot. Apply gentle pressure and be patient, as cutting through the metal lid may take some time. Rotate the knife in small circles as you cut to make the process easier.
Step 4: Smooth the Edges
After you have successfully cut a hole in the lid, use sandpaper or a file to smooth any rough edges. This will prevent any injuries when using the lid.
This method may require some extra effort, but it can be a good alternative if you don’t have access to a drill.

Step-by-Step Instructions
- First, gather all the materials you will need: a mason jar lid, a hammer, a nail, a block of wood or a hard surface.
- Place the mason jar lid upside down on the block of wood or hard surface.
- Take the nail and position it at the center of the lid.
- Using the hammer, gently tap the nail into the lid. Continue tapping until the nail has pierced through the lid.
- Remove the nail from the lid.
- Inspect the hole and ensure it is the desired size. If not, you can repeat steps 3-5 until the hole is the right size.
- Once the hole is the desired size, clean any debris or metal shavings from the lid.
- Your mason jar lid is now ready to use with the new hole!
Method 4: Candle Flame
Materials needed:
- Mason jar lid
- Candle
- Lighter or matches
- Protective gloves
- Table or work surface
Steps:
- Ensure you are working in a well-ventilated area and on a stable surface.
- Put on protective gloves to prevent burns.
- Light the candle using a lighter or matches.
- Hold the underside of the Mason jar lid about an inch above the flame, making sure to keep it level.
- Rotate the lid slowly, allowing the flame to evenly heat the metal surface.
- Continue rotating the lid for about 2-3 minutes or until the metal becomes hot enough to melt through.
- Remove the lid from the flame and set it aside to cool down.
- Once the lid has cooled, check if the hole is the desired size. If not, repeat the heating process until the desired size is achieved.
Caution:
- Be cautious while working with an open flame and always prioritize safety.
- Do not touch the heated metal with bare hands to avoid burns.
- Ensure the Mason jar lid is made of appropriate material that can withstand the heat without causing damage or releasing harmful substances.
This method can be an alternative when you don’t have access to a drill or other tools. However, make sure to take necessary precautions and exercise caution while using an open flame.
FAQ:
What can I use instead of a drill to make a hole in a mason jar lid?
If you don’t have a drill, you can use a hammer and nail to make a hole in a mason jar lid. Simply place the lid on a sturdy surface, position the nail where you want the hole to be, and gently tap the nail with the hammer until it punctures through the lid.
Can I use a screwdriver to make a hole in a mason jar lid?
Yes, you can use a screwdriver as an alternative to a drill. To do this, you need to heat the tip of the screwdriver until it becomes hot enough to melt through the plastic or metal of the mason jar lid. Press the heated tip against the lid and apply pressure until it creates a hole.
What is the easiest way to create a hole in a mason jar lid without a drill?
The easiest way to create a hole in a mason jar lid without a drill is to use a power tool called a rotary tool. This tool is handheld and can easily make precise holes in various materials, including the lid of a mason jar. Simply attach a cutting bit to the rotary tool and slowly guide it through the lid to create the desired hole.
Are there any other household items I can use to make a hole in a mason jar lid?
Yes, there are several household items you can use instead of a drill to make a hole in a mason jar lid. For example, you can use a hot soldering iron to melt through the lid, a metal file to slowly carve a hole, or even a sharp kitchen knife to cut through the lid. Just remember to take safety precautions and work carefully to avoid injury.
Is it possible to make a hole in a mason jar lid without any tools?
Yes, it is possible to make a hole in a mason jar lid without any tools. One method is to heat a metal or glass rod until it becomes red hot, and then press it against the lid to burn a hole through. However, this method requires extreme caution as the hot rod can cause burns or start a fire. It is always recommended to use proper tools for safety.
Video:


Meet Harrison Clayton, a distinguished author and home remodeling enthusiast whose expertise in the realm of renovation is second to none. With a passion for transforming houses into inviting homes, Harrison's writing at https://thehuts-eastbourne.co.uk/ brings a breath of fresh inspiration to the world of home improvement. Whether you're looking to revamp a small corner of your abode or embark on a complete home transformation, Harrison's articles provide the essential expertise and creative flair to turn your visions into reality. So, dive into the captivating world of home remodeling with Harrison Clayton and unlock the full potential of your living space with every word he writes.


