How to Fill a Drill Hole in Wood: A Step-by-Step Guide

Drilling holes in wood is a common task when working on woodworking projects. However, sometimes you may find yourself needing to fill a drill hole for aesthetic or practical reasons. Whether you want to conceal a hole that served its purpose or you made a mistake and need to fix it, knowing how to properly fill a drill hole can help you achieve a seamless finish.
In this step-by-step guide, we will walk you through the process of filling a drill hole in wood, from gathering the necessary materials to achieving a smooth and professional-looking result. Whether you are a beginner or an experienced woodworker, following these steps will help you master this essential skill.
Before we dive into the steps, it is essential to note that the method you choose to fill a drill hole will depend on the size of the hole and the type of wood you are working with. For smaller holes, there are quick fixes, while larger holes may require more extensive repairs. It is also important to consider the final finish you want to achieve, as it may affect the method and materials you use to fill the hole.
What is a Drill Hole in Wood?

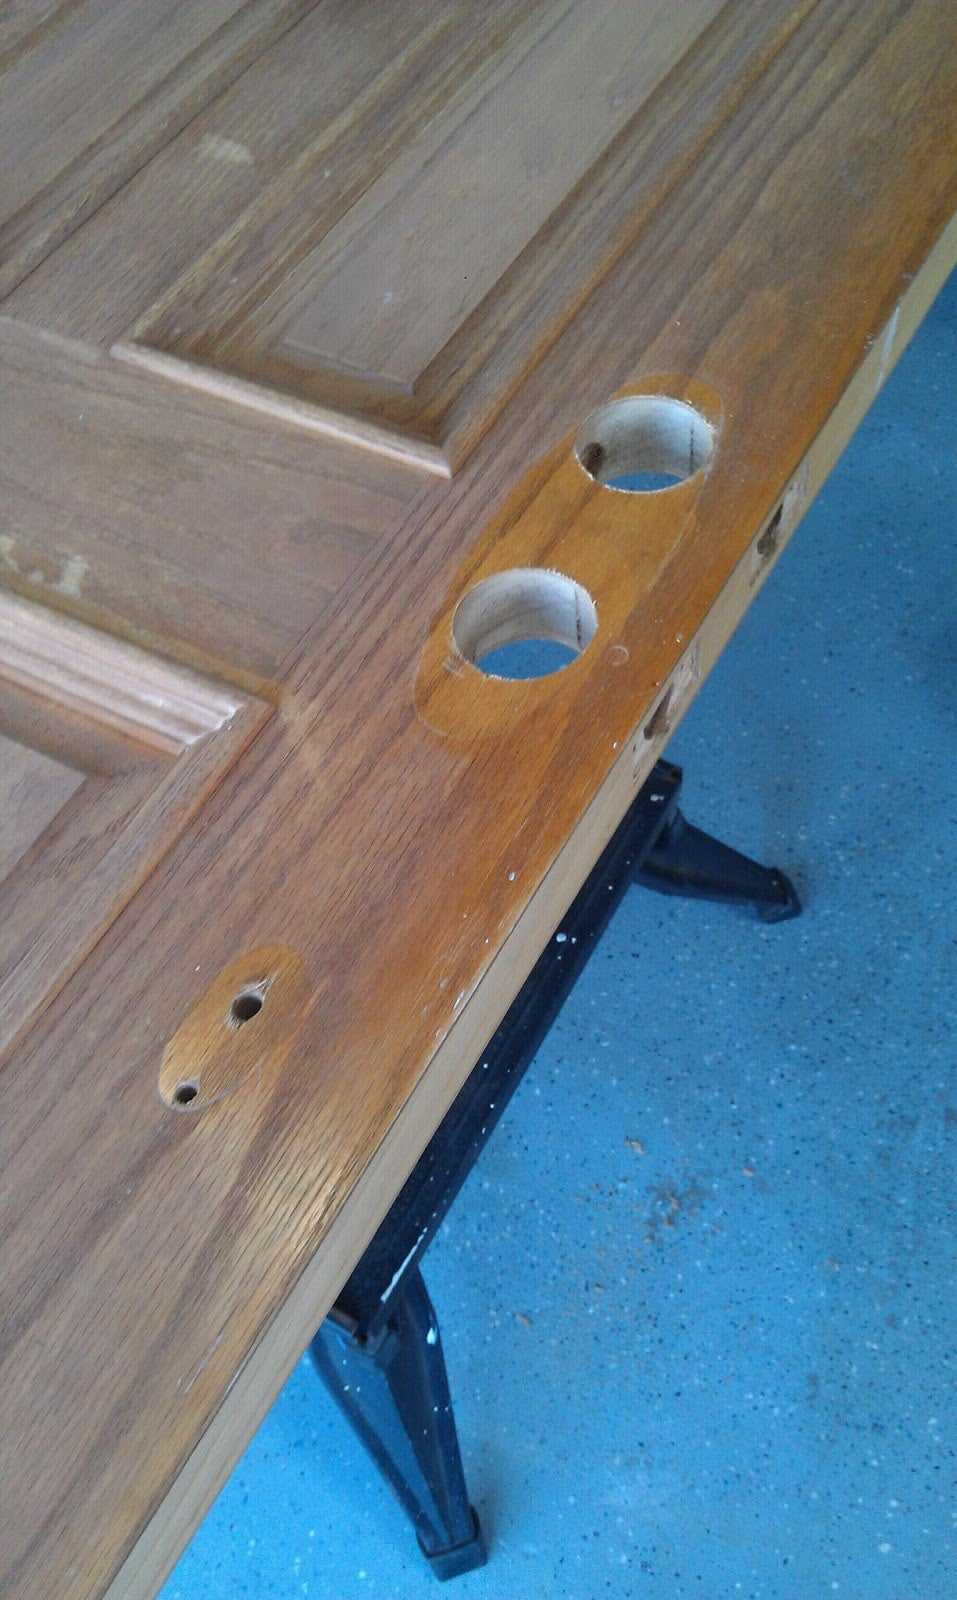
A drill hole in wood is a small, cylindrical opening that is made in a piece of wood using a drill. It is often created in order to insert screws, nails, or other fasteners into the wood. Drill holes are commonly used in woodworking projects to securely join pieces of wood together, create countersunk or counterbored holes, or to attach hardware such as hinges or handles.

Drill holes are typically made with a drill bit, which is a cutting tool that can be attached to a power drill or a hand drill. The drill bit rotates rapidly and bores through the wood, removing material and leaving a clean, round hole.
There are different types of drill bits that can be used to create different types of holes in wood. For example, a twist bit is a common type of drill bit that creates a simple, cylindrical hole. A spade bit, on the other hand, creates a larger, flat-bottomed hole.
Drill holes can vary in size, depth, and position depending on the specific woodworking project. They can be small, barely visible holes used for attaching small screws, or they can be larger holes used for inserting dowels or other joinery techniques.
Why Fill a Drill Hole in Wood?
When working with wood, it is common to drill holes for various reasons, such as installing screws, nails, or other hardware. These holes can leave unsightly gaps or expose the raw wood, which may not be visually appealing. Filling the drill holes in wood can help enhance the appearance and provide a seamless and polished finish to your woodworking projects.

In addition to aesthetics, filling drill holes in wood serves practical purposes as well. It can help prevent moisture, dust, and debris from entering the holes, which can lead to structural damage or deterioration over time. By filling the drill holes, you can protect the wood from potential issues such as rotting or weakening.
Another reason to fill drill holes in wood is to create a smooth and level surface. This is especially important if you plan to paint or stain the wood. Filling the holes can ensure that the paint or stain adheres uniformly and gives a professional-looking finish.
Additionally, filling drill holes in wood can provide added strength and stability to the overall structure. By filling the voids left by the drill holes, you can reinforce the wood and prevent potential weakness or warping.
Overall, filling drill holes in wood is an essential step in woodworking projects. It not only improves the appearance but also protects and enhances the longevity of the wood. Whether you are a DIY enthusiast or a professional woodworker, taking the time to fill drill holes is a worthwhile investment in your projects.
Step 1: Gather the Necessary Tools and Materials


Before you begin filling a drill hole in wood, it is important to gather all the necessary tools and materials. Having everything prepared beforehand will make the process smoother and more efficient. Here is a list of what you will need:
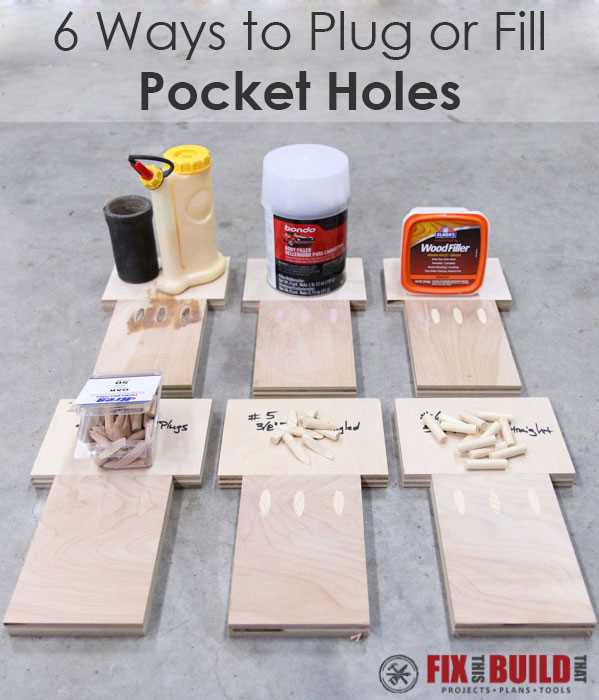
- Wood filler: Choose a wood filler that matches the color of your wood to achieve a seamless finish.
- Putty knife: A putty knife will be used to apply the wood filler to the drill hole and spread it evenly.
- Sandpaper: You will need sandpaper to smoothen the filled area and prepare it for finishing.
- Paint or stain: If you plan to paint or stain the wood after filling the drill hole, make sure you have the appropriate paint or stain on hand.
- Paintbrush or sponge: Depending on your chosen finish, you will need a paintbrush or sponge to apply it to the wood surface.
- Cloth or sponge: You will need a cloth or sponge to wipe away any excess wood filler and clean the area.
- Protective gear: To protect yourself, wear safety glasses and gloves while working with wood filler and other materials.
Once you have gathered all these tools and materials, you will be ready to proceed to the next step of filling the drill hole in wood.
Tools Needed
To fill a drill hole in wood, you will need the following tools:
- A putty knife
- Sandpaper (medium-grit and fine-grit)
- Wood filler
- A drill with a matching drill bit
- A vacuum cleaner or a dustpan and brush
- A clean cloth or sponge
- Paint or stain (optional)
Note: The specific tools you may need could vary depending on the size and depth of the drill hole and the type of wood you are working with. The tools listed above are commonly used for filling small to medium-sized drill holes in standard wood surfaces.
Materials Needed

- Wood filler or putty
- Putty knife or scraper
- Sandpaper (various grits: coarse, medium, fine)
- Paint or stain (matching the wood)
- Paintbrush or foam brush
- Clean cloth
- Protective gloves
- Dust mask
- Bucket or container for mixing filler
- Water (for water-based fillers)
Step 2: Prepare the Drill Hole and Surrounding Area
Before filling the drill hole in wood, it is important to properly prepare the hole and the surrounding area. This will ensure that the filling material adheres well and provides a seamless finish. Follow these steps to prepare the drill hole:
Clean the Hole
- Use a brush or a cloth to remove any dust, dirt, or debris from the drill hole. This will help the filling material to bond effectively.
- Ensure that the hole is free from any loose wood fibers or splinters. You can gently sand the edges of the hole with sandpaper to smooth out any rough areas.
Inspect the Hole
- Check the depth and size of the drill hole to ensure that it is appropriate for the filling material.
- Inspect the surrounding wood for any cracks, splits, or damage that may need to be addressed before filling the hole.
Prevent Stain or Paint Bleeding
- If you plan to stain or paint your wood after filling the hole, take precautions to prevent bleeding from the filling material.
- Apply tape or painter’s tape around the hole, leaving a clean border between the filling and the wood surface.
Clear Any Excess Wood Filler
- If you have previously filled the hole but the filler has shrunk or cracked, remove any excess or loose filler before proceeding with the filling process.
- You can use a putty knife or sandpaper to carefully remove the old filler without damaging the surrounding wood.
By following these steps to prepare the drill hole and surrounding area, you can ensure a better outcome when filling the hole in wood.

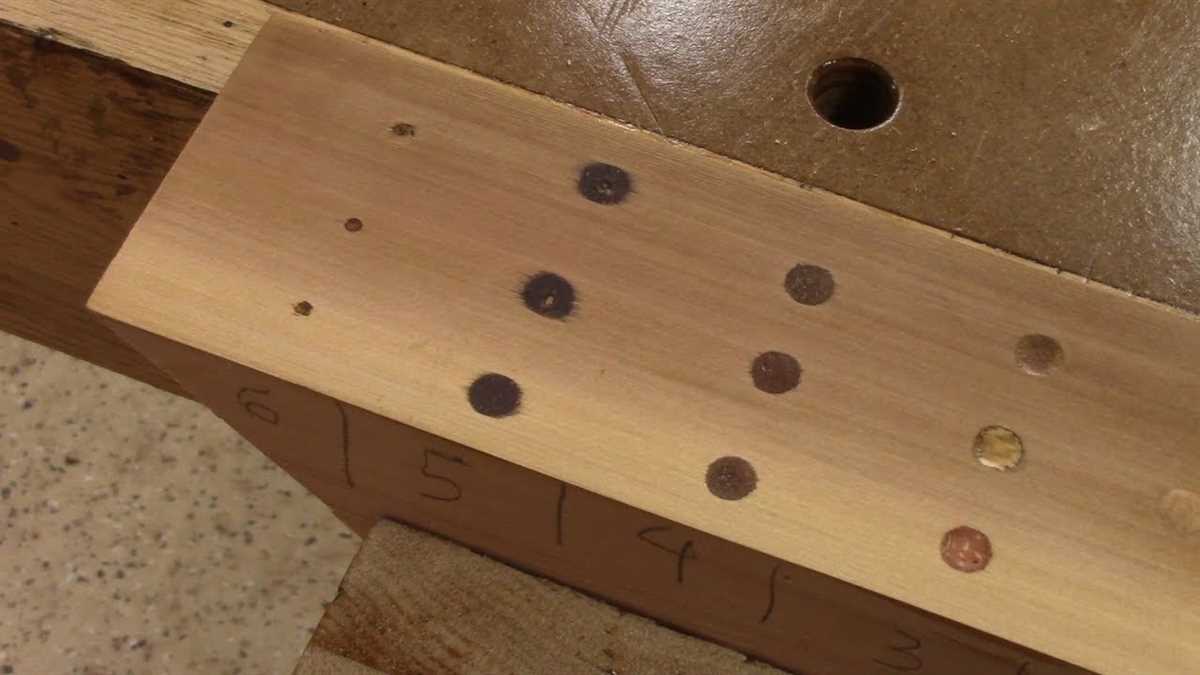
Inspect the Drill Hole
Before filling a drill hole in wood, it is important to inspect the hole to determine its size and condition. This inspection will help you determine the appropriate method for filling the hole and ensure a successful repair.
Step 1: Check the Size of the Hole
Use a ruler or tape measure to measure the diameter and depth of the drill hole. This will help you determine the amount of filler material needed.
Step 2: Assess the Condition of the Hole
Check the condition of the hole to determine if there are any cracks or splinters around the edges. If the hole is damaged or has rough edges, it may require additional preparation before filling.
Step 3: Clean the Hole
Thoroughly clean the hole using a brush or vacuum to remove any dust, debris, or loose wood particles. This will enable the filler material to adhere properly and create a strong bond.
Step 4: Sand the Surrounding Area
If there are any rough or uneven surfaces around the drill hole, use sandpaper to smooth them out. This will ensure a seamless and even finish after filling.
Step 5: Check for Wood Type
Identify the type of wood that has been drilled. Different types of wood may require different types of filler or techniques for filling the hole. Consult a woodworking guide or expert if necessary.
Step 6: Prepare the Filler Material
Based on the size and condition of the hole, choose an appropriate filler material such as wood putty, wood filler, or epoxy. Follow the manufacturer’s instructions to prepare the filler material for use.
Step 7: Test the Filler Material
Before filling the entire hole, it is a good idea to test the filler material on a small, inconspicuous area of the wood. This will allow you to ensure that the color, texture, and hardness of the filler match the surrounding wood.
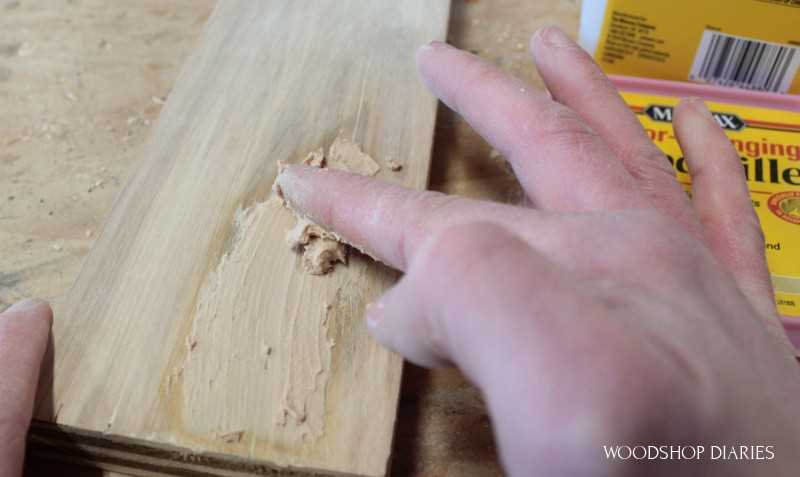
Step 8: Fill the Hole
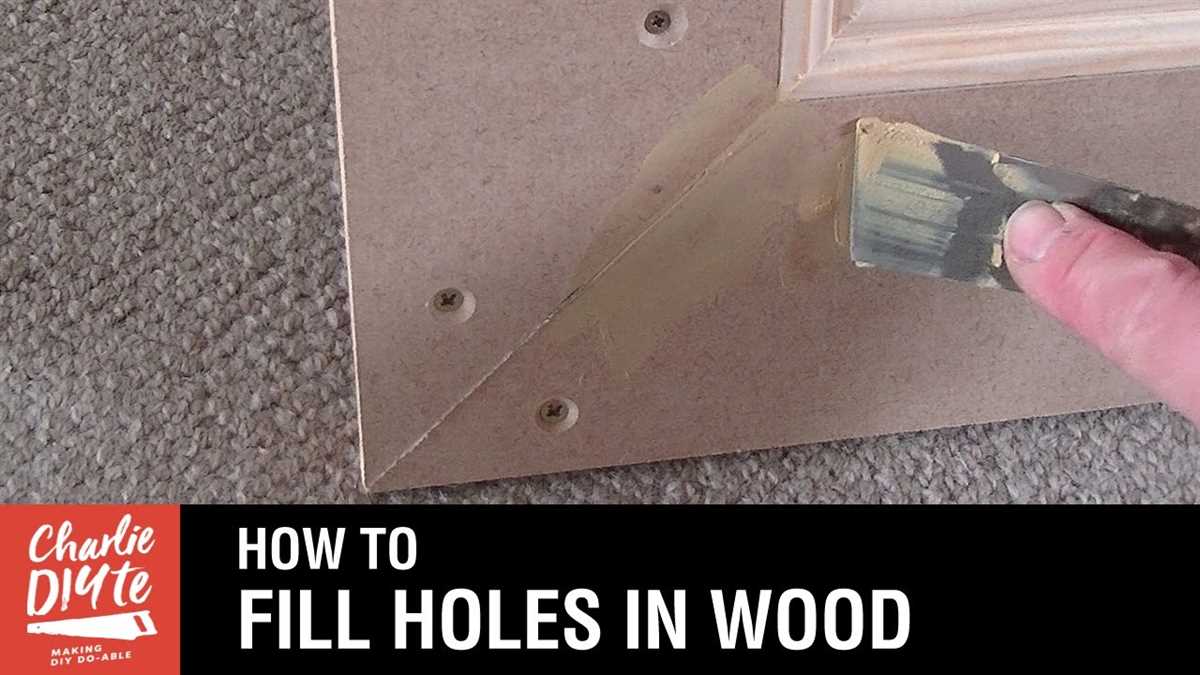
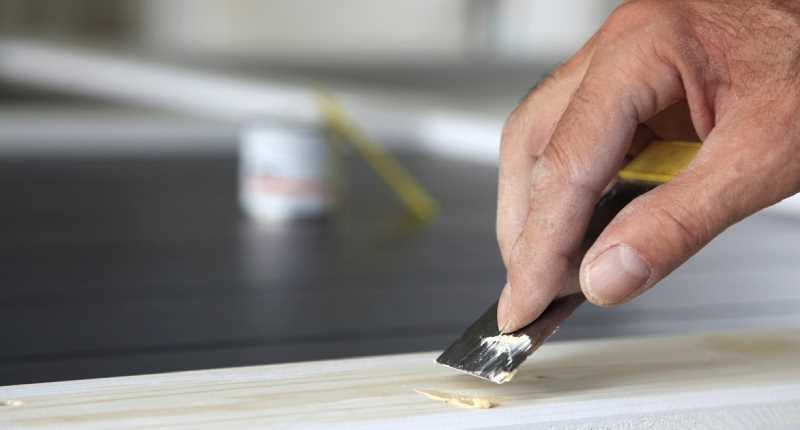
Using a putty knife or a similar tool, carefully fill the drill hole with the prepared filler material. Apply the filler in layers if necessary, allowing each layer to dry before adding the next.
Step 9: Sand and Finish
Once the filler has dried completely, use sandpaper to smooth out the surface and blend it seamlessly with the surrounding wood. Apply a finish or stain, if desired, to match the rest of the wood.
Step 10: Final Inspection
After the filling and finishing process is complete, inspect the repair to ensure that it is smooth, even, and matches the surrounding wood. Make any final touch-ups or adjustments as needed.
Clean the Drill Hole and Surrounding Area
Before filling a drill hole in wood, it is important to clean both the hole itself and the surrounding area to ensure a clean and smooth finish.
Here are the steps to clean the drill hole and surrounding area:
- Start by removing any debris or dust that may have accumulated in the hole. Use a small brush or a can of compressed air to blow out any loose particles. This will help the filler material adhere better to the wood.
- Next, examine the surrounding area for any splintered or damaged wood. Use a chisel or sandpaper to carefully remove any splinters or rough edges, creating a smooth surface around the hole.
- If there are any grease or oil stains around the hole, use a gentle detergent or wood cleaner to remove them. Wipe the area clean with a damp cloth and let it dry completely before proceeding.
- If the drill hole is located on a painted surface, gently sand the area using fine-grit sandpaper. This will create a slightly rougher surface for the filler to bond with. Be careful not to remove too much paint or damage the surrounding area.
By thoroughly cleaning the drill hole and the surrounding area, you will ensure a proper and long-lasting fill. This step is crucial for achieving a seamless result when filling drill holes in wood.
Step 3: Choose the Right Filler
Choosing the right filler for your drill hole is an important step in the process of filling it. The type of filler you choose will depend on the size of the hole and the type of wood you are working with.
1. Wood Filler: If you are working with a small drill hole in a wooden surface, wood filler can be a great option. Wood fillers come in different colors to match the color of the wood you are working with, and they are easy to apply. Simply squeeze the filler into the hole, smooth it out with a putty knife, and let it dry. Once it’s dry, you can sand it down to create a smooth, even surface.
2. Wood Putty: Wood putty is another option for filling small drill holes in wood. It differs from wood filler in that it is oil-based and typically has a clay-like consistency. To use wood putty, simply take a small amount and press it into the hole. Use a putty knife to smooth it out and remove any excess. Let it dry and sand it down if necessary.
3. Epoxy: For larger drill holes or holes in a wooden surface that will be under heavier use, epoxy can be a good choice. Epoxy is a two-part adhesive that when mixed together forms a strong, durable filler. To use epoxy, mix the two parts together according to the manufacturer’s instructions and then apply it to the hole using a putty knife. Smooth it out and let it cure according to the instructions.
4. Wood Dowels: If you have a larger drill hole and prefer a more traditional approach, you can use wood dowels to fill the hole. Measure the diameter of the hole and then select a dowel that is slightly larger. Apply wood glue to the dowel and insert it into the hole, tapping it in gently with a hammer. Allow the glue to dry and then cut off any excess dowel using a saw. Sand it down if necessary to create a smooth surface.
Consider the Wood Type
When filling a drill hole in wood, it is important to consider the type of wood you are working with. Different types of wood have different characteristics that may affect how you fill the hole.
- Hardwood: Hardwoods such as oak, maple, and walnut tend to be more dense and durable. They are less likely to need extensive filling and can usually be filled with standard wood filler or putty.
- Softwood: Softwoods like pine, fir, and cedar are typically less dense and more prone to damage. They may require more extensive filling and may benefit from using wood filler that has structural or adhesive properties.
- Engineered wood: Engineered wood, such as plywood or particle board, is made up of multiple layers of wood fibers or particles. These materials may require special considerations when filling drill holes, as they may not hold traditional wood fillers as well.
It is important to choose a wood filler or putty that is compatible with the type of wood you are working with. This will ensure a proper bond and a long-lasting repair. If you are unsure about the type of wood you are working with, consult a professional or do some research to determine the best filler for your project.
FAQ:
What materials do I need to fill a drill hole in wood?
To fill a drill hole in wood, you will need wood filler, a putty knife, sandpaper, and paint or stain to match the color of the wood.
Can I use anything else instead of wood filler?
While wood filler is the most commonly used material for filling drill holes in wood, you can also use epoxy, wood glue mixed with sawdust, or even toothpaste as a temporary solution.
What is the process of filling a drill hole in wood?
The process of filling a drill hole in wood involves cleaning the hole, applying the wood filler with a putty knife, allowing it to dry, sanding the surface, and finally, applying paint or stain to match the color of the wood.
How long does it take for the wood filler to dry?
The drying time of wood filler can vary depending on the brand and type of filler used. Generally, it takes about 24 hours for the wood filler to fully dry and harden.
Do I need to sand the surface after filling the drill hole?
Yes, sanding the surface after filling the drill hole is an important step to ensure a smooth and seamless finish. It helps to blend the filled area with the surrounding wood and provides a uniform surface for painting or staining.
Can I paint or stain over the filled drill hole?
Yes, after the wood filler has dried and the surface has been sanded, you can paint or stain over the filled drill hole. Make sure to choose a paint or stain that matches the color of the wood to achieve a seamless and professional look.
Video:


Meet Harrison Clayton, a distinguished author and home remodeling enthusiast whose expertise in the realm of renovation is second to none. With a passion for transforming houses into inviting homes, Harrison's writing at https://thehuts-eastbourne.co.uk/ brings a breath of fresh inspiration to the world of home improvement. Whether you're looking to revamp a small corner of your abode or embark on a complete home transformation, Harrison's articles provide the essential expertise and creative flair to turn your visions into reality. So, dive into the captivating world of home remodeling with Harrison Clayton and unlock the full potential of your living space with every word he writes.


