How to effectively use a countersink drill bit

A countersink drill bit is a useful tool when it comes to woodworking and other projects that involve drilling holes in different materials. This tool is specifically designed to create a conical recess in the surface of the material, allowing the head of a screw to fit flush with the surface. By using a countersink drill bit, you can ensure clean and professional-looking results in your projects.
When using a countersink drill bit, it is important to follow a few key steps to ensure that it is used effectively. First, you should choose the appropriate size of countersink drill bit for the screw you will be using. The size of the countersink should match the size of the screw head, so that it fits perfectly and creates a flush finish.
Next, you should secure the material that you will be drilling into. This can be done by clamping it down or using a vice to hold it in place. This will provide stability and prevent the material from moving while you are drilling.
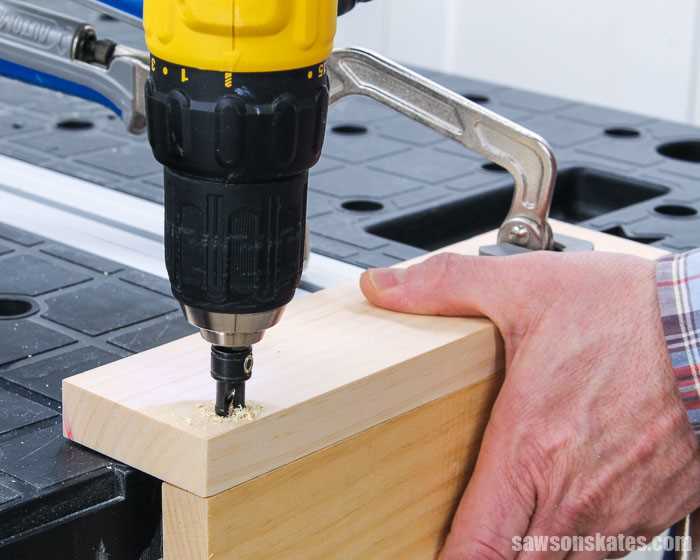
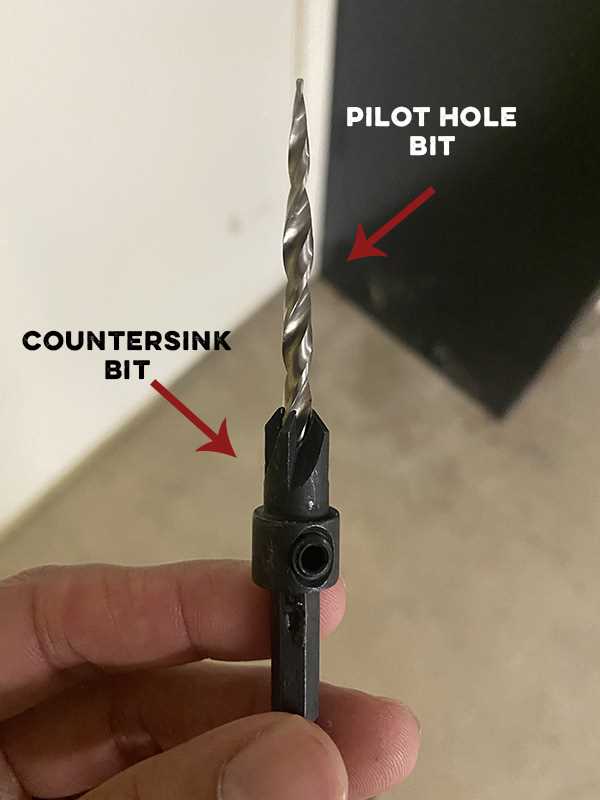
Once the material is secured, you can begin drilling with the countersink drill bit. Start by making a pilot hole using a regular drill bit. Then, switch to the countersink bit and position it over the pilot hole. Apply gentle pressure and slowly drill into the material, being careful not to drill too deep.
Finally, remove the countersink bit from the material and insert the screw into the hole. The screw should fit perfectly, with the head sitting flush with the surface. If the screw does not fit properly, you may need to adjust the size of the countersink hole or choose a different size of screw.

Using a countersink drill bit can greatly improve the aesthetic appeal of your woodworking projects and ensure that screws are securely fastened. By following these steps, you can effectively use a countersink drill bit and achieve professional results in your projects.
Choosing the Right Countersink Drill Bit
When it comes to effectively using a countersink drill bit, one of the most important factors is selecting the right bit for the job. Here are some considerations to keep in mind when choosing a countersink drill bit:
Material
The first thing to consider is the material you will be working with. Different materials have different hardness levels, and some materials may require specialized bits. For example, if you are working with wood, a regular high-speed steel countersink bit should work just fine. However, if you need to countersink holes in metal, you will need a bit that is specifically designed for metalworking.
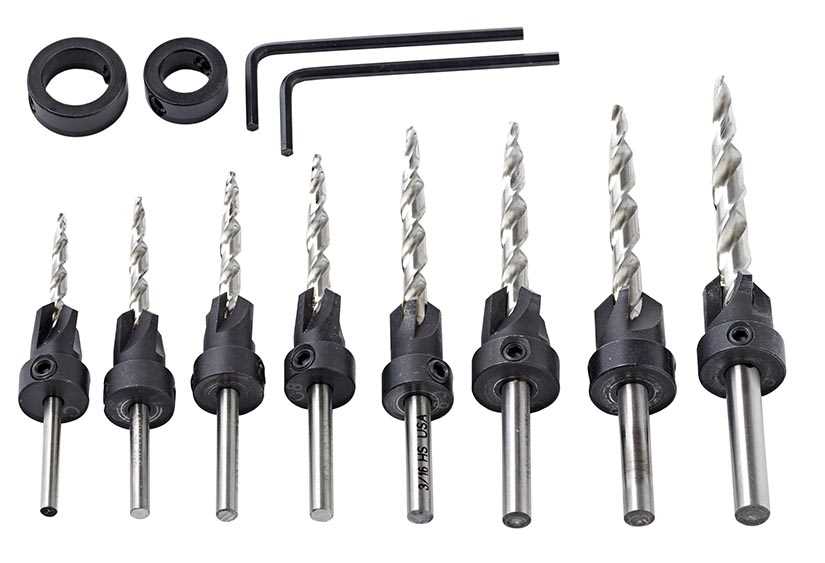
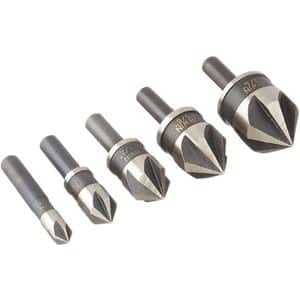
Bit Set or Individual Bits
You also have the option of purchasing a set of countersink drill bits or buying individual bits as needed. If you frequently work on projects that require countersinking, investing in a set may be a good idea as it will give you a range of sizes to choose from. However, if you only occasionally need to countersink, buying individual bits in the sizes you need may be more cost-effective.

Angle
The angle of the countersink drill bit is another important factor to consider. The most common angle for countersinking is 82 degrees, but you can also find bits with angles ranging from 60 to 90 degrees. The choice of angle depends on the specific application and the type of material being countersunk. Experimenting with different angles can help you achieve the desired results.
Size
The size of the countersink drill bit is determined by the size of the screw or bolt that will be used. It is important to choose a bit that matches the size of the screw or bolt head to ensure a proper fit. Countersink drill bit sizes are typically indicated by the size of the screw they are meant to be used with, such as #6 or #8. Make sure to consult a size chart or the manufacturer’s recommendations to find the right size for your needs.
Quality
Lastly, it is important to consider the quality of the countersink drill bit. Higher quality bits tend to be more durable and provide cleaner cuts. Cheap or low-quality bits may wear out quickly, leading to poor results and the need for frequent replacements. Investing in a good quality countersink drill bit can save you time and money in the long run.
By considering these factors and making the right choices, you can ensure that you have the appropriate countersink drill bit for your specific project, resulting in professional-looking, clean and precise countersinks.

Understanding Countersink Drill Bit Materials
Countersink drill bits are important tools used in woodworking and metalworking to create a conical hole to accommodate the head of a screw or bolt. These tools are available in various materials, each with its own set of advantages and disadvantages. Understanding the different materials used for countersink drill bits is essential in choosing the right tool for your needs.
High-Speed Steel (HSS)
High-speed steel (HSS) is one of the most commonly used materials for countersink drill bits. It is known for its durability and heat resistance, making it ideal for drilling into metal and other hard materials. HSS countersink drill bits can withstand high drilling speeds and maintain their cutting edges for a longer time.
Carbide
Carbide countersink drill bits are made from a mixture of tungsten carbide particles and a metal binder. They are extremely hard and can withstand high drilling speeds. Carbide bits are ideal for drilling into abrasive materials such as composites, laminates, and metal alloys. However, they are more brittle compared to HSS and may chip or break if not used properly.
Cobalt
Cobalt countersink drill bits are made from a cobalt alloy mixed with high-speed steel. They are known for their heat resistance and can endure high drilling speeds. Cobalt bits are commonly used for drilling into stainless steel and other tough materials. However, they are more expensive than HSS bits and may not be necessary for general drilling tasks.

Titanium
Titanium countersink drill bits are coated with a thin layer of titanium nitride. This coating increases the hardness and heat resistance of the bit, making it last longer than uncoated bits. Titanium bits are suitable for drilling into wood, plastic, and metal, but they may wear out quickly when used on abrasive materials. They are a good choice for general drilling tasks and offer a good balance between performance and cost.
Conclusion
Choosing the right material for your countersink drill bit depends on the type of materials you will be working with and the specific drilling tasks you need to perform. High-speed steel (HSS) is a versatile option suitable for most applications, while carbide, cobalt, and titanium offer specific advantages for drilling into harder or more abrasive materials. Consider the material properties and your specific needs to make an informed decision when selecting a countersink drill bit.
Properly Preparing the Workpiece
Before using a countersink drill bit, it is important to properly prepare the workpiece to ensure accurate and clean results. Follow these steps to effectively prepare your workpiece:
1. Determine the Material
Identify the material of the workpiece, such as wood, metal, or plastic. Different materials may require different techniques and tools for preparation.

2. Mark the Hole Locations
Use a pencil or marker to mark the locations where you want to create the countersink holes. Accurate marking will ensure precise placement of the holes.
3. Secure the Workpiece
Secure the workpiece firmly using clamps or a vice. This will prevent any movement during the drilling process and ensure stable and accurate results.
4. Measure and Mark the Depth
Measure the desired depth for the countersink hole using a ruler or depth gauge. Mark this depth on the drill bit using a piece of tape or a marker. This will act as a visual guide to help you achieve the correct depth.
5. Clear the Work Area
Clear the work area of any debris or obstructions that could interfere with the drilling process. This will ensure a clean and smooth operation.

6. Wear Safety Equipment
Before starting the drilling process, put on safety goggles and other appropriate safety equipment to protect yourself from any flying debris.
7. Select the Proper Drill and Speed
Choose the appropriate drill bit size for the countersink hole and ensure that it is securely fastened in the drill chuck. Adjust the speed of the drill based on the material being drilled to avoid overheating or causing damage.
8. Practice on a Scrap Piece
If you are unfamiliar with using a countersink drill bit, it is recommended to practice on a scrap piece of the same material before working on the actual workpiece. This will give you a chance to familiarize yourself with the drill and its operation.
9. Begin Drilling
Align the drill bit with the marked hole location and apply gentle pressure to start drilling. Keep the drill perpendicular to the workpiece to ensure a straight and accurate hole.
10. Remove the Burrs
After drilling the countersink hole, use a burr removal tool or sandpaper to remove any burrs or rough edges around the hole. This will give your workpiece a clean and finished look.

11. Clean Up
Finally, clean the work area, remove any debris, and store your tools properly. Proper clean up and maintenance will ensure that your countersink drill bit remains in good condition and ready for future projects.
By following these steps to properly prepare the workpiece, you can achieve accurate and clean results when using a countersink drill bit. Take your time, work carefully, and always prioritize safety.
Setting Up the Drill and Workpiece
Before using a countersink drill bit, it is important to properly set up both the drill and the workpiece to ensure accurate and effective results. Follow these steps to ensure a successful drilling process:
1. Choose the Right Drill Bit Size
Start by selecting the appropriate size of countersink drill bit for your project. Consider the size of the screw or fastener that will be used and choose a drill bit that matches the screw size.
2. Secure the Workpiece
Place the workpiece securely in a vice or clamp it down to a stable surface to prevent it from moving during the drilling process. This will help to maintain control and accuracy while drilling.
3. Mark the Drilling Points
Use a pencil or marker to mark the desired drill points on the workpiece. This will serve as a guide for positioning the drill bit and ensure consistent hole placement.
4. Set the Depth of the Countersink
Adjust the depth stop on the drill to set the desired depth for the countersink. This will determine how deep the screw or fastener will sit in the countersunk hole.
5. Secure the Drill Bit in the Chuck
Insert the countersink drill bit into the drill chuck and tighten it securely. Ensure that the drill bit is centered and straight in the chuck to prevent wobbling or misalignment during drilling.
6. Adjust the Drill Speed
Refer to the drill’s user manual to determine the appropriate speed for your specific countersink drill bit. Adjust the drill speed accordingly to optimize drilling performance and prevent damage to the workpiece.
Once you have completed these steps, you are ready to start drilling with your countersink drill bit. Make sure to wear appropriate safety gear, such as safety glasses, and follow proper drilling techniques to achieve the best results.
Using the Countersink Drill Bit Correctly
A countersink drill bit is a useful tool for creating holes with a tapered opening. It is commonly used in woodworking, metalworking, and DIY projects. By using a countersink drill bit correctly, you can create clean and professional-looking holes that are ready for fasteners or screws.
Choose the Right Drill Bit Size
Before you begin, it is important to choose the right size of the countersink drill bit for your project. The size of the drill bit should match the size of the screw or fastener you will be using. This ensures that the screw head will fit neatly into the countersunk hole.
Secure the Workpiece
Next, secure the workpiece firmly in place. This can be done by clamping it down or using a vice. Ensuring that the workpiece is stable will prevent any movement or wobbling during the drilling process, which can lead to inaccurate holes.
Mark the Hole Locations
Using a pencil or a marking tool, mark the locations where you want to create the countersunk holes. This will help you stay organized and ensure that the holes are evenly spaced and aligned.
Drill the Countersink Holes
Attach the countersink drill bit to your power drill or drill press. Start by applying light pressure on the drill, and gradually increase the pressure as you drill into the workpiece. Make sure to keep the drill bit perpendicular to the workpiece to create straight and uniform holes.
Deburr the Holes
After drilling the countersink holes, you may notice rough edges or burrs around the hole opening. To remove these imperfections, use a deburring tool or sandpaper to smooth the edges. This will ensure a clean and professional finish.
Clean Up
Finally, clean up any wood shavings or metal shavings that may have accumulated during the drilling process. Use a brush or a vacuum cleaner to remove any debris from the work area.
Conclusion
By following these steps and using a countersink drill bit correctly, you can achieve precise and professional-looking holes in your woodworking or metalworking projects. Remember to always wear safety goggles and work in a well-ventilated area when using power tools.
Applying the Right Amount of Pressure
When using a countersink drill bit, it is crucial to apply the right amount of pressure to achieve the desired results. Improper pressure can lead to inefficient drilling, damaged materials, or even injury. Here are some tips on how to effectively apply pressure when using a countersink drill bit:
1. Start with a Firm Grip
Before you begin drilling, make sure you have a firm grip on the drill and the workpiece. This will give you better control and help you apply consistent pressure throughout the process. Avoid holding the drill too tightly, as it may lead to fatigue or strain on your hand.
2. Let the Bit Do the Work
It is essential to remember that the drill bit should do the majority of the work. You should guide and direct the drill, but avoid pushing too hard or forcing the bit into the material. Apply gentle, steady pressure and let the sharp cutting edges of the drill bit do their job.
3. Use Proper Body Position
Body position plays a significant role in applying the right amount of pressure when using a countersink drill bit. Stand in a stable position with your feet shoulder-width apart. Place your non-dominant hand on the workpiece to hold it steady while using your dominant hand to control the drill. Maintain a balanced posture to ensure better control and avoid accidents.
4. Be Mindful of Material Type
The amount of pressure required may vary depending on the type of material you are drilling. For softer materials like wood or plastic, you can apply slightly more pressure. However, when working with hard metals or brittle materials, such as glass or ceramic, it is crucial to use a lighter touch to prevent cracks or breakage.
5. Take Breaks When Needed
Drilling can be physically demanding, and applying constant pressure for an extended period can lead to fatigue. If you feel tired or notice a decline in the quality of your drilling, take short breaks to rest and rejuvenate. This will help you maintain better control and achieve more accurate results.
By following these tips and applying the right amount of pressure, you can effectively use a countersink drill bit and achieve professional-looking results. Remember to prioritize safety and take your time to ensure the best outcome.
Preventing Common Mistakes
- Not selecting the right countersink drill bit: One of the most common mistakes is using the wrong type or size of countersink drill bit. It is important to choose the right type of bit for the material you are working with, as well as the desired size and angle of the countersink.
- Using too much force: Another mistake is applying too much force while using a countersink drill bit. This can lead to the bit becoming dull or breaking, as well as damaging the material. It is important to apply gentle, steady pressure and let the bit do the work.
- Not properly securing the workpiece: Failing to securely clamp or hold down the workpiece can result in it moving or shifting during the drilling process. This can lead to uneven or inaccurate countersink holes. It is important to properly secure the workpiece to ensure accuracy and prevent accidents.
- Not checking for depth: For countersink holes that require a specific depth, it is important to check and measure the depth throughout the drilling process. Failing to do so can result in holes that are too shallow or too deep, affecting the overall appearance and functionality of the countersink.
- Not using a pilot hole: In some cases, it is recommended to use a pilot hole before drilling the countersink hole. This helps to guide the countersink bit and prevent any wandering or slipping. Not using a pilot hole can result in inaccurate or uneven holes.
- Not cleaning the bit: After each use, it is important to clean the countersink drill bit to remove any debris or buildup. Failing to clean the bit can result in decreased performance and potential damage to the bit over time.
- Not using proper safety precautions: When using a countersink drill bit, it is important to wear safety goggles to protect your eyes from flying debris. Additionally, it is recommended to wear gloves to protect your hands and have a clear work area free of clutter.
Finishing and Cleaning Up
Once you have successfully countersunk a hole using a countersink drill bit, it is important to properly finish and clean up the workpiece. This will ensure a professional and polished look to your project.
Sanding
After countersinking, you may notice rough edges or imperfections on the surface of the hole. To smooth out these areas, use a fine-grit sandpaper and gently sand the surface. Be careful not to apply too much pressure, as this can remove too much material and weaken the workpiece.
Removing Dust
Countersinking can create a lot of dust, so it is important to remove it before moving on to the next step. Use a clean cloth or a brush to carefully wipe away any remaining dust. This will help prevent it from interfering with your project and ensure a clean finish.
Applying Finish
Depending on the material of your workpiece, you may want to consider applying a finish to enhance its appearance and protect it from moisture or other damage. This could include painting, staining, or applying a clear coat. Follow the manufacturer’s instructions for the specific finish you choose to achieve the best results.
Final Inspection
Before finishing up, take a final look at your workpiece to ensure that the countersink hole looks clean and smooth. If you notice any remaining imperfections, you can make additional sanding or touch-ups as needed.
By taking the time to properly finish and clean up after using a countersink drill bit, you can achieve professional and polished results. This attention to detail will make your project stand out and ensure its longevity.
FAQ:
What is a countersink drill bit and what is it used for?
A countersink drill bit is a tool that is used to make a conical hole in a material, typically metal or wood. The hole created by a countersink drill bit allows the head of a screw to sit flush with or below the surface of the material, providing a smooth and finished appearance.
What are the different types of countersink drill bits available?
There are several types of countersink drill bits available, including single-flute, multi-flute, and adjustable countersink drill bits. Single-flute countersink drill bits are best for softer materials, while multi-flute bits are better for harder materials. Adjustable countersink drill bits allow you to change the size of the hole to match different screw sizes.
How do I choose the right countersink drill bit for my project?
To choose the right countersink drill bit for your project, consider the material you are working with, the size of the screw you will be using, and the desired finish of the surface. If you are working with a softer material, such as wood, a single-flute countersink drill bit may be sufficient. For harder materials, like metal, a multi-flute or adjustable countersink drill bit may be necessary.
What are some tips for effectively using a countersink drill bit?
When using a countersink drill bit, it’s important to start with a pilot hole to guide the bit. This can prevent the bit from wandering and ensure a clean and precise hole. Additionally, it’s important to use the appropriate speed and pressure when drilling to avoid damaging the material or the bit. After drilling the hole, make sure to remove any debris to ensure the screw will sit flush with the surface.
Can a countersink drill bit be used with a power drill?
Yes, a countersink drill bit can be used with a power drill. However, it’s important to use the appropriate speed and pressure to prevent damaging the material or the bit. It’s also important to use a drill with a variable speed setting, as this will allow you to adjust the speed to match the material you are working with.
Video:

Best Beginner Scroll Saw

Meet Harrison Clayton, a distinguished author and home remodeling enthusiast whose expertise in the realm of renovation is second to none. With a passion for transforming houses into inviting homes, Harrison's writing at https://thehuts-eastbourne.co.uk/ brings a breath of fresh inspiration to the world of home improvement. Whether you're looking to revamp a small corner of your abode or embark on a complete home transformation, Harrison's articles provide the essential expertise and creative flair to turn your visions into reality. So, dive into the captivating world of home remodeling with Harrison Clayton and unlock the full potential of your living space with every word he writes.


