How to Drill Straight Holes Without a Drill Press

Drilling straight holes is an essential skill for many DIY projects and woodworking tasks. While a drill press is the ideal tool for achieving precise and straight holes, not everyone has access to one. However, with the right techniques and tools, it is still possible to drill straight holes without a drill press.
Firstly, it’s important to choose the right drill bit for the job. For drilling straight holes, a brad point or auger bit is recommended. These types of drill bits have a sharp tip and a center spur that helps to guide the bit into the wood. They are designed to create clean and accurate holes, making them ideal for achieving straight holes.
Next, it is crucial to secure the piece of wood you are drilling. To ensure stability and prevent the wood from moving or spinning as you drill, use clamps to secure it to a workbench or tabletop. This will provide a solid and steady surface for drilling, allowing for greater control and accuracy.
When drilling, it is important to use a slow and steady pace. Applying too much pressure or drilling too quickly can cause the bit to wander and result in an uneven hole. Instead, apply gentle and constant pressure, allowing the drill bit to do the work. Additionally, it can be helpful to mark the desired drilling depth on the drill bit with tape to ensure consistency.
Finally, taking breaks while drilling can help prevent overheating and ensure the drill bit stays sharp. Heat can cause the wood to expand, potentially resulting in a distorted hole. Therefore, it is recommended to periodically remove the drill bit from the hole, clean off any wood debris, and allow it to cool down before continuing.

By following these techniques and using the right tools, it is possible to achieve straight holes without a drill press. With practice and patience, you can master the art of drilling straight holes and improve the quality and accuracy of your DIY projects.
Choosing the Right Drill Bit
When it comes to drilling straight holes without a drill press, one of the most important factors is choosing the right drill bit. A drill bit is the cutting tool attached to the drill, and there are several types available for different materials and drilling applications.
1. Twist Drill Bits
Twist drill bits are the most common and versatile type of drill bit. They have a spiral groove that helps to remove materials as they cut into it. They can be used for drilling into wood, metal, and plastic.
2. Brad-Point Drill Bits
Brad-point drill bits are designed specifically for drilling into wood. They have a sharp point at the tip, which helps to position the bit accurately and prevents it from wandering. These bits are great for drilling clean and accurate holes in wood.
3. Forstner Drill Bits
Forstner drill bits are also used for drilling into wood, but they are specifically designed for drilling large and flat-bottomed holes. They have a center point and flat bottom, which makes them ideal for creating holes for dowels or hinge cups.

4. Masonry Drill Bits
Masonry drill bits are used for drilling into concrete, brick, and other masonry materials. Unlike twist drill bits, they have a carbide tip that helps them to cut through hard materials. It is important to use a hammer drill or a drill with a hammer function when using masonry drill bits.
5. Spade Drill Bits
Spade drill bits, also known as paddle bits, are used for drilling large holes in wood. They have a flat, wide blade with a center point that helps to keep the bit on track. These bits are commonly used for drilling holes for electrical wires and pipes.
6. Step Drill Bits
Step drill bits are designed for drilling holes of different sizes. They have a cone-shaped tip with multiple stepped levels. These bits are commonly used in metalworking, plumbing, and electrical applications.
7. Countersink Drill Bits
Countersink drill bits are used to create tapered holes that can accommodate screws or bolts. They have a cylindrical shape with a cone-shaped tip that allows the screw head to sit flush with the surface. These bits are commonly used in woodworking and metalworking.
8. Hole Saw Bits
Hole saw bits are used for cutting large holes in wood, plastic, and thin metal sheets. They have a cylindrical blade with teeth that can remove a plug of material in one go. These bits are commonly used in plumbing, carpentry, and electrical work.

When choosing a drill bit, consider the material you are drilling into and the size of the hole you need. It is also important to select a bit that fits your drill and has a shank size that matches the chuck.
Marking the Drilling Spot

Before you start drilling, it’s important to accurately mark the spot where you want to drill. This will ensure that your holes are straight and in the right position.
Here are some tips for marking the drilling spot:
- Measure and mark the exact position where you want to drill using a pencil or marker. Use a tape measure or ruler to ensure accurate measurements.
- If you’re drilling through a material that you don’t want to mark directly, such as wood or metal, use a piece of masking tape. Place the tape on the spot you want to drill and mark it on the tape instead.
- If you’re drilling into a wall, use a stud finder to locate the studs. Mark the drilling spot on the stud so you know where to drill. This will help prevent any damage to pipes or electrical wiring hidden behind the wall.
- For more precise drilling, you can create a drilling template. This can be done by creating a guide hole in a piece of scrap wood or plastic and using it as a template to mark the drilling spot on your workpiece.
Remember, taking the time to accurately mark the drilling spot will save you from frustration and potential mistakes later on. So make sure to double-check your measurements and markings before drilling.

Preparing the Surface
Before you start drilling, it is important to prepare the surface to ensure a clean and accurate hole. Here are some steps you can follow:
1. Clean the surface
Make sure the surface where you will be drilling is clean and free from any dust, debris, or other materials that might interfere with the drilling process. Use a brush or a vacuum cleaner to remove any loose particles.
2. Mark the drilling spot
Use a pencil or a marker to mark the exact spot where you want to drill. This will serve as a guide to ensure that you drill in the right place. Double-check the measurements and make sure the marking is clear and visible.
3. Secure the workpiece
If you are drilling into a workpiece that is not already secured, make sure to clamp it down or place it in a vise to prevent it from moving during the drilling process. This will help maintain stability and ensure straight holes.

4. Use a center punch
To create a small indentation in the center of the drilling spot, use a center punch. This will help prevent the drill bit from wandering and ensure that it starts drilling in the right place.
5. Apply masking tape
If you are working on a delicate surface or want to minimize splintering, apply a piece of masking tape over the drilling spot. This will help protect the surface and provide a cleaner hole.
6. Double-check your setup
Before you start drilling, double-check that everything is properly set up. Ensure that the drill is securely fitted with the appropriate drill bit and that the depth stop is adjusted correctly. This will help ensure accuracy and prevent any mishaps.
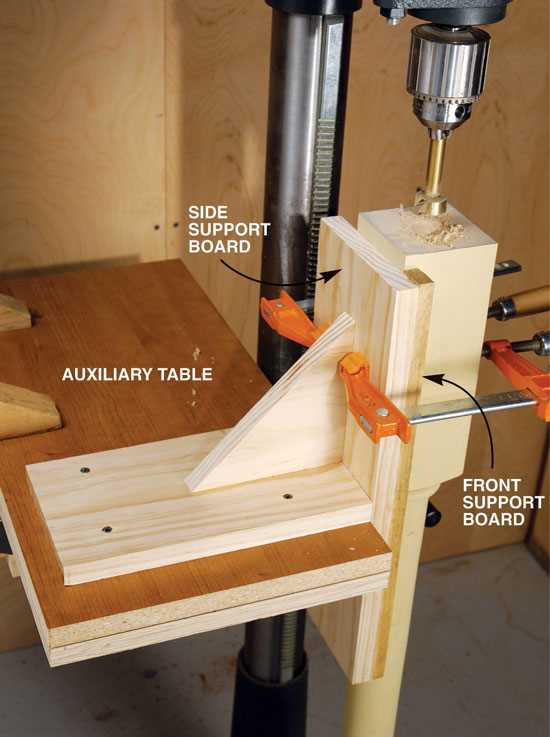
7. Gather necessary accessories
If you are using any accessories or guides to help you drill straight holes, make sure they are properly set up and ready to use. This might include a drill guide, a jig, or a homemade drilling aid.
8. Wear protective gear
Always wear appropriate protective gear, such as safety goggles and earplugs, when drilling. This will protect your eyes and ears from any potential hazards, such as flying debris or loud noise.
By following these steps to prepare the surface, you can ensure that you are ready to drill straight holes without a drill press. Taking the time to properly set up and prepare will help increase your accuracy and produce clean, professional results.
Positioning the Drill
When drilling straight holes without a drill press, the positioning of the drill is crucial to ensure accuracy. Here are some tips to help you position the drill correctly:
1. Mark the drilling location
Before you start drilling, use a pencil or marker to mark the exact spot where you want to drill. This will act as a guide and help you maintain the desired position throughout the drilling process.
2. Use a center punch
For better accuracy and to prevent the drill bit from slipping, use a center punch to create a small indentation at the center of the marked spot. This will provide a starting point for the drill bit and help keep it aligned.
3. Secure the workpiece
Before drilling, make sure to secure the workpiece firmly in place. You can use clamps or a vise to hold the material securely, ensuring it doesn’t move or shift during drilling.
4. Align the drill bit
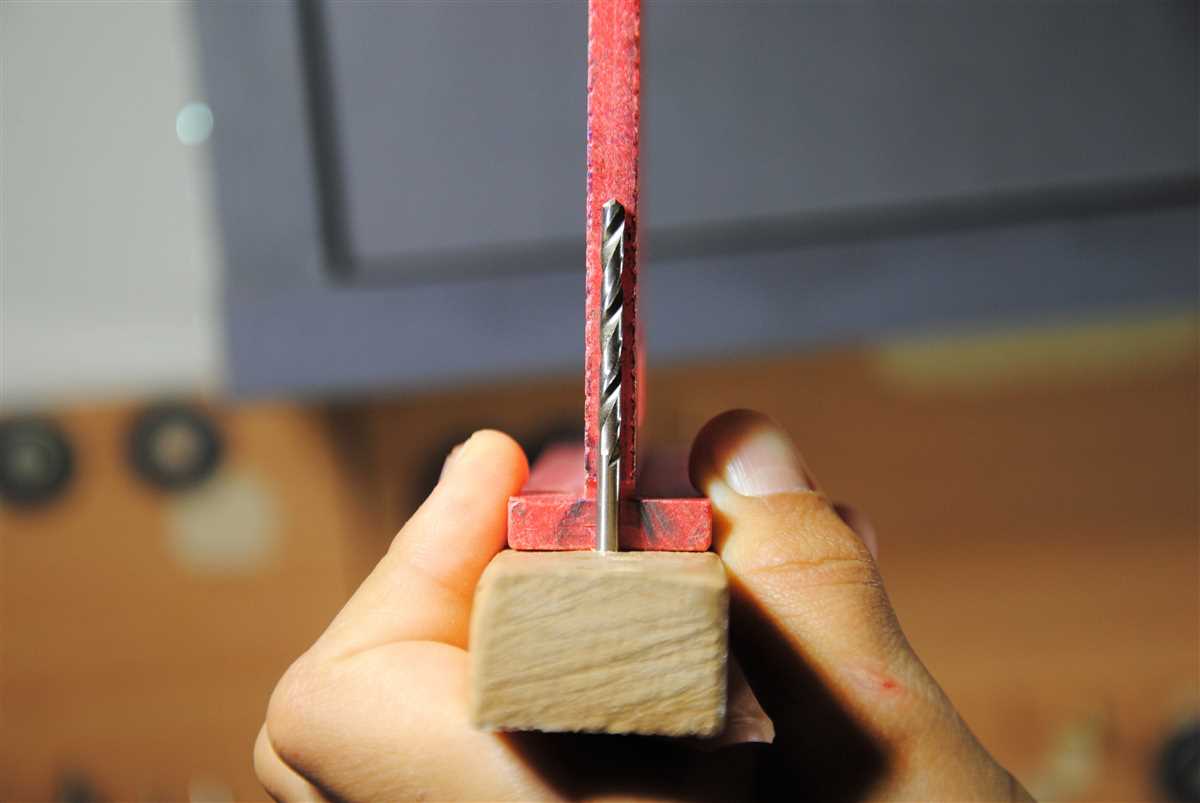
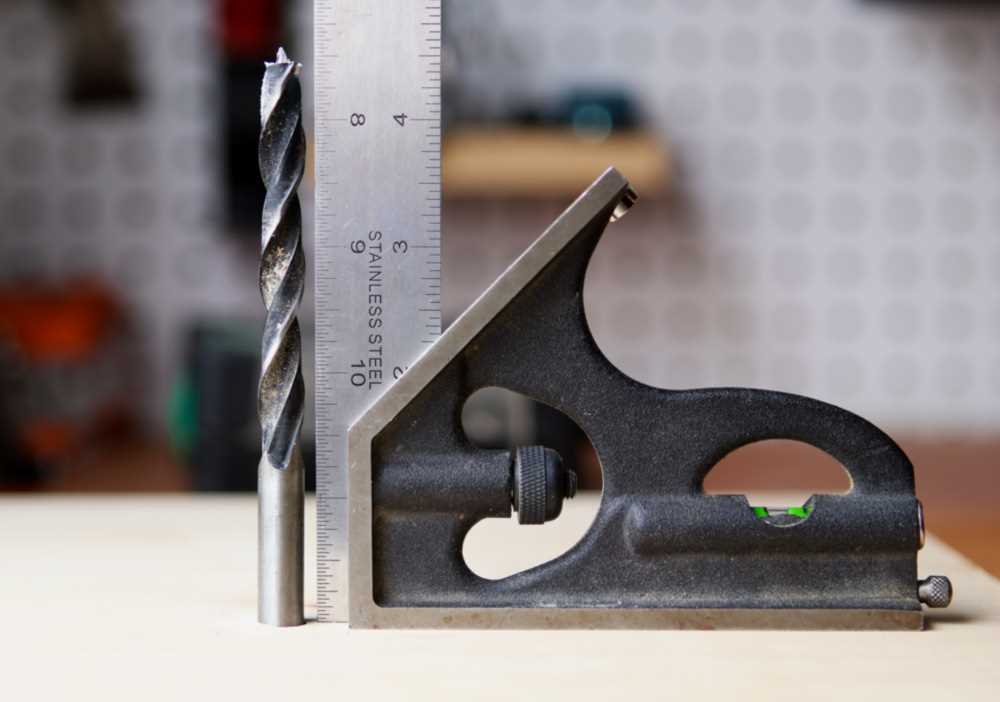
When aligning the drill bit, make sure it is perpendicular to the surface of the material. You can use a combination square or a level to check the alignment. This will help ensure that the hole you drill is straight and not angled.
5. Drill slowly and steadily

When drilling, it’s important to maintain a steady and controlled pace. Apply consistent pressure to the drill, but avoid pushing too hard, as it can cause the bit to veer off course. Take your time and let the drill do the work.
6. Use a drill guide
If you need to drill multiple holes in a straight line, consider using a drill guide. A drill guide is a tool that helps you maintain consistent hole spacing and alignment. It can be especially useful when drilling holes in a row or at specific intervals.
By following these positioning tips, you can increase the accuracy of your drilling and ensure that your holes are straight and properly aligned.
Starting the Drill Slowly
When drilling a straight hole without a drill press, it’s important to start the drill slowly. This allows you to maintain control and accuracy throughout the drilling process. Here are some tips to help you start the drill slowly:
- Secure the workpiece: Before you start drilling, it’s important to secure the workpiece firmly. You can use clamps or a vise to hold the workpiece in place, ensuring that it doesn’t move while drilling.
- Mark the desired drilling point: Use a pencil or a marker to mark the exact spot where you want to drill the hole. This will serve as a visual guide and help you stay on track.
- Select the appropriate drill bit: Choose a drill bit that is suitable for the material you are drilling into. A dull or incorrect drill bit can cause the drill to wander off course.
- Position the drill bit: Place the tip of the drill bit on the marked spot. Make sure the drill is perpendicular to the workpiece before you begin drilling. This will help ensure a straight hole.
- Start the drill at a low speed: Begin drilling at a low speed to prevent the drill bit from slipping or digging too deep too quickly. This will give you more control over the drilling process.
- Gradually increase the speed: As you feel more comfortable and in control, gradually increase the speed of the drill. Maintain a steady and straight drilling motion to achieve a straight hole.
By starting the drill slowly and following these tips, you’ll be able to drill straight holes without a drill press. Remember to always prioritize safety and wear appropriate protective gear when working with power tools.
Applying Steady Pressure
One of the most crucial aspects of drilling straight holes without a drill press is applying steady pressure. This helps ensure that the drill bit goes through the material at the right angle and prevents it from wandering off course.
Here are some tips for applying steady pressure:
- Start Slow: Begin drilling at a low speed to establish control over the drill. This will allow you to have a better feel for the drilling process and the resistance you encounter.
- Hold Firmly: Hold the drill with a steady grip, making sure your hand is positioned securely on the handle. This will minimize any unwanted movements that can result in an off-center hole.
- Align Properly: Align the drill bit with the desired drilling location and maintain a steady position. It’s important to keep your hands and body stable to avoid any unnecessary movements during drilling.
- Apply Even Pressure: Apply consistent pressure on the drill while drilling to ensure a smooth and straight hole. Avoid pushing too hard or too lightly, as it can lead to uneven drilling and an angled hole.
- Take Breaks: If you’re drilling through a thick or hard material, it’s advisable to take short breaks to prevent overheating. This also allows you to reposition yourself and regain control over the drilling process.
Remember, practice makes perfect when it comes to drilling straight holes without a drill press. With time and experience, you’ll be able to develop a steady hand and achieve accurate results.
Checking the Alignment
- Place a straight edge or ruler next to the drill bit to visually check if it is aligned with your intended hole.
- Make sure the drill bit is perpendicular to the surface you are drilling into. Use a bubble level or a try square to check the alignment.
Using a Bubble Level:
- Hold the bubble level against the side of the drill bit or against the drill body itself.
- Make adjustments to the drill angle until the bubble in the level is centered between the lines. This indicates that the drill bit is perpendicular to the surface.
Using a Try Square:
- Hold the try square against the side of the drill bit or against the drill body.
- Adjust the drill angle until the try square is parallel to the surface you are drilling into. This indicates that the drill bit is perpendicular to the surface.
Regularly check the alignment while drilling to ensure that the drill bit stays perpendicular to the surface and that you are drilling straight holes.
| Tools | Materials |
|---|---|
|
|
Finishing and Cleaning the Hole
- Once you have drilled the hole, it’s important to finish and clean it up to ensure a smooth and professional result.
- Start by sanding the inside of the hole using a piece of sandpaper or a sanding block. This will help remove any rough edges and smooth out the surface.
- You can also use a countersink bit to create a chamfer around the edges of the hole. This will make it easier to insert screws or other fasteners.
- Next, use a vacuum or compressed air to remove any dust or debris from the hole. This will ensure that the hole is clean and ready for use.
- If you are working with wood, you can use a wood filler to fill in any small gaps or imperfections in the hole. Apply the filler using a putty knife, and then sand it down once it has dried.
- For metal holes, you can use a metal file to smooth out any rough edges or burrs. Be sure to wear gloves and eye protection when working with metal.
- Finally, inspect the hole to make sure it is clean, smooth, and free of any debris. This will ensure that your project turns out professional-looking and that any fasteners you insert will fit properly.
FAQ:
What is a drill press and how does it work?
A drill press is a tool used for drilling holes in various materials. It consists of a base, column, drill head, and a motor. The drill head holds the cutting tool, which is attached to the motor. When the motor is turned on, the drill bit spins rapidly, allowing it to cut through the material.
What are some alternatives to a drill press?
Some alternatives to a drill press include a hand drill, a rotary tool, or even a power drill. These tools can be used to drill holes, although they may not offer the same precision and stability as a drill press.
What are some tips for drilling straight holes without a drill press?
Some tips for drilling straight holes without a drill press include using a drill guide or jig, marking the hole with a center punch, using a slow and steady drilling speed, and applying consistent pressure. It’s also important to use a sharp drill bit and to secure the material being drilled.
Can I achieve the same level of precision without a drill press?
While it may be more challenging to achieve the same level of precision without a drill press, it is still possible to drill straight holes with the right techniques and tools. Using a drill guide or jig, taking your time, and practicing proper drilling techniques can help you achieve satisfactory results.
Are there any limitations to drilling straight holes without a drill press?
Yes, there are some limitations to drilling straight holes without a drill press. Without the stability and precision of a drill press, it may be more difficult to achieve perfectly straight and accurate holes, especially in harder materials. In addition, drilling very large or deep holes may be more challenging without the power and torque of a drill press.
Video:


Meet Harrison Clayton, a distinguished author and home remodeling enthusiast whose expertise in the realm of renovation is second to none. With a passion for transforming houses into inviting homes, Harrison's writing at https://thehuts-eastbourne.co.uk/ brings a breath of fresh inspiration to the world of home improvement. Whether you're looking to revamp a small corner of your abode or embark on a complete home transformation, Harrison's articles provide the essential expertise and creative flair to turn your visions into reality. So, dive into the captivating world of home remodeling with Harrison Clayton and unlock the full potential of your living space with every word he writes.


