How to Drill Square Holes in Wood: A Step-by-Step Guide

If you’ve ever wondered how to create perfectly square holes in wood, you’re in luck. While it may seem like an impossible feat, drilling square holes is actually quite achievable with the right tools and technique. In this step-by-step guide, we’ll walk you through the process of drilling square holes in wood, allowing you to take your woodworking projects to the next level.
Before we dive into the steps, it’s important to understand why you might want to drill square holes in wood. Square holes can be incredibly useful for creating joinery, such as mortise and tenon joints, that require precise and tight-fitting connections. By drilling square holes, you can achieve a level of precision and strength that is not easily attainable with standard circular holes.
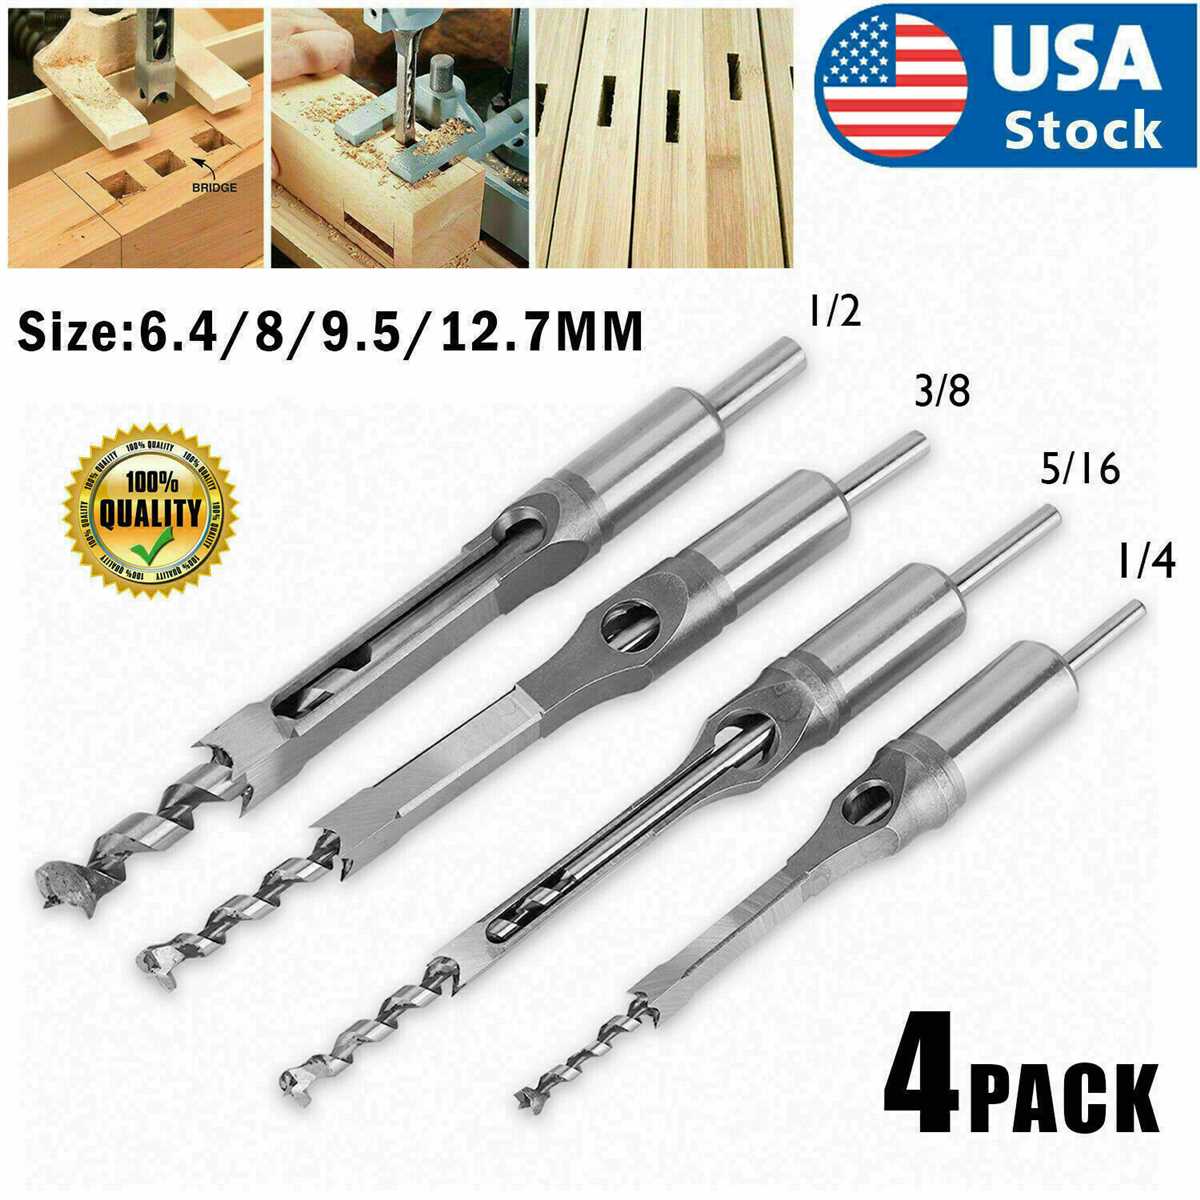
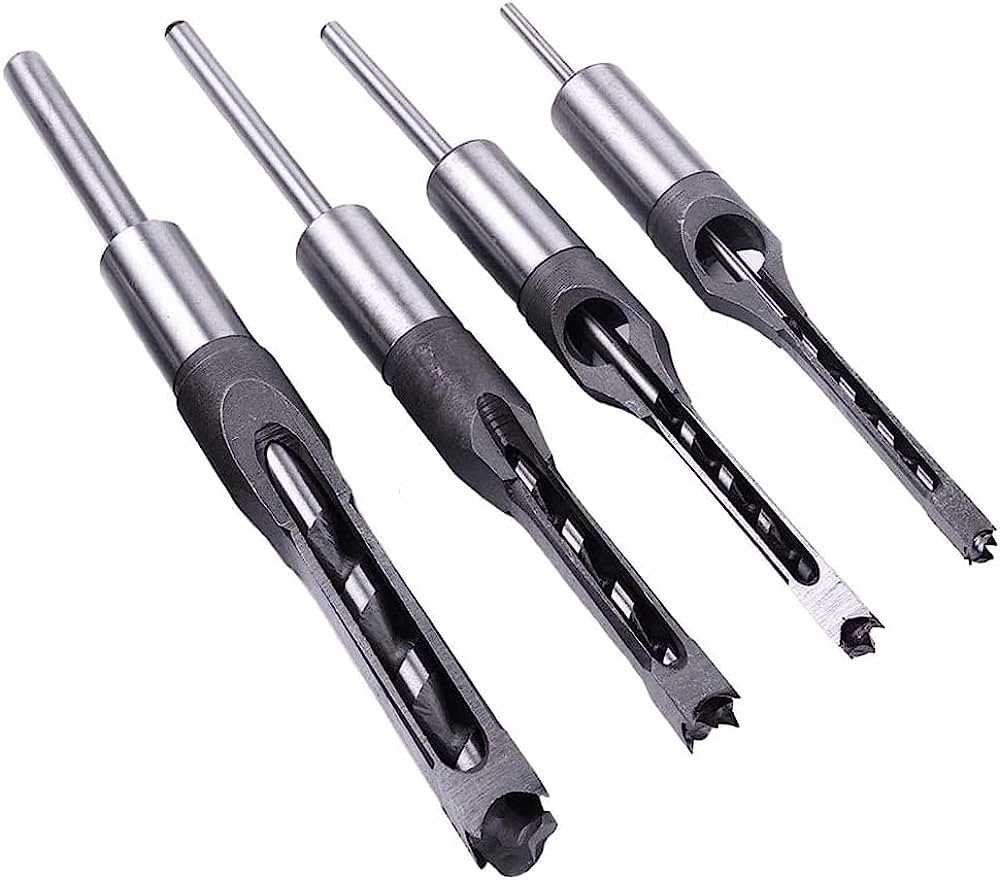
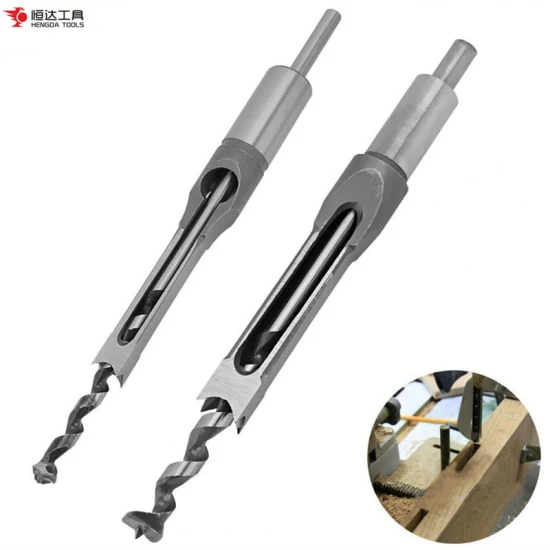
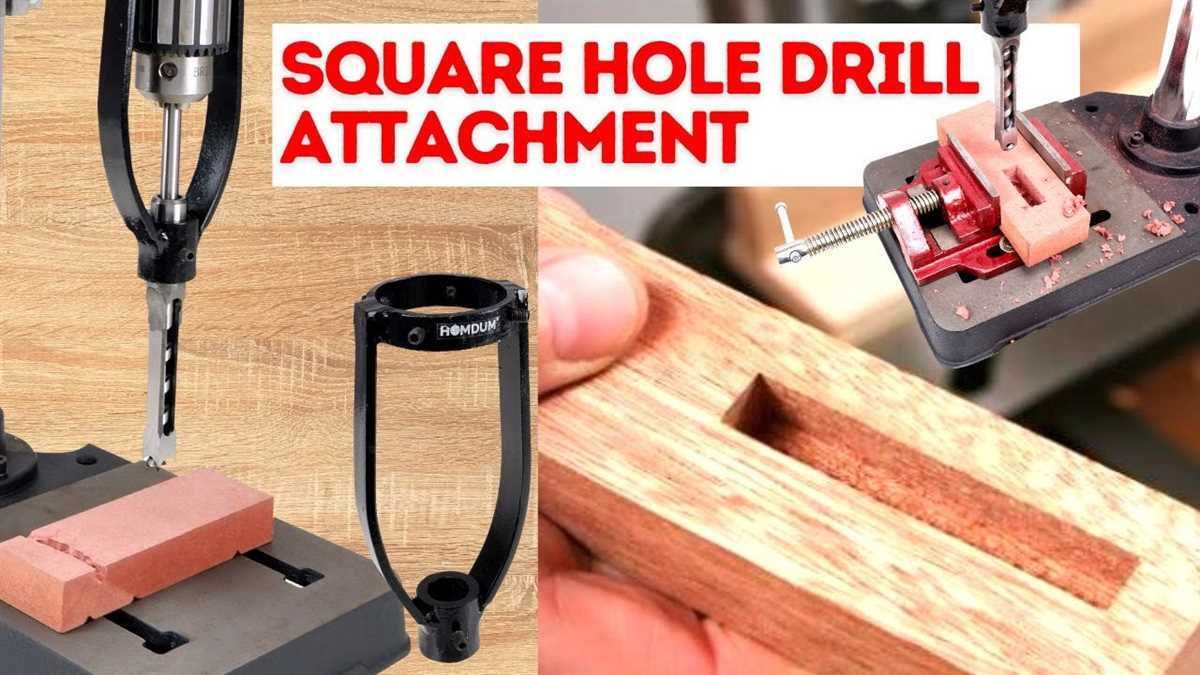
So, let’s get started with the first step: selecting the right drill bit. To drill square holes, you’ll need a special tool called a mortising chisel. This chisel is specifically designed to create square holes and is available in various sizes to accommodate different project needs. Make sure to choose a chisel that matches the size of the square hole you want to create.
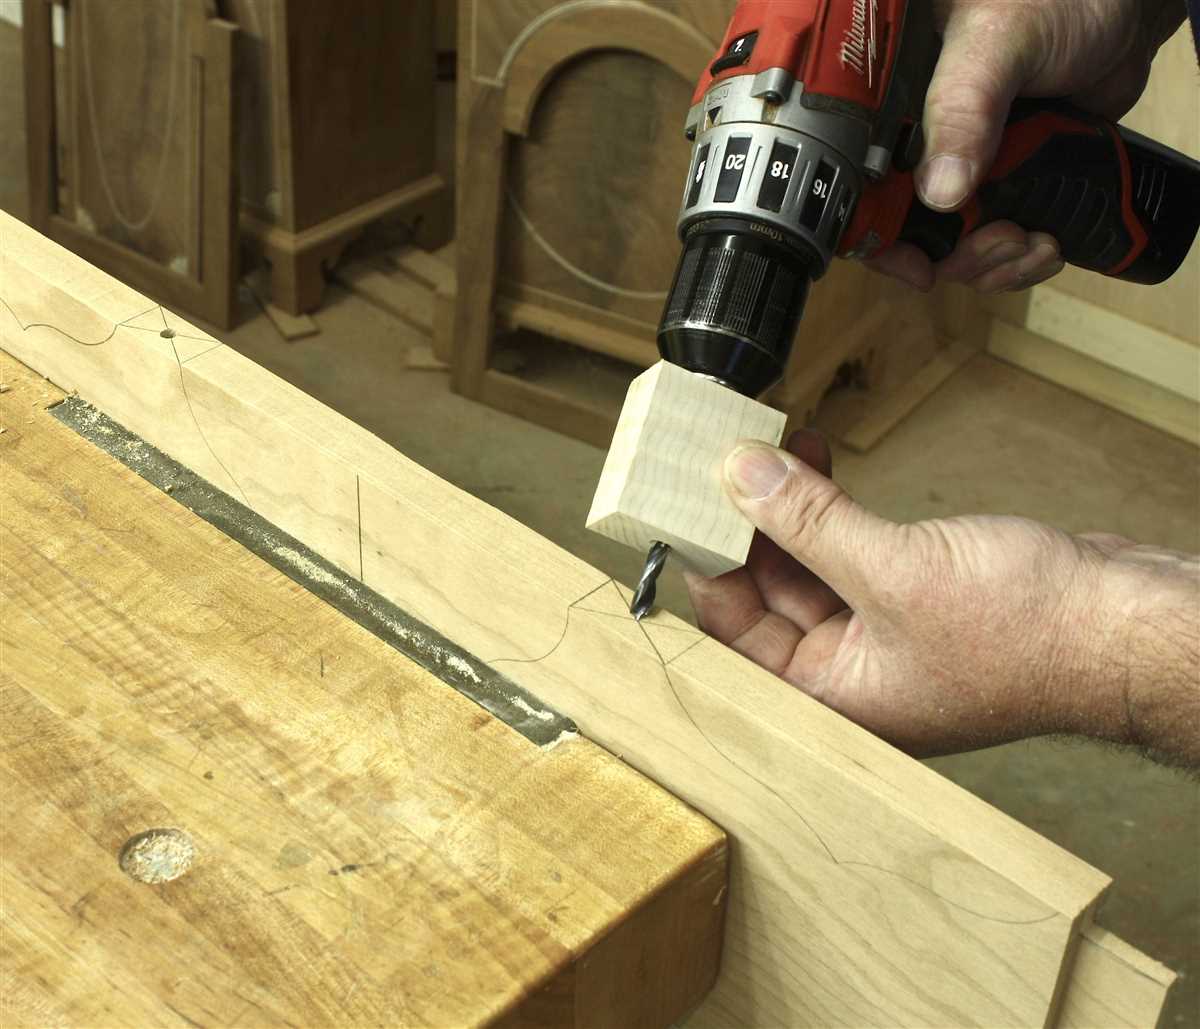
Once you have the right chisel, it’s time to mark the location of your square hole on the wood. Use a ruler and pencil to carefully measure and mark the desired dimensions of your hole. It’s important to be precise with your measurements to ensure a clean and accurate result. You can also use a square or a straightedge to ensure that your markings are perfectly aligned.
Now that you have your drilling area marked, it’s time to secure the wood in place. Clamp the piece of wood onto a workbench or another sturdy surface to prevent any movement during the drilling process. This will help maintain the accuracy of your hole and prevent any damage to the surrounding wood.

With the wood secured, it’s time to start drilling. Place the chisel into the drill chuck and adjust it so that it is centered and aligned with your marked hole. Start the drill at a low speed and gradually increase the speed as you drill. Apply steady pressure and let the chisel do the work, allowing it to cut through the wood. Take your time and make sure to keep the drill and chisel aligned with your markings to achieve a square hole.
Once the chisel has cut through the wood, remove the drill and chisel and check the squareness of your hole. You may need to use a chisel or sandpaper to clean up any rough edges or corners and ensure a perfect square shape. When you’re satisfied with the result, you can proceed with the rest of your woodworking project, knowing that you have successfully drilled a square hole in wood.
In conclusion, drilling square holes in wood is not as challenging as it may seem. With the right tools, careful measurements, and proper technique, you can achieve precise and neatly squared holes in your woodworking projects. So, go ahead and give it a try – you’ll be amazed at the level of craftsmanship and precision you can achieve.
Choosing the Right Tools
1. Drill
To drill square holes in wood, you will need a special tool called a “mortise chisel”. This chisel has a square cutting edge and is designed specifically for square hole drilling. Make sure to choose a drill with a sturdy construction and sharp cutting edges for efficient and accurate drilling.
2. Chisel
In addition to the drill, you will also need a chisel. The chisel will be used to clean up the square hole and remove any excess wood after drilling. Choose a chisel that is sharp, durable, and designed for woodworking tasks. A good-quality chisel will ensure clean and precise cuts.
3. Measuring Tools

Accurate measurements are crucial when drilling square holes in wood. You will need measuring tools such as a tape measure, ruler, or calipers to ensure precise hole placement. These tools will help you mark the correct positions on the wood and ensure that your holes are perfectly square and aligned.
4. Clamps
When drilling square holes, it is important to secure the wood in place to prevent it from moving during the drilling process. Clamps are a useful tool for holding the wood securely in position. Make sure to choose clamps that are strong and have a good grip to ensure stability and accuracy while drilling.
5. Safety Equipment
Working with power tools and sharp objects can be dangerous, so it is important to have the right safety equipment. Wear safety glasses to protect your eyes from flying wood chips, and use gloves to protect your hands. Additionally, consider using ear protection if you will be drilling for an extended period of time.
Select the Appropriate Drill Bit

Before you start drilling square holes in wood, it is crucial to select the appropriate drill bit. Choosing the right drill bit will ensure clean and precise square holes, without causing any damage to the wood.
Typically, you will need a special type of drill bit known as a square hole drill bit or a mortise chisel. These specialized drill bits are designed specifically for drilling square holes and come in a variety of sizes.
When selecting a drill bit, consider the size of the square hole you want to create. Look for a drill bit that matches the width and depth of the desired hole. Keep in mind that the size of the drill bit will determine the size of the square hole.
Additionally, pay attention to the quality of the drill bit. Ensure that it is made from high-quality materials, such as hardened steel, to ensure durability and longevity. A sharp drill bit will also make the drilling process easier and more efficient.
It is highly recommended to invest in a set of square hole drill bits, as they will provide you with a range of sizes to choose from. This will allow you to drill square holes of various dimensions, depending on your project requirements.

Once you have selected the appropriate drill bit, you are ready to move on to the next step in drilling square holes in wood.
Use a Square Hole Chisel
A square hole chisel is a specialized tool designed specifically for drilling square holes in wood. It features a cutting edge that is shaped like a square, allowing you to create precise square holes with ease. Here is a step-by-step guide on how to use a square hole chisel:
-
Prepare the wood: Begin by marking the area where you want to drill the square hole. Use a ruler or measuring tape to ensure accurate placement of the hole.
-
Secure the wood: Clamp the wood securely to a workbench or place it in a vice to prevent it from moving during the drilling process. This will help ensure clean and precise cuts.
-
Position the chisel: Place the cutting edge of the square hole chisel on the marked area of the wood. Make sure it is aligned properly to achieve the desired hole size and shape.
-
Apply pressure: Hold the chisel firmly and apply downward pressure to penetrate the wood. Be sure to use controlled force to avoid any accidents or damage to the wood.
-
Create a pilot hole: Begin by drilling a small pilot hole along the edges of the marked area. This will help guide the chisel and prevent any splitting or cracking of the wood.
-
Start chiseling: Using a hammer, gently tap the chisel into the pilot hole. Slowly and steadily, begin removing wood by chiseling along the marked lines. Take your time to ensure clean and precise cuts.
-
Repeat the process: Continue chiseling along the marked lines until the desired square hole is achieved. Take breaks as needed to avoid fatigue and maintain accuracy.
Using a square hole chisel requires some practice and patience. It is important to take your time and work slowly to achieve the best results. Remember to always wear safety goggles and use caution while working with sharp tools.
Preparing the Wood
Cut the wood to the desired size

Before you can drill square holes in the wood, you will first need to cut it to the desired size. Use a saw or any cutting tool suitable for the type of wood you are working with. Measure the dimensions carefully and use a straight edge or a square to ensure precise cuts.
Sand the surface
Next, sand the surface of the wood to remove any roughness or imperfections. This will not only make the wood look more polished but will also help to prevent splintering during the drilling process. Start with a coarse-grit sandpaper and gradually move to finer-grit sandpaper for a smooth finish.
Mark the center
Locate the center of the wood where you will be drilling the square hole. Use a ruler or a measuring tape to find the midpoint, and make a small mark with a pencil. This will serve as a reference point for positioning the drill bit accurately.
Clamp the wood securely
Clamp the wood securely to a workbench or any stable surface before drilling. This will prevent the wood from moving or vibrating during the drilling process, ensuring a more precise and controlled operation. Use woodworking clamps or a vise to hold the wood firmly in place.
Protective gear
Wear appropriate protective gear such as safety glasses and gloves before beginning the drilling process. This will ensure your safety and minimize the risk of injury from flying wood chips or accidental contact with the drill.
Plan your drilling strategy
Before drilling the square hole, it is important to plan your drilling strategy. Determine the dimensions of the square hole and choose the appropriate type and size of drill bits. Consider the depth of the hole and the spacing between each hole, depending on your specific woodworking project.
Summary:
- Cut the wood to the desired size.
- Sand the surface to remove roughness.
- Mark the center of the hole.
- Clamp the wood securely.
- Wear protective gear.
- Plan your drilling strategy.
Mark the Hole Location
Before you start drilling, it is important to accurately mark the location of the square hole on the wood. This will ensure that the hole is drilled in the correct position and at the desired size.
To mark the hole location, follow these steps:
- Measure and mark the dimensions of the square hole on the wood using a ruler or tape measure. Use a pencil to make the marks, as it can be easily erased if necessary.
- If the hole needs to be centered or aligned with an existing feature on the wood, use a square or straight edge to ensure accurate positioning.
- Double-check the measurements and make any necessary adjustments before proceeding to the drilling step. It is essential to have precise measurements to achieve a square hole.
By taking the time to accurately mark the hole location, you can prevent any mistakes or errors during the drilling process. This step is crucial for achieving a clean and professional-looking square hole in your woodwork.
Create a Pilot Hole
Before attempting to drill a square hole, it’s important to create a pilot hole. A pilot hole is a small guide hole that helps to ensure accuracy when drilling the larger hole.
To create a pilot hole, you’ll need a drill bit that is smaller in diameter than the width of your desired square hole. For example, if you want to create a 1-inch square hole, you might start with a 1/4-inch drill bit.
Here are the steps to create a pilot hole:
- Mark the center point of where you want the square hole to be drilled.
- Attach the smaller drill bit to your drill and tighten it securely.
- Place the tip of the drill bit on the marked center point and apply gentle pressure to start drilling. The drill should be perpendicular to the surface of the wood.
- Slowly drill down into the wood, being careful not to apply too much force. Let the drill bit do the work.
- Continue drilling until the desired depth of the pilot hole is reached. This depth should be slightly shorter than the length of your intended square hole.
- Once the pilot hole is created, remove the smaller drill bit and prepare to drill the larger square hole.
Creating a pilot hole helps to prevent the wood from splitting or cracking while drilling the larger square hole. It also helps to guide the larger drill bit, ensuring that the square hole is drilled accurately.
Drilling the Hole
Now that you have prepared your wood piece and marked the area for the square hole, it’s time to start drilling.
Here are the steps to follow:
- Choose the right drill bit size: Depending on the size of the square hole you need, select a drill bit that is slightly larger than the width of the hole. This will ensure that you can remove the wood material easily.
- Secure your wood piece: Place your wood piece securely on a workbench or clamp it down to prevent it from moving while drilling.
- Mark the starting point: Use a pencil or a marker to mark the starting point of the hole. This will help you guide the drill bit and prevent it from wandering.
- Create a pilot hole: Start by drilling a small pilot hole at the marked starting point. This will serve as a guide for the larger drill bit. Use a drill speed appropriate for the type of wood you are working with.
- Drill the main hole: Once the pilot hole is created, switch to the larger drill bit and align it with the pilot hole. Start drilling slowly and steadily, applying even pressure. Make sure to keep the drill bit perpendicular to the surface of the wood.
- Clear out the wood material: As you drill, periodically remove the drill bit from the hole to clear out the wood chips and dust. This will prevent the drill bit from getting stuck and ensure a smoother drilling process.
- Clean up the hole: After drilling the hole, use a chisel or sandpaper to clean up the edges and smooth out any rough spots. This will give your square hole a clean and professional finish.
Remember to work slowly and carefully, taking breaks if needed. Drilling square holes in wood requires patience and precision, but with the right technique, you can achieve excellent results.
Start Drilling at an Angle
When drilling square holes in wood, it is important to start drilling at an angle. This technique helps create a guide for the square hole and makes it easier to achieve precise and clean results.
- Mark the starting point: Begin by marking the starting point of the square hole on the wood surface. Use a pencil or a marking tool to make a clear and visible mark.
- Position the drill: Hold the drill at a slight angle, around 45 degrees, to the surface of the wood. Make sure the drill bit is aligned with the starting point mark.
- Start drilling: Slowly start drilling into the wood surface while maintaining the angle. Apply consistent pressure to the drill as you begin to create a hole.
- Adjust the angle: As the drill bit starts to make progress, gradually adjust the angle to become more perpendicular to the wood surface. This transition should be smooth to avoid any sudden shifts or jerks.
- Continue drilling: Once the drill bit is at a perpendicular angle, continue drilling to the desired depth. Maintain a steady hand and consistent pressure for even results.
By starting the drilling process at an angle, you are able to create a guide that helps guide the drill bit along the desired path. This initial angle allows for more control and precision when drilling the square hole in the wood.
Gradually Increase the Drill Depth
Once you have successfully made a pilot hole, it’s time to gradually increase the drill depth to achieve a square hole. This step requires patience and precision.
First, measure the desired depth of the square hole on your drill bit. Mark this depth using a piece of masking tape or a permanent marker. This will serve as a guide for how deep you should drill.
Next, set your drill to a low speed and apply gentle pressure as you begin drilling. Start by drilling a few millimeters deeper than the pilot hole. This will help widen the hole and give you better control over the drill.
After drilling for a short distance, stop and remove the drill from the hole. Clear away any wood chips or debris that may have accumulated. This will prevent them from interfering with the drilling process.
Repeat the above steps, gradually increasing the drill depth each time. As you go deeper into the wood, you may notice that the wood chips become larger and more difficult to remove. Use a wood chisel or a brush to clear them away.
Continue drilling and removing debris until you reach the desired depth for your square hole. Be careful not to drill too quickly or apply excessive pressure, as this can cause the wood to splinter or crack.
Remember to periodically check the depth of the hole using your marked drill bit or a depth gauge. This will ensure that you stay on track and achieve an accurate square hole.
Once you have reached the desired depth, you can remove the masking tape or markings from the drill bit. Your square hole is now complete and ready for use!
Finishing Touches
Sanding the edges
After drilling the square holes, you may notice that the edges are rough and uneven. To achieve a professional and polished finish, it is important to sand the edges of the holes. This will remove any splinters or imperfections and create a smooth and even surface.
Applying wood filler
If there are any small gaps or imperfections around the square holes, you can use wood filler to fill them in. Apply the wood filler using a putty knife and make sure to smooth it out to match the surrounding wood. Once the filler dries, sand it down until it is flush with the rest of the surface.
Staining or painting
Now that the square holes are drilled and any imperfections have been addressed, you can choose to stain or paint the wood. Staining will enhance the natural beauty of the wood, while painting allows you to add color and personality to your project. Apply the stain or paint evenly, following the manufacturer’s instructions, and let it dry completely.
Sealing the wood
To protect the wood and ensure its longevity, it is important to seal it. You can use a clear varnish or polyurethane sealer to create a protective barrier on the surface of the wood. Apply the sealer evenly and allow it to dry completely before using or handling the wood.
Final touches
Once the finishing touches are complete, take a step back and admire your work. The square holes you have drilled in the wood now have a professional and finished look. Whether you are using the wood for furniture, shelves, or any other project, the square holes will add a unique touch and enhance the overall aesthetic.
Remember to always use caution when working with power tools and follow safety guidelines. Wear protective gear, such as safety goggles and gloves, and work in a well-ventilated area. With practice and patience, you can become skilled at drilling square holes in wood and create impressive woodworking projects.
FAQ:
What tools do I need to drill square holes in wood?
To drill square holes in wood, you will need a drill, a chisel, a mallet, and a square hole drill bit.
Can I drill square holes with a regular drill bit?
No, you cannot drill square holes with a regular drill bit. You need a special square hole drill bit designed for this purpose.
How do I mark the area to drill the square hole?
To mark the area for drilling the square hole, you can use a square or a template. Place the square or template on the wood and use a pencil or a pen to mark the corners of the hole.
What techniques can I use to remove the waste wood from the square hole?
There are two techniques you can use to remove the waste wood from the square hole: 1) You can use a chisel and a mallet to carefully chip away at the wood until the hole is square; 2) You can use a router with a square hole bit to remove the waste wood.
Video:


Meet Harrison Clayton, a distinguished author and home remodeling enthusiast whose expertise in the realm of renovation is second to none. With a passion for transforming houses into inviting homes, Harrison's writing at https://thehuts-eastbourne.co.uk/ brings a breath of fresh inspiration to the world of home improvement. Whether you're looking to revamp a small corner of your abode or embark on a complete home transformation, Harrison's articles provide the essential expertise and creative flair to turn your visions into reality. So, dive into the captivating world of home remodeling with Harrison Clayton and unlock the full potential of your living space with every word he writes.


