How to Drill Out an Ignition Key Lock Cylinder: Step-by-Step Guide

Drilling out an ignition key lock cylinder may seem like a daunting task, but with the right tools and a step-by-step guide, it can be done. Whether you need to replace a faulty cylinder or gain access to a locked vehicle, this article will walk you through the process, ensuring a successful outcome.
Before getting started, it’s important to note that drilling out a lock cylinder should only be done as a last resort. You should attempt to use other methods, such as picking the lock, before resorting to drilling. Additionally, it’s crucial to ensure that you have the proper legal authority and ownership of the vehicle before proceeding.
To begin, you’ll need a few tools: a drill with a variety of drill bits, a center punch or screwdriver, a hammer, and a pair of pliers. It’s also recommended to have some lubricant, like WD-40, on hand to aid in the drilling process. Safety goggles and gloves are also essential to protect yourself from any flying debris.
The first step is to locate the ignition key lock cylinder. This is typically located on the steering column, dashboard, or console of the vehicle. Once you’ve found it, you’ll need to remove any surrounding panels or covers to gain access to the cylinder. This may require the use of a screwdriver or socket set, depending on the vehicle.
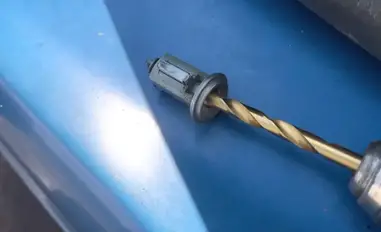
Next, insert the key into the ignition cylinder and turn it to the “on” position. This will align the pins inside the cylinder, making it easier to drill. Take the center punch or screwdriver and place it in the center of the cylinder. Use the hammer to lightly tap the punch or screwdriver, creating a small indentation. This will help guide the drill bit and prevent it from slipping.

Preparing for the Procedure
Before you begin drilling out an ignition key lock cylinder, there are several important preparations you need to make. Taking the time to properly prepare will help ensure a smoother and more successful procedure.
1. Gather the necessary tools
- A drill with a drill bit set
- Pliers or a vice grip
- A screwdriver
- A pry bar or a chisel
- A metal file or sandpaper
- A lubricant such as WD-40
2. Wear proper protective gear
Drilling out an ignition key lock cylinder can produce metal shavings and debris, so it’s important to protect yourself. Wear safety goggles or glasses to protect your eyes, and use gloves to protect your hands.
3. Work in a well-ventilated area
Drilling can create fumes from the metal being drilled, so it’s important to work in a well-ventilated area. If possible, open windows and doors to allow fresh air to circulate. Alternatively, you can use a fan or work outside if weather permits.
4. Secure the vehicle

Before starting the procedure, ensure that the vehicle is parked on a flat surface with the parking brake engaged. This will prevent any movement or accidental rolling while you are working on the ignition key lock cylinder.
5. Disconnect the battery

For safety reasons, it’s best to disconnect the vehicle’s battery before working on the ignition key lock cylinder. This will prevent any electrical issues or accidental starting of the vehicle during the procedure. Locate the battery and disconnect the negative terminal using a wrench or socket set.
6. Remove any obstructions
Before you can access the ignition key lock cylinder, you may need to remove any obstructions that are in the way. This could include panels, covers, or trim pieces. Use a screwdriver or pry bar to carefully remove these components, taking care not to damage them.
7. Lubricate the lock cylinder
Before drilling, it is important to lubricate the lock cylinder to reduce friction and make the drilling process easier. Apply a generous amount of lubricant, such as WD-40, to the keyhole and key. Allow the lubricant to penetrate the lock cylinder for a few minutes before proceeding.
Gathering the Right Tools
- Drill with various drill bits
- Screwdriver set
- Hammer
- Center punch
- Wire brush
- Needle-nose pliers
- Vice grips
- Masking tape
- Protective goggles
- Gloves
Before attempting to drill out an ignition key lock cylinder, it is essential to gather all the necessary tools. These tools will help you efficiently and safely remove the lock cylinder from your ignition key. Here are the tools you will need:
- Drill with various drill bits: You will need a drill to create holes in the lock cylinder and eventually destroy it. It is recommended to have a set of drill bits with different sizes so that you can start with smaller holes and gradually increase the size.
- Screwdriver set: A set of screwdrivers will come in handy when it comes to removing any screws or panels that are blocking access to the lock cylinder.
- Hammer: A hammer can be used to tap the center punch and create a small indentation on the lock cylinder, providing a starting point for drilling.
- Center punch: A center punch is a metal tool with a sharp point used to create a small indentation on the lock cylinder. This indentation helps guide the drill bit and prevents it from slipping off the cylinder’s surface.
- Wire brush: A wire brush can be used to clean the lock cylinder after drilling out the core. It helps remove any metal shavings or debris that may interfere with the functioning of the new lock cylinder.
- Needle-nose pliers: Needle-nose pliers are useful for pulling out any remaining pieces of the lock cylinder after drilling. They can grip small fragments securely and allow for their removal.
- Vice grips: Vice grips are adjustable pliers with strong jaws that can securely hold the lock cylinder or any other object that needs to be stabilized during the drilling process.
- Masking tape: Masking tape can be applied to the surrounding area of the lock cylinder to protect surrounding parts from accidental scratches or damage during the drilling process.
- Protective goggles: It is crucial to wear protective goggles to shield your eyes from any flying debris generated during the drilling process.
- Gloves: Wearing gloves helps protect your hands from cuts, scrapes, or any injuries that may occur while handling the tools or working with the lock cylinder.
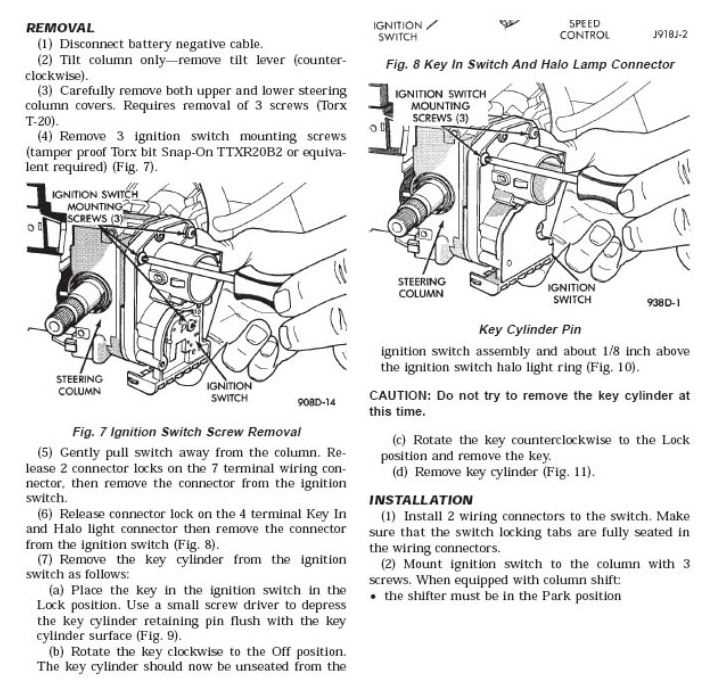
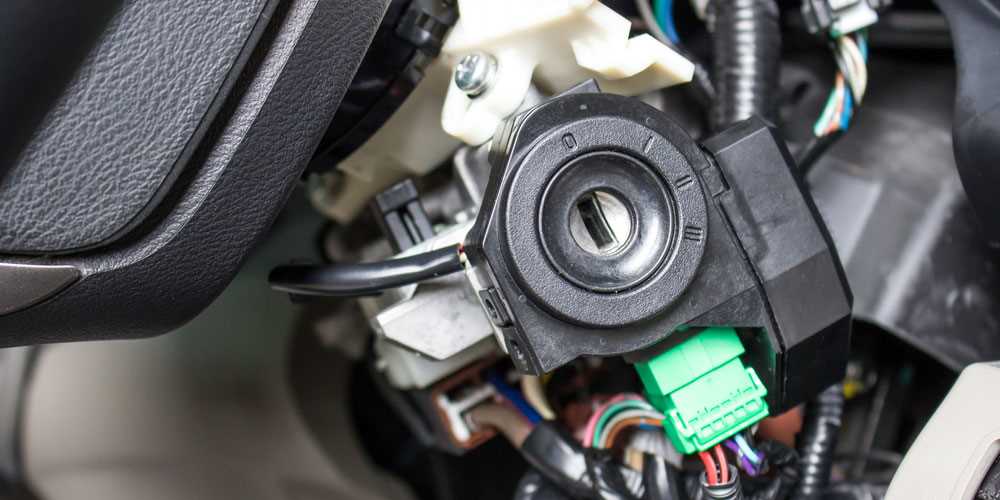
Removing the Steering Column Covers
Before you can access the ignition key lock cylinder, you will need to remove the steering column covers. These covers protect the internal components of the steering column and may need to be removed in order to gain access to the ignition lock cylinder.
Step 1: Disconnect the Battery
First, disconnect the negative terminal of the vehicle’s battery to prevent any accidental electrical charges or damage.
Step 2: Adjust the Steering Wheel Position
Adjust the steering wheel to its lowest position, which will provide you with more room to work and remove the steering column covers.
Step 3: Locate the Screws or Clamps
Inspect the steering column covers to locate the screws or clamps that are securing them in place. These screws or clamps may be located at the bottom or top of the steering column cover.
Step 4: Remove the Screws or Clamps
Using a suitable screwdriver or wrench, remove the screws or loosen the clamps that are holding the steering column covers in place. Keep track of any screws or clamps you remove as they will need to be reinstalled later.
Step 5: Separate the Covers
Once the screws or clamps are removed, gently separate the steering column covers starting from the bottom and working your way up. Be careful not to force or break any plastic tabs or connectors that may be securing the covers together.
Step 6: Remove the Covers
Once the covers are separated, carefully remove them from the steering column, taking care not to damage any wiring harnesses or other components.
Step 7: Store the Covers Safely
Store the steering column covers in a safe place where they will not be damaged or lost. You will need to reinstall them once you have completed the ignition key lock cylinder replacement.
Step 8: Continue with Ignition Key Lock Cylinder Replacement
With the steering column covers removed, you can now proceed with the steps outlined in the guide for drilling out the ignition key lock cylinder. Follow the remaining steps carefully to successfully remove and replace the cylinder.
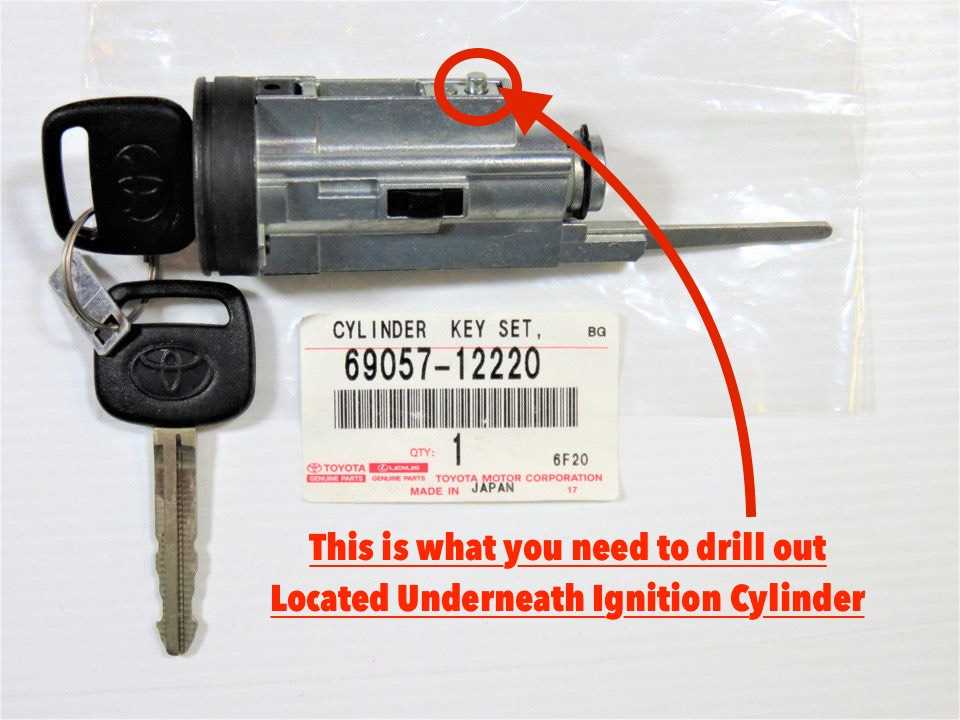
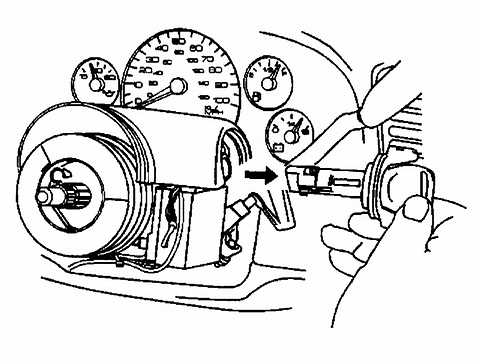
Locating the Ignition Lock Cylinder
The ignition lock cylinder is a crucial part of your vehicle’s ignition system. It is responsible for starting the engine of your car. To find the ignition lock cylinder, you need to follow these steps:
- Ensure that your car is in a safe and secure location. Park it in a flat and level area, away from traffic.
- Turn off the engine and remove the key from the ignition.
- Locate the steering column, which is the long vertical shaft where your steering wheel and other controls are mounted.
- Examine the steering column for the ignition lock cylinder. It is usually located on the right-hand side of the steering column, near the bottom.
- If you have trouble finding the ignition lock cylinder, consult your vehicle’s owner’s manual for guidance. It may provide specific instructions or diagrams to help you locate it.
Once you have located the ignition lock cylinder, you can proceed with drilling it out if necessary. Keep in mind that drilling out the ignition lock cylinder should only be done as a last resort and should be performed by a professional locksmith or mechanic.
Disconnecting the Battery
Before you begin drilling out the ignition key lock cylinder, it’s essential to disconnect the battery to ensure safety and prevent any electrical damage. Follow these steps to disconnect the battery:
- Locate the battery: Most car batteries are located in the engine bay. Open the hood and locate the battery.
- Identify the negative terminal: The negative terminal is usually marked with a “-” symbol. It is also the terminal with the black cable attached to it.
- Prepare the necessary tools: You will need a wrench or socket set to loosen the nut that holds the negative cable to the battery terminal.
- Loosen the nut: Use the wrench or socket set to loosen the nut that holds the negative cable to the battery terminal. Turn it counterclockwise to loosen it.
- Disconnect the negative cable: Once the nut is loose, carefully remove the negative cable from the battery terminal. Make sure to keep it away from any metal surfaces or other battery terminals.
- Secure the negative cable: To prevent accidental contact, secure the loose end of the negative cable with tape or a tie wrap, ensuring it doesn’t come into contact with the battery or other components.
With the battery disconnected, you can now proceed with drilling out the ignition key lock cylinder without the risk of electrical shock or damage to your vehicle’s electrical system.
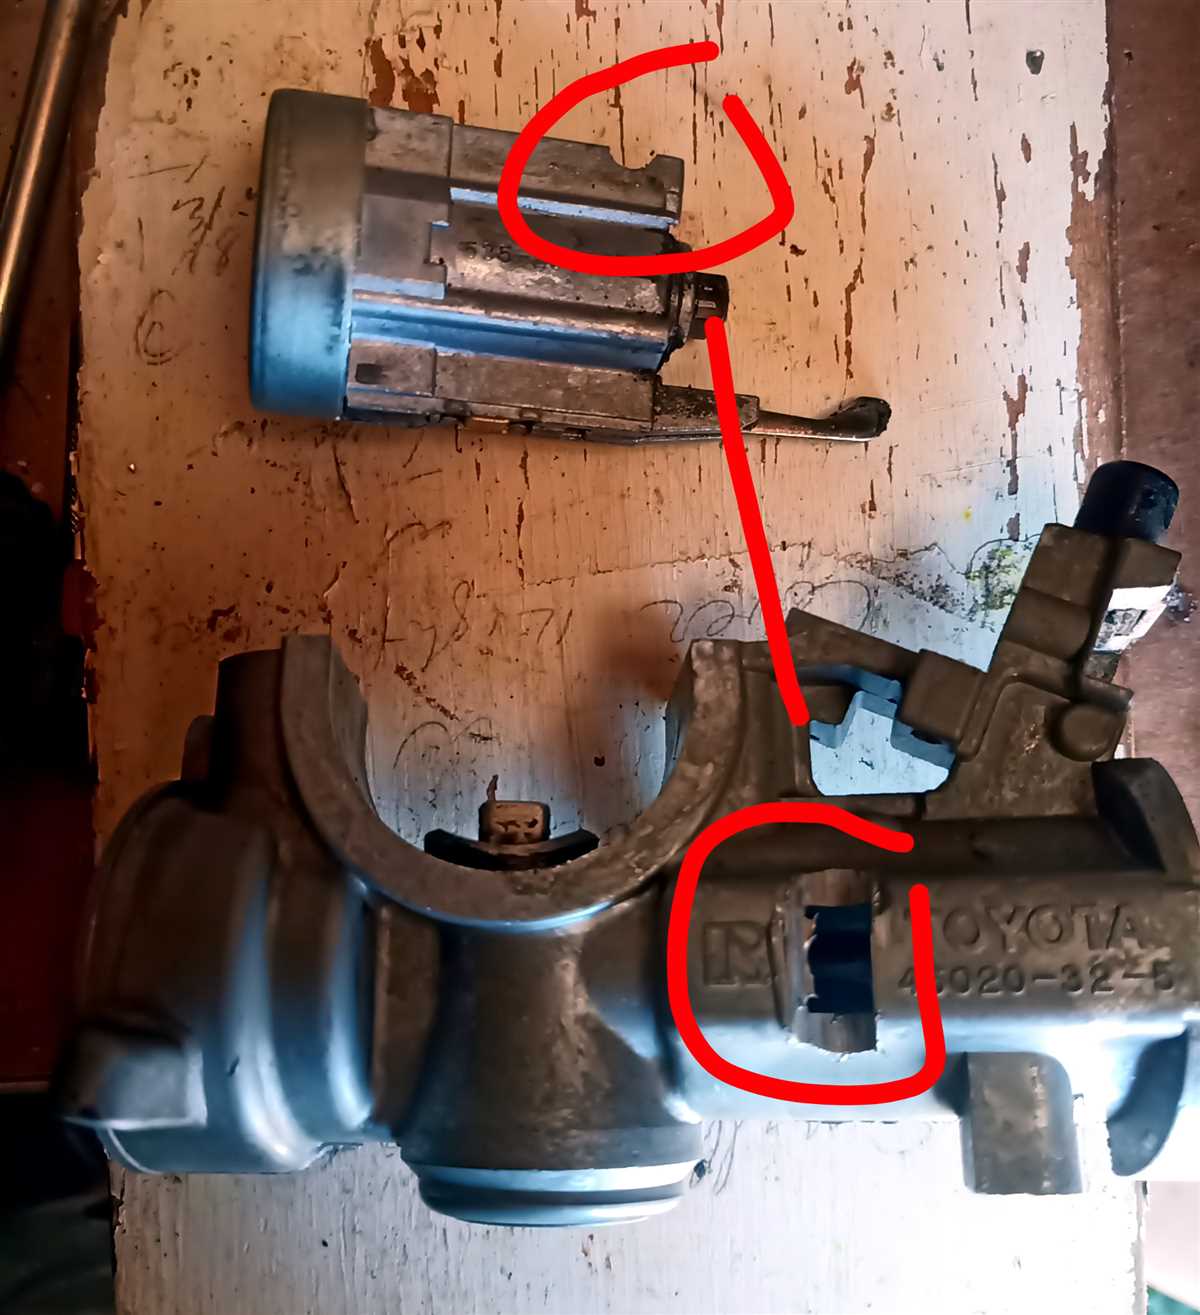
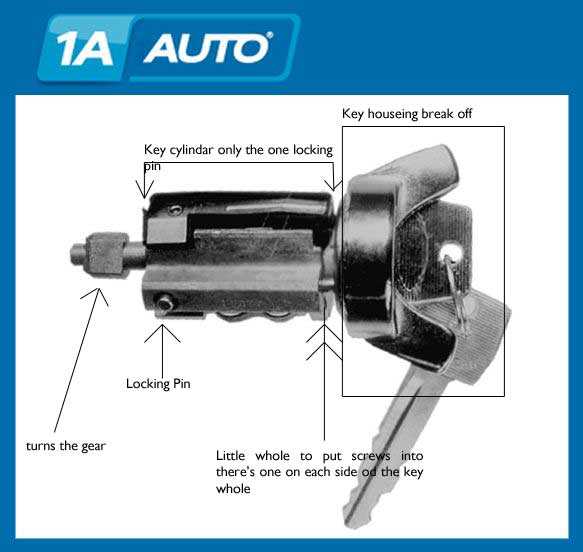
Removing the Retaining Clip
Once you have successfully removed the ignition switch and exposed the ignition lock cylinder, the next step is to remove the retaining clip. The retaining clip is a small metal piece that holds the ignition lock cylinder in place.
To remove the retaining clip, you will need a pair of needle nose pliers. Here’s how to do it:
- Locate the retaining clip. It is usually located at the top or bottom of the ignition lock cylinder.
- Use the needle nose pliers to grip the retaining clip firmly.
- Gently pull the retaining clip outwards. Be careful not to apply too much force as it may break.
- Once the retaining clip is removed, set it aside in a safe place.
Removing the retaining clip allows you to easily slide out the ignition lock cylinder from the ignition switch housing.
Note: The retaining clip can sometimes be difficult to remove, especially if it has become rusty or stuck. In such cases, you may need to use penetrating oil or even heat to loosen the clip.
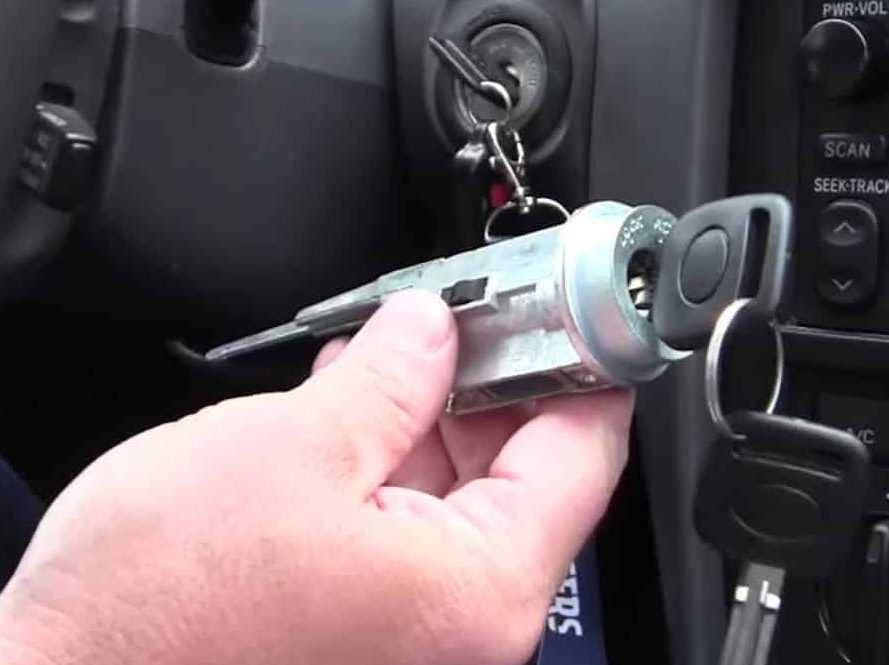
Extracting the Ignition Lock Cylinder
If you are unable to turn the key in the ignition to the “On” position and want to remove the ignition lock cylinder, you will need to follow these steps:
- Disconnect the negative terminal of your vehicle’s battery to prevent any electrical issues.
- Remove the steering column cover by unscrewing any screws or clips holding it in place. This will expose the ignition lock cylinder.
- Using a small flathead screwdriver or a pick tool, locate the release pin or button on the ignition lock cylinder. This pin or button may be located on the bottom or side of the cylinder.
- Depress the release pin or button while gently pulling on the ignition key. This will allow you to remove the ignition lock cylinder from the steering column.
- If the cylinder does not easily come out, you may need to rotate and wiggle it while applying pressure until it pops out.
- Once the ignition lock cylinder is removed, you can inspect it for any damage or wear that may be causing the key to not turn.
It is important to note that removing the ignition lock cylinder may require some force and patience. If you are uncomfortable or unsure about this process, it is recommended to consult a professional locksmith or car mechanic for assistance.
Installing the New Ignition Lock Cylinder
After successfully removing the old ignition lock cylinder, you can now proceed with installing the new one. Follow these steps:
- Start by inserting the new ignition lock cylinder into the ignition switch housing. Make sure it is properly aligned and seated securely in place.
- Align the cylinder with the keyway provided in the ignition switch. The keyway should be in the same position as it was when you removed the old cylinder.
- Once aligned, gently push the new cylinder into the switch until it clicks into place. Be careful not to exert too much force, as this may damage the new cylinder or the switch housing.
- After the new ignition lock cylinder is securely in place, insert the key and turn it to the “ON” position. This will allow the cylinder to properly align with the ignition switch and ensure that it functions correctly.
- If the key turns smoothly and without any resistance, you have successfully installed the new ignition lock cylinder. Congratulations!
It is important to note that if you are using a new ignition lock cylinder, you may need to have it re-keyed to match your existing keys. This can typically be done by a professional locksmith or at your local dealership.
Remember, always exercise caution when working with your vehicle’s ignition system. If you are unsure about any step or lack the necessary tools and experience, it is recommended to seek the assistance of a professional locksmith or automotive technician.
FAQ:
What tools do I need to drill out an ignition key lock cylinder?
In order to drill out an ignition key lock cylinder, you will need a drill, drill bits of various sizes, a wrench, and a flathead screwdriver.
Is it difficult to drill out an ignition key lock cylinder?
Drilling out an ignition key lock cylinder can be a difficult task, especially if you do not have experience with locksmithing or mechanical work. It requires precision and patience to successfully remove the cylinder without causing any damage.
Can I drill out an ignition key lock cylinder if I have never done it before?
If you have never drilled out an ignition key lock cylinder before, it is recommended that you seek the help of a professional locksmith. They have the necessary skills and experience to remove the cylinder without causing any damage to your vehicle.
What are the steps involved in drilling out an ignition key lock cylinder?
The first step is to remove the steering column cover and expose the lock cylinder. Then, you will need to drill a small hole in the cylinder to insert a wire or paperclip. Next, you will need to drill larger holes to remove the pins inside the cylinder. Finally, you can use a wrench or flathead screwdriver to turn and remove the cylinder.
What precautions should I take when drilling out an ignition key lock cylinder?
When drilling out an ignition key lock cylinder, it is important to wear protective goggles to protect your eyes from flying debris. Additionally, you should be cautious not to apply excessive force while drilling, as this can cause damage to the surrounding components.
Can I replace an ignition key lock cylinder after drilling it out?
Yes, it is possible to replace an ignition key lock cylinder after drilling it out. However, it is recommended that you consult a professional locksmith for assistance with finding and installing a new cylinder to ensure proper functionality and security.
Video:


Meet Harrison Clayton, a distinguished author and home remodeling enthusiast whose expertise in the realm of renovation is second to none. With a passion for transforming houses into inviting homes, Harrison's writing at https://thehuts-eastbourne.co.uk/ brings a breath of fresh inspiration to the world of home improvement. Whether you're looking to revamp a small corner of your abode or embark on a complete home transformation, Harrison's articles provide the essential expertise and creative flair to turn your visions into reality. So, dive into the captivating world of home remodeling with Harrison Clayton and unlock the full potential of your living space with every word he writes.


