How to Drill Angled Holes in Wood: Step-by-Step Guide and Tips

Drilling angled holes in wood can be a challenging task, especially if you’re not familiar with the technique. However, with the right tools and a step-by-step guide, you can easily achieve precise and accurate angled holes in your woodworking projects. In this article, we’ll walk you through the process and provide you with some useful tips to ensure successful results.
Step 1: Marking the Hole
Before you start drilling, it’s important to mark the exact location where you want the angled hole to be. Use a pencil or a marking knife to make a clear, visible mark on the wood’s surface.
Step 2: Choosing the Right Drill Bit
Next, choose the appropriate drill bit for your project. For angled holes, a Forstner bit or a spade bit with a centering tip is highly recommended. These bits have a flat bottom and will provide you with a clean cut.

Step 3: Setting the Drill Angle
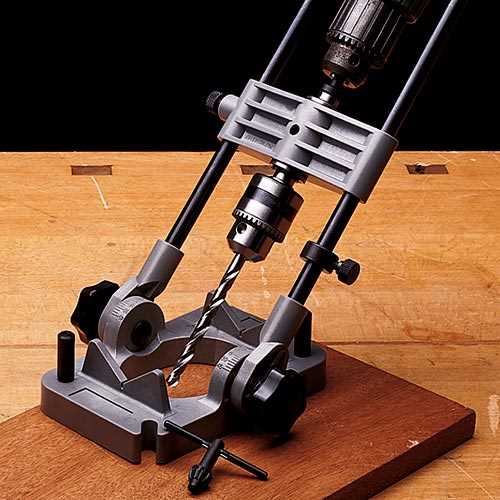
Now it’s time to set the drill’s angle. If you have a drill press with an adjustable table, adjust it to the desired angle. If you’re using a handheld drill, a drill guide or a jig can help you achieve the correct angle consistently.
Step 4: Secure the Wood
Before drilling, make sure the wood is securely clamped or held in place to prevent any movement or wobbling. This will help ensure a clean and precise hole.
Step 5: Start Drilling

Begin drilling the angled hole by slowly lowering the drill bit into the wood. Apply steady, even pressure and let the bit do the work. Be patient and avoid forcing the bit, as this can cause the wood to splinter or the bit to become dull.
Tips:
– Use a scrap piece of wood as a backing to prevent tear-out on the opposite side of the hole.
– Always wear safety goggles and ear protection when drilling to protect yourself from flying wood chips and noise.
– Practice on a scrap piece of wood before drilling angled holes on your actual project to gain confidence and perfect your technique.
By following these steps and tips, you’ll be able to drill angled holes in wood with ease and precision. Remember to take your time, use the right tools, and prioritize safety. Happy woodworking!
What are angled holes?
An angled hole, also known as a pocket hole or a countersink hole, is a hole that is drilled at an angle other than 90 degrees to the surface of the wood. Angled holes are commonly used in woodworking to join two pieces of wood together at an angle or to create recessed areas for screws or fasteners.
There are several reasons why you may need to drill angled holes in wood. One common reason is to create strong and invisible joints in furniture or cabinetry. An angled hole allows you to drill a screw or dowel at an angle which provides a stronger connection between two pieces of wood compared to a straight hole.

Angled holes can also be used to create recessed areas for screws or fasteners. By drilling a hole at an angle and partially countersinking it, the screw or fastener can sit below the surface of the wood, creating a flush or hidden finish.
Another reason to drill angled holes is for decorative purposes. Angled holes can be used to create interesting patterns or designs in wood, adding visual interest to your woodworking projects.
There are various tools and techniques available to drill angled holes in wood, including drill guides, jigs, and specialized drill bits. These tools and techniques help ensure accuracy and precision when drilling angled holes.
Overall, angled holes are a versatile and important part of woodworking, allowing you to create strong joints, hidden fasteners, and decorative designs in wood.
Why drill angled holes in wood?

There are several reasons why you might need to drill angled holes in wood:
- Joinery: Angled holes are often used in joinery to create strong and secure connections between two pieces of wood. By drilling angled holes and using dowels or screws, you can create joints that are less likely to come apart over time.
- Decorative purposes: Angled holes can also be used for decorative purposes, such as creating unique designs or patterns in wood. These angled holes can be filled with contrasting wood plugs or left open to create a visually appealing effect.
- Routing wires or cables: If you need to route wires or cables through a piece of wood, drilling angled holes can be a practical solution. By drilling at an angle, you can create a path for the wires or cables without compromising the integrity of the wood.
- Adjustable shelving: When building furniture with adjustable shelving, drilling angled holes can allow for easy adjustment of the shelves. By drilling angled holes and using pegs or brackets, you can easily move the shelves up or down as needed.
- Preventing splitting: In some cases, drilling angled holes can help prevent wood from splitting. By drilling pilot holes at an angle before driving in screws or nails, you can reduce the likelihood of the wood splitting under pressure.
Overall, drilling angled holes in wood can provide practical, decorative, and functional benefits for various woodworking projects.
Step 1: Marking the hole
Before you start drilling an angled hole in wood, it’s important to accurately mark the spot where the hole will be. This step is crucial for ensuring that the hole is drilled in the correct location and at the desired angle.
Here are the steps to follow when marking the hole:

- Measure and mark: Use a ruler or measuring tape to determine the exact location on the wood where you want the hole to be. Make a small mark with a pencil or marker.
- Find the desired angle: Decide on the angle at which you want the hole to be drilled. You can use a protractor or an angle finder tool to measure the angle accurately. Mark the angle on the wood using a straight edge or a square.
- Transfer the mark: Align the drill bit with the mark you made on the wood. Make sure the drill bit is centered on the mark. Use a straight edge or a square to ensure accuracy.
- Double-check the alignment: Before drilling, double-check the alignment of the mark and the drill bit. Make any necessary adjustments to ensure that the hole will be drilled at the correct angle.
By taking the time to properly mark the hole, you can ensure that your angled hole will be drilled accurately and according to your specifications.
Choose the location
Before you start drilling angled holes in wood, it is important to choose the right location for your holes. Here are a few factors to consider:
- Functionality: Think about the purpose of the angled holes. Are you creating a pocket hole joint, attaching a hinge, or simply adding decorative features? Understanding the function will help you determine the best location.
- Wood type: Different types of wood have different strengths and characteristics. Consider the type of wood you are drilling into and its ability to hold screws or other fasteners at an angle.
- Visible or hidden: Determine if the angled holes will be visible or hidden. If they will be visible, you may want to take extra care in choosing a location that aligns with the overall design and aesthetic of the project.
- Workpiece size: Take into account the size and dimensions of your workpiece. Ensure that the chosen location for the angled holes will not compromise the structural integrity or stability of the wood.
Once you have considered these factors, mark the location on the wood where you want to drill your angled holes. Use a pencil or a marking tool to create a clear and visible mark that will guide you during the drilling process.
Mark the angle
Before you start drilling angled holes in wood, it’s important to mark the angle accurately. This will ensure that your holes are drilled correctly and align with your desired angle.
To mark the angle, you can use a protractor, angle finder, or a combination square. Here are the steps to mark the angle:
- Measure the desired angle with a protractor. For example, if you want to drill a hole at a 45-degree angle, place the protractor on the wood and align the 45-degree angle line with the edge of the wood.
- Once the angle is set, use a pencil to mark the line along the edge of the protractor or angle finder. Make sure to draw a clear and straight line to easily guide your drilling.
- If you’re using a combination square, set the desired angle by adjusting the square’s sliding ruler or rotating the square’s blade. Then, hold the square firmly against the wood and use a pencil to mark the line along the edge of the square.
- Double-check your marked line to ensure it is accurate and matches your desired angle.
By properly marking the angle, you’ll have a clear guideline to follow when drilling your angled holes. This step is crucial in achieving precise and professional results.
Step 2: Setting up the drill
Before you start drilling angled holes in wood, it is important to set up your drill properly. Follow these steps to ensure accurate and safe drilling:
-
Choose the right drill bit: Select a drill bit that matches the size and angle of the hole you want to create. For angled holes, you will need a special drill bit called a counterbore bit or a spade bit with a brad point. Make sure the bit is sharp and in good condition.
-
Adjust the drill press angle: If you are using a drill press, adjust the table angle to match the desired hole angle. Use the built-in angle guide or a protractor to set the angle accurately. Ensure that the table is locked securely in position before drilling.
-
Secure the workpiece: Place the wood on a stable surface or secure it in a vise to prevent movement during drilling. This will ensure that the hole is drilled at the correct angle.
-
Mark the hole location: Use a pencil or a marking tool to indicate the center point of the hole on the wood surface. This will serve as a guide for positioning the drill bit.
-
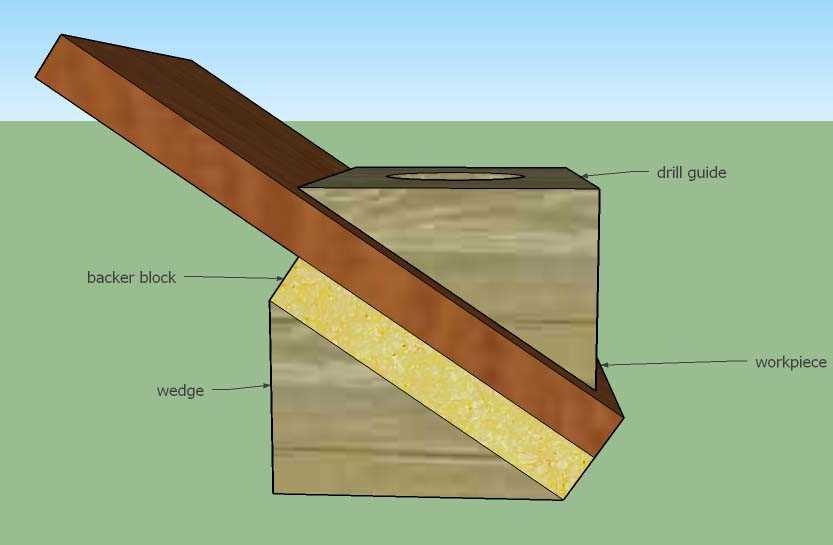
Use a drill guide: To ensure precise drilling, consider using a drill guide or a drilling jig. These tools provide a stable platform for drilling angled holes and help control the depth and alignment of the hole.
-
Double-check the setup: Before turning on the drill, inspect the setup to ensure everything is properly aligned and tightened. Verify that the drill bit is securely inserted into the chuck and the drilling angle is set correctly.
Following these steps will help you set up your drill correctly and ensure accurate and safe drilling of angled holes in wood.
Select the right drill bit
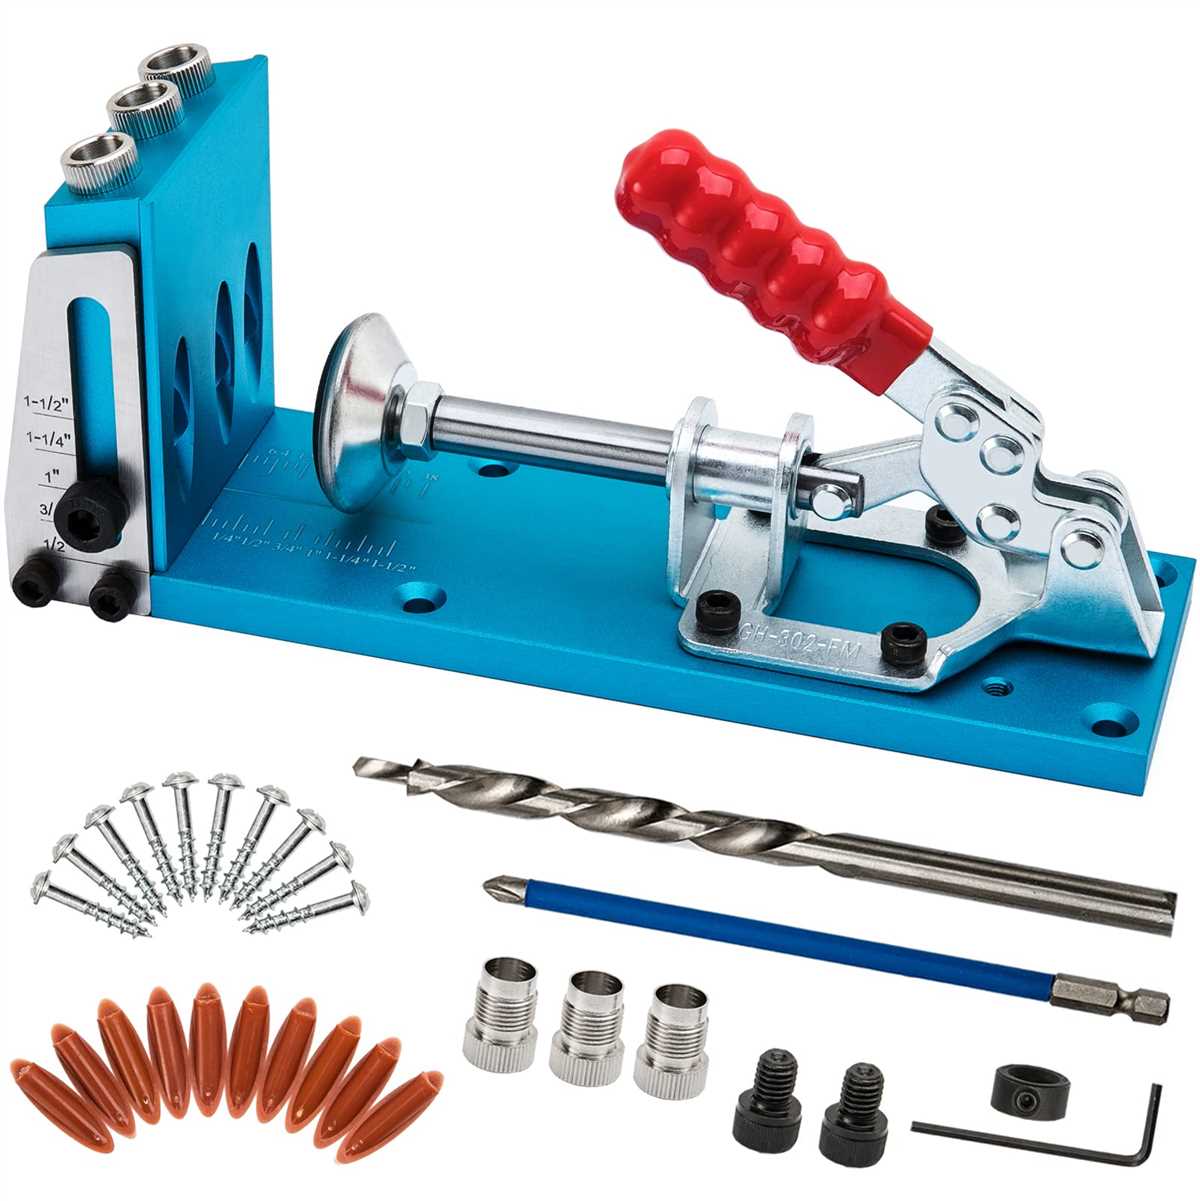
Choosing the right drill bit is crucial when drilling angled holes in wood. The type and size of the drill bit will depend on the specific project and the angle at which you need to drill the hole. Here are a few factors to consider when selecting the right drill bit:
- Drill bit type: There are various types of drill bits available, such as twist bits, spade bits, and Forstner bits. The type of drill bit you choose will depend on the size and shape of the hole you need to drill.
- Drill bit size: The size of the drill bit is determined by its diameter. Be sure to choose a drill bit that is suitable for the size of the hole you need to drill. Too large of a drill bit may result in an oversized hole, while too small of a drill bit may not create a hole of the desired size.
- Drill bit material: Drill bits are made from different materials, such as high-speed steel (HSS) or carbide. Consider the material you will be drilling into and choose a drill bit that is designed to work well with that material.
It is important to have a variety of drill bits on hand to ensure you can choose the right one for each project. Investing in a good quality set of drill bits will pay off in the long run, as they will provide better performance and last longer.
Adjust the drill press or angle guide
Before you start drilling angled holes in wood, it is important to properly adjust your drill press or angle guide. This will ensure precise and accurate drilling.
1. Drill press adjustment
If you are using a drill press, follow these steps to adjust it for drilling angled holes:
- Loosen the locking handle on the drill press table.
- Rotate the table and adjust the angle to the desired degree.
- Tighten the locking handle to secure the table in place.
- Adjust the height of the table if necessary by turning the crank or using the height adjustment mechanism.
Make sure to check the angle using a protractor or angle gauge to ensure accuracy.
2. Angle guide adjustment
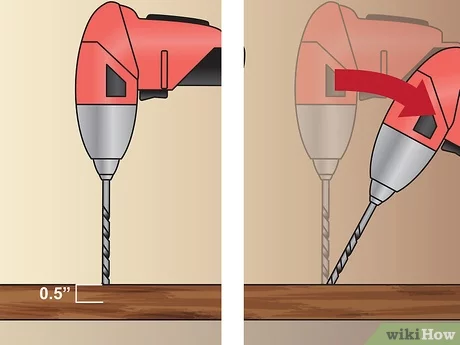
If you are using an angle guide with a handheld drill, here’s how you can adjust it:
- Loosen the locking mechanism on the angle guide.
- Set the desired angle by aligning the guide with the degree markings.
- Tighten the locking mechanism to secure the guide in place.
Some angle guides may have additional adjustments for controlling depth or setting a stop point. Follow the manufacturer’s instructions for these specific adjustments.
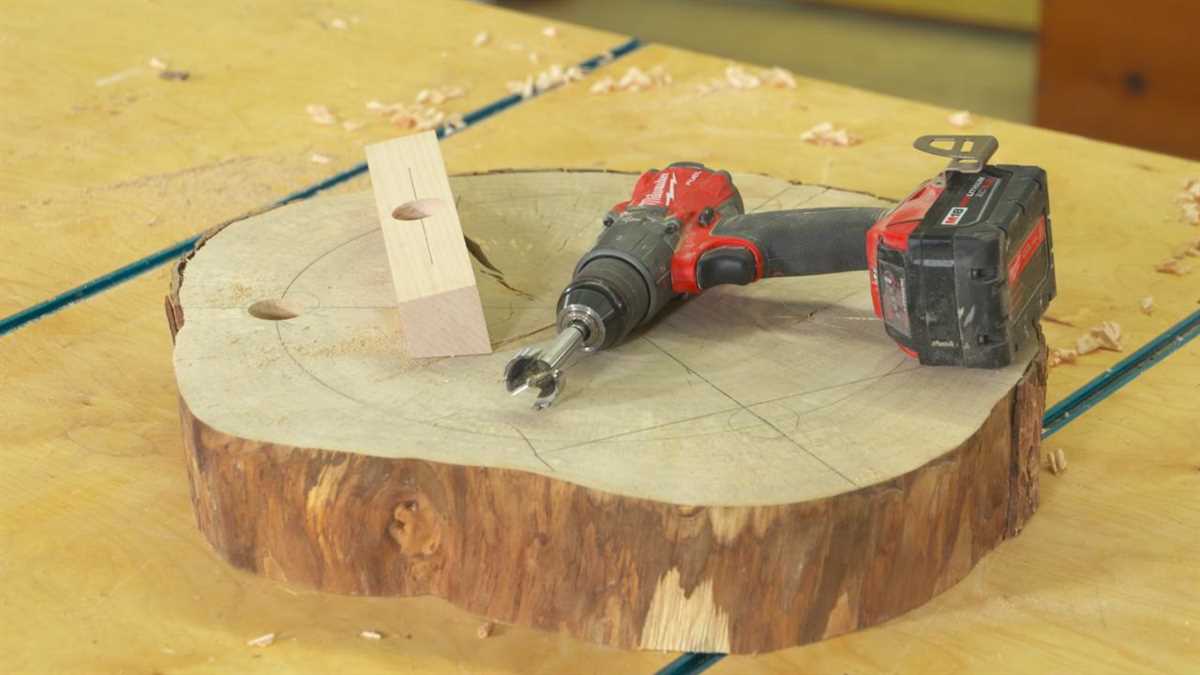
Step 3: Drilling the hole
Once you have marked the location for the angled hole, prepare your drill and the appropriate drill bit. Make sure to choose a drill bit size that matches the diameter of the screw or fastener you will be using.
Tip: It is recommended to start with a smaller drill bit and gradually increase the size if needed, especially if you are drilling through a thick or hard piece of wood.
Set the drill to low speed and insert the drill bit into the mark you made. Position the drill at the desired angle and hold it steadily. Apply gentle pressure and slowly begin drilling into the wood.
Tip: To improve stability and prevent the drill bit from slipping, you can use a center punch to create a small indentation at the center of the mark before drilling.
Continue drilling until you have reached the desired depth. Be careful not to drill too far or you may damage the wood or go through the other side.
After drilling the angled hole, remove the drill bit from the wood and inspect the hole to ensure it is clean and free of any debris. If necessary, use a brush or compressed air to remove any wood chips or dust from the hole.
Once the hole is clean, you can proceed to the next step of your project, whether it is inserting a screw, dowel, or any other fastener.
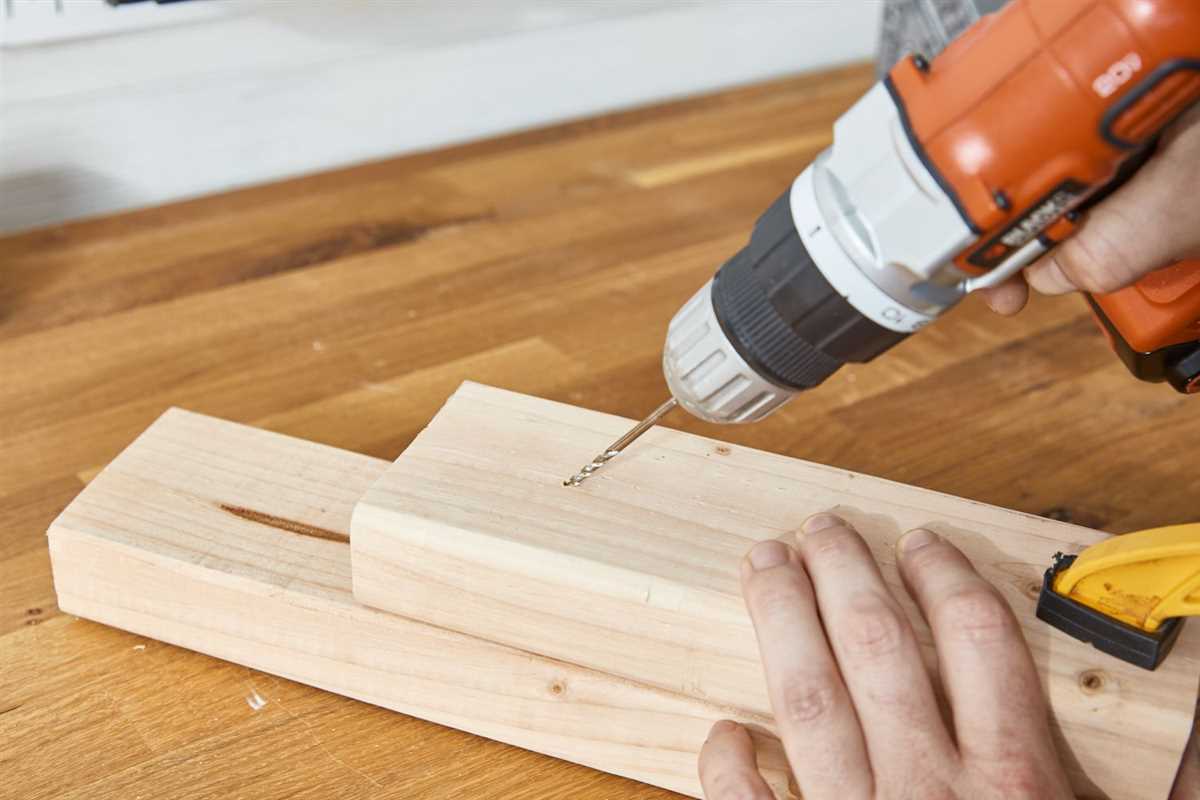
Secure the wood

Before drilling angled holes in wood, it is important to properly secure the wood to prevent it from moving or shifting during the drilling process. This will help to ensure accurate and clean holes.
Here are some methods to securely hold the wood in place:
- Clamps: Use clamps to hold the wood firmly in place on a workbench or table. Make sure the clamps are tightened securely to prevent any movement or shifting.
- Vise: If you have access to a vise, secure the wood in the jaws of the vise. This will provide a stable and secure base for drilling.
- Bench dogs: If you have a workbench with bench dogs, use them to hold the wood securely in place. Bench dogs are pegs that can be raised or lowered to hold the wood firmly.
- Workpiece support: If you are drilling a larger piece of wood or a long board, use a workpiece support underneath the wood to provide additional stability and prevent sagging or movement.
Regardless of the method you choose, always ensure that the wood is securely held in place before starting to drill. This will not only prevent accidents but also help to produce consistent and accurate angled holes in the wood.
FAQ:
What tools do I need to drill angled holes in wood?
To drill angled holes in wood, you will need a drill, a drill bit, an angle guide or a protractor, and clamps to hold the wood in place.
What is the purpose of drilling angled holes in wood?
Drilling angled holes in wood is often necessary when joining two pieces of wood at an angle or when creating pocket holes for screws to be hidden.
Can I use a regular drill bit to drill angled holes?
Yes, you can use a regular drill bit to drill angled holes in wood. However, using an angled drill bit or a spade bit with an angled handle will make it easier to drill at the desired angle.
How do I determine the correct angle to drill a hole?
You can determine the correct angle to drill a hole by using an angle guide or a protractor. Measure and mark the desired angle on the wood, align the guide or protractor with the mark, and drill the hole at the indicated angle.
Do I need to clamp the wood before drilling angled holes?
Yes, it is recommended to clamp the wood securely before drilling angled holes. This will help to keep the wood in place and prevent it from moving or shifting during the drilling process.
What are some tips for drilling angled holes in wood?
Some tips for drilling angled holes in wood include starting with a small pilot hole, using a steady and controlled drilling motion, and using a depth stop to ensure consistent hole depth. It is also important to choose the correct drill bit size and type for the job.
Video:


Meet Harrison Clayton, a distinguished author and home remodeling enthusiast whose expertise in the realm of renovation is second to none. With a passion for transforming houses into inviting homes, Harrison's writing at https://thehuts-eastbourne.co.uk/ brings a breath of fresh inspiration to the world of home improvement. Whether you're looking to revamp a small corner of your abode or embark on a complete home transformation, Harrison's articles provide the essential expertise and creative flair to turn your visions into reality. So, dive into the captivating world of home remodeling with Harrison Clayton and unlock the full potential of your living space with every word he writes.


