How to Drill and Tap a Hole: A Step-by-Step Guide

Drilling and tapping a hole is a fundamental skill that every DIY enthusiast should have in their toolbox. Whether you need to install a new light fixture, hang a shelf, or repair a broken piece of furniture, knowing how to drill and tap a hole will come in handy.
Drilling a hole is the first step in the process. You’ll need a drill and a bit that matches the size of the hole you want to create. Start by marking the spot where you want to drill, then secure your workpiece in a vice or clamp to keep it steady. Use a center punch to make a small indentation at the marked spot, which will help prevent the drill bit from wandering.
Next, insert the appropriate drill bit into your drill and tighten it securely. Position the drill bit over the center punch indentation and apply gentle pressure. Start the drill at a low speed to prevent the bit from slipping, then gradually increase the speed. Keep the drill bit straight and perpendicular to the workpiece as you drill, and periodically withdraw the bit to clear away any chips or debris.
Once you’ve drilled the hole, it’s time to tap it. Tapping is the process of creating threads inside the hole, allowing you to screw in a bolt or screw. First, select the appropriate tap for the size of the hole. Insert the tap into a tapping handle or wrench, then position it at the mouth of the hole. Apply steady pressure and turn the tap in a clockwise direction. Make sure to keep the tap straight and aligned with the hole as you turn it.
After a few turns, you’ll feel resistance as the tap begins to cut into the material. Keep applying pressure and turning the tap until the threads are fully formed. Be careful not to over-tighten or force the tap, as this can damage the threads. Once you’re done, use a tap wrench or adjustable wrench to remove the tap from the hole. Now your hole is ready for use!

What is drilling and tapping?
Drilling and tapping are two common processes used in metalworking and woodworking to create holes or threads in a workpiece. Both processes involve the use of a drill bit, but their purposes and methods differ.
Drilling:
Drilling is the process of creating a hole in a material using a drill bit, which rotates and applies force to the workpiece. The drill bit cuts through the material, removing chips and creating a hole with a specific diameter. Drilling is commonly used to create holes for various purposes, such as installing screws, bolts, or dowels, or for creating openings for wires or pipes.
Tapping:

Tapping is the process of creating internal threads in a hole. It is typically used when a screw or bolt needs to be inserted into a hole and secured in place. To tap a hole, a tap is used, which is a tool with a threaded end that matches the desired thread size. The tap is rotated and pressed into the hole, cutting threads into the workpiece. Tapping can be done by hand or with the help of a tapping machine.
Tapping can also refer to the process of creating external threads on a cylindrical workpiece using a die, but in this article, we will focus on the process of tapping internal threads.
Importance of drilling and tapping accurately
Drilling and tapping accurately is crucial for a variety of reasons. When drilling a hole, it is important to align the drill bit properly to avoid any deviations. A slight misalignment can result in an off-centered hole, which can lead to numerous issues.
Precision and Accuracy
Accurate drilling and tapping ensure precision in the resulting hole. This is particularly important in applications where the hole needs to be aligned with other components or structures. Without precise drilling and tapping, the hole may not match the intended specifications, causing problems in the assembly or function of the finished product.

Thread Integrity
Tapping refers to cutting threads into the drilled hole, allowing screws or bolts to be securely fastened. Accurate tapping ensures the integrity of the threads. If the tapping is not done correctly, the threads may be damaged or misaligned, leading to weak connections or improper fit of fasteners. This can result in decreased structural integrity and potential failure of the assembled components.
Efficiency and Productivity
Drilling and tapping accurately also improves efficiency and productivity. When the holes are drilled and tapped accurately, the assembly process becomes smoother and faster. Components can be easily aligned and securely fastened, reducing the chances of rework or errors. This can save time and resources, leading to increased productivity and improved overall output.
Cost and Safety
Inaccurate drilling and tapping can also have financial implications. If the holes are not drilled and tapped accurately, it may require additional resources to fix or replace the components. This can increase costs and delay project timelines. Furthermore, improper drilling and tapping can compromise the safety of the finished product or structure, leading to potential accidents or failures.
Therefore, it is essential to take the necessary time and care to drill and tap accurately. Using the appropriate tools and techniques, as well as following proper guidelines, can ensure precise drilling and tapping, resulting in a high-quality and reliable end product.

Step 1: Gather the necessary tools
Before you begin drilling and tapping a hole, it is important to gather all the necessary tools and materials. Here is a list of the tools you will need:
- Drill: A power drill or a hand drill will be needed to create the hole. Make sure the drill has a chuck that can hold the tap securely.
- Tap: This is the tool used to create internal threads in the hole. Choose a tap that matches the size and type of threads you need.
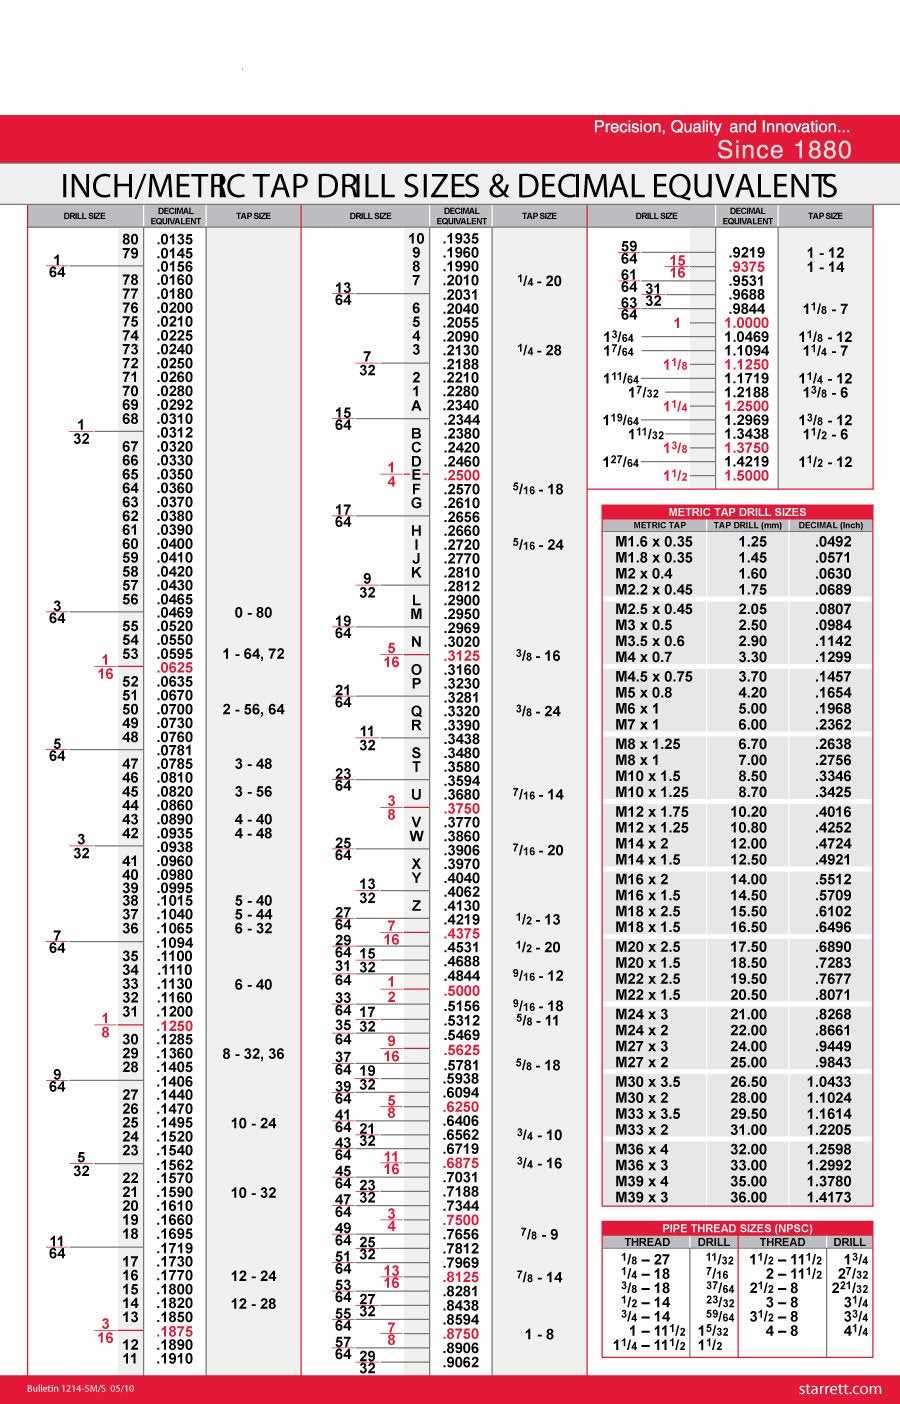
- Drill bits: You will need the appropriate drill bit size for the hole to be drilled before tapping. The drill bit size should match the tap size or be slightly smaller to ensure proper thread engagement.
- Tap handle: A tap handle is used to turn the tap, allowing it to cut threads into the hole. Make sure the tap handle is comfortable to grip and provides enough leverage.
- Tap lubricant: Using a tap lubricant will make the drilling and tapping process smoother and help prolong the life of your tools. Cutting fluid or oil can be used as a lubricant.
- Depth gauge: A depth gauge is used to measure the depth of the hole, ensuring that you drill and tap the hole to the correct depth.
- Cutting oil: Cutting oil helps cool the drill bit and tap, reducing friction and extending their lifespan. It is important to apply cutting oil during the drilling and tapping process.
- Safety equipment: Always wear safety goggles and gloves when drilling and tapping holes. This will protect you from any flying debris or accidental injury.
Having all these tools and materials ready before you start will ensure a smooth and efficient drilling and tapping process.
Choosing the right drill bit
When it comes to drilling and tapping a hole, choosing the right drill bit is essential for achieving the desired result. Using the wrong drill bit can lead to poor-quality holes, damaged threads, or even injury. Here are some factors to consider when selecting a drill bit:
Material to be drilled
The material you are drilling will determine the type of drill bit you should use. Different materials require different bits to ensure a smooth and accurate hole. Some common drill bit materials include:
- High-Speed Steel (HSS): Suitable for drilling wood, plastic, and most metals.
- Cobalt: Ideal for drilling hard metals such as stainless steel and cast iron.
- Carbide: Used for drilling extremely hard materials like concrete, stone, and tile.
Drill bit size
The size of the hole you need to drill will determine the drill bit size you should choose. Drill bit sizes are measured in fractions of an inch or in millimeters. The correct size should be specified in the project plans or determined based on the required hole diameter.

Drill bit type
There are various types of drill bits available, each designed for specific drilling applications. Some common drill bit types include:
- Twist Drill Bit: This is the most common type of drill bit and is used for general-purpose drilling in a wide range of materials.
- Step Drill Bit: Ideal for drilling multiple hole sizes with a single bit. It works by gradually increasing the hole size in increments.
- Forstner Bit: Used for drilling flat-bottomed holes, typically in wood. It creates clean and precise holes with minimal tear-out.
- Spade Bit: Designed for drilling large-diameter holes in wood. It has a flat, paddle-like tip and can produce holes up to 2 inches in diameter.
Quality and brand
Choosing a high-quality drill bit from a reputable brand is important to ensure durability, accuracy, and longevity. Investing in a good quality drill bit may cost more initially but will save you time, money, and frustration in the long run.
Remember to always wear appropriate safety gear when drilling and tapping holes, including safety glasses and gloves. Take your time to carefully select the right drill bit for your specific project, and you’ll be on your way to successful drilling and tapping.
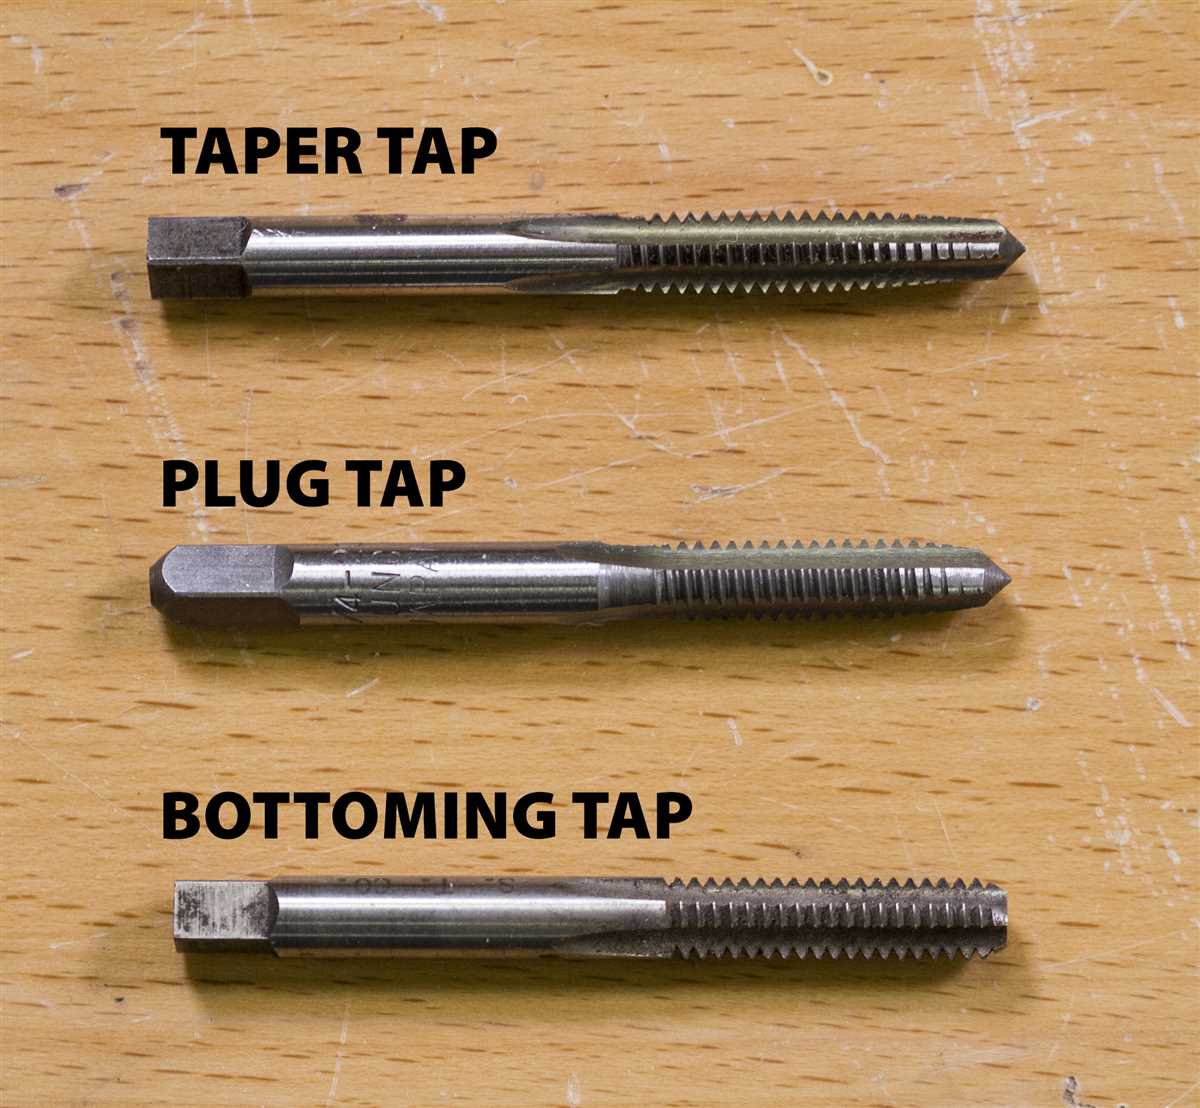
Selecting the appropriate tap
When it comes to drilling and tapping a hole, selecting the right tap is crucial. The tap is the tool used to create internal threads in the hole that will allow a screw or bolt to be inserted and secured.
There are several factors to consider when selecting the appropriate tap:
- Thread size: The tap must match the desired thread size. Taps are available in various sizes, indicated by a number or letter, such as 1/4-20 or M6. The first number represents the thread diameter, while the second number or letter represents the thread pitch.
- Tap material and coating: Taps are made from different materials, such as high-speed steel (HSS) or cobalt, each with its own advantages. Some taps also have coatings, like TiN (titanium nitride), which provide additional hardness and lubrication.
- Type of tap: There are different types of taps, including straight flute (also known as hand taps), spiral flute, and spiral point taps. Each type has its own purpose and is suitable for different materials and applications.
- Material being tapped: The material being tapped is an essential factor to consider. Different materials require different taps and cutting speeds. For example, a tap designed for aluminum may not be suitable for stainless steel.
- Thread form: Depending on the application, you may need to choose between different thread forms, such as standard (UNC or UNF), metric (M), or pipe threads (NPT).
It is essential to follow the manufacturer’s recommendations and guidelines when selecting a tap. Choosing the wrong tap can lead to poor-quality threads, damaged tools, or broken taps.
Proper tap selection can ensure successful drilling and tapping operations and produce high-quality threads that will securely hold fasteners in place.
Step 2: Prepare the workpiece
Before you can start drilling and tapping a hole, it is important to properly prepare the workpiece. This involves measuring and marking the location of the hole, securing the workpiece, and ensuring it is stable and positioned correctly.
1. Measure and mark the hole location
Using a measuring tape or ruler, carefully measure the location where you want to drill and tap the hole. Make sure to double-check your measurements to ensure accuracy. Once you have determined the correct location, use a center punch or punch set to mark the center point of the hole. This will serve as a guide for drilling.
2. Secure the workpiece
It is important to secure the workpiece before drilling and tapping to prevent any movement or slipping. Depending on the size and shape of the workpiece, you can use clamps, a vise, or a workbench with a clamp system. Make sure the workpiece is firmly held in place to ensure precise drilling and tapping.
3. Position the workpiece correctly
Ensure the workpiece is positioned correctly before proceeding with drilling and tapping. The hole should be easily accessible and aligned with the drill bit or tapping tool. Take into consideration the size and shape of the workpiece to determine the best position for drilling and tapping. Make any necessary adjustments to achieve the desired position.
By properly preparing the workpiece, you can ensure accurate and efficient drilling and tapping. Take the time to measure and mark the hole location, secure the workpiece, and position it correctly to achieve the best results.
Marking the drill spot
Before you start drilling, it’s important to accurately mark the spot where the hole will be drilled. This will ensure that the hole is in the right location and that the drilled hole is straight.
Here are the steps for marking the drill spot:
- Gather all the necessary equipment, including the drill, the drill bit, and a marker or punch.
- Position the item or surface to be drilled on a stable and level work surface.
- Use a measuring tape or ruler to measure the exact location for the hole, taking into account any specific dimensions or spacing requirements.
- Once you have identified the precise spot for the hole, use a marker or punch to make a small indentation or mark at the center of the drilling location.
- Double-check the marked spot to ensure it is accurate and aligned correctly.
It’s essential to take your time during the marking process to ensure accuracy. Small mistakes in marking can lead to significant errors when drilling, resulting in a hole that is off-center or not aligned properly.
Cleaning the workpiece
Before drilling and tapping a hole, it is essential to clean the workpiece thoroughly. Cleaning ensures that no debris or contaminants interfere with the drilling and tapping process. Here are the steps to clean the workpiece:
- Inspect the workpiece for any dirt, grease, or rust. Use a clean cloth or brush to remove any loose contaminants.
- If there is heavy grease or oil on the workpiece, you may need to use a degreaser or solvent to remove it. Apply the degreaser or solvent to a clean cloth and wipe the workpiece until it is clean.
- For rusted areas, you can use a wire brush or sandpaper to remove the rust. Make sure to remove all the rust before proceeding.
- After cleaning the workpiece, it is recommended to wipe it again with a clean cloth to ensure that no residue is left behind.
- If necessary, you can use compressed air or a vacuum to blow away any remaining dust or debris.
Note: Cleaning the workpiece is crucial for achieving accurate and precise drilling and tapping results. Any debris or contaminants left on the workpiece can affect the quality of the drilled and tapped hole.
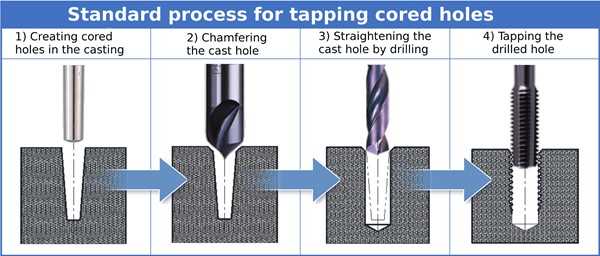
Step 3: Drilling the hole
Once you have marked the spot where you want to drill the hole, it’s time to start drilling. Before you begin, make sure you have the correct drill bit for the type of hole you want to create.
Here’s how to drill the hole:
- Secure the workpiece in a steady position, using clamps or a vice if necessary.
- Put on safety goggles and gloves to protect yourself from any flying debris.
- Insert the appropriate drill bit into your drill. Make sure it is secure and tightened properly.
- Position the drill bit directly over the marked spot on your workpiece.
- Apply steady pressure to the drill, keeping it perpendicular to the workpiece. Avoid leaning the drill to one side or applying too much pressure, as this can result in a crooked or damaged hole.
- Start drilling, applying consistent pressure. Let the drill bit do the work, instead of forcing it through the material. Be patient and take your time.
- Check the hole periodically to ensure you are drilling to the desired depth. You can do this by pulling the drill bit out slightly and inspecting the hole.
- Continue drilling until you have reached the desired depth. Take breaks if necessary to prevent overheating or damaging the drill bit.
- Once you have drilled the hole, release the pressure on the drill and allow it to come to a complete stop before removing the drill bit from the hole.
Drilling a hole requires patience and precision, so take your time and be careful throughout the process. Remember to always follow safety precautions and wear the appropriate protective gear.
Using the correct drilling technique
Drilling a hole correctly is essential for a successful tapping process. Here are some key steps to follow when using the correct drilling technique:
- Choose the right drill bit: The drill bit you use should match the size of the tapping hole required. It should also be sharp and in good condition to ensure clean and accurate drilling.
- Mark the drilling point: Before drilling, mark the point where you want the hole to be. This will help guide your drilling and ensure accuracy.
- Secure the workpiece: Make sure the workpiece is securely clamped or held down to prevent any movement while drilling. This will ensure the hole is drilled in the correct location and at the right angle.
- Start with a pilot hole: To ensure accuracy, it’s a good idea to start with a smaller pilot hole before drilling the final hole size. The pilot hole will act as a guide for the larger drill bit and help prevent any deviation or wandering.
- Use appropriate speeds and feeds: Different materials require different drilling speeds and feeds. Check the manufacturer’s guidelines or refer to a cutting data chart to determine the correct drilling speeds and feeds for the material you are working with.
- Keep the drill bit lubricated: Using a cutting fluid or lubricant while drilling will help reduce heat and friction, prolonging the life of the drill bit and improving the quality of the hole.
- Drill slowly and steadily: When drilling, it’s important to maintain a consistent speed and apply steady pressure. Avoid applying too much force or rushing the process, as this can lead to a misaligned or damaged hole.
- Clear the chips: As you drill, chips and debris will accumulate in the hole. Use a brush or compressed air to clear the chips regularly. This will prevent chip clogging and ensure the drilling process goes smoothly.
- Measure the hole depth: If you need to drill a hole to a specific depth, use a depth gauge or mark the drill bit to achieve the desired depth.
By following these steps and using the correct drilling technique, you can achieve clean, accurate, and properly-sized holes for tapping.
FAQ:
What equipment do I need to drill and tap a hole?
To drill and tap a hole, you will need a drill bit, a tap, a tap handle, cutting oil, safety goggles, and a drill press or handheld drill.
What is the purpose of cutting oil when drilling and tapping a hole?
Cutting oil is used to lubricate and cool the drill bit and tap during the drilling and tapping process. It helps extend the life of the tools and ensures smooth and accurate drilling and tapping.
Can I use a handheld drill instead of a drill press to drill and tap a hole?
Yes, you can use a handheld drill instead of a drill press for drilling and tapping a hole. However, using a drill press provides more stability and precision, especially when drilling and tapping larger holes.
Is it necessary to wear safety goggles when drilling and tapping a hole?
Yes, it is highly recommended to wear safety goggles when drilling and tapping a hole. The drilling and tapping process produces metal chips and can be hazardous to the eyes. Safety goggles protect your eyes from potential injuries.
What are the common sizes for drill bits and taps?
The common sizes for drill bits and taps depend on the specific requirements of your project. However, some common sizes for drill bits are 1/8″, 1/4″, 3/8″, and 1/2″, while common tap sizes include 4-40, 6-32, 8-32, 10-24, and 1/4″-20.
Can I use any type of cutting oil when drilling and tapping a hole?
It is best to use cutting oil specifically designed for metal cutting applications when drilling and tapping a hole. These oils have the right viscosity and additives to provide optimal lubrication and cooling for the drilling and tapping process.
Video:


Meet Harrison Clayton, a distinguished author and home remodeling enthusiast whose expertise in the realm of renovation is second to none. With a passion for transforming houses into inviting homes, Harrison's writing at https://thehuts-eastbourne.co.uk/ brings a breath of fresh inspiration to the world of home improvement. Whether you're looking to revamp a small corner of your abode or embark on a complete home transformation, Harrison's articles provide the essential expertise and creative flair to turn your visions into reality. So, dive into the captivating world of home remodeling with Harrison Clayton and unlock the full potential of your living space with every word he writes.


