How to Drill an Aquarium: A Step-by-Step Guide
Drilling an aquarium can be a daunting task, but with the right tools and techniques, it can be done safely and effectively. Whether you want to add a filtration system or create a custom plumbing setup, drilling an aquarium allows you to customize your tank to your specific needs.
Before you begin, it’s important to gather all the necessary tools and materials. You will need a diamond-coated glass drill bit, a drill press or power drill, safety goggles, a tape measure, a marker, a small container filled with water, and a level. It’s also crucial to have a clear understanding of the dimensions and layout of your aquarium in order to determine the best spot to drill.
First, measure and mark the location for the hole on the glass. Use the tape measure to ensure accuracy, and use a marker to mark the exact spot. Next, put on the safety goggles to protect your eyes. Fill the container with a small amount of water to use as a lubricant. The water will keep the drill bit cool and prevent it from overheating. It’s important to keep the drill bit and glass wet throughout the drilling process to prevent cracking or shattering.
Place the drill bit in the drill press or power drill, and slowly begin drilling at a low speed. Apply gentle, even pressure and allow the drill bit to do the work. Avoid applying too much pressure, as this can increase the risk of cracking the glass. As you drill, periodically dip the drill bit and glass into the water to keep them wet. This will help dissipate heat and prevent damage to the glass.
Once the hole is drilled, use a level to ensure that it is perfectly vertical or at the desired angle. Clean any debris or glass fragments from the hole, and rinse it with water to remove any remaining particles. You can now install any fittings or attachments as needed, such as bulkhead fittings or overflow boxes.

Drilling an aquarium requires patience and precision, but with the right tools and techniques, it can be accomplished successfully. By following these step-by-step instructions, you can safely drill a hole in your aquarium and customize it to meet your specific needs.
Choosing the Right Tools
Drilling an aquarium requires the use of specific tools to ensure a safe and successful outcome. Here are some tools you will need:
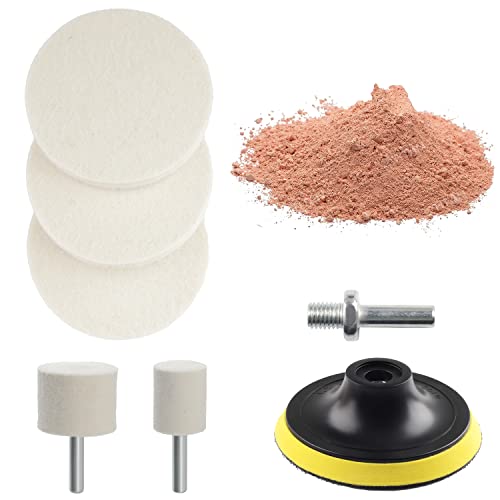
1. Diamond-coated Hole Saw Bit
A diamond-coated hole saw bit is essential for drilling through glass or acrylic aquariums. The diamond coating on the bit provides the necessary strength and durability to cut through the tough material without causing damage.
2. Power Drill
A power drill is necessary to provide the necessary rotational force for the hole saw bit. Make sure to select a drill that has enough power and torque to effectively drill through the glass or acrylic material.

3. Water Dispenser
When drilling through glass or acrylic, it is important to use water as a lubricant and coolant. A water dispenser with a spray nozzle will help to keep the drill bit and the aquarium cool during the drilling process, preventing overheating and potential damage.
4. Safety Glasses
Protecting your eyes is crucial during any drilling activity. Safety glasses will help to prevent any debris or glass shards from getting into your eyes, ensuring a safe working environment.
5. Masking Tape
Masking tape is used to create a barrier on the glass or acrylic surface to prevent any cracks or chips during the drilling process. It should be applied in a circle around the desired drill location to provide a guide for the hole saw bit.
6. Rubber Grommet
If you plan to install any additional hardware, such as filters or heaters, you will need a rubber grommet to create a watertight seal around the drilled hole. The grommet will prevent any leaks and ensure the stability of the aquarium.

In addition to these tools, it is important to have a clean and organized workspace to prevent any accidents or damage to your aquarium. Make sure to follow all safety precautions and take your time during the drilling process for the best results.
Preparing the Aquarium
Before you can start drilling your aquarium, you will need to take several steps to ensure that it is properly prepared.
1. Empty the Aquarium
First, you will need to empty the aquarium completely. Remove all the water, rocks, plants, and any other decorations or inhabitants from the tank. It is important to have a clean and dry work area to avoid any accidents during the drilling process.
2. Measure and Mark the Hole
Using a tape measure, determine the exact location where you want the hole to be drilled. Make sure to take into account the size and positioning of any existing plumbing or equipment that may be present in the aquarium.
Once you have determined the location, mark it with a pencil or a marker. This will help guide you when drilling the hole later on.

3. Gather the Necessary Tools and Supplies

Drilling an aquarium requires specific tools and supplies. Make sure you have everything you need before starting the process. Here is a list of the most common items you will need:
- Drill with diamond drill bit
- Masking tape
- Water supply
- Safety goggles and gloves
- A helper (optional but recommended)
4. Set up a Work Area
Designate a clean and well-ventilated area where you can securely place your aquarium for drilling. Make sure you have enough space to work comfortably and that the surface is protected from scratches or damage.
Place a sturdy worktable or a piece of plywood on the designated area to provide a stable surface for drilling. It is also a good idea to cover the worktable or plywood with a soft cloth or towel to prevent any scratches on the bottom of the tank.
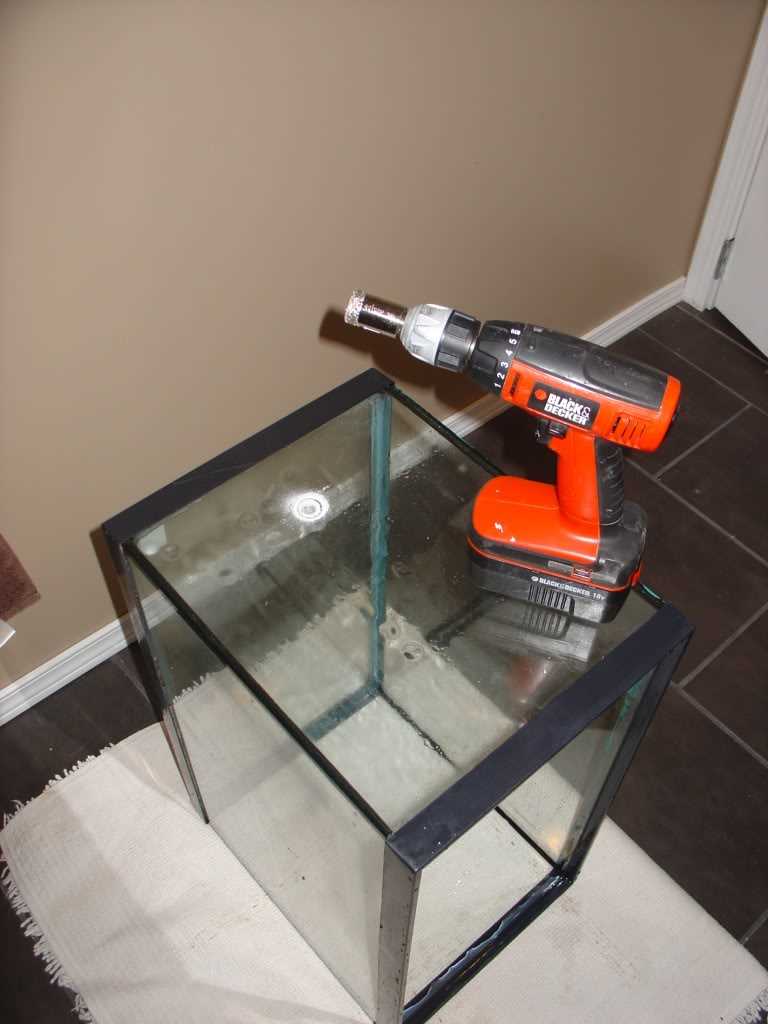
5. Secure the Aquarium
Place the empty aquarium on the worktable or plywood, making sure it is stable and won’t move during the drilling process. You can use clamps or supports to secure the tank if necessary. This will help prevent accidents and ensure precision while drilling.

Remember, safety should always be your top priority when drilling an aquarium. Take your time and follow these steps carefully to successfully prepare your aquarium for drilling.
Marking the Hole
Before you start drilling your aquarium, it is important to mark the exact spot where you want to drill the hole. This will ensure that the hole is drilled in the right place and avoid any mishaps or damage to the tank.
To mark the hole, follow these steps:
- Measure and mark the desired location on the outside of the tank using a pencil or marker. Make sure to choose a spot that is suitable for your needs, such as the bottom or side of the tank.
- Take into consideration the size of the drill bit and the fittings you will be using for your project. This will help determine the appropriate location for the hole.
- Use a level or ruler to ensure that the mark is straight and aligned correctly. This will help maintain the aesthetic appeal of your aquarium.
Note: It is important to be cautious when handling tools and working with glass. Take your time and double-check your measurements before proceeding to the next step.
Once you have marked the hole, you are ready to move on to the next step in the drilling process. Make sure to refer to the accompanying guide for further instructions.
Securing the Aquarium
- Step 1: Place the aquarium on a sturdy and level surface. Ensure that the surface can support the weight of the aquarium and the water it will hold.
- Step 2: If the aquarium does not come with a pre-drilled hole, determine the location where you want the hole to be drilled. Mark the spot using a pencil or a marker.
- Step 3: Place a piece of masking tape over the marked spot. This will help to prevent the drill bit from slipping and scratching the glass.
- Step 4: Choose an appropriate drill bit for drilling through glass. Diamond-coated bits are highly recommended for their durability and precision.
- Step 5: Attach the chosen drill bit to a drill. Clamp the aquarium securely to prevent it from shifting while drilling.
- Step 6: Begin drilling at a low speed with light pressure. Apply water to the drill bit regularly to keep it cool and lubricated.
- Step 7: Continue drilling, gradually increasing the speed and pressure. Take frequent breaks to prevent overheating and ensure the hole is drilled smoothly.
- Step 8: Once the hole is drilled, remove the masking tape and rinse the area with water to remove any glass shavings.
- Step 9: If desired, use a silicon carbide grinding stone to smooth the edges of the hole.
- Step 10: Finally, clean the aquarium thoroughly and ensure all equipment, such as filters and heaters, are securely installed before adding water and introducing fish.
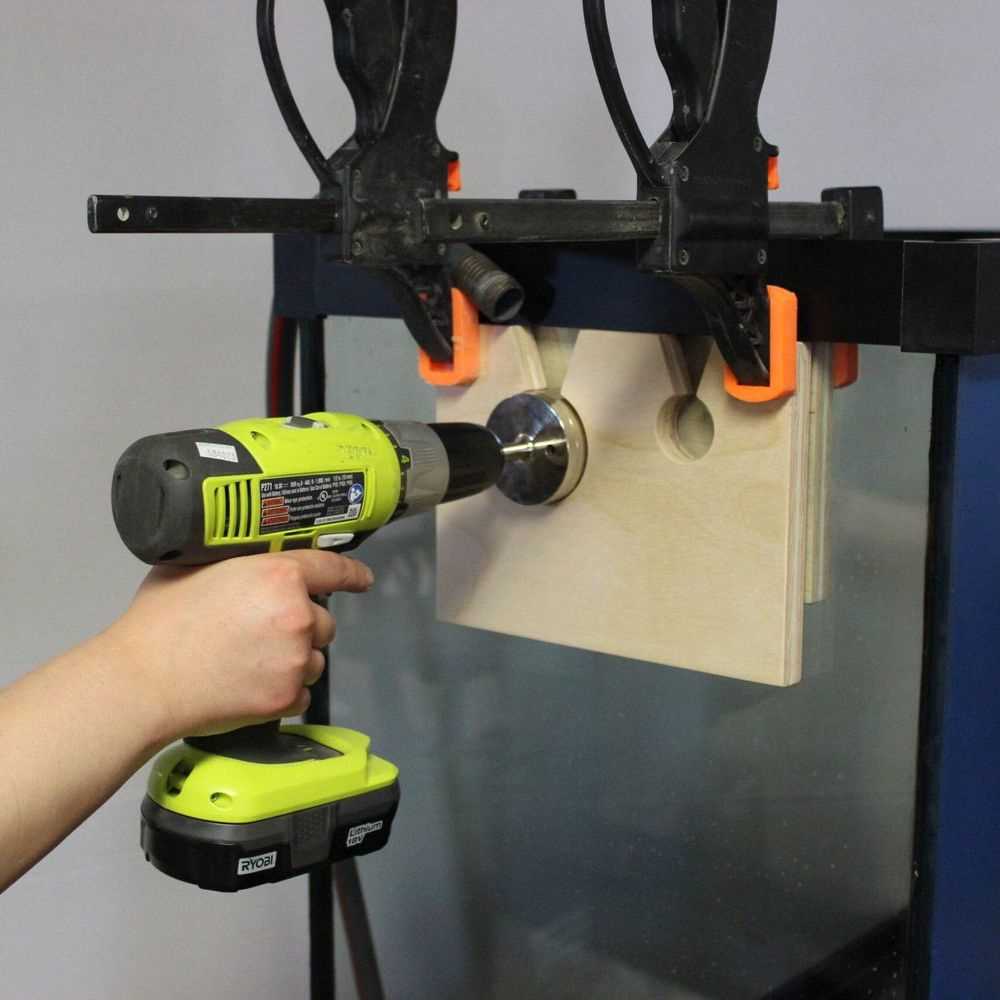
Drilling the Hole
Drilling a hole in your aquarium is a critical step in creating a customized setup. This is the stage where you will create an opening for your equipment, such as a filter or heater, to pass through.
Step 1: Gather the necessary equipment
Before you start drilling, make sure you have all the necessary equipment. This includes a drill with a diamond hole saw, a glass or tile drill bit, a drill guide, and safety goggles.
Step 2: Mark the spot
Decide where you want to drill the hole and mark the spot with a permanent marker. It’s essential to choose the right location to ensure minimal stress on the glass and proper functionality of your equipment.
Step 3: Prepare the drill guide
Attach the drill guide to the glass surface. The drill guide will help keep the drill bit steady and prevent it from slipping or damaging the glass. Position it precisely over the marked spot.
Step 4: Start drilling
Put on your safety goggles and start drilling. Apply gentle pressure and keep the drill at a low speed to prevent excess heat and cracking of the glass. Use water or a coolant to keep the drill bit and glass cool during the drilling process.
Step 5: Clean and smooth the hole
Once the hole is drilled, carefully remove the drill bit. Clean the hole thoroughly to remove any glass shavings or debris. Use sandpaper or a file to smooth the edges of the hole and remove any sharp edges that could harm your equipment or fish.
Step 6: Test the hole
Before installing any equipment, it’s essential to test the hole to ensure a proper fit. Place the equipment through the hole and check if it fits securely without any leaks or gaps. Make any necessary adjustments or modifications if needed.
By following these step-by-step instructions, you can safely drill a hole in your aquarium and create a customized setup that meets your specific needs.
Cleaning the Hole
After drilling the hole in your aquarium, it is important to clean it thoroughly before proceeding with any additional steps. This will ensure that the hole is free from any debris or contaminants that could potentially harm your aquatic life.
Here is a step-by-step guide on how to clean the hole:
- Inspect the hole: Take a close look at the hole and remove any large pieces of glass or debris that may be present. Use a pair of tweezers or a small brush to gently remove these items.
- Rinse the hole: Thoroughly rinse the hole with clean, fresh water. This will help remove any remaining debris and ensure that the hole is clean and ready for further steps.
- Disinfect the hole: Use a mild bleach solution or aquarium-safe disinfectant to disinfect the hole. This will eliminate any harmful bacteria or pathogens that may still be present.
- Rinse again: After disinfecting the hole, rinse it once more with clean water to remove any residue from the disinfectant.
- Dry the hole: Allow the hole to air dry completely before moving on to the next step. This will help prevent any moisture or remaining disinfectant from contaminating the aquarium water.
By following these steps and ensuring that the hole is thoroughly cleaned, you can proceed with confidence to the next steps of drilling an aquarium.
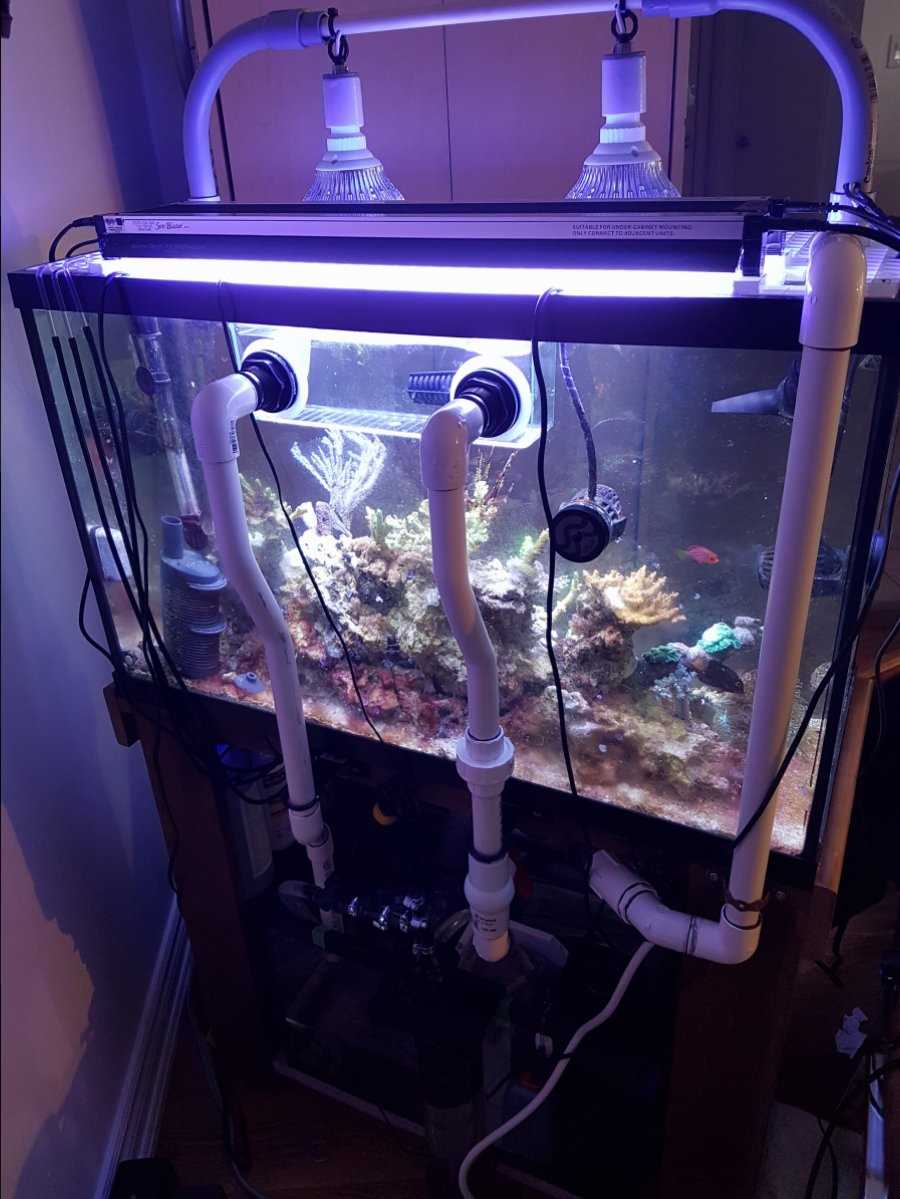
Installing the Fitting
Once you have successfully drilled the hole in your aquarium, it is time to install the fitting. This fitting will allow you to connect various water flow attachments to your aquarium.
Materials Needed:
- Fitting
- Teflon tape
- Wrench or pliers
- Silicone sealant (optional)
Step 1: Clean the Hole
Before installing the fitting, make sure to clean the hole you drilled. Remove any debris or glass shards to ensure a clean and smooth surface for the fitting.
Step 2: Apply Teflon Tape
Wrap Teflon tape around the threads of the fitting. This will help create a watertight seal and prevent any leaks.
Step 3: Insert the Fitting
Insert the fitting into the hole from the inside of the aquarium. Make sure the threaded end is on the outside of the tank.
Step 4: Tighten the Fitting
Using a wrench or pliers, tighten the fitting from the outside of the tank. Be careful not to over-tighten, as this can damage the glass.
Step 5: Optional – Apply Silicone Sealant
If you want extra security, you can apply silicone sealant around the fitting on the inside and outside of the tank. This will provide an additional layer of waterproofing.
Step 6: Test for Leaks
Before filling your aquarium with water, test for leaks by spraying the fitting with water or filling the tank partially and checking for any signs of leakage. If you notice any leaks, tighten the fitting further or reapply silicone sealant as necessary.
By following these steps, you will be able to successfully install the fitting in your drilled aquarium. This will allow you to connect various water flow attachments, such as filters or pumps, to enhance the overall functionality of your tank.
Testing for Leaks
Once you have drilled the necessary holes in your aquarium, it is essential to test for leaks before adding any water or marine life. Follow these steps to ensure that your aquarium is watertight:
- Inspect the drilled holes: Start by visually inspecting the drilled holes. Look for any cracks, chips, or irregularities that could compromise the integrity of the tank.
- Prepare the testing area: Set up a clean and dry surface where you can perform the leak test. Make sure to have a towel or absorbent mat ready to catch any water that may escape.
- Plug the holes: Take appropriate plugs or gaskets designed for the size and type of drilled holes and seal them tightly. This will prevent any water from escaping during the test.
- Add water slowly: Fill the tank with water slowly, taking care not to create any splashes or disturbances that could mask the presence of a leak. Fill the water level to a few inches below the holes you drilled.
- Observe for leaks: Carefully inspect the drilled holes and surrounding areas for any signs of water leakage. Pay close attention to difficult-to-reach corners and edges.
- Wait and recheck: Allow the tank to sit for at least 24 hours while keeping a close eye on the drilled holes. If there are no signs of leakage during this time, it is a good indication that the tank is watertight.
If you notice any leaks during the testing process, you may need to reevaluate the drilling process or seek professional assistance to fix the issue. It is crucial to address any leaks before adding water or living organisms to avoid damaging your aquarium and endangering the aquatic life.
FAQ:
What tools do I need to drill an aquarium?
In order to drill an aquarium, you will need a few essential tools. These include a glass drill bit, a power drill, safety goggles, and a water source to cool the drill bit while drilling.
Is it safe to drill an aquarium?
Drilling an aquarium can be safe if done correctly. It is important to take necessary precautions such as wearing safety goggles, using the correct drill bit, and having a water source to cool the drill bit. However, it is still recommended to consult with professionals or experienced aquarists to ensure safety and minimize the risk of damaging the aquarium.
What are the benefits of drilling an aquarium?
Drilling an aquarium can have several benefits. One of the main benefits is that it allows for the installation of an overflow system, which helps maintain a stable water level in the aquarium and prevents overflows. Additionally, drilling allows for the use of a sump system, which can provide additional filtration and help keep the aquarium water clean and clear.
Can I drill any type of aquarium?
Not all aquariums can be drilled. Only aquariums made of tempered or non-tempered glass can be drilled. It is important to determine the type of glass used in the aquarium before attempting to drill. Tempered glass cannot be drilled as it will shatter when subjected to high pressure, while non-tempered glass can be drilled with the right tools and techniques.
Video:


Meet Harrison Clayton, a distinguished author and home remodeling enthusiast whose expertise in the realm of renovation is second to none. With a passion for transforming houses into inviting homes, Harrison's writing at https://thehuts-eastbourne.co.uk/ brings a breath of fresh inspiration to the world of home improvement. Whether you're looking to revamp a small corner of your abode or embark on a complete home transformation, Harrison's articles provide the essential expertise and creative flair to turn your visions into reality. So, dive into the captivating world of home remodeling with Harrison Clayton and unlock the full potential of your living space with every word he writes.


