How to Drill a Tapered Hole in Wood: Step-by-Step Guide

If you’re a woodworker or enjoy DIY projects, knowing how to drill a tapered hole in wood can be a valuable skill to have. Tapered holes are often used when inserting dowels or plugs into wood, creating a secure and seamless connection. While it may seem like a daunting task, drilling a tapered hole is actually quite simple with the right tools and technique.
To drill a tapered hole in wood, you’ll need a few key tools: a drill press, a drill bit with a tapered design, and a clamp to secure the wood in place. The drill press allows for precise drilling and ensures that the hole is straight and accurate. The tapered drill bit is specially designed to create a hole that gradually widens, providing a snug fit for the dowel or plug.
Before you begin drilling, it’s important to mark the center of the hole on the wood surface. You can use a pencil or a small awl to create a starting point for the drill bit. Once you have your center mark, secure the wood in place with a clamp to prevent any movement during drilling.
With everything set up, it’s time to start drilling. Begin by aligning the drill bit with the center mark on the wood. Slowly lower the drill bit onto the surface, applying gentle pressure to create a starting point. Once the drill bit has created a groove, increase the speed and continue drilling. As you drill, the tapered design of the bit will gradually widen the hole, creating the desired taper.
What is a tapered hole?
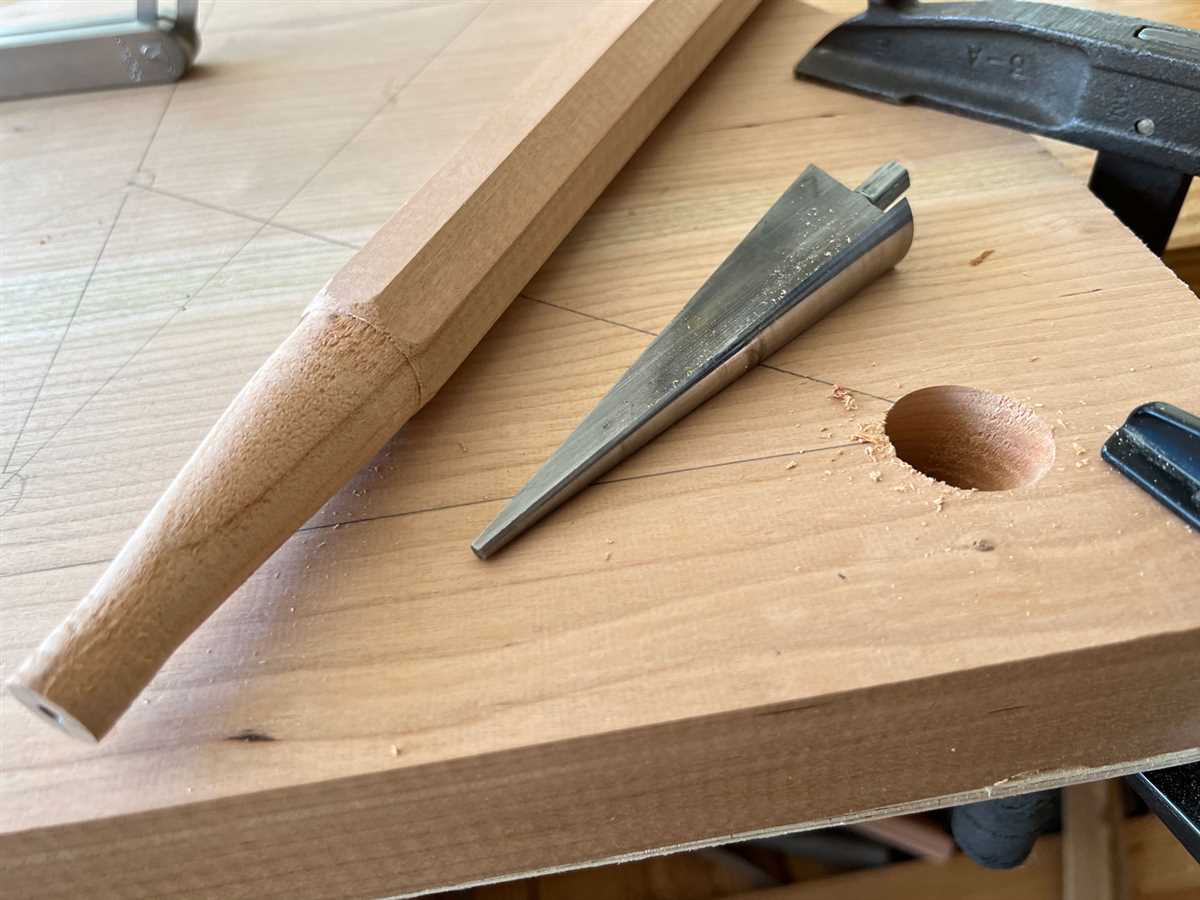
A tapered hole is a hole that has a gradually decreasing diameter from one end to the other. This type of hole is wider at one end and narrower at the opposite end. The taper allows for a secure fit when joining two pieces of wood or other materials together.

Tapered holes are commonly used in woodworking projects when creating joints or connections that require a tight fit. The taper helps to ensure that the components stay securely in place without the need for additional fasteners or adhesives. This type of hole is often used in applications such as dowel joints, tapered mortise and tenon joints, or turnings on a lathe.
In woodworking, the taper in a hole is usually created using a special tool called a tapered drill bit or a countersink bit. These bits have a conical shape that gradually reduces the diameter of the hole as it is drilled deeper. By using a tapered drill bit, woodworkers can easily create holes that perfectly match the shape and size of the corresponding taper on the joining piece.
Tapered holes offer several advantages over regular straight holes. Firstly, they provide a stronger and more stable joint, as the wider end of the hole allows for a larger surface area to make contact with the joining piece. Secondly, tapered holes can help to align the components more accurately, as the taper acts as a guide for fitting the pieces together. Lastly, tapered holes can create a visually appealing design element, adding an interesting detail to the overall look of the project.
When using tapered holes in woodworking projects, it is important to carefully measure and plan the dimensions of the hole to ensure a proper fit. Additionally, it is crucial to use the correct drill bit and drilling technique to achieve the desired taper. With the right tools and techniques, creating a tapered hole in wood can be a straightforward process that adds strength and beauty to your projects.
Why would you need to drill a tapered hole in wood?
Drilling a tapered hole in wood can serve various purposes and can be beneficial for a range of woodworking projects. Here are some common reasons why you might need to drill a tapered hole:

1. Joinery
Tapered holes are often used in joinery to create secure and tight connections between wooden pieces. By drilling a tapered hole, you can make it easier to insert dowels, screws, or other fasteners, ensuring a strong and durable joint.
2. Furniture construction
When building furniture, tapered holes can be used to attach legs or supports to the main structure. By creating a tapered hole, you can achieve a snug fit, preventing wobbling or instability in the furniture piece.
3. Decorative purposes
Tapered holes can also be used for aesthetic purposes. By drilling a tapered hole and inserting a decorative wooden or metal rod, you can create an eye-catching detail in your woodworking project.
4. Woodturning
In woodturning, tapered holes are commonly used for mounting workpieces onto the lathe. By drilling a tapered hole in the center of a wooden blank, you can securely attach it to the lathe’s spindle, allowing for safe and precise turning.

5. Tool handles
Tapered holes are often used in tool handles to create a secure fit between the handle and the tool’s shaft. This ensures stability and control while using the tool, reducing the risk of accidents or injuries.
Overall, drilling a tapered hole in wood provides structural integrity, aesthetic appeal, and functional benefits for a variety of woodworking projects. Mastering this skill can greatly enhance your woodworking abilities and open up new possibilities for creativity and craftsmanship.
Step 1: Gather the necessary tools and materials
To drill a tapered hole in wood, you will need the following tools and materials:
- Drill: A power drill or a hand drill with adjustable speed settings will work best for this task.
- Drill Bits: Depending on the size of the tapered hole you want to create, you will need a set of drill bits with various diameters. Make sure to have at least two bits, one larger and one smaller.
- Tape Measure: This will help you measure and mark the depth and angle of the hole accurately.
- Pencil or Marker: To mark the starting point and the target depth of the hole.
- Clamps: These will hold the wood piece securely in place, preventing it from moving during the drilling process.
- Safety glasses: It’s important to protect your eyes from any flying debris or wood chips.
Once you have gathered all the necessary tools and materials, you will be ready to move on to the next step of drilling a tapered hole in wood.
What tools do you need?
- Power drill: A power drill is essential for creating a tapered hole in wood. Make sure to choose a drill with adjustable speed settings to match the requirements of the wood and drill bit.
- Tapered drill bit: A tapered drill bit is specifically designed to create tapered holes. It has a gradual decrease in diameter along its length, allowing for smooth and precise drilling.
- Center punch: A center punch is used to create a starting point for drilling. It creates a small indentation on the surface of the wood, preventing the drill bit from slipping and ensuring accuracy.
- Clamps or vice: Clamps or a vice are necessary to secure the wood in place during drilling. They provide stability and prevent the wood from moving or vibrating while drilling.
- Measuring tools: Accurate measurements are crucial when drilling tapered holes. Measuring tools such as a tape measure, ruler, or combination square help ensure that the hole is drilled to the correct depth and angle.
- Protective gear: Safety should always be a priority when working with power tools. Wear protective gear such as safety glasses, gloves, and a dust mask to protect yourself from flying wood chips, debris, and dust.
- Optional tools: Depending on the project, you may also need additional tools such as a mallet or hammer for tapping the drill bit, a chisel for cleaning up the hole edges, or sandpaper for smoothing the surface of the wood.
What materials do you need?
- Tapered drill bit
- Wooden board
- Measuring tape
- Pencil
- Clamps or vice
- Power drill
- Safety goggles
To drill a tapered hole in wood, you will need a few materials. The most important one is a tapered drill bit, which is designed specifically for creating tapered holes. Make sure to choose a drill bit that matches the size of the taper you want to create.

You will also need a wooden board, preferably with a flat and smooth surface. This will serve as the base for your drilling work. A measuring tape and pencil are essential for marking the dimensions of the tapered hole on the wood.
Clamps or a vice will be useful for securing the wood in place while you drill. This will ensure stability and prevent any accidental movements of the wood while drilling. Additionally, a power drill is necessary for the actual drilling process.
Finally, don’t forget to wear safety goggles to protect your eyes from any flying wood particles or debris.
Step 2: Mark the location of the tapered hole
Once you have determined the size and angle of the tapered hole you want to drill, you need to mark the location on the wood. This will ensure that you place the hole accurately and precisely.
Here are the steps to mark the location of the tapered hole:

- Carefully measure and mark the starting point of the tapered hole on one side of the wood. Use a pencil or a marking tool to make a small, visible mark.
- Measure and mark the ending point of the tapered hole on the opposite side of the wood. Use the same method as before to make another small mark.
- Connect the starting and ending points with a straight line. This line will serve as a guide for drilling the tapered hole.
- If you are drilling multiple tapered holes, mark the locations of each hole using the same method. Make sure to measure and mark accurately to maintain consistency.
By marking the location of the tapered hole, you will have a clear guide to follow during the drilling process. This will help ensure that the hole is drilled in the correct position and at the desired angle.
How do you determine the correct location?
When drilling a tapered hole in wood, it is crucial to determine the correct location before starting the drilling process. This involves considering a few factors:
- Design and Function: Determine where the tapered hole needs to be placed based on the design and function of the woodworking project. Identify the specific location where the hole is required and mark it accordingly.
- Measurements: Use a measuring tape or ruler to measure the accurate dimensions for the hole. Take into account the diameter and depth of the tapered hole and mark these measurements on the wood surface.
- Alignment: Ensure that the marked location is aligned properly with other components or angles. Use a level or square to ensure accuracy and alignment before proceeding with drilling.
- Preparation: Prepare the wood surface by sanding or smoothing if necessary. This will help to create a clean and uniform hole, preventing any splintering or damage.
- Clamping: If required, use clamps or other securing methods to hold the wood piece in place. This will prevent any movement or shifting during the drilling process, ensuring the hole is drilled in the correct location.
- Double-check: Before starting the actual drilling process, double-check all the measurements and markings to ensure accuracy. This will help to avoid any mistakes or errors.
By following these steps and paying attention to detail, you can determine the correct location for drilling a tapered hole in wood.
What tools can help you mark the location accurately?
When drilling a tapered hole in wood, it is important to accurately mark the location where the hole needs to be drilled. There are several tools that can help you achieve this precision:
- Measuring Tape: A measuring tape is an essential tool for marking the location accurately. Use it to measure the exact distance from the edge of the wood where the hole needs to be drilled.
- Marking Gauge: A marking gauge is a handheld tool with a blade or pin that can be adjusted to the desired depth. Use the marking gauge to mark the exact location on the surface of the wood where the hole needs to be drilled.
- Pencil: A simple pencil can also be used to mark the location accurately. Make sure the pencil is sharp, and use it to draw a precise line or dot on the wood where the hole needs to be drilled.
- Center Punch: A center punch is a metal tool with a pointed end that is used to create a small indentation on the wood. This indentation serves as a guide for the drill bit and helps to prevent it from slipping when starting the hole.
By using these tools, you can ensure that the location of the hole is marked accurately, allowing you to drill a tapered hole with precision and accuracy.
Step 3: Prepare the wood for drilling
Before you start drilling a tapered hole in wood, it is important to properly prepare the wood to ensure accurate and clean results. Here are the steps to follow:
Gather the necessary tools and materials
Make sure you have all the tools and materials needed for the drilling process. This includes a power drill with an adjustable speed setting, a tapered drill bit, clamps or a vice to secure the wood, measuring tape or ruler, and pencil or marker for marking the drilling point.
Mark the drilling point
Using a measuring tape or ruler, determine the exact location on the wood where you want to drill the tapered hole. Mark this point with a pencil or marker to create a visible guide for drilling.
Secure the wood
Clamp the piece of wood onto a sturdy work surface using clamps or a vice. This will prevent the wood from moving or shifting during the drilling process, ensuring accuracy and safety.
Safety precautions
Before you begin drilling, it is important to take safety precautions. Wear safety goggles to protect your eyes from any flying debris, and consider using ear protection if the drilling process is particularly noisy.
Set the drill’s speed
Adjust the speed setting on your power drill to a suitable level for drilling through wood. Lower speeds are typically recommended for larger holes or harder woods, while higher speeds may be used for smaller holes or softer woods. Refer to the drill’s instruction manual for specific speed recommendations.
Start drilling
Position the tapered drill bit on the marked drilling point and apply moderate pressure to begin drilling. Start slowly and gradually increase the speed and pressure as needed. Remember to keep the drill perpendicular to the wood surface to ensure a straight and accurate hole.
Following these steps will help you properly prepare the wood for drilling a tapered hole and ensure better results. Always prioritize safety and take your time to achieve the desired outcome.
How do you prepare the wood surface?
Before drilling a tapered hole in wood, it is important to properly prepare the wood surface to ensure a clean and accurate hole. Here are the steps you can follow to prepare the wood surface:
- Choose the right type of wood: Select a high-quality wood that is suitable for your project. Different types of wood have different densities, which can affect the drilling process.
- Measure and mark the drilling location: Use a measuring tape and a pencil to mark the exact spot where you want to drill the tapered hole. Double-check the measurements to ensure accuracy.
- Secure the wood: Clamp the piece of wood securely to a workbench or table to prevent it from moving while you drill.
- Cover the surface: Place a clean cloth or a sheet of paper underneath the wood to protect the surface from scratches or damage.
- Choose the right drill bit: Select a drill bit that matches the diameter of the hole you want to create. If you are drilling a tapered hole, you will need a drill bit with a tapered point.
- Check the drill bit: Inspect the drill bit to make sure it is sharp and in good condition. Dull or damaged bits can cause splintering or a rough finish.
- Set the drilling depth: Adjust the depth stop on your drill or mark the desired drilling depth on the drill bit using a piece of tape. This will help ensure that you do not drill too deep.
By following these steps, you can properly prepare the wood surface for drilling a tapered hole. This will help ensure a precise and clean result.
FAQ:
Why would I need to drill a tapered hole in wood?
Drilling a tapered hole in wood can be useful for various applications, such as creating a countersink for a screw head, making a hole that fits a tapered dowel, or creating an angled pocket hole for joinery purposes. It allows for a tight and secure fit, while also providing an aesthetically pleasing finish.
What tools and materials do I need to drill a tapered hole in wood?
To drill a tapered hole in wood, you will need a drill press or a hand drill with a tapered drill bit, a piece of wood, clamps to secure the wood in place, sandpaper for finishing, and a dust mask for safety purposes. It is also recommended to have a pencil or marker to mark the depth of the hole.
Can I drill a tapered hole without a drill press?
Yes, it is possible to drill a tapered hole without a drill press. All you need is a hand drill with a tapered drill bit. However, it may require more precision and control compared to using a drill press. It is important to take your time and go slowly to ensure accuracy when drilling the tapered hole.
Video:


Meet Harrison Clayton, a distinguished author and home remodeling enthusiast whose expertise in the realm of renovation is second to none. With a passion for transforming houses into inviting homes, Harrison's writing at https://thehuts-eastbourne.co.uk/ brings a breath of fresh inspiration to the world of home improvement. Whether you're looking to revamp a small corner of your abode or embark on a complete home transformation, Harrison's articles provide the essential expertise and creative flair to turn your visions into reality. So, dive into the captivating world of home remodeling with Harrison Clayton and unlock the full potential of your living space with every word he writes.


