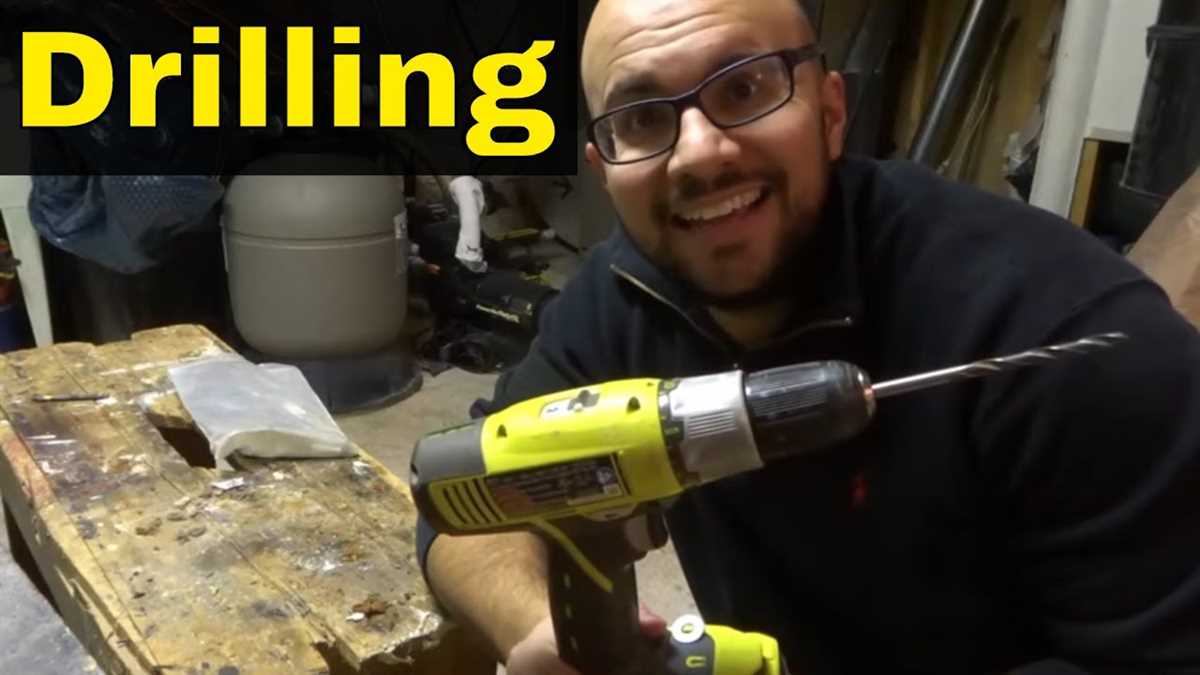
How to Drill a Straight Level Hole

Drilling a straight level hole is an essential skill for any DIY enthusiast or professional. Whether you’re hanging a picture frame, installing shelves, or building furniture, drilling accurate holes ensures a perfect fit and a polished finish. However, achieving straight level holes can be challenging, especially for beginners. In this article, we will provide you with some tips and techniques to help you drill straight level holes like a pro.
1. Mark your spot: Before you start drilling, it’s crucial to mark the spot where you want to drill the hole. Use a pencil or a marker to make a small dot or cross on the surface, indicating the exact position. This will serve as a guide and help you maintain accuracy throughout the drilling process.
2. Use a level: A level is an essential tool when drilling straight level holes. Place the level on the surface where you marked the spot, and adjust it until the bubble is centered. This will ensure that your hole is perfectly level. You can also use a laser level for added precision.
3. Start with a pilot hole: For larger holes, it’s always a good idea to start with a pilot hole. A pilot hole is a small hole drilled before the actual drilling to guide the larger drill bit. This helps prevent the drill bit from wandering or slipping, ensuring a straight level hole. Use a smaller drill bit than the final hole size for the pilot hole.
4. Use a drill guide: If you need to drill multiple holes in a straight line or at a specific angle, a drill guide can be a handy tool. A drill guide is a template that helps you maintain accuracy and consistency while drilling. Simply align the guide with your markings and drill through the holes in the guide for perfectly straight level holes.

5. Take it slow: When drilling, it’s important to take your time and apply steady, even pressure. Rushing or applying excessive force can cause the drill bit to wander, resulting in an uneven hole. Start the drill at a slow speed and gradually increase the speed as you go. This will help you maintain control and accuracy throughout the drilling process.
In conclusion, drilling straight level holes requires precision and attention to detail. By following these tips and techniques, you can achieve professional-looking results and ensure that your holes are straight and level every time. Remember to use the right tools, mark your spot accurately, and take your time to drill slowly and steadily. With practice, you’ll become an expert at drilling straight level holes.
Tools for Drilling Straight Level Holes
Drilling a straight level hole is crucial for many construction and DIY projects. To achieve the desired results, it is important to have the right tools at your disposal. Here are some essential tools that can help you drill straight level holes:
1. Power Drill
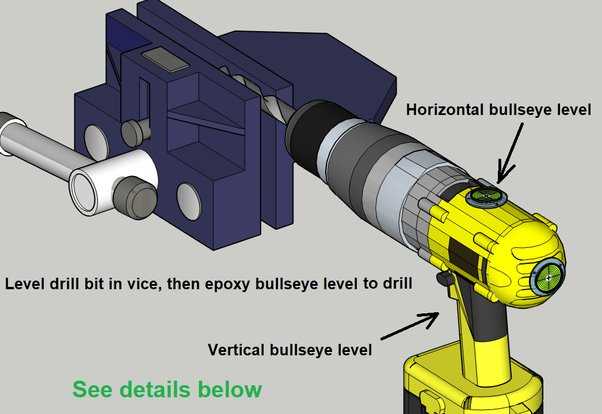
A power drill is a versatile tool that can be used for a wide range of drilling tasks. When drilling straight level holes, it is important to use a drill that has a level or a built-in bubble level. This will help you ensure that the drill is positioned correctly and that the hole will be straight.
2. Drill Press

If you need to drill multiple straight level holes or if you need precise and accurate holes, a drill press is a great tool to have. A drill press allows you to align and position the drill bit vertically, ensuring straight holes with consistent depth and accuracy.
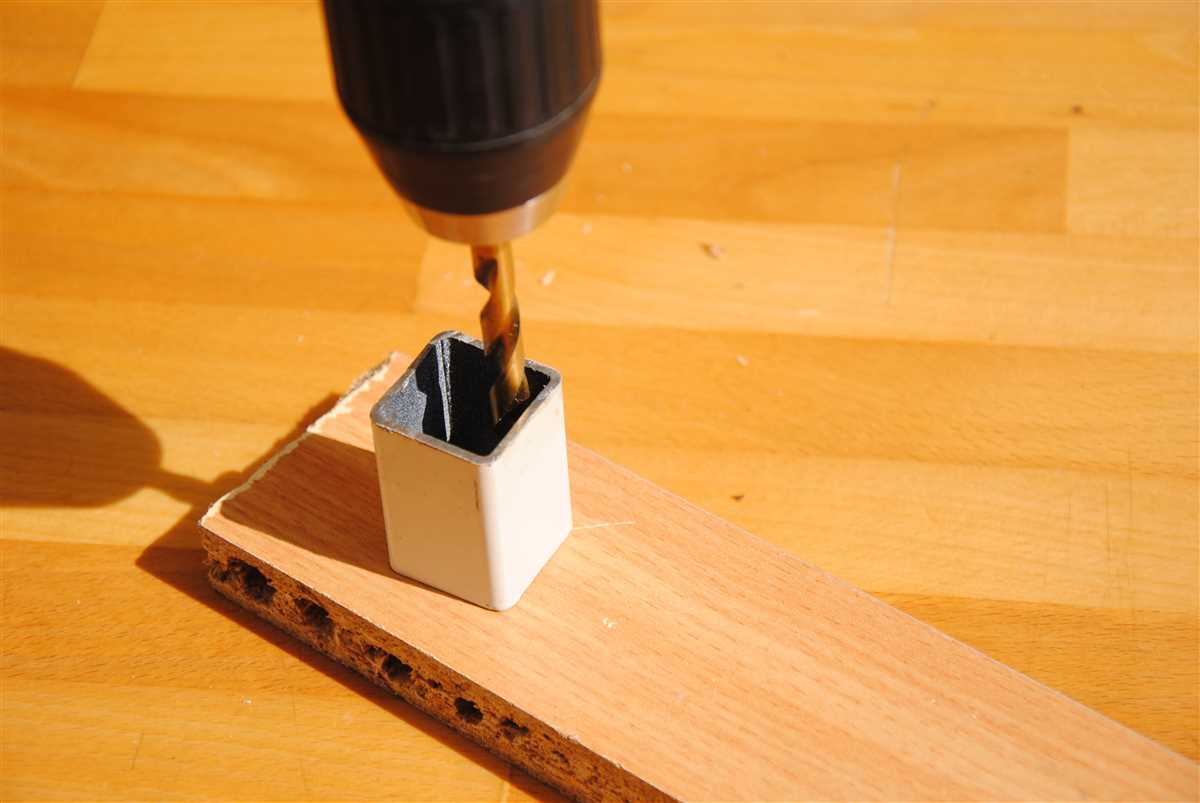
3. Guide Block
A guide block is a simple but effective tool that can help you drill straight level holes. It is usually made of wood or metal and has a hole that matches the size of the drill bit. By placing the guide block on the surface where you want to drill the hole, you can use it as a guide to keep the drill bit straight and level.
4. Level
A level is an essential tool for any drilling project. It helps you determine if a surface or object is straight or level. By using a level before drilling, you can ensure that the hole will be drilled in a straight and level manner. There are various types of levels available, including bubble levels, laser levels, and digital levels.
5. Clamps
When drilling straight level holes, it is important to secure the workpiece in place. Clamps are valuable tools that can hold the workpiece firmly, preventing it from moving or shifting during drilling. This helps ensure that the hole will be drilled in the desired location and angle.
By using the right tools and techniques, you can easily drill straight level holes for your projects. Whether you are drilling holes for a shelf, installing hardware, or performing other woodworking tasks, these tools can help you achieve accurate and professional results.

Choosing the Right Drill Bit
When it comes to drilling a straight level hole, one of the most important factors to consider is the type of drill bit you are using. Different types of drill bits are designed for specific materials and purposes, so it’s essential to choose the right one for the job. Here are some common types of drill bits and their recommended uses:
- Twist Drill Bits: These are the most common type of drill bits and can be used on a wide range of materials, including wood, plastic, and metal. They have a spiral shape that helps to remove debris as you drill.
- Screwdriver Bits: These bits are specifically designed for driving screws rather than drilling holes. They come in various shapes and sizes, including Phillips, flat-head, and Torx.
- Masonry Bits: If you need to drill into concrete, brick, or stone, you will need a masonry bit. These bits have a carbide or diamond tip that can handle the hardness of these materials.
- Spade Bits: Spade bits are best for drilling larger holes in wood. They have a flat, paddle-like shape and are available in various sizes.
- Forstner Bits: Forstner bits are perfect for drilling flat-bottomed holes with a clean finish. They are commonly used for woodworking tasks, such as drilling holes for dowels or hinges.
- Hole Saw Bits: Hole saw bits are ideal for cutting large diameter holes in materials like wood, plastic, and metal. They consist of a circular saw blade attached to a center bit.
When selecting a drill bit, be sure to choose one that is suitable for the material you are drilling and the size of the hole you need. Using an incorrect or dull drill bit can result in crooked or uneven holes, making it more challenging to achieve a straight level hole.
Additionally, remember to consider the speed and power of your drill when drilling different materials. Some materials may require slower speeds or more powerful drills to achieve the desired results.
By selecting the right drill bit for your specific needs, you can increase the chances of drilling a straight level hole and achieve professional-looking results.
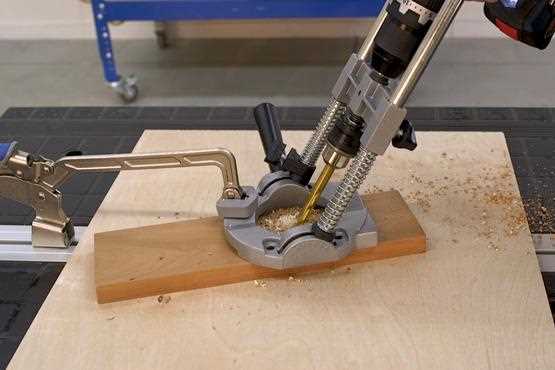
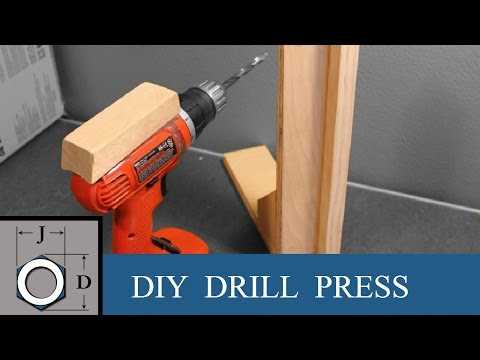
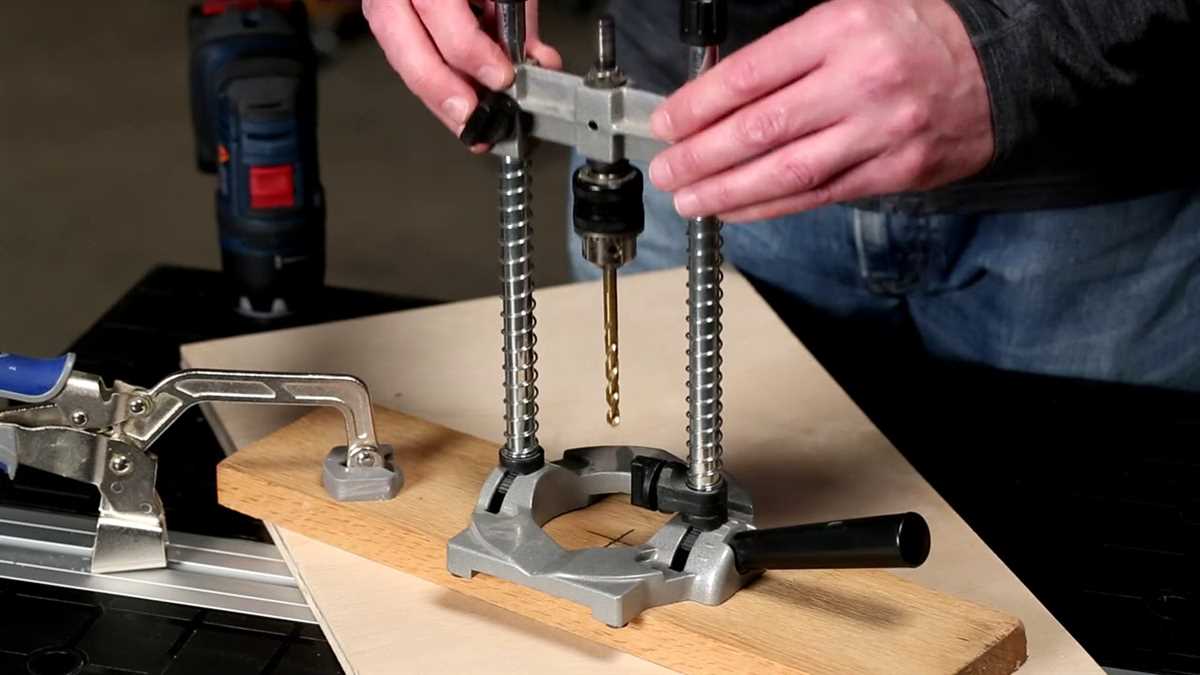
Using a Drill Guide
If you want to ensure your holes are drilled straight and level every time, using a drill guide can be a great solution. A drill guide is a tool or attachment that helps you align your drill bit perfectly perpendicular to the surface you are drilling into. This ensures that your hole will be straight and level.

Benefits of Using a Drill Guide
- Accuracy: A drill guide provides a precise angle for drilling, resulting in more accurate and level holes.
- Consistency: By using a drill guide, you can achieve consistent hole depths and alignments. This is especially useful when drilling multiple holes in a row.
- Control: A drill guide gives you better control over your drilling process, reducing the risk of mistakes or errors.
Types of Drill Guides
There are several types of drill guides available, depending on your needs and the type of drill you have. Here are some common types:
- Benchtop Drill Guide: This type of drill guide is mounted or clamped to a workbench or table, providing a stable surface for drilling. It usually comes with adjustable guides and stops for precise hole positioning.
- Portable Drill Guide: This type of drill guide is compact and lightweight, making it ideal for on-the-go drilling. It can be attached directly to your drill or used as a standalone tool.
- Angle Drill Guide: An angle drill guide is designed for drilling at specific angles, such as 45 degrees or 90 degrees. It is useful for tasks that require angled holes, such as installing hardware or making joinery.
How to Use a Drill Guide
Using a drill guide is quite simple, but it requires some attention to detail. Here are the basic steps to follow:
- Choose the appropriate drill guide for your needs and securely attach it to your drill.
- Position the drill guide on the surface where you want to drill the hole.
- Adjust the guide to the desired depth and angle, if applicable.
- Hold the drill guide firmly against the surface, making sure it is aligned properly.
- Start drilling slowly, applying even pressure and keeping the drill bit perpendicular to the surface.
- Continue drilling until the desired depth is reached.
- Release the drill guide and remove it from the surface.
Conclusion
Using a drill guide can greatly improve the accuracy and precision of your drilling projects. Whether you are a DIY enthusiast or a professional, having a drill guide in your toolbox is a valuable investment. It will save you time, effort, and frustration by helping you drill straight and level holes with ease.
Marking the Hole Location
Before drilling a straight level hole, it is important to accurately mark the location where the hole needs to be drilled. This will help ensure that the hole is drilled in the correct spot and at the desired depth.
To mark the hole location, follow these steps:

- Measure and mark the position: Use a measuring tape or ruler to determine the exact location where the hole needs to be drilled. Make a small mark with a pencil or marker to indicate the center point of the hole.
- Use a level or straight edge: Place a level or straight edge against the surface where the hole will be drilled. Ensure that it is perfectly vertical or horizontal, depending on the desired angle of the hole. Adjust the position of the straight edge as needed to align it properly.
- Mark the hole location: Once the straight edge is properly aligned, use a pencil or marker to draw a straight line along the edge of the straight edge. This line will serve as a guide for drilling the hole in a straight and level manner.
- Double-check the markings: Take a step back and visually inspect the marked hole location. Ensure that everything is correctly aligned and that the mark accurately represents the desired position of the hole. Make any necessary adjustments before proceeding with drilling.
By accurately marking the hole location, you can improve the precision and accuracy of your drilling. Taking the time to properly mark the hole will help avoid any mistakes and ensure that the hole is drilled in the desired position.
Holding the Drill Steady
One of the most important factors in drilling a straight and level hole is keeping the drill steady. Any movement or wobbling can cause the hole to become crooked or uneven. There are a few methods you can use to ensure that the drill remains steady while you’re drilling.
1. Proper Grip
Make sure you have a firm and comfortable grip on the drill. Your hand should be positioned on the handle in a way that allows you to have full control over the drill’s movement. Avoid gripping the drill too tightly, as this can cause hand fatigue and shaking.
2. Use Both Hands
Whenever possible, use both hands to hold the drill. This will provide additional stability and control. Place one hand on the handle and the other hand on the side of the drill, near the front. This will help to steady the drill and prevent it from wobbling.
3. Apply Even Pressure
Apply even pressure to the drill throughout the drilling process. Avoid pushing too hard or too lightly, as either can cause the drill to veer off course. Use a steady and controlled motion, maintaining consistent pressure as you drill into the material.
4. Work at a Comfortable Height
When drilling, it’s important to work at a height that is comfortable for you. If you’re straining or reaching awkwardly, it can be difficult to maintain control over the drill. Use a workbench or table that allows you to position the material at a height that is comfortable for your body.
5. Use a Drill Press or Guide
If you frequently need to drill straight and level holes, consider investing in a drill press or drill guide. These tools can provide additional stability and precision, making it easier to drill perfectly straight holes. They can be especially useful for larger or more complex drilling projects.
6. Secure the Material
Make sure the material you’re drilling into is properly secured. If it’s loose or moving around, it can cause the drill to slip or wobble. Use clamps, vices, or other methods to firmly hold the material in place before you begin drilling.
By following these tips, you can improve your drilling technique and increase your chances of drilling a straight and level hole. Remember to always prioritize safety and take your time when drilling.
Applying the Right Amount of Pressure
When drilling a hole, it is important to apply the right amount of pressure to ensure that the hole is straight and level. Too much pressure can cause the drill bit to wander, while too little pressure can result in a slow and inefficient drilling process.
To apply the right amount of pressure, follow these steps:
- Hold the drill firmly: Make sure you have a secure grip on the drill to maintain control and stability. This will help you maintain a consistent pressure throughout the drilling process.
- Start drilling with light pressure: Begin by applying light pressure to the drill. This will allow the drill bit to make initial contact with the surface without wandering off course.
- Increase pressure gradually: As you continue to drill, gradually increase the pressure. This will help the drill bit penetrate the surface more effectively while still maintaining control.
- Monitor the drilling progress: Pay attention to the feedback you’re getting from the drill. If you feel the drill bit starting to wander or the drilling process becoming difficult, adjust the pressure accordingly. Avoid forcing the drill bit, as this can lead to damage or breakage.
Remember that the right amount of pressure may vary depending on the material you’re drilling into. So, take into account the hardness of the surface and adjust your pressure accordingly.
By applying the right amount of pressure, you can ensure that your holes are straight, level, and efficient.
Drilling in Stages
When drilling a hole, it can be beneficial to drill in stages rather than attempting to drill the entire hole in one go. This is especially useful for larger holes or when drilling through harder materials.
Advantages of Drilling in Stages
There are several advantages to drilling in stages:
- Increased Precision: Drilling in stages allows for more control and precision in the drilling process. By breaking the hole down into smaller increments, you can ensure that each section is drilled accurately.
- Reduced Heat Buildup: Drilling in stages helps to prevent excessive heat buildup. When drilling through harder materials, such as metal or stone, the friction from the drill bit can generate a significant amount of heat. By drilling in stages and allowing the bit to cool between each stage, you can prevent the bit from overheating and prolong its lifespan.
- Improved Chip Removal: When drilling deep holes, it can be challenging to remove the chips and debris efficiently. By drilling in stages, you can remove the chips more easily by withdrawing the bit and clearing the hole at each stage.
How to Drill in Stages
Here is a step-by-step guide on how to drill in stages:
- Mark the hole: Start by marking the desired location of the hole with a pencil or marker. This will help guide your drilling.
- Start with a small pilot hole: Begin by drilling a small pilot hole using a drill bit with a diameter appropriate for the size of the hole you are drilling. This will serve as a guide for the larger drill bit.
- Gradually increase the drill bit size: Once the pilot hole is drilled, gradually increase the size of the drill bit in subsequent stages. This can be done by using drill bits with progressively larger diameters.
- Clear the hole: After each drilling stage, withdraw the drill bit and clear the hole of chips and debris. This can be done using a brush or compressed air.
- Continue drilling: Repeat the previous steps until the desired hole size is achieved. Take your time and continue drilling in stages to ensure accuracy and prevent overheating.
Conclusion
Drilling in stages can greatly improve the precision and efficiency of your drilling. By breaking the hole down into smaller increments, you can achieve more accurate results and prevent issues such as overheating or blockages. Take your time, follow the steps outlined above, and enjoy drilling straight, level holes with ease!
Checking the Alignment of the Hole
Once you have drilled the hole, it’s important to check its alignment to ensure that it is straight and level. Here are a few methods you can use to check the alignment of the hole:
1. Visual Inspection
First, take a step back and visually inspect the hole. Look for any signs of misalignment, such as tilting or leaning to one side. If the hole appears straight and level, you may proceed to the next step. However, if you notice any misalignment, you may need to make some adjustments to correct it.
2. Using a Level
Another method to check the alignment of the hole is by using a level. Place the level across the top of the hole and see if the bubble is centered. If the bubble is centered, it indicates that the hole is level. If the bubble is not centered, you will need to make adjustments until the bubble is centered, ensuring the hole is level.
3. Utilizing a Plumb Line
A plumb line is a simple and effective tool to check if the hole is straight. Attach a string or a cord with a weight at the end to the top of the hole. The weight should hang freely. If the weight is perfectly centered in the hole, it indicates that the hole is straight. If the weight is off-center, you will need to adjust the hole until the weight hangs in the center, ensuring the hole is straight.
4. Measuring the Depth
One final way to check the alignment of the hole is by measuring its depth. Using a measuring tape or ruler, measure the depth of the hole at various points. If the depth is consistent throughout, it indicates that the hole is straight. However, if there are variations in the depth, it suggests that the hole may not be straight, and you may need to make adjustments.
5. Checking with a Guide
For more accuracy, you can use a drilling guide or jig to ensure that the hole is drilled straight and level. These guides provide a fixed reference point and can help you achieve better alignment.
By using these methods, you can check the alignment of the hole to ensure that it is straight and level. This is important for various projects where precise alignment is required, such as installing shelves, hanging pictures, or building furniture.
FAQ:
What are the common challenges when drilling a straight level hole?
One common challenge when drilling a straight level hole is keeping the drill bit straight and perpendicular to the surface. If the drill bit is not at the correct angle, the hole may end up skewed or not level. Another challenge is maintaining a consistent drilling speed and pressure. If the speed or pressure varies during drilling, it can lead to an uneven hole.
What tools and materials do I need to drill a straight level hole?
To drill a straight level hole, you will need a few tools and materials. First, you will need a power drill with a drill bit suitable for your project. You may also need a level to ensure the hole is straight. Additionally, you will need safety equipment such as safety goggles and gloves to protect yourself while drilling.
What are some tips for drilling a straight level hole?
There are several tips that can help you drill a straight level hole. First, it is important to mark the drilling spot with a pencil or marker to ensure accuracy. Next, you can use a drill guide or template to help guide the drill bit and keep it straight. It is also essential to apply steady pressure and maintain a consistent drilling speed. Additionally, using a level to check the hole’s alignment periodically can help ensure it remains straight and level.
Are there any alternative methods for drilling a straight level hole?
Yes, there are alternative methods for drilling a straight level hole. One method is using a drill press, which provides more stability and precision compared to a handheld power drill. Another option is using a guide block or jig, which can help keep the drill bit at the correct angle. Additionally, some advanced power drills have built-in features such as laser levels or depth guides that can assist in drilling straight level holes.
Video:


Meet Harrison Clayton, a distinguished author and home remodeling enthusiast whose expertise in the realm of renovation is second to none. With a passion for transforming houses into inviting homes, Harrison's writing at https://thehuts-eastbourne.co.uk/ brings a breath of fresh inspiration to the world of home improvement. Whether you're looking to revamp a small corner of your abode or embark on a complete home transformation, Harrison's articles provide the essential expertise and creative flair to turn your visions into reality. So, dive into the captivating world of home remodeling with Harrison Clayton and unlock the full potential of your living space with every word he writes.


