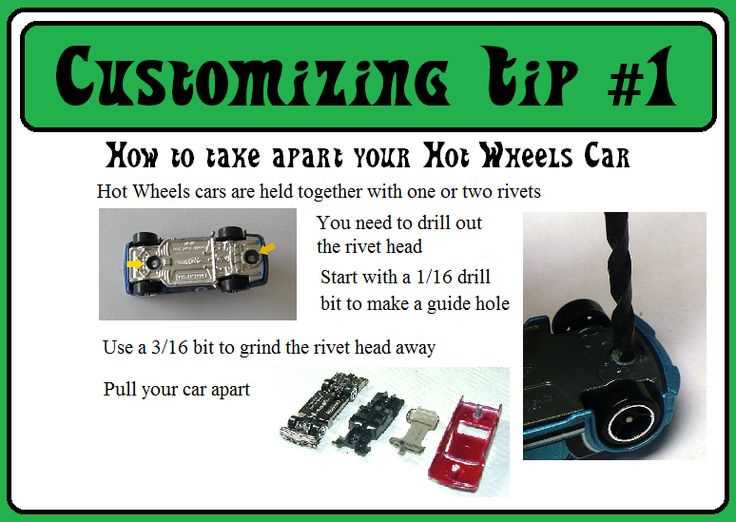
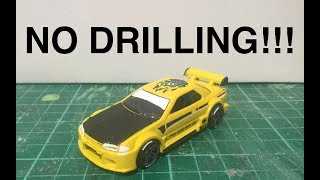
How to Dismantle a Hotwheels Car Without a Drill

If you’ve ever wanted to take apart a Hotwheels car for repairs or customizations, but don’t have a drill on hand, don’t worry! There are other methods you can use to dismantle the car without damaging it. In this article, we will guide you through a step-by-step process that will allow you to safely disassemble a Hotwheels car using simple household tools.
Step 1: Gather Your Tools
Before you begin, make sure you have the necessary tools at hand. While a drill is the most commonly used tool for disassembling Hotwheels cars, you can also use a pair of pliers, a small screwdriver, and a hammer. These tools will allow you to carefully remove the rivets that hold the car together without causing any damage to the body or wheels.
Step 2: Locate the Rivets
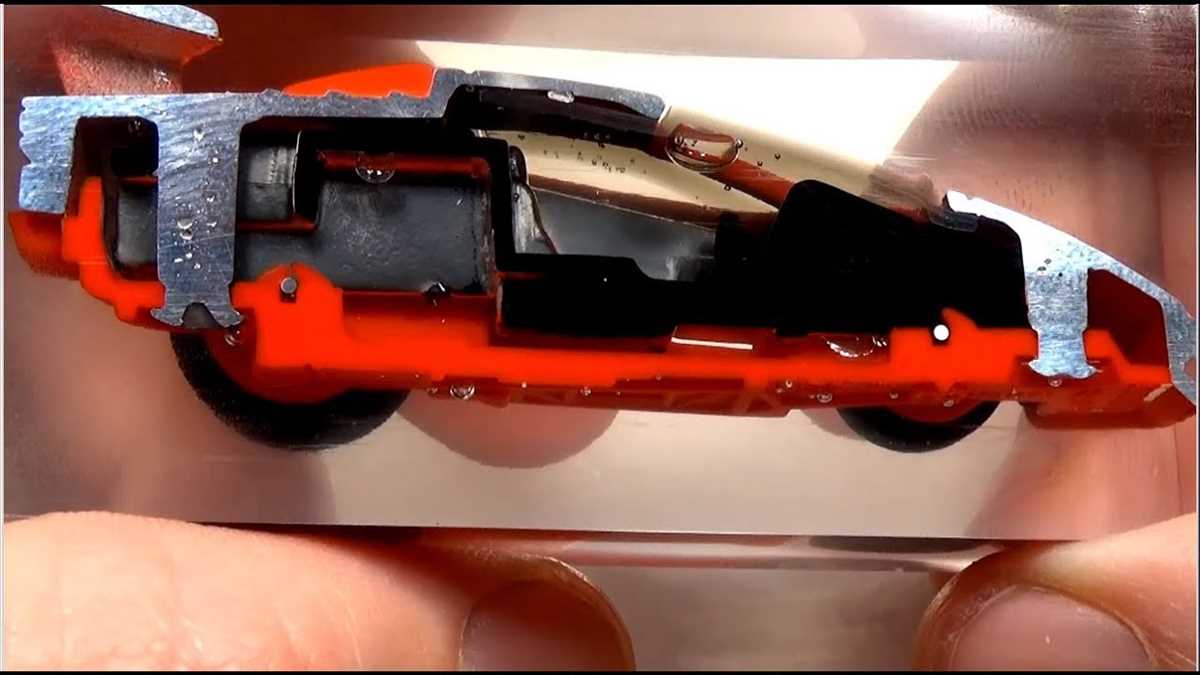
Next, locate the rivets that hold the car together. They are typically found on the bottom of the car and are small, round metal pieces that secure the body and wheels in place. There are usually four or six rivets, depending on the model of the car.

Step 3: Remove the Rivets
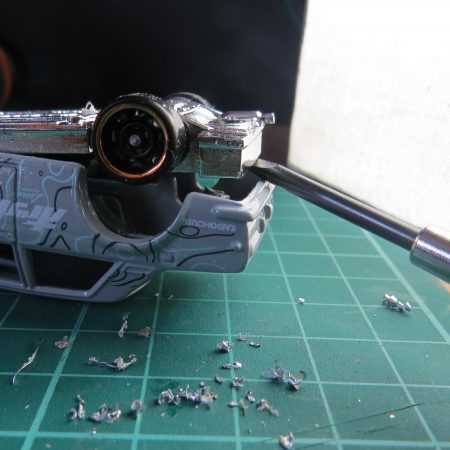
Using the pliers, grip the top of each rivet and twist it counterclockwise. Apply gentle pressure until the rivet loosens and can be pulled out. Repeat this process for all the rivets until the car is completely disassembled. If the pliers are not strong enough, you can use a small screwdriver or a hammer to gently pry the rivets out.
Step 4: Separate the Body and Wheels
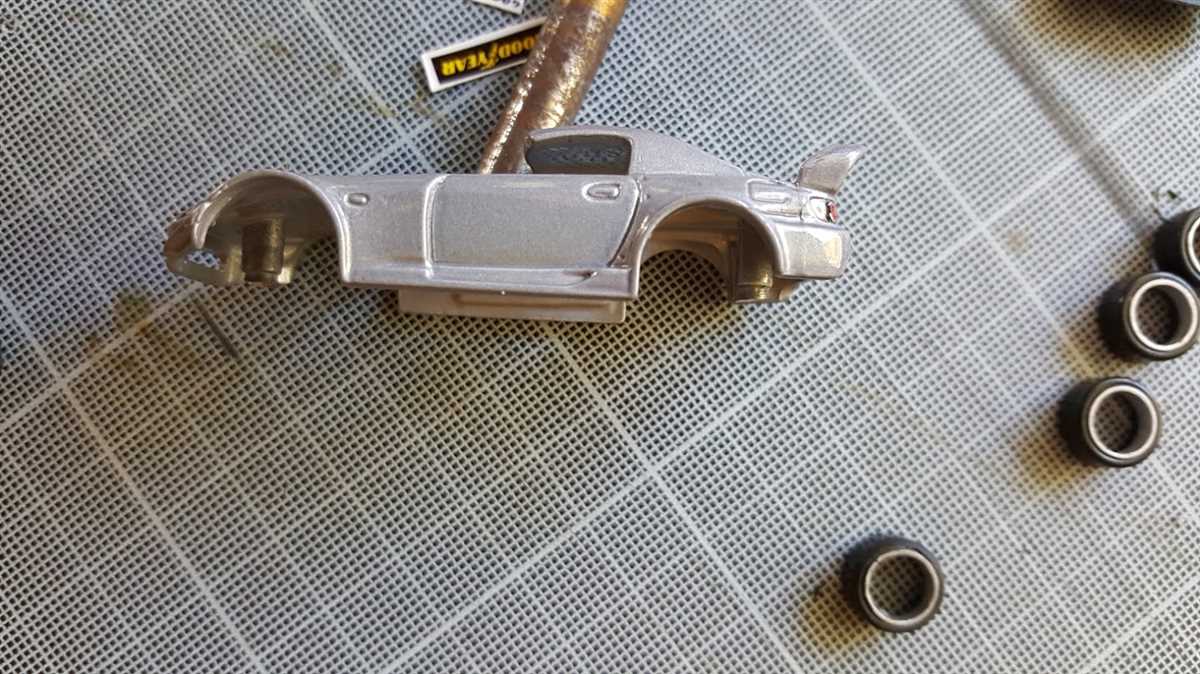
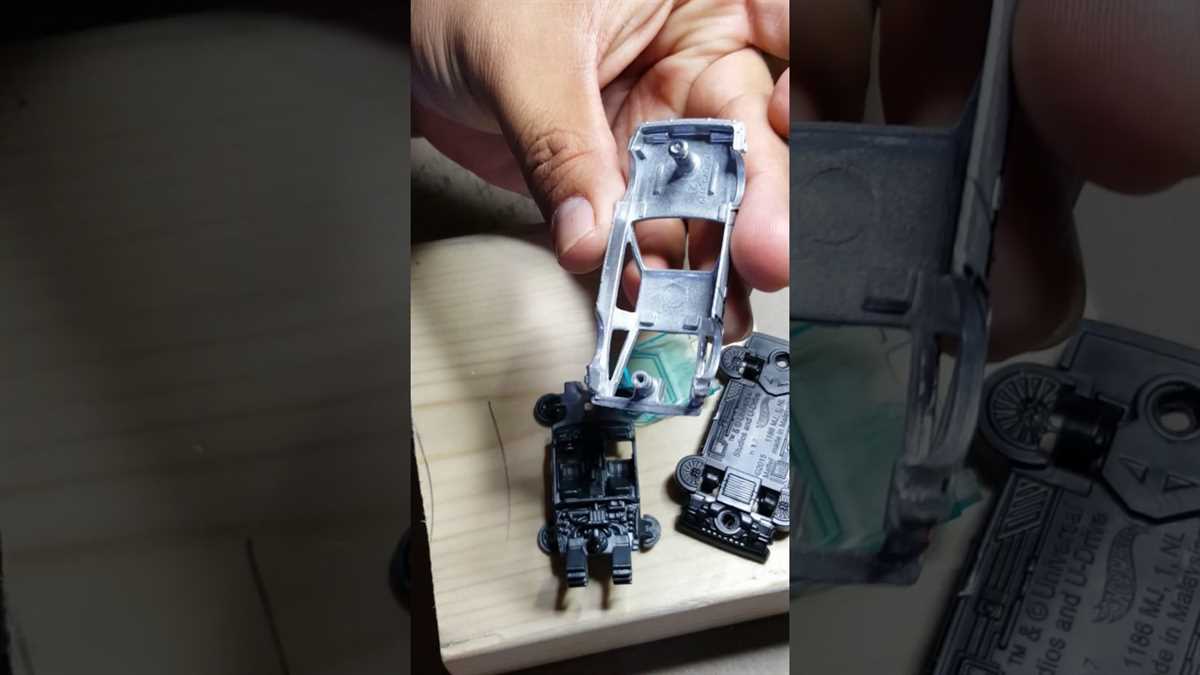
Once all the rivets are removed, you can separate the body and wheels of the car. Gently pull the body and wheels apart, being careful not to damage any other parts of the car. You can now access the interior components or customize the car to your liking.
Note: If you plan on reassembling the car, make sure to keep track of the order in which the parts are removed. This will make it easier to put the car back together later on.
By following these steps, you can easily dismantle a Hotwheels car without a drill. Remember to always handle the car with care and be mindful of the delicate parts. Happy disassembling!

What Is a Hotwheels Car?
A Hotwheels car is a type of toy car that is often associated with the brand Mattel. These cars are highly collectible and have been popular among children and adults alike for many years. Hotwheels cars are known for their small scale and detailed design, which often includes features such as working wheels, realistic paint jobs, and intricate interiors.
Hotwheels cars are typically made of die-cast metal, which makes them durable and able to withstand rough play. They are also designed to be compatible with various playsets and tracks, allowing children to create their own racing adventures.
One of the key features of Hotwheels cars is their ability to roll and perform stunts. The wheels are carefully engineered to provide smooth and fast movement, making them ideal for racing and jumping off ramps. Some Hotwheels cars even come with additional accessories, such as boosters or loop-the-loops, to enhance the play experience and add an extra element of excitement.
Hotwheels cars come in a wide range of designs, including replicas of popular real-life vehicles, fantasy cars, and custom designs. This variety allows collectors and enthusiasts to find cars that appeal to their individual tastes and interests.
Overall, Hotwheels cars are beloved by car enthusiasts and toy collectors alike for their high-quality construction, attention to detail, and endless fun possibilities. Whether you’re a child playing with them on the floor or an adult displaying them in a collection, Hotwheels cars offer a unique and enjoyable play experience for all ages.

Tips for Dismantling
- Use a Screwdriver: One of the easiest ways to dismantle a Hotwheels car without a drill is to use a screwdriver. Look for screws or fasteners that are holding the car together and use the screwdriver to remove them.
- Be Careful: When using a screwdriver or any other tool to dismantle the car, make sure to be careful to avoid injury. The parts of the car can be sharp, so it’s important to handle them with caution and wear protective gloves if necessary.
- Start from the Bottom: It’s often easiest to begin dismantling the car from the bottom. Look for any screws or attachments on the underside of the car and remove them first. This will make it easier to separate the different parts of the car.
- Keep Track of Screws: As you remove screws from the car, make sure to keep track of them. You can use a small dish or container to hold the screws so they don’t get lost. Additionally, it’s helpful to keep the screws organized so you know where they go when reassembling the car.
- Use Pliers: In some cases, you may encounter screws or attachments on the car that are difficult to remove with a screwdriver alone. In these situations, you can use a pair of pliers or a wrench to provide additional leverage and help loosen stubborn fasteners.
- Take Note of Connections: As you dismantle the car, take note of how the various parts connect to each other. This will help you when it comes time to reassemble the car. You can take pictures or make notes to ensure the correct placement of each part.
- Use a Table: It can be helpful to work on a flat table or surface when dismantling the car. This will provide stability and make it easier to access different areas of the car. Additionally, having a table or surface to work on will prevent the car from rolling away or getting lost.
- Be Patient: Dismantling a Hotwheels car can be a time-consuming process, especially if you’re doing it without a drill. It’s important to be patient and take your time to avoid damaging the car or losing any small parts.
Tools You’ll Need
- A small screwdriver
- A pair of pliers
- A set of allen keys
- A small hammer
Before you begin dismantling your Hotwheels car, it’s important to gather the necessary tools. These tools will make the process much easier and help you avoid damaging the car or injuring yourself. Here are the tools you’ll need:
- A small screwdriver: This will be used to remove any screws that are holding the car together. Make sure to use a screwdriver that fits the screws properly to prevent stripping them.
- A pair of pliers: Pliers can be used to grip and twist small parts or pieces that are difficult to remove by hand.
- A set of allen keys: Some Hotwheels cars may have screws that require an allen key to remove. Having a set of allen keys will ensure you have the correct size for removing these screws.
- A small hammer: In some cases, stubborn parts may need a little extra help to come apart. A small hammer can be used to gently tap on parts to loosen them.
Having these tools handy will make the dismantling process much smoother and more efficient. Remember to handle the tools with care and follow any safety precautions to avoid injury.
Screwdriver and Pliers
Using a screwdriver and pliers is a common method for dismantling a Hotwheels car without a drill. This technique requires a little bit of manual effort but is quite effective.
Materials Needed:
- Screwdriver
- Pliers
Step-by-Step Instructions:
- Locate the screws: Hotwheels cars usually have screws holding the body and chassis together. These screws are typically located on the underside of the car.
- Choose the right screwdriver: Depending on the size of the screws, select the appropriate screwdriver. It is important to choose a screwdriver that fits snuggly into the screw head to prevent stripping.
- Remove the screws: Place the screwdriver into the screw head and turn it counterclockwise to loosen and remove the screws. Some screws may be tightly fastened, so it may require a bit of force.
- Separate the body and chassis: Once all screws have been removed, gently pry apart the body and chassis using the pliers. Start at one end and work your way around, applying even pressure to separate the two pieces.
With a screwdriver and pliers, dismantling a Hotwheels car is a straightforward process. Just make sure to handle the delicate parts with care to avoid any damage. Enjoy your car disassembling experience!

Cutting Tools
1. Scissors
Scissors are a basic cutting tool that can be used to dismantle a Hotwheels car without a drill. They are especially useful for cutting through plastic parts, such as the body of the car or the wheels. When using scissors, it is important to have a firm grip and apply steady pressure to ensure a clean cut.
2. X-Acto Knife
An X-Acto knife, also known as a craft knife or precision knife, is another cutting tool that can be used for dismantling a Hotwheels car. Its sharp, pointed blade allows for more precise cuts, which can be useful when removing small or delicate parts. When using an X-Acto knife, be sure to exercise caution and keep your fingers away from the blade.
3. Dremel Rotary Tool
A Dremel rotary tool is a versatile cutting tool that can be used for various tasks, including dismantling a Hotwheels car without a drill. It is equipped with different attachments, such as cutting wheels or grinding stones, that can be used to cut through metal or plastic parts. However, using a Dremel rotary tool requires some experience and caution, as it can be powerful and potentially dangerous if not handled properly.
4. Wire Cutters
Wire cutters, also known as side cutters, are a useful tool for cutting through wires or metal components in a Hotwheels car. They have sharp, angled blades that can easily snip through small wires or metal parts. When using wire cutters, make sure to position the blades firmly against the material to ensure a clean cut.

5. Pliers
Pliers are a versatile tool that can be used in dismantling a Hotwheels car. They can be used for various tasks, such as removing screws, straightening bent parts, or gripping and pulling apart stubborn pieces. Different types of pliers, such as needle-nose pliers or flat-nose pliers, can be used for different purposes, so it is beneficial to have a variety of pliers on hand.
6. Metal Snips
Metal snips, also known as tin snips, are designed specifically for cutting through metal. They have short, sturdy blades that can easily cut through thin metal parts in a Hotwheels car. When using metal snips, it is important to wear protective gloves and eye goggles, as small metal fragments may fly during the cutting process.
7. Hacksaw
A hacksaw is a cutting tool that consists of a blade with fine teeth, attached to a handle. It can be used for cutting through various materials, including plastic or metal parts in a Hotwheels car. When using a hacksaw, it is important to secure the material being cut and to apply firm, steady strokes to ensure an even cut.
8. Utility Knife
A utility knife, also known as a box cutter or Stanley knife, is a versatile cutting tool that can be used for dismantling a Hotwheels car. It is equipped with a retractable blade that can be adjusted to different lengths, allowing for more precise cuts. When using a utility knife, be sure to handle it with care and keep the blade retracted when not in use to prevent accidents.
9. Hand Saw
A hand saw is a cutting tool that can be used for cutting through various materials, including wood or plastic parts in a Hotwheels car. It has a long, serrated blade that can be used with a back and forth motion to make quick cuts. When using a hand saw, it is important to secure the material being cut and to keep your fingers away from the blade to prevent injuries.
10. Shears
Shears, also known as tin snips or aviation snips, are a cutting tool that can be used for cutting through thin metal parts in a Hotwheels car. They have long, straight blades that can easily cut through sheet metal. When using shears, it is important to wear protective gloves and eye goggles, as small metal fragments may fly during the cutting process.
Remember to always exercise caution and use the appropriate tools for the task at hand. Safety should be the top priority when dismantling a Hotwheels car without a drill.
Heat Gun
A heat gun is a useful tool for dismantling a Hotwheels car without a drill. It is a handheld device that blows hot air, which can be used to soften the adhesive used to hold the car parts together.
How to use a heat gun:
- Make sure the heat gun is plugged into a power source and turned on.
- Hold the heat gun about 4 to 6 inches away from the area you want to heat.
- Move the heat gun in a sweeping motion, evenly heating the area.
- Pay close attention to the adhesive areas, as they will soften and become easier to dismantle.
- Use a pair of pliers or your fingers to gently separate the heated parts.
- Repeat the process for any other parts you want to remove.
Precautions:
- Be careful when using a heat gun, as it can get very hot and cause burns if not handled properly.
- Always wear protective gloves to avoid any accidental burns.
- Keep the heat gun away from flammable materials and never leave it unattended.
- Do not point the heat gun at yourself or others.
Advantages of using a heat gun:
- Using a heat gun allows for precise and controlled heating of specific areas.
- It is a safer alternative to using a drill, as there is less risk of damaging the car.
- Heat guns are relatively inexpensive and easy to use.
- They can be used for various other DIY projects and repairs.
Conclusion:
Using a heat gun can be an effective and safe method to dismantle a Hotwheels car without a drill. It allows for controlled heating of specific areas, softening the adhesive and making it easier to separate the car parts. However, proper precautions should be taken when using a heat gun to avoid any accidents or injuries.
Step-by-Step Guide
1. Gather the necessary tools
Before you begin dismantling the Hotwheels car, make sure you have the following tools:
- Flathead screwdriver
- Pliers
- Wire cutters
- Scissors
2. Remove the screws
Look for any visible screws on the Hotwheels car and use the flathead screwdriver to remove them. The screws are usually located on the bottom of the car or inside the wheel wells. Set the screws aside for reassembly later.
3. Disassemble the car body
Once the screws are removed, carefully separate the body of the car from the chassis. This can usually be done by gently pulling or prying the two pieces apart. Use the pliers or wire cutters to remove any plastic tabs or pins that may be holding the body and chassis together.
4. Separate the wheels
Most Hotwheels cars have plastic wheels that are press-fit onto metal axles. To remove the wheels, grip the wheel firmly and pull it straight out from the axle. If the wheels are stuck, you can carefully use the pliers to help loosen them.
5. Remove any additional parts
Inspect the car for any additional parts that may need to be removed. This could include spoilers, exhaust pipes, or other accessories. Use the pliers or scissors to carefully detach these parts from the car.
6. Take note of the interior components
If you plan to reassemble the car later, take a moment to examine and note the placement of any interior components, such as the seats or steering wheel. This will make it easier to reassemble the car correctly.
7. Clean the components
Before reassembling the Hotwheels car or using the parts for other projects, it’s a good idea to clean the components. Use water and mild soap to remove any dirt or debris, and dry them thoroughly before storing or using them.
8. Reassembly (optional)
If you wish to reassemble the Hotwheels car, reverse the steps above, ensuring that all components are positioned correctly. Use the screws that were removed earlier to secure the body to the chassis.
9. Enjoy your dismantled Hotwheels car!
Now that you have successfully dismantled your Hotwheels car, you can use the parts for various projects or simply enjoy exploring the inner workings of the car.
Removing the Wheels
To begin removing the wheels of your Hotwheels car, you will need a few tools:
- A pair of pliers
- A small screwdriver or a sharp object
Follow these steps to remove the wheels:
- Turn the car upside down to expose the bottom side.
- Locate the wheel axle, which is the metal rod that runs through the center of the wheel.
- Using the pliers, grip the axle firmly and pull it straight out of the wheel.
- If the axle is difficult to remove, you can use the small screwdriver or sharp object to apply some leverage and pry it out.
- Repeat this process for all the wheels of the car.
Once you have removed the wheels, you can proceed to the next step of dismantling your Hotwheels car.
Disassembling the Body
To dismantle the body of a Hotwheels car without a drill, you can follow the steps below:
- Use a screwdriver or a small pry tool to remove any visible screws on the body of the car. These screws are usually located on the bottom of the car, holding the chassis and body together.
- If there are no visible screws, carefully flip the car over and examine the underside. Look for any tabs or clips that may be holding the body in place.
- Using a small flathead screwdriver or pry tool, gently pry and release the tabs or clips to detach the body from the chassis. Take caution not to apply excessive force, as this may break or damage the plastic parts.
- Once the tabs or clips have been released, use your fingers to carefully lift the body off the chassis. If there are any additional attachments, such as adhesive or snaps, take note of their locations.
If you encounter any difficulties during the disassembly process, try using a magnifying glass to locate hidden screws or tabs. Additionally, referring to the car’s manual or online disassembly guides specific to the model you are working on can provide valuable insights.
Note: Disassembling Hotwheels cars may vary depending on the specific model and design. Always exercise caution and patience while handling small parts to prevent any damage.
Separating the Chassis
The chassis is the main body of the Hotwheels car that holds all the components together. To dismantle the car, you will need to separate the chassis from the rest of the car.
Here are the steps to separate the chassis:
- Remove the screws: Look for screws on the underside of the car. These screws hold the chassis in place. Use a screwdriver to unscrew them.
- Detach the body: Once the screws are removed, you can gently lift the body of the car off the chassis. Be careful not to apply too much force, as you don’t want to break any of the plastic components.
- Separate the wheels: Take a closer look at the chassis and locate the wheels. The wheels are usually snapped into place on the axle. To separate them, gently pry them off using your fingers or a small tool like a flathead screwdriver.
- Disconnect any additional parts: Depending on the specific model of the Hotwheels car, there might be additional parts connected to the chassis, such as spoilers or exhaust pipes. Look for any visible attachments and detach them carefully.
- Inspect the chassis: Once the chassis is separated from the body and all the parts, take a moment to inspect it. Look for any signs of damage or wear and tear. This is also a good opportunity to clean the chassis if needed.
By following these steps, you will be able to separate the chassis from a Hotwheels car without the need for a drill. This will allow you to further explore the inner workings of the car or replace any damaged parts.
FAQ:
Can I dismantle a Hotwheels car without using a drill?
Yes, you can dismantle a Hotwheels car without using a drill. There are alternative methods you can use to take apart the car such as using pliers, a screwdriver, or even your hands.
Is it easy to dismantle a Hotwheels car without a drill?
Yes, dismantling a Hotwheels car without a drill can be relatively easy. It may require some force and precision, but with the right tools and technique, it can be done without much difficulty.
What tools can I use to dismantle a Hotwheels car without a drill?
There are several tools you can use to dismantle a Hotwheels car without a drill. Pliers, a screwdriver, or even a small pair of snips can be effective in removing the screws or pins that hold the car together.
Do I need any specific tools to dismantle a Hotwheels car without a drill?
No, you do not necessarily need any specific tools to dismantle a Hotwheels car without a drill. However, having a pair of pliers, a screwdriver, or a small pair of snips can make the process easier and more efficient.
Are there any risks involved in dismantling a Hotwheels car without a drill?
There are minimal risks involved in dismantling a Hotwheels car without a drill. However, it is important to exercise caution and be mindful of sharp edges or small parts that may pose a choking hazard, especially if there are children present.
Can I reuse the parts of a dismantled Hotwheels car?
Yes, you can definitely reuse the parts of a dismantled Hotwheels car. The wheels, axles, and other components can be reused for various purposes such as customizing other Hotwheels cars or creating unique dioramas.
What are some tips for dismantling a Hotwheels car without a drill?
Some tips for dismantling a Hotwheels car without a drill include using pliers or a screwdriver to remove screws or pins, applying steady pressure while twisting or pulling on the parts, and being patient and careful to avoid damaging the car or its components.
Video:

Harrison Clayton
Meet Harrison Clayton, a distinguished author and home remodeling enthusiast whose expertise in the realm of renovation is second to none. With a passion for transforming houses into inviting homes, Harrison's writing at https://thehuts-eastbourne.co.uk/ brings a breath of fresh inspiration to the world of home improvement. Whether you're looking to revamp a small corner of your abode or embark on a complete home transformation, Harrison's articles provide the essential expertise and creative flair to turn your visions into reality. So, dive into the captivating world of home remodeling with Harrison Clayton and unlock the full potential of your living space with every word he writes.