How to Create a Keyhole Slot in Wood Using a Drill

Keyhole slots are popular in woodworking projects because they provide a simple and effective way to hang or mount items on a wall. Whether you’re making a wall-mounted shelf, a cabinet, or a picture frame, adding keyhole slots to your wood project can make installation a breeze. And the best part? You don’t need any special tools or advanced woodworking skills to create keyhole slots!
The keyhole slot gets its name from its unique shape, resembling the silhouette of a keyhole. It consists of a round entry hole that leads into a narrow slot. The slot allows the object to be inserted easily and securely onto a screw or nail head, while the entry hole keeps the object in place. This design allows for easy installation and removal, making it a popular choice for hanging lightweight items.
Creating a keyhole slot in wood is a straightforward process that can be done using a drill and a few basic woodworking tools. In this article, we’ll walk you through the step-by-step process of creating a keyhole slot, from marking the position to drilling the hole and shaping the slot. By the end, you’ll have the skills and knowledge to confidently add keyhole slots to your future woodworking projects.
What is a keyhole slot?
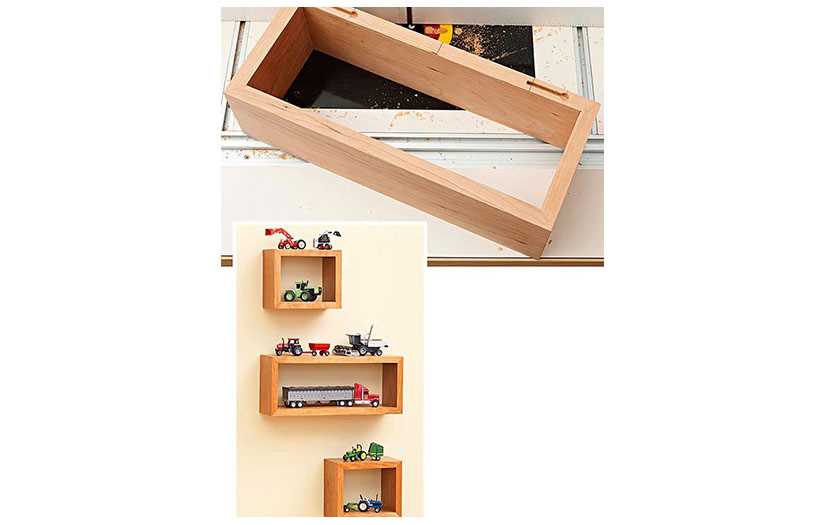
A keyhole slot is a type of recessed slot that is commonly used in woodworking. It is typically shaped like a keyhole, with a larger circular opening at one end and a narrower slot at the other end. Keyhole slots are often used for hanging objects on a wall or other flat surface, such as picture frames or shelves.
The keyhole slot allows for easy and secure hanging without the need for additional hardware like hooks or brackets. The larger circular opening at the top of the slot is used to hang the object on a screw or nail, while the narrower slot provides stability and prevents the object from sliding off the wall.

Creating a keyhole slot can be done using a few tools, such as a drill, a jigsaw, and sandpaper. By following a few simple steps, you can easily create a keyhole slot in wood to hang your desired objects securely.
Here are the steps to create a keyhole slot in wood:
- Measure and mark the desired location of the keyhole slot on the wood.
- Use a drill to create a hole at the larger circular end of the keyhole slot.
- Use a jigsaw to carefully cut out the narrower slot from the drilled hole.
- Smooth the edges of the keyhole slot using sandpaper.
- Test the fit of the keyhole slot by inserting a screw or nail through the larger circular opening and sliding it into the narrower slot.
- Hang your desired object on the keyhole slot by placing the screw or nail through the larger circular opening and sliding it into the narrower slot.
With these simple steps, you can easily create a keyhole slot in wood using a drill and other common woodworking tools. This allows you to hang objects securely on the wall without the need for additional hardware.
Why use a keyhole slot in wood?
A keyhole slot, also known as a keyhole hanger or simply keyhole, is a popular type of mounting hardware used in woodworking. It consists of a narrow slot with a wider circular hole at one end. Keyhole slots are used to hang objects on a wall or other vertical surfaces.
Benefits of using a keyhole slot:
- Secure attachment: Keyhole slots provide a secure and stable way to hang objects on the wall. The narrow slot prevents the object from sliding or moving once it is mounted, ensuring that it stays in place.
- Hidden installation: When using keyhole slots, the mounting hardware remains hidden behind the object, giving it a clean and professional appearance. This is particularly desirable for decorative items or artwork, where the focus should be on the object itself, not the mounting hardware.
- Easily adjustable: One of the advantages of keyhole slots is that they allow for easy adjustment of the mounted object. By simply sliding the object along the slot, you can change its position or level it without having to remove it from the wall.
- Uniform hanging: Keyhole slots ensure that an object hangs uniformly on the wall. Since the weight is evenly distributed along the slot, there is less chance of the object tilting or hanging at an angle.
- Versatility: Keyhole slots can be used for a wide range of objects, including picture frames, mirrors, shelves, cabinets, and more. They are suitable for both lightweight and heavier objects, depending on the size and strength of the slot.
Overall, using a keyhole slot in wood provides a convenient and reliable way to hang objects on the wall, offering both functionality and aesthetic appeal.

Materials Needed
- Wood piece
- Keyhole bit
- Drill
- Clamps
- Measuring tape
- Pencil
- Masking tape
- Safety goggles
Drill
A drill is a tool used to create holes in various materials, including wood. It consists of a motor that rotates a drill bit at high speed, allowing it to penetrate the material and create a hole. Drills can be handheld or mounted on a stand, depending on the application.
There are several types of drills available, including:
- Hand drill: This is the most basic type of drill, operated manually by turning a handle. It is often used for small, precise drilling tasks.
- Power drill: This type of drill is powered by electricity or a battery. It is more powerful than a hand drill and can be used for a wide range of drilling tasks.
- Hammer drill: A hammer drill is a type of power drill that also has a hammering action. It is commonly used for drilling into masonry or concrete.
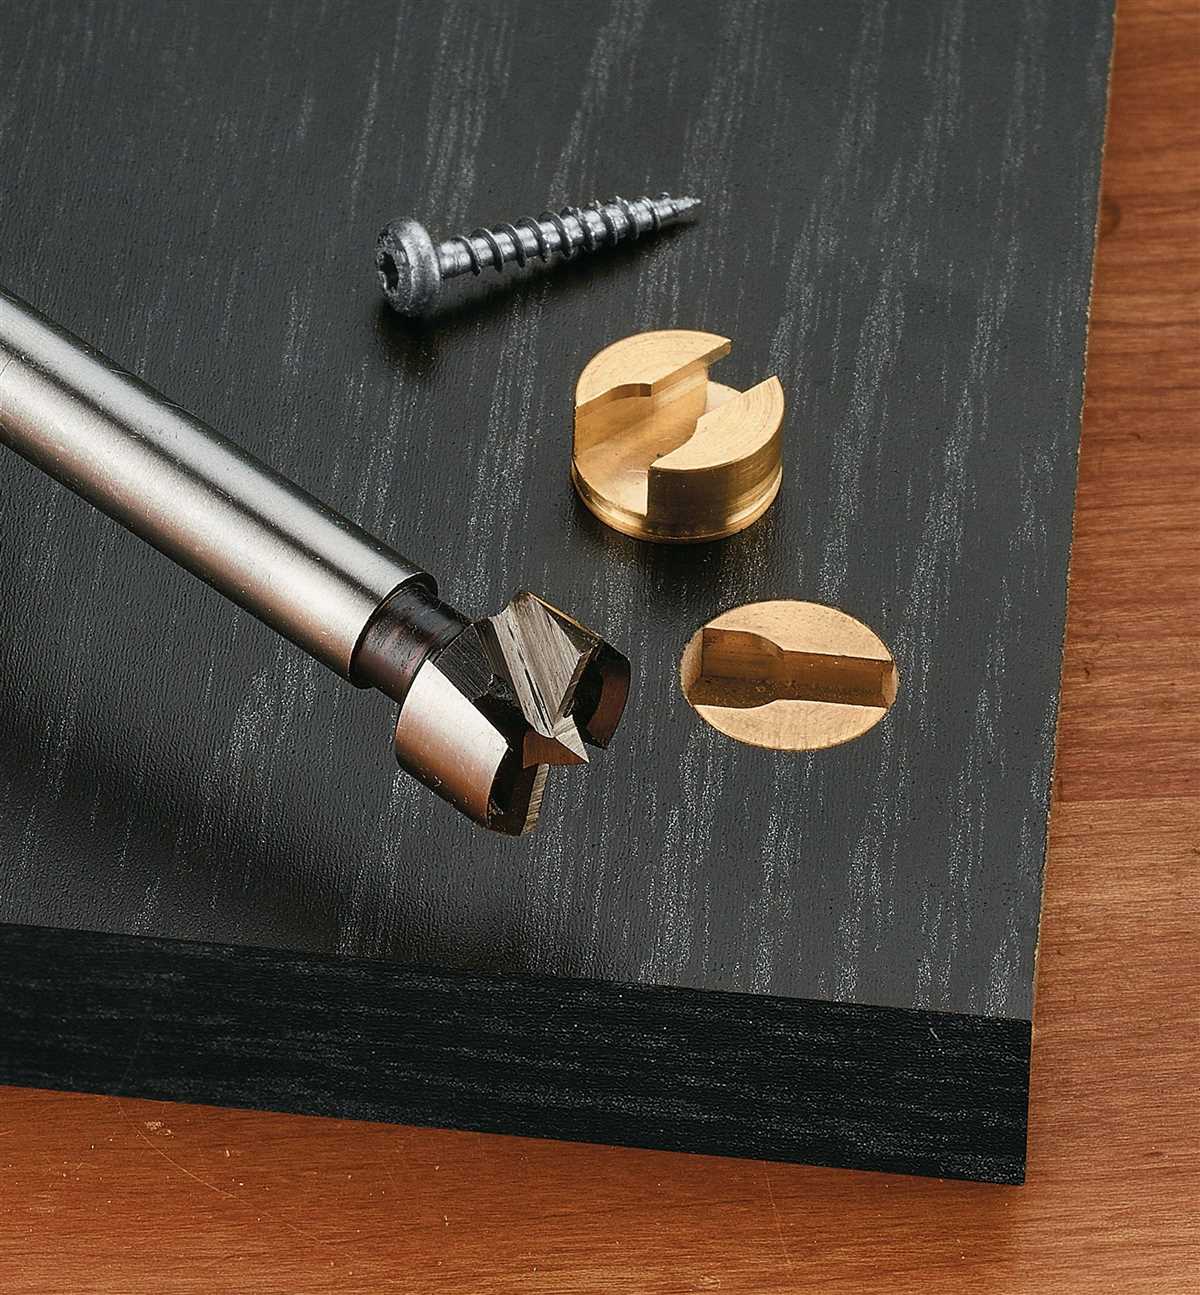
When using a drill to create a keyhole slot in wood, it is important to select the appropriate drill bit size and type. A Forstner bit or spade bit is commonly used for this purpose. These bits are designed to create flat-bottomed holes and are suitable for cutting the keyhole shape.
Before drilling the keyhole slot, it is recommended to mark the location of the slot using a pencil or masking tape. This will ensure accurate placement and prevent any mistakes. Once the slot is marked, the drill can be positioned at the starting point and pressed firmly into the wood. The drill should be operated at a slow speed to avoid splintering or damaging the wood. As the drill bit penetrates the wood, it should be guided along the marked path to create the desired keyhole slot shape.

After drilling the keyhole slot, it may be necessary to sand or file the edges to smooth out any rough or sharp edges. This will help ensure a clean and professional finish. The keyhole slot can then be used to hang various objects, such as pictures or shelves, by inserting a corresponding keyhole hanger into the slot.
Router Bit
A router bit is a specialized cutting tool used in woodworking to create various types of cuts and shapes in wood. These bits are typically made from high-speed steel or carbide and are designed to be used with a router, a power tool used for shaping wood.
Router bits come in a variety of shapes and sizes, each designed for specific woodworking tasks. Some common types of router bits include:
- Straight bits: These bits have a flat cutting edge and are used for making straight cuts and dadoes.
- Round-over bits: These bits have a rounded cutting edge and are used to create a rounded edge on the wood.
- Cove bits: These bits have a concave cutting edge and are used for creating decorative edges on wood.
- Rabbeting bits: These bits have a pilot bearing that allows them to cut a groove along the edge of a piece of wood, creating a rabbet joint.
Router bits are typically used in a router table, which provides a stable and secure work surface for the wood to be routed. The router bit is attached to the router’s collet and spins at high speeds, cutting into the wood as it is guided along the table. The depth of the cut can be adjusted by raising or lowering the router bit.
It is important to use the correct router bit for the specific woodworking task at hand. Using the wrong type or size of router bit can result in inefficient cutting or even damage to the wood. Additionally, it is important to use proper safety precautions when using a router bit, such as wearing safety goggles and using a push stick or feather board to keep your hands away from the bit.

Overall, a router bit is an essential tool in woodworking that allows for precise and intricate cuts and shapes in wood. By choosing the right router bit for the job and using it correctly, you can achieve professional-quality results in your woodworking projects.
Wood
Introduction
Wood is a versatile material that has been used for centuries in construction, furniture making, and craft projects. It is a natural and renewable resource that offers strength, durability, and beauty. In this article, we will explore different aspects of wood, including types of wood, woodworking techniques, and keyhole slots in wood using a drill.
Types of Wood
There are various types of wood available for woodworking projects, each with its own characteristics and uses. Some common types of wood include:
- Hardwood: Hardwoods come from deciduous trees and are known for their strength and durability. Examples of hardwoods include oak, maple, and cherry.
- Softwood: Softwoods come from evergreen or coniferous trees and are generally less dense than hardwoods. Examples of softwoods include pine, spruce, and cedar.
- Plywood: Plywood is made by bonding several layers of wood veneers together. It is a versatile material that is often used for furniture, cabinets, and decorative projects.
Woodworking Techniques
Woodworking involves various techniques to shape, cut, and join wood pieces together. Some common woodworking techniques include:
- Cutting: Cutting wood is typically done using hand saws, power saws, or a combination of both. This allows for the creation of different shapes and sizes of wood pieces.
- Joinery: Joinery refers to the techniques used to connect wood pieces together. Common joinery methods include butt joints, dado joints, and dovetail joints.
- Sanding: Sanding is an essential step in woodworking to smoothen the surface of the wood and remove any imperfections or rough edges.
- Finishing: Applying a finish to wood helps protect it from moisture, enhances its appearance, and brings out its natural beauty. Common wood finishes include varnish, stain, and paint.
Keyhole Slots in Wood Using a Drill

A keyhole slot is a popular method for hanging objects on a wall. It allows for easy installation and removal of the object without the need for additional hardware. To create a keyhole slot in wood using a drill, follow these steps:
- Measure and mark the desired location for the keyhole slot on the wood.
- Select a drill bit that matches the width of the narrow part of the keyhole slot.
- Drill a hole along the marked line using the selected drill bit.
- Use a jigsaw or scroll saw to cut a slot from the drilled hole to the wider part of the keyhole slot.
- Sand the edges of the keyhole slot to smoothen them.
Conclusion
Wood is a versatile material that offers endless possibilities for woodworking projects. Whether you are a beginner or an experienced woodworker, understanding the different types of wood, woodworking techniques, and how to create keyhole slots in wood using a drill can help you unleash your creativity and create beautiful and functional pieces.
Measuring tape
A measuring tape is an essential tool in woodworking and many other trades. It allows for accurate measurements to be taken, ensuring that cuts and joints are precise.
Measuring tapes come in various lengths, commonly ranging from 16 feet to 25 feet. They are typically made of a flexible material such as steel or fiberglass, allowing them to easily extend and retract.
The tape itself is marked with measurements in both inches and centimeters. The inch markings are further divided into fractions, such as 1/16 or 1/32 of an inch, providing more precise measurements.
Types of measuring tapes
- Standard measuring tape: This is the most common type of measuring tape and is suitable for general woodworking tasks. The tape is housed in a plastic or metal casing, with a button or lever for retracting the tape.
- Long tape measure: This type of tape measure is used for measuring longer distances, typically ranging from 25 feet to 100 feet. It is often used in construction projects.
- Self-retracting tape measure: These tape measures have a spring-loaded mechanism that automatically retracts the tape into the casing. This can be convenient, especially when working alone.
How to use a measuring tape
Using a measuring tape is straightforward. Simply extend the tape to the desired length and lock it in place using the locking mechanism on the casing. Ensure that the tape is straight and not twisted to get accurate measurements.
When measuring, it is important to read the markings on the tape accurately. The smallest marking on the tape represents the fraction of an inch or centimeter, while the larger markings represent whole numbers. Additionally, some tapes have red markings that can indicate important measurements, such as 16-inch stud centers.
Tips for using a measuring tape
- Always ensure that the tape is securely locked in place before taking measurements.
- When measuring longer distances, have someone hold the other end of the tape to prevent it from sagging or bending.
- If the tape measure is not long enough, use the “add-on” method by measuring a shorter distance and adding it to the total length.
- When measuring inside dimensions, such as the width of a cabinet, use the hook at the end of the tape to secure it against one edge for accurate measurements.
In conclusion, a measuring tape is an indispensable tool in woodworking. It allows for precise measurements to be taken, ensuring the accuracy of cuts and joints. By understanding the different types of measuring tapes and following some simple tips, you can improve your woodworking skills and achieve better results.
Pencil
A pencil is a writing instrument that is used for drawing or writing. It typically consists of a thin cylindrical graphite or lead core encased in a wooden or plastic barrel. The core is sharpened to a point, making it easier to create precise lines or marks on paper or other surfaces.
Pencils are commonly used for a variety of purposes, including artistic drawings, writing, sketching, and drafting. They are a versatile tool that can be used by people of all ages, from young children learning to write to professional artists creating intricate works of art.
One of the advantages of using a pencil is that it allows for easy erasing and correction of mistakes. If a line or mark needs to be changed or removed, it can be easily erased with an eraser at the end of the pencil. This makes pencils a popular choice for activities that require precision and accuracy.
Pencils come in various grades of hardness, which refers to the softness or hardness of the graphite or lead core. Harder pencils produce lighter and crisper lines, while softer pencils create darker and smoother lines. The choice of pencil grade depends on the desired effect and the type of surface being used.
In addition to the traditional wooden pencils, there are also mechanical pencils that have a refillable lead core and a mechanism for advancing the lead. These pencils are popular among professionals and students who prefer a consistent line width and do not want to continually sharpen a pencil.
Pencils are an essential tool for many people, whether for writing, drawing, or other artistic purposes. They offer versatility, ease of use, and the ability to make corrections, making them a reliable and popular choice among different users.
Clamps
When creating a keyhole slot in wood using a drill, it’s important to secure the workpiece in place to ensure accuracy and safety. Clamps are an essential tool for this task. They help hold the wood firmly, preventing any movement or slippage during the drilling process.
Types of Clamps:
- C-clamps: These clamps have a C-shaped frame and are commonly used for securing workpieces to a workbench or table.
- Bar clamps: Also known as F-clamps, these clamps have a fixed jaw at one end and a sliding jaw that can be adjusted to fit different sizes of workpieces. They are versatile and provide strong clamping pressure.
- Spring clamps: These clamps have a spring-loaded mechanism that allows for quick and easy clamping. They are ideal for light-duty applications or when you need to hold small pieces in place temporarily.
- Toggle clamps: Toggle clamps use a lever system to apply pressure and hold a workpiece securely. They are commonly used when you need a quick and reliable way to hold down workpieces, especially in jigs or fixtures.
Tips for Using Clamps:
- Ensure that the clamps are in good working condition and can provide enough pressure to hold the workpiece securely.
- Position the clamps strategically to distribute the clamping pressure evenly across the workpiece.
- Use scrap wood or protective pads between the clamps and the workpiece to prevent any damage or indentation.
- Make sure the clamps are tightened enough to hold the workpiece firmly in place, but avoid overtightening, which may cause the wood to deform or split.
- Check the clamp placement and alignment before drilling to ensure that the workpiece won’t shift during the process.
By using the right clamps and following these tips, you can create a stable and secure setup for creating keyhole slots in wood using a drill.
Step-by-Step Guide
Materials:
- Wood
- Drill
- Keyhole bit
- Clamps
- Ruler or tape measure
- Pencil
- Safety goggles
Step 1: Mark the Slot
Use a ruler or tape measure to measure and mark the location for the keyhole slot on the wood. Make sure to choose a spot that is suitable for the item you will be hanging.
Step 2: Secure the Wood
Place the wood on a flat, stable surface and secure it using clamps. This will prevent the wood from moving while you drill.
Step 3: Put on Safety Goggles
Before drilling, put on safety goggles to protect your eyes from any flying wood chips or debris.
Step 4: Drill the Starter Hole
Attach the keyhole bit to your drill. Start by drilling a small pilot hole at the marked location. This will act as a guide for the keyhole bit.
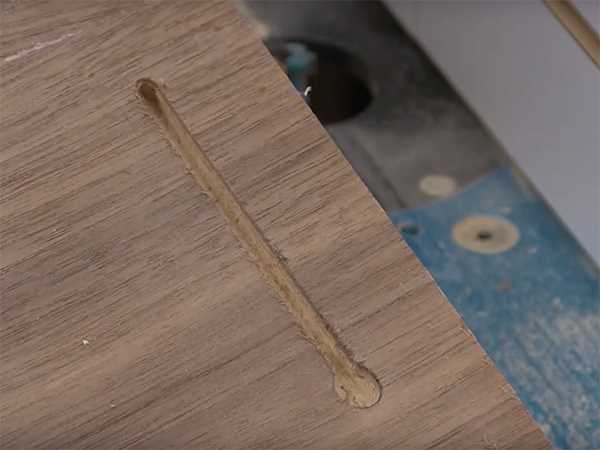
Step 5: Drill the Slot
Once the pilot hole is drilled, switch to the keyhole bit and position it over the pilot hole. Apply gentle pressure and let the bit do the cutting. Slowly drill the slot with an up-and-down motion until you reach the desired length. Be careful not to apply too much pressure or the wood may splinter.
Step 6: Clean the Slot
After drilling the slot, remove any wood chips or debris from the hole using a brush or compressed air. This will ensure a clean and smooth slot.
Step 7: Test the Fit
Before finishing the project, test the fit of the keyhole slot by inserting the corresponding hardware or object. It should fit snugly and securely.
Step 8: Optional Finishing
If desired, you can sand, stain, or paint the wood to finish the project. This step is optional but can enhance the appearance of the keyhole slot.
Congratulations! You have successfully created a keyhole slot in wood using a drill. Now you can hang your item securely on the wall.
FAQ:
What tools do I need to create a keyhole slot in wood using a drill?
To create a keyhole slot in wood using a drill, you will need a drill with various drill bits, a jigsaw, a keyhole saw, sandpaper, and safety goggles.
Can I create a keyhole slot in wood without a drill?
While it is possible to create a keyhole slot in wood without a drill, using a drill will make the process much easier and give you more control over the depth and size of the slot.
Can I use a keyhole slot for hanging objects on the wall?
Yes, a keyhole slot is commonly used for hanging objects on the wall. It provides a secure and invisible mounting solution, as the object can be easily hung on a screw or nail inserted into the slot.
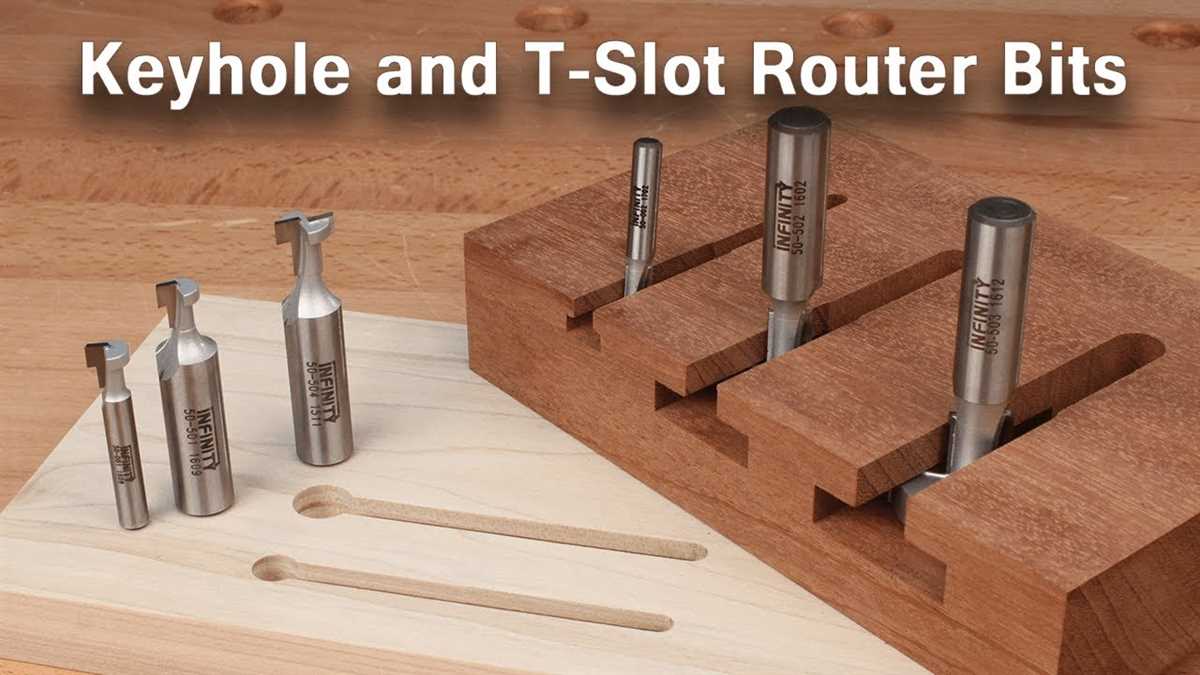
Are there any alternative methods for creating a keyhole slot in wood?
Yes, there are alternative methods for creating a keyhole slot in wood. One method involves using a router with a keyhole bit to create the slot. Another method is to use a plunge saw or a coping saw to carefully cut out the shape of the keyhole slot.
Video:


Meet Harrison Clayton, a distinguished author and home remodeling enthusiast whose expertise in the realm of renovation is second to none. With a passion for transforming houses into inviting homes, Harrison's writing at https://thehuts-eastbourne.co.uk/ brings a breath of fresh inspiration to the world of home improvement. Whether you're looking to revamp a small corner of your abode or embark on a complete home transformation, Harrison's articles provide the essential expertise and creative flair to turn your visions into reality. So, dive into the captivating world of home remodeling with Harrison Clayton and unlock the full potential of your living space with every word he writes.


