How to Create a Glass Hole Without the Use of a Drill

Creating a hole in glass can be a challenging task, especially if you don’t have a drill on hand. However, there are alternative methods that can be used to achieve the desired result without the use of a drill. In this article, we will explore different techniques that can be employed to create a glass hole without the need for a drill.
Method 1: Glass Cutting Wheel
If you have a glass cutting wheel, you can use it to score a circle on the glass surface where you want the hole to be. Once the circle is scored, you can apply gentle pressure on the scored line to create a crack. With the crack created, you can carefully chip away at the glass using pliers or a glass cutter until you achieve the desired hole size.
Note: This method requires practice and caution as it involves working with glass and can result in sharp edges. Make sure to wear safety goggles and gloves while working with glass.
Method 2: Diamond Core Drill Bit

Another alternative is to use a diamond core drill bit, which is specifically designed for drilling through hard materials like glass. To create a hole using this method, you will need to attach the diamond core drill bit to a rotary tool. Apply steady pressure to the glass surface while drilling to create the hole. Make sure to go slow and steady to avoid cracking or damaging the glass.
Pro Tip: It’s recommended to use a lubricant, such as water or glass cutting oil, to keep the diamond core drill bit cool and reduce friction while drilling.
By following these alternative methods, you can successfully create a hole in glass without the use of a drill. Remember to exercise caution and take necessary safety precautions while working with glass to avoid injuries. Happy glass hole creation!
Tips for Creating a Glass Hole
- Choose the right glass: When creating a glass hole without a drill, it is important to choose the right type of glass. Ensure that the glass is sturdy and can withstand the pressure applied during the hole creation process. Avoid using fragile glass to prevent breakage.
- Use a glass cutter: A glass cutter is a tool specifically designed for cutting glass. It creates a score line on the glass, which makes it easier to break. Start by drawing a line on the glass with a straightedge and then use the glass cutter to score along the line.
- Apply pressure evenly: Once you have scored the glass, it is important to apply pressure evenly to break it. You can do this by placing the glass on a firm and flat surface and pressing down firmly along the score line. Be careful not to crack the glass unevenly.
- Use safety gloves: Wearing safety gloves is essential when working with glass, especially when creating a hole. The gloves provide protection from potential injuries caused by broken glass pieces.
- Work slowly and patiently: Creating a glass hole without a drill requires patience and precision. Take your time to ensure that you score the glass properly and apply pressure evenly. Rushing the process can lead to mistakes and accidents.
- Consider using a glass grinder: If you have access to a glass grinder, it can help to smooth out the edges of the hole after it is created. This can make the hole safer to handle and prevent any cuts or injuries.
- Clean up any glass shards: After creating the hole, make sure to carefully clean up any glass shards or debris to avoid potential accidents. Use a broom and dustpan or a vacuum cleaner to gather all the glass fragments.
Remember, working with glass can be dangerous if not done carefully. Always wear appropriate safety gear and take necessary precautions to avoid accidents or injuries.
Alternative Methods

1. Glass Cutter
One alternative method is to use a glass cutter to create a hole in glass. This method can be particularly useful if you need to create a small hole or a specific shape. Here is how you can use a glass cutter:

- Measure and mark the spot where you want the hole to be.
- Place a straight edge along the mark to ensure a clean and straight cut.
- Hold the glass cutter firmly in your hand and press the blade against the glass at the marked spot.
- Apply even pressure and score the glass along the marked line with a single, continuous motion.
- Carefully tap the backside of the glass along the scored line to break it.
2. Diamond Rotary Tool
Another alternative method is to use a diamond rotary tool, such as a Dremel, to create a hole in glass. This method is suitable for creating larger holes or when you need more control over the shape and size of the hole. Here are the steps to follow:
- Attach a diamond-coated drill bit or a diamond cutting disc to the rotary tool.
- Wet the glass surface with water to prevent overheating and to provide lubrication.
- Position the tool at the marked spot and turn it on at a medium speed.
- Apply gentle pressure to the glass, gradually increasing it to drill through the surface.
- Continue drilling until the desired hole size is achieved.
3. Hot Wire Cutter
If you have access to a hot wire cutter, you can use it to create a hole in glass. This method is ideal for creating clean and precise holes, especially in thinner glass materials. Follow these steps to use a hot wire cutter for creating a glass hole:
- Measure and mark the desired location for the hole on the glass.
- Set up the hot wire cutter according to the manufacturer’s instructions.
- Position the cutter at the marked spot and turn it on.
- Slowly and steadily push the wire into the glass, following the marked line.
- Continue until the wire completely cuts through the glass, creating the hole.
4. Acid Etching
Acid etching is another alternative method to create a hole in glass. This method involves using an acid-based solution to eat away at the glass and create a hole. However, it is important to note that acid etching can be dangerous and should be done with caution. Here is a general overview of the process:
- Measure and mark the spot where you want the hole in the glass.
- Prepare the acid etching solution according to the manufacturer’s instructions.
- Apply the solution to the marked area, making sure to wear protective gloves and eyewear.
- Let the acid etch away at the glass for the recommended amount of time.
- Rinse the glass thoroughly with water to remove any remaining acid.
| Method | Pros | Cons |
|---|---|---|
| Glass Cutter | – Suitable for small holes and specific shapes – Relatively affordable – Does not require a power tool |
– May require some practice for clean cuts – Not suitable for thick glass |
| Diamond Rotary Tool | – Can create larger holes – Provides more control over hole size and shape – Can be used on various glass thicknesses |
– Requires a diamond-coated drill bit or cutting disc – Produces dust and noise – Requires wearing protective gear |
| Hot Wire Cutter | – Creates clean and precise holes – Ideal for thin glass materials – Easy to use |
– Requires a hot wire cutter tool – Not suitable for thick glass |
| Acid Etching | – Can create intricate designs – Does not require specialized tools |
– Requires working with hazardous chemicals – Can be time-consuming – Requires safety precautions |

Tools Required
- Glass cutter
- Utility knife
- Sandpaper (220 grit)
- Masking tape
- Ruler
- Marker or pencil
- Safety goggles
- Gloves
Before you begin creating a glass hole without a drill, make sure you have all the necessary tools on hand. These tools will help you safely and effectively cut a hole in glass.
A glass cutter is essential for scoring the glass before cutting, while a utility knife can be used to make precise cuts along the scored line. Sandpaper will be useful for smoothing any rough edges after cutting, and masking tape can be used to create a guide for the cut.
Using a ruler and a marker or pencil, you can measure and mark the area on the glass where you want to create the hole. Safety goggles and gloves are important for protecting your eyes and hands during the cutting and sanding process.
Choosing the Right Glass
When it comes to creating a glass hole without a drill, it is important to choose the right type of glass. Not all glasses are suitable for this kind of project, and using the wrong type of glass can lead to cracks or breaks.
Glass Thickness

The thickness of the glass is an important factor to consider. Thicker glass tends to be more durable and less likely to break during the hole creation process. It is recommended to choose glass that is at least 1/4 inch thick for this project.
Glass Type
There are various types of glass available, each with different characteristics. When selecting glass for this project, it is important to choose a type that is strong and resistant to breakage. Some suitable options include:
- Tempered glass: This type of glass is heat-treated to increase its strength and durability. It is resistant to breakage and is a good option for creating a glass hole without a drill.
- Laminated glass: This glass consists of two or more layers of glass sandwiched together with a layer of plastic. It is strong and resistant to breakage, making it a suitable choice for this project.
- Borosilicate glass: Also known as Pyrex, this type of glass is highly resistant to thermal stress and is commonly used in scientific experiments. It is a strong and durable option for creating a glass hole.
Glass Shape
The shape of the glass also plays a role in determining its suitability for creating a hole. Flat or slightly curved glass surfaces are easier to work with compared to highly curved or irregularly shaped surfaces. It is recommended to choose glass with a flat or slightly curved surface for this project.
Glass Safety
It is important to prioritize safety when working with glass. Wear safety goggles and gloves to protect yourself from any potential injuries. Additionally, always handle the glass with care to avoid accidents or breakage.

Summary
Choosing the right glass is crucial for creating a glass hole without a drill. Consider the thickness, type, shape, and safety measures when selecting the glass for your project. By choosing the appropriate glass, you can successfully create a glass hole without the use of a drill.
Preparing the Glass Surface
- 1. Clean the glass: Before getting started, it is important to thoroughly clean the glass surface. This will help ensure that the adhesive used later on sticks properly. Use a glass cleaner and a lint-free cloth to clean the surface.
- 2. Mark the position: Use a marker or a tape to mark the exact position where you want to create the hole. Make sure the mark is centered and easily visible.
- 3. Apply masking tape: To prevent any possible cracks or chips during the drilling process, it is a good idea to apply masking tape around the marked area. This will act as a protective barrier and provide additional support.
- 4. Use a glass lubricant: Applying a glass lubricant on the marked area will help reduce friction and heat during the drilling process. This will prevent the glass from cracking or shattering. Follow the instructions on the lubricant and apply it evenly over the marked area.
Important Note: It is important to wear protective eyewear and gloves when working with glass to prevent any injuries.
Marking the Hole
Before you start creating a glass hole, you need to mark the exact location where the hole will be placed. This is an important step to ensure accuracy and precision in the hole creation process.
Here are the steps to mark the hole on the glass:
- Clean the glass surface: Use a glass cleaner and a microfiber cloth to thoroughly clean the area where the hole will be created. This will remove any dirt or dust particles that could interfere with the marking process.
- Measure and mark the center point: Use a measuring tape or ruler to find the center point of the hole. Once you have determined the center point, make a small dot or mark on the glass surface using a permanent marker or a glass etching pen.
- Use a template or stencil: If you need a specific size or shape for the hole, you can create a template or use a stencil to guide your marking. Place the template or stencil on the glass surface and trace the outline with a marker or pen.
- Double-check the markings: After marking the hole, double-check the accuracy of your markings. Make sure the measurements are correct and the markings are clear and visible.
Once you have marked the hole on the glass surface, you are ready to proceed with the next steps of creating the glass hole. The markings will serve as a guide throughout the process, ensuring that you drill or cut the hole at the designated location and shape.

Cutting the Hole
Step 1: Marking the Hole
To begin, mark the location where you want to create the glass hole.
Use a ruler or measuring tape to measure the dimensions of the hole you want to cut.
Make sure to mark both the width and length of the hole on the glass surface.
Step 2: Prepare the Glass Surface
Before cutting the hole, it is important to ensure that the glass surface is clean and free of any debris.
Wipe down the glass surface with a lint-free cloth or paper towel to remove any dust or dirt.

Step 3: Apply Tape
To prevent the glass from cracking or splintering during the cutting process, apply masking tape or painter’s tape around the marked area.
Press the tape firmly onto the glass surface, ensuring that it covers the entire perimeter of the marked hole.
Step 4: Cutting the Hole
There are several methods you can use to cut a hole in glass without a drill. Here are two common techniques:
- Glass Cutter:
- Score the glass along the marked lines using a glass cutter.
- Apply steady pressure while running the glass cutter along the marked lines to create a shallow cut.
- Repeat the scoring process several times until the cut is deep enough.
- Once the score is deep enough, place a dowel or similar object under the glass, directly underneath the marked hole.
- Apply downward pressure on either side of the score line to break the glass along the score line.
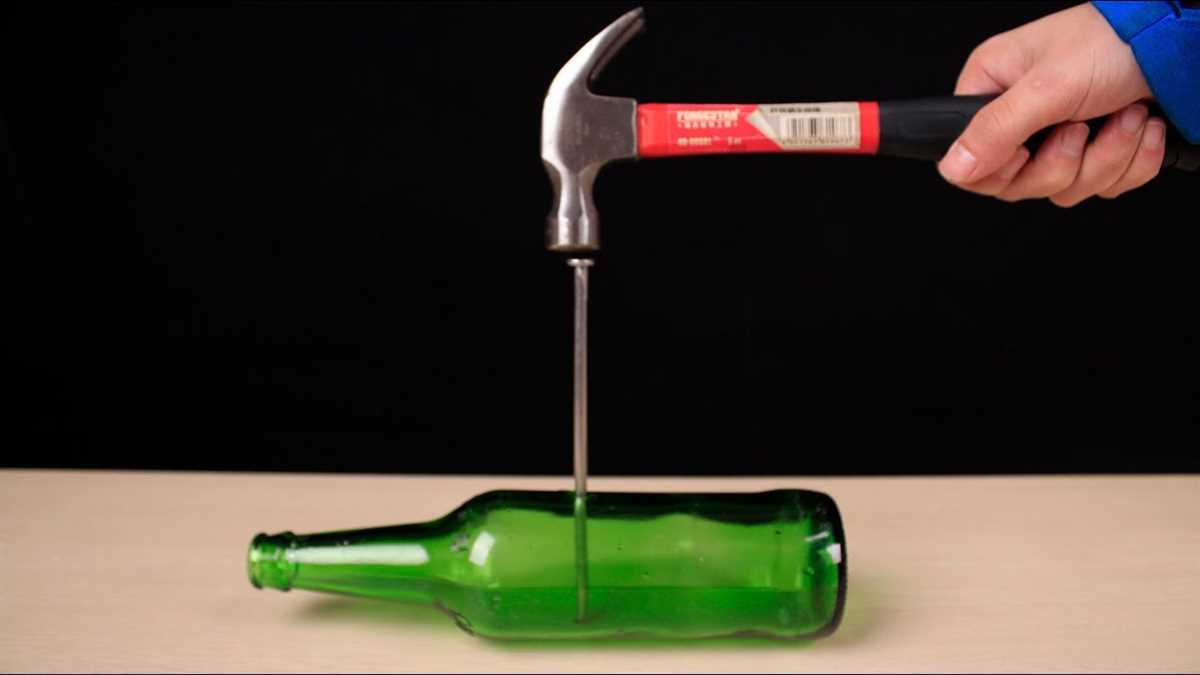
- Wire Method:
- Attach a small metal file or diamond file to a sturdy piece of wire.
- Loop the wire around the marked hole, ensuring that the file is positioned on the inside of the loop.
- Hold the wire firmly in both hands and saw back and forth, applying gentle pressure.
- Continue sawing back and forth until the wire severs the glass along the marked lines.
Step 5: Finishing
Once the glass has been cut, carefully remove the tape from the glass surface.
Inspect the hole to ensure that it is clean and smooth. If necessary, use a fine-grit sandpaper to smooth the edges of the hole.
Dispose of any glass remnants and clean up the work area.
Finishing Touches
Once you have successfully created the glass hole using the techniques mentioned above, there are a few finishing touches that you can add to make it look even better.
1. Sanding the edges
After creating the hole, you may have sharp edges around it. To make the edges smooth and safe, use sandpaper to gently sand them down. Start with a rough-grit sandpaper and gradually move to a finer grit until the edges are smooth to the touch.
2. Cleaning the glass
Before using the glass with the hole, it is important to clean it thoroughly. Use a glass cleaner and a lint-free cloth to remove any fingerprints, dirt, or dust from the surface. This will ensure that the glass hole looks clear and pristine.
3. Adding decorative elements
If you want to enhance the appearance of the glass hole, consider adding some decorative elements. You can use colored glass paints to create a stained glass effect around the hole or use adhesive gems or stickers for a more whimsical look.
4. Sealing the hole
If you want to prevent any water leakage through the hole, you can use a clear silicone sealant to seal it. Apply a thin layer of silicone around the edges of the hole and let it dry completely before using the glass.
5. Displaying your glass with a hole
Once you have finished all the necessary touch-ups, you can proudly display your glass with a hole. Place it on a shelf, use it as a centerpiece, or incorporate it into your home decor in any way you like.
Remember to handle the glass with care and avoid putting excessive weight or pressure on the hole. With the right finishing touches, your glass hole will be a unique and eye-catching addition to your home.
Safety Precautions
When creating a glass hole without the use of a drill, it is important to take certain safety precautions to protect yourself and ensure a successful outcome. Here are some important safety tips to follow:
1. Wear Protective Gear
Always wear appropriate protective gear, such as safety goggles, gloves, and a face mask, to shield yourself from any potential injuries or flying debris.
2. Select the Right Glass
Make sure to use the right type of glass for the task at hand. Glass with a high lead content or tempered glass can be difficult to work with and might require specialized tools.
3. Choose the Right Tools
Use the proper tools for your glass hole creation. Instead of a drill, consider using alternative tools like a glass cutter, glass grinder, or a diamond hole saw.
4. Work in a Well-Ventilated Area
Ensure that you work in a well-ventilated area to prevent the accumulation of any harmful fumes or dust particles. If necessary, use a ventilation fan or work outdoors.
5. Secure the Glass
Properly secure the glass before starting your project. Use clamps or a sturdy work surface to prevent the glass from moving during the cutting or grinding process.
6. Take Breaks
Take breaks during extended periods of cutting or grinding to prevent fatigue. This will help maintain your focus and reduce the chances of making any mistakes that could result in injury.
7. Dispose of Glass Safely
Dispose of any glass waste properly to avoid injury. Wrap broken glass pieces in newspaper or place them in a designated container specifically designed for glass disposal.
8. Seek Professional Help if Needed
If you are unsure about any step of the process or do not have the necessary skills or tools, it is best to seek professional help. Professional glass cutters or installation services can help you create the desired glass hole safely and efficiently.
By following these safety precautions, you can minimize the risks associated with creating a glass hole without a drill and ensure a safe and successful project.
FAQ:
Is it possible to create a glass hole without using a drill?
Yes, it is possible to create a glass hole without using a drill. There are alternative methods that can be used, such as using a glass cutter or a diamond hole saw.
What is a glass cutter and how does it work?
A glass cutter is a tool that is used to score a line on the surface of the glass. The scoring weakens the glass, making it easier to break along that line. To use a glass cutter, you need to hold it firmly and apply pressure while making a straight line on the glass.
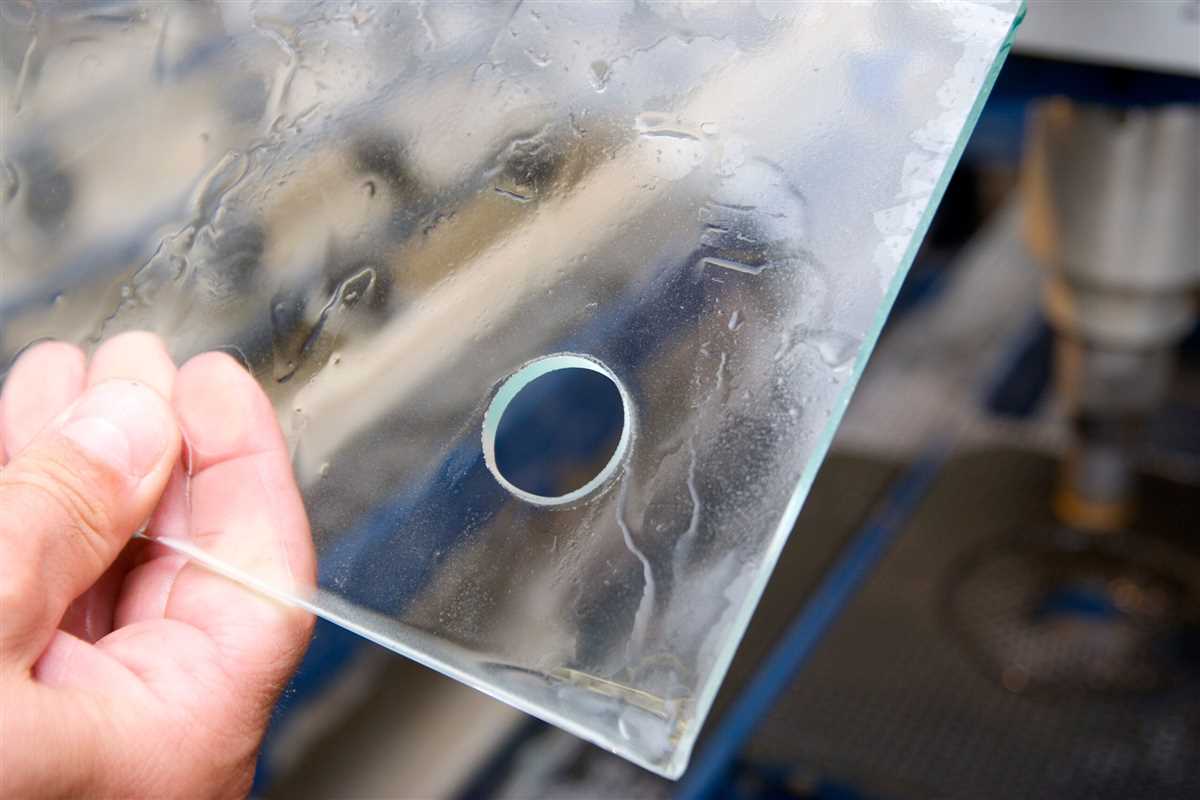
Can I use a diamond hole saw to create a glass hole?
Yes, a diamond hole saw can be used to create a glass hole. Diamond hole saws are specifically designed to cut through hard materials like glass and porcelain. To use a diamond hole saw, you need to attach it to a drill and slowly apply pressure while drilling into the glass.
Are there any safety precautions I should take when creating a glass hole?
Yes, there are several safety precautions you should take when creating a glass hole. It is important to wear safety goggles to protect your eyes from glass shards. You should also wear gloves to protect your hands from any sharp edges. Additionally, it is recommended to work in a well-ventilated area and to have a first aid kit nearby in case of any accidents.
Video:


Harrison Clayton
Meet Harrison Clayton, a distinguished author and home remodeling enthusiast whose expertise in the realm of renovation is second to none. With a passion for transforming houses into inviting homes, Harrison's writing at https://thehuts-eastbourne.co.uk/ brings a breath of fresh inspiration to the world of home improvement. Whether you're looking to revamp a small corner of your abode or embark on a complete home transformation, Harrison's articles provide the essential expertise and creative flair to turn your visions into reality. So, dive into the captivating world of home remodeling with Harrison Clayton and unlock the full potential of your living space with every word he writes.


