How to Conceal Drill Holes in Your Wall: Easy Solutions

Drilling holes in your walls may be necessary for a variety of reasons – hanging artwork, mounting shelves, or installing new fixtures. However, once the job is done, you may be left with unsightly holes that can be a real eyesore. But fear not, there are easy and inexpensive solutions to conceal those drill holes and restore your wall to its former glory.
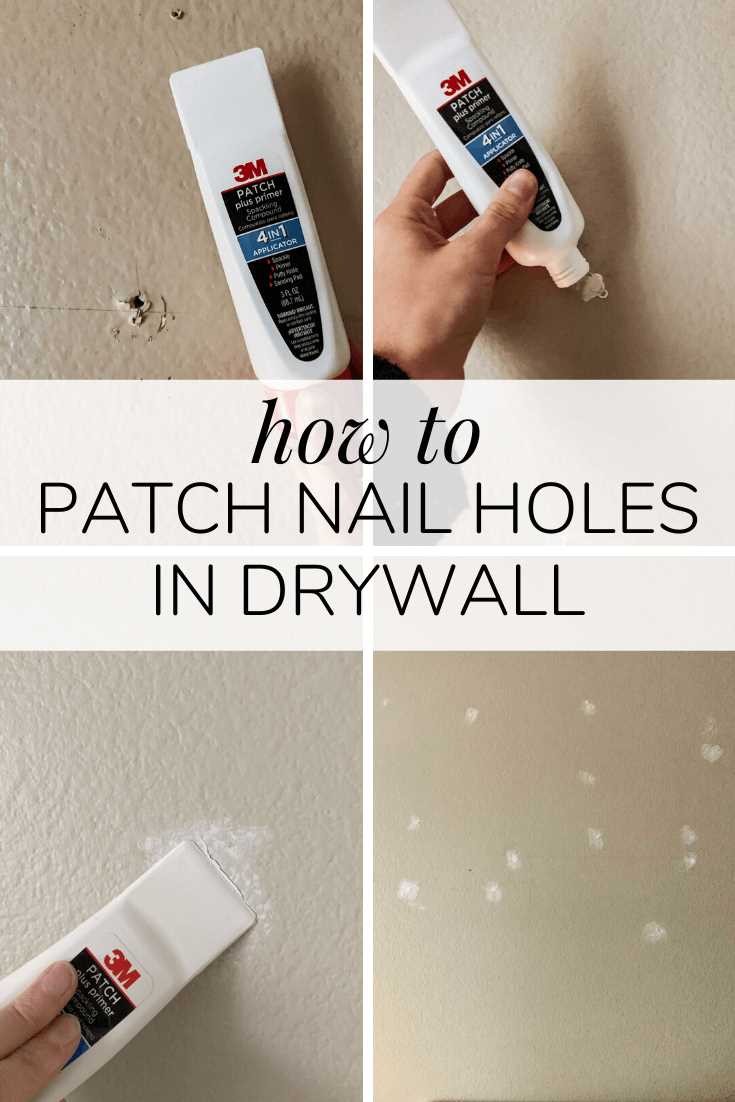
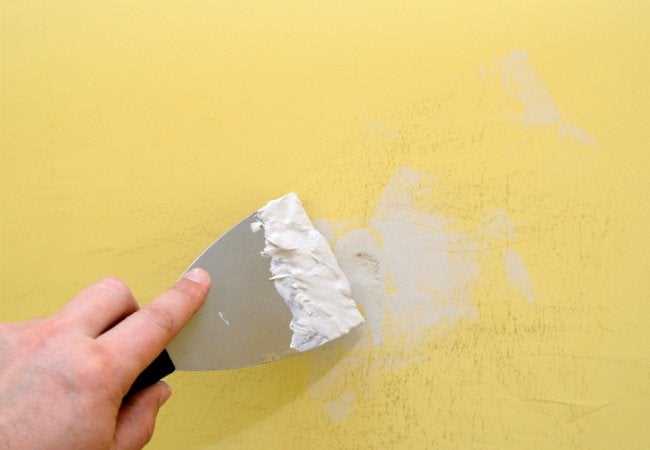
One simple solution is to use spackle or wall putty. These products are readily available at any hardware store and can be easily applied with a putty knife. Simply apply the spackle or putty to the hole, filling it in and smoothing it out. Once it dries, you can sand it down for a seamless finish. This method works best for small holes and is a quick and affordable way to hide any evidence of your previous work.
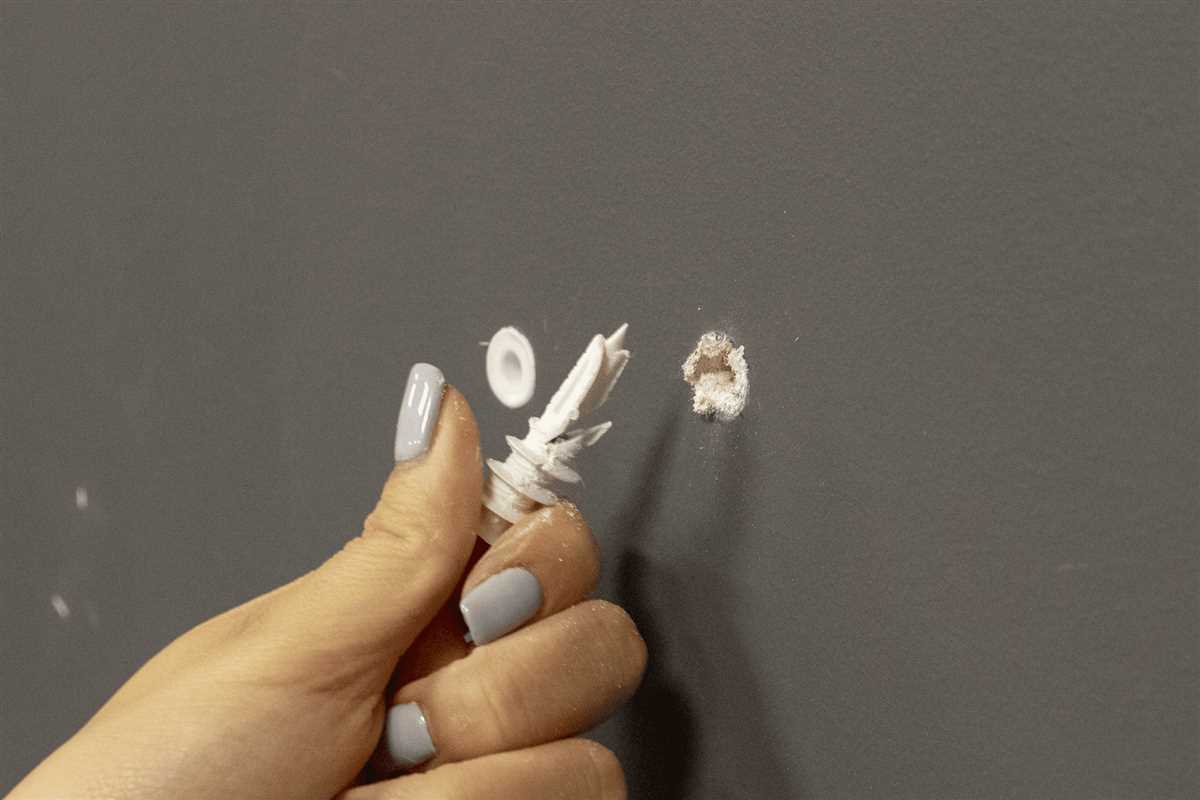
If you’re looking for a more decorative option, consider using wall anchors or plugs. These come in different sizes and colors, allowing you to match them to your wall’s paint or even create a unique design. Simply insert the anchor or plug into the hole and tighten it until it is snug against the wall. Then, trim the excess and paint over it for a seamless appearance. This method not only conceals the hole but also adds a stylish touch to your wall.
In some cases, you may want to completely cover the hole with a new element. This is where wall patches come in handy. Wall patches are adhesive-backed fabric or mesh patches that can be applied directly over the hole. Once in place, you can paint or wallpaper over the patch to match your wall. This method is ideal for larger holes or when you want to add a unique design element to your space.
When it comes to concealing drill holes in your wall, the options are endless. Whether you choose to use spackle, wall anchors, or patches, the key is to choose a method that suits your needs and style. With a little creativity and some basic tools, you can easily restore your wall to its original beauty and make those drill holes disappear.

Preparation for Wall Repairs
Before you begin repairing the drill holes in your wall, it is important to properly prepare the area to ensure a successful and seamless repair. Follow these steps to prepare your wall for repairs:
- Clean the wall: Use a damp cloth or sponge to wipe away any dust, dirt, or debris from the area around the drill holes. This will help the repair material adhere better to the wall.
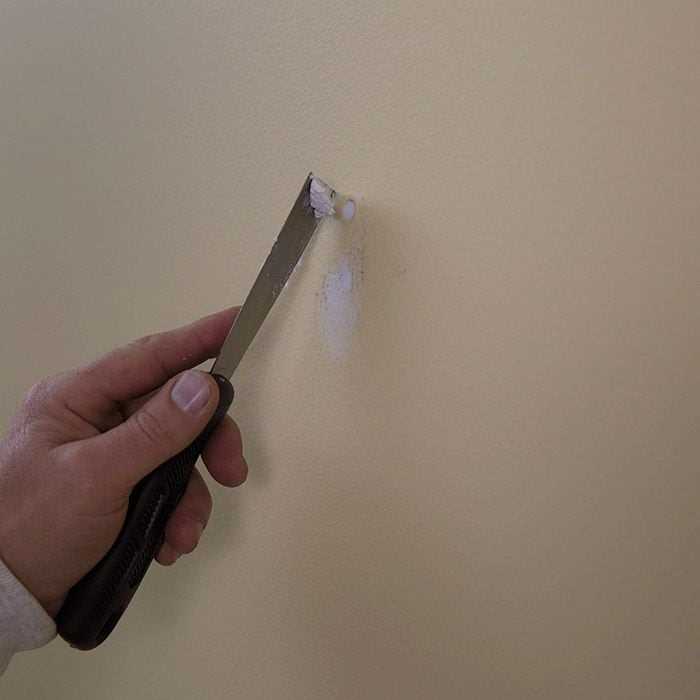
- Remove loose paint or wallpaper: If there is any loose paint or wallpaper around the drill holes, gently scrape it off using a putty knife or scraper. Make sure to remove all loose material to create a smooth surface for the repair.
- Sand the area: Use a fine-grit sandpaper to gently sand the area around the drill holes. This will help smooth out any rough edges and create a better surface for the repair material to bond with.
- Fill larger holes: If the drill holes are larger than a nail hole, you may need to fill them with a patching compound or spackling paste. Follow the instructions on the product packaging to ensure proper application.
- Allow the repair material to dry: Depending on the product you use, the repair material may need some time to dry and cure. Follow the manufacturer’s instructions for drying times before moving on to the next step.
- Sand the repaired area: Once the repair material is dry, use a fine-grit sandpaper to smooth out the repaired area. This will help blend the repair with the surrounding wall surface.
- Clean the wall again: After sanding, use a damp cloth to remove any dust or debris from the repaired area. This will ensure a clean surface for painting or touching up the wall.
Following these preparation steps will help you achieve a professional-looking repair that seamlessly conceals the drill holes in your wall. Once the preparation is complete, you can move on to the actual repair process.
Tools and Materials Needed
- Putty knife or scraper
- Spackle or lightweight joint compound
- Sanding block or sandpaper
- Primer
- Paint color matching the wall
- Paintbrush or roller
- Painter’s tape
- Drywall patch or mesh tape
- Drill
- Wall anchors
- Screwdriver or wrench (if needed to remove wall anchors)
Preparing the Wall Surface
Before you start concealing drill holes in your wall, it’s important to properly prepare the wall surface. Here are the steps you need to follow:
1. Gather the necessary materials
- Spackle or wall putty
- Putty knife
- Sandpaper (medium and fine grits)
- Cloth or sponge
2. Clean the wall
Use a cloth or sponge to wipe down the area around the drill holes. This will remove any dust, dirt, or grease that may be on the surface.
3. Fill the drill holes
Take a small amount of spackle or wall putty and apply it to the end of your putty knife. Press the putty firmly into each drill hole until it is completely filled. Scrape off any excess putty using the edge of the putty knife. Make sure the putty is level with the surface of the wall.

4. Allow the putty to dry
Follow the manufacturer’s instructions regarding the drying time for the spackle or wall putty. Typically, it will take around 24 hours for the putty to fully dry. Avoid touching or applying pressure to the filled drill holes during this time.
5. Sand the filled drill holes
Once the putty is dry, use medium grit sandpaper to smooth out the filled drill holes. Sand in a circular motion until the surface is even and flush with the surrounding wall. Then, switch to fine grit sandpaper to further smoothen the area. Wipe away any dust with a cloth or sponge.
6. Inspect the wall surface
Check the filled drill holes to ensure that they are seamlessly integrated with the rest of the wall. If necessary, repeat steps 3 to 5 to achieve a perfectly smooth finish.
By properly preparing the wall surface, you’ll be able to effectively conceal drill holes and restore the appearance of your wall. Now that you’re ready, you can move on to the next steps of covering the holes.

Concealing Small Drill Holes
If you have small drill holes in your wall that you want to hide, there are several easy solutions you can try. Whether you want a temporary fix or a more permanent solution, here are some ideas to help you conceal those unsightly holes.
1. Spackle or Joint Compound
One of the easiest ways to hide small drill holes is to use spackle or joint compound. These materials can be easily applied to the hole using a putty knife or a small spatula. Simply fill the hole with the compound, smooth it out, and let it dry. Once dry, you can sand the area and paint over it to match the surrounding wall. This method is great for small holes and is a quick and affordable solution.
2. Wall Putty
Another option to conceal small drill holes is to use wall putty. Wall putty is a versatile material that can be easily molded and shaped to fill in the holes. Simply take a small amount of putty and press it into the hole, making sure to fill it completely. Once the putty is in place, smooth it out with a putty knife or your fingers. Let it dry and then sand and paint over it if necessary. Wall putty is a great solution for small holes and can be easily removed if needed.
3. Adhesive Hooks or Picture Hangers
If you want to avoid drilling more holes in your wall, adhesive hooks or picture hangers can be a great alternative. These hooks and hangers use strong adhesive to stick to the wall, allowing you to hang pictures, mirrors, or other items without the need for drilling. If you remove the hooks or hangers in the future, they may leave a small adhesive mark, but these can usually be easily washed off or hidden with a small amount of spackle or putty.
4. Decorative Wall Coverings
If you have multiple small drill holes in your wall, you can consider using decorative wall coverings to hide them. This can include things like wall decals, wallpaper, or even a large piece of artwork. By strategically placing these coverings over the holes, you can effectively conceal them while also adding a decorative touch to your space.

5. Furniture or Decorative Items
If the small drill holes are near the floor or behind furniture, you can simply place a piece of furniture or a decorative item over them to hide them from view. This is a quick and easy solution that doesn’t require any additional materials or tools. Just make sure that the item you choose is large enough to cover the holes completely.
With these simple solutions, you can easily conceal small drill holes in your wall and restore the appearance of your space. Whether you choose to use spackle, wall putty, adhesive hooks, wall coverings, or furniture, there are options available for every preference and need.
Using Spackle or Wood Filler
Spackle or wood filler is a great option for concealing drill holes in your wall. These products are designed to fill in holes and cracks in walls, providing a smooth and seamless surface for painting or wallpapering. Here’s how you can use spackle or wood filler to hide drill holes:
1. Prepare the area
Before you start filling the drill holes, it’s important to prepare the area. Clean the wall around the holes with a damp cloth to remove any dirt or dust. This will ensure that the spackle or wood filler adheres properly to the wall.
2. Gather the materials
Next, gather all the materials you’ll need for the job. This includes spackle or wood filler, a putty knife or scraper, sandpaper, and a dry cloth. Make sure the spackle or wood filler matches the color of your wall for the most seamless finish.

3. Fill the holes
Using a putty knife or scraper, scoop some spackle or wood filler onto the blade. Press the blade against the hole and use a smooth motion to fill it in. Make sure the hole is completely filled and the surface is level with the rest of the wall. Remove any excess spackle or wood filler from the surrounding area.
4. Smooth the surface
After filling the holes, use the putty knife or scraper to smooth the surface of the spackle or wood filler. This will create a seamless finish and ensure that the filled-in holes blend in with the surrounding wall. Let the spackle or wood filler dry according to the manufacturer’s instructions.
5. Sand and paint
Once the spackle or wood filler is completely dry, use sandpaper to gently sand the filled-in holes. This will smooth out any rough edges and create an even surface. Wipe away any dust with a dry cloth. If needed, apply a coat of paint that matches your wall color to completely conceal the drill holes.
6. Finishing touches
After the paint has dried, step back and inspect the wall. If there are any imperfections or unevenness, you can apply an additional coat of paint or touch up the area as needed. This will ensure a professional-looking finish and make the drill holes virtually invisible.
Using spackle or wood filler is a simple and effective way to conceal drill holes in your wall. With a few easy steps, you can have a wall that looks seamless and flawless, ready for any type of decor or design.
Using Toothpaste or Soap
If you’re looking for a quick and easy solution to concealing drill holes in your wall, you can try using toothpaste or soap. Both of these household items can be used to fill in small holes and create a smooth surface for painting or wallpapering.
Materials you will need:
- Toothpaste or soap
- Putty knife or scraper
- Sandpaper
- Paint or wallpaper
Steps to conceal drill holes using toothpaste or soap:
- Start by cleaning the area around the drill holes with a damp cloth to remove any dust or debris. This will ensure that the toothpaste or soap adheres properly.
- If you’re using toothpaste, squeeze a small amount onto your putty knife or scraper. If you’re using soap, moisten the end of the soap and rub it over the hole.
- Use the putty knife or scraper to press the toothpaste or soap into the hole, filling it completely. Ensure that the surface is smooth and level.
- Allow the toothpaste or soap to dry completely. This may take a few hours or overnight, depending on the brand and amount used.
- Once the toothpaste or soap is dry, use sandpaper to gently sand the surface until it is smooth and flush with the surrounding wall. Be careful not to sand too much and damage the surrounding area.
- If you’re planning to paint over the area, apply a coat of primer to the repaired spots before painting. This will help the paint adhere evenly to the surface.
- If you’re wallpapering, you can proceed with applying the wallpaper directly over the repaired spots.
Using toothpaste or soap is a cost-effective and simple way to hide drill holes in your wall. Both options are readily available in most households and can be easily applied and smoothed out. Just remember to match the color of the toothpaste or soap to the color of your wall for a seamless finish.
Concealing Large Drill Holes
Large drill holes can be more challenging to conceal, but with the right techniques and materials, it is still possible to make them disappear. Here are some solutions for concealing large drill holes in your wall:
1. Patch and paint
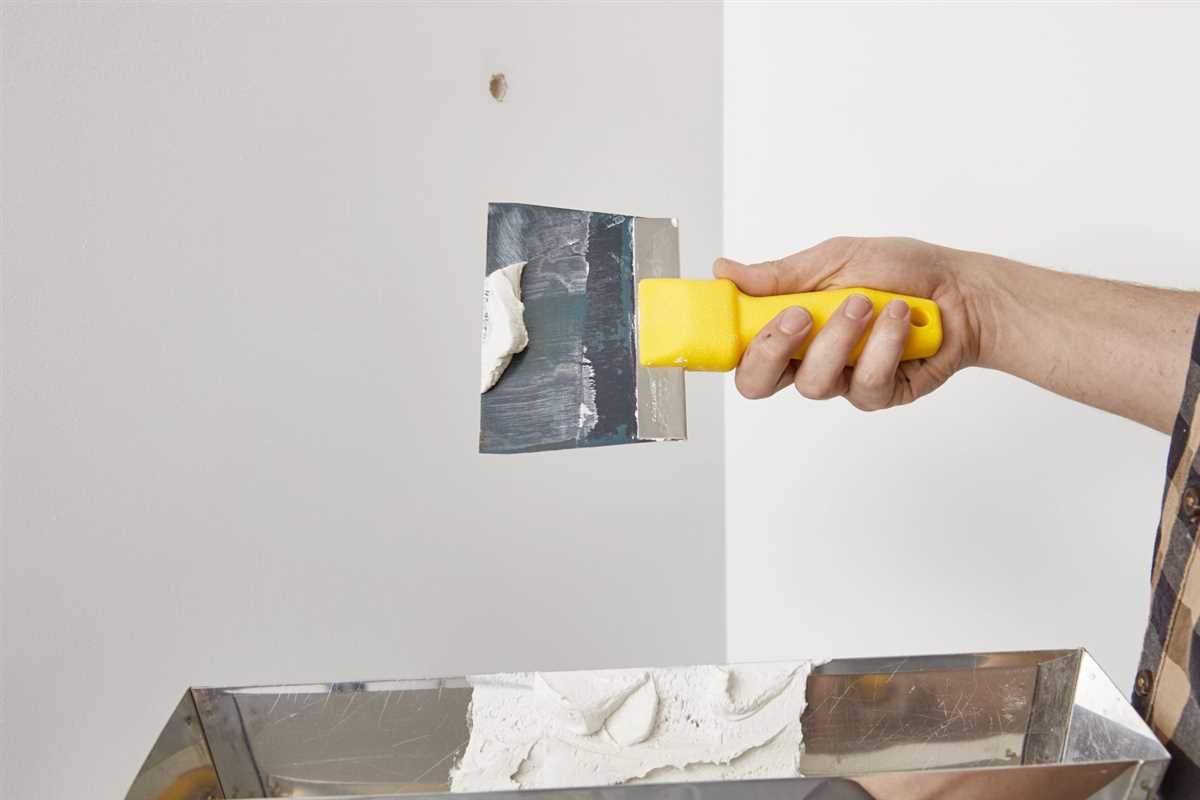
One common method for concealing large drill holes is to patch them with spackling compound or drywall joint compound. Start by cleaning the hole and removing any loose debris. Apply the compound to the hole using a putty knife and smooth it out. Let it dry and then sand it down until it is smooth and flush with the surrounding wall. Finally, paint over the patched area to match the color of the rest of the wall.
2. Use a decorative cover
If you want to add a decorative element to your wall while concealing the large drill hole, you can use a decorative cover. These covers come in various designs and materials, such as metal or plastic, and can be easily attached over the hole using adhesive or screws. This solution not only hides the hole but also adds a stylish touch to your wall.
3. Install a wall-mounted accessory
If the large drill hole is located in an area where you could use some extra storage or functionality, consider installing a wall-mounted accessory. This could be a shelf, a hook, or a small cabinet that covers the hole while providing a functional purpose. Make sure to properly secure the accessory to the wall to ensure it stays in place.
4. Cover with a piece of artwork
An easy and aesthetically pleasing way to conceal large drill holes is to hang a piece of artwork over them. Choose a framed piece that covers the hole completely or opt for a gallery wall arrangement to distract from the hole. This solution not only hides the hole but also adds visual interest to your wall.
5. Install a wall panel or tiles
If you want a more permanent solution and don’t mind making a larger modification to your wall, consider installing a wall panel or tiles over the hole. This option works well for larger holes or multiple drill holes that are close together. Choose a panel or tile design that complements the rest of your wall or creates an interesting accent.
When concealing large drill holes, it’s important to consider the size, location, and purpose of the hole to determine the best solution. With these ideas, you can effectively conceal large drill holes and maintain the aesthetics of your wall.
Using Drywall Patch
Step 1: Gather the necessary materials
Before you begin, make sure you have all the necessary materials:
- Drywall patch
- Putty knife
- Sanding block or sandpaper
- Primer
- Paint
Step 2: Prepare the hole
Start by cleaning the area around the hole. Use a putty knife to remove any loose debris or flaking paint. Make sure the edges of the hole are smooth and free of any loose or jagged pieces.
Step 3: Apply the drywall patch
Take your drywall patch and place it over the hole, ensuring that it covers the entire area. Use a putty knife to spread a thin layer of joint compound or spackling over the patch, feathering the edges to blend it with the surrounding wall. Smooth out any excess compound with the putty knife.
Step 4: Sand and smooth
Allow the compound to dry completely. Once dry, use a sanding block or sandpaper to smooth the patched area, creating an even surface with the surrounding wall. Be careful not to sand too aggressively, as this can damage the patch.
Step 5: Prime and paint
After sanding, wipe away any dust and apply a coat of primer over the patched area. Allow the primer to dry, and then apply paint that matches the color of your wall. Apply multiple coats as needed to achieve a seamless finish.
Step 6: Final touches
Once the paint has dried, inspect the patched area to ensure it blends seamlessly with the rest of the wall. If necessary, touch up any imperfections with additional paint.
Tip:
If the hole is larger or more complex, you may need to use a drywall repair kit or consult a professional for assistance.
Using Patching Compound
Patching compound is a great solution for concealing drill holes in your wall. It is easy to use and provides a smooth finish. Here is a step-by-step guide on how to use patching compound:
Materials You Will Need:
- Patching compound
- Putty knife
- Sandpaper
- Paint
- Paintbrush
Step 1: Prepare the Surface
Start by cleaning the area around the drill hole with a damp cloth. Make sure there is no dust or debris on the wall.
Step 2: Apply the Patching Compound
- Take a small amount of patching compound on your putty knife.
- Spread the compound over the drill hole, making sure to fill it completely.
- Use the putty knife to smooth out the surface of the compound. Make it as flush with the wall as possible.
Step 3: Let It Dry
Allow the patching compound to dry completely. This may take a few hours, depending on the brand and thickness of the compound.
Step 4: Sand the Surface
Once the patching compound is dry, use sandpaper to smooth out the surface. Gently sand the area in a circular motion until it is flush with the surrounding wall.
Step 5: Paint the Wall
If needed, paint the patched area to match the rest of the wall. Use a paintbrush to apply the paint evenly. Let it dry according to the paint manufacturer’s instructions.
Using patching compound is an effective way to conceal drill holes in your wall. It provides a smooth and seamless finish, making the patched area practically invisible.
Painting the Repaired Area
Once you have completed the necessary repairs to the drill holes in your wall, it’s time to paint the area to make it blend in seamlessly with the rest of the wall. Here’s how to paint the repaired area:
1. Gather the Necessary Supplies
Before you begin, gather all the supplies you need. This includes:
- Primer
- Paint in the color that matches your wall
- Paintbrushes
- Roller and tray
- Painter’s tape
- Damp cloth
- Dropsheet or old newspaper
2. Prepare the Area
Cover the floor with a dropsheet or old newspaper to protect it from any paint splatters. Use painter’s tape to mask off any areas that you don’t want to paint.
3. Apply Primer
Start by applying a coat of primer to the repaired area. This will help the paint adhere better and ensure that the color is consistent. Use a brush to apply the primer and feather it out around the edges.
4. Paint the Repaired Area
Once the primer has dried, it’s time to paint the repaired area. Dip your brush or roller in the paint and apply a thin, even coat to the repaired area. Use a brush for smaller areas and a roller for larger ones. Be sure to feather the paint out around the edges to blend it in with the rest of the wall.
5. Allow the Paint to Dry
Allow the first coat of paint to dry completely. Depending on the type of paint you are using, this could take anywhere from a few hours to overnight. Once the first coat is dry, you can assess if you need to apply a second coat.
6. Apply a Second Coat (if necessary)
If the color is not completely opaque or if there are any noticeable differences between the repaired area and the rest of the wall, apply a second coat of paint. Repeat the process of applying a thin, even coat and feathering it out around the edges.
7. Clean up
Once you have finished painting the repaired area, clean up any paint spills or splatters using a damp cloth. Remove the painter’s tape carefully to avoid peeling off any fresh paint. Allow the paint to dry completely before removing the dropsheet or newspaper.
With these steps, you can paint the repaired area and make it virtually undetectable. Take your time and ensure that the paint is blended well to achieve the best results.
FAQ:
What are some easy solutions for concealing drill holes in the wall?
There are several easy solutions for concealing drill holes in the wall. One option is to use spackling or putty to fill the holes, then sand it down and paint over it to match the wall. Another option is to use wall anchors or picture hangers that can cover up the holes. You can also use adhesive hooks or adhesive strips to hang items over the holes and hide them. There are also wall patches or repair kits available that can be applied over the holes to make them less noticeable. Finally, if all else fails, you can consider hanging a picture or artwork over the holes to hide them.
Can I use toothpaste to cover drill holes in the wall?
Yes, toothpaste can be used as a temporary solution for covering drill holes in the wall. It can be applied to the holes using a putty knife or any similar tool. However, toothpaste is not as durable or long-lasting as other options like spackling or putty. It may dry out or crumble over time, so it’s best to use it as a temporary fix until you can find a more permanent solution.
Are there any DIY methods to conceal drill holes in the wall?
Yes, there are several DIY methods you can try to conceal drill holes in the wall. One option is to fill the holes with a mixture of white toothpaste and baking soda, then smooth it out and paint over it. Another option is to use crayons or markers that match the color of your wall to color over the holes. You can also try using a small piece of drywall or cardboard, cut to size, to cover the holes. These DIY methods may not be as effective or long-lasting as professional solutions, but they can be a quick and easy way to hide small drill holes.
How can I make sure the paint matches when concealing drill holes in the wall?
To ensure that the paint matches when concealing drill holes in the wall, it’s best to use the same paint that was originally used on the wall. If you don’t have the exact matching paint, you can try taking a small sample of the paint to a home improvement store and asking them to color match it. They can create a custom paint color that closely matches the existing paint on your wall. Alternatively, you can try using touch-up paint or a paint pen that matches the color of your wall to cover the holes. It’s a good idea to test the paint in an inconspicuous area first to make sure it matches before applying it to the holes.
Are there any alternative methods for concealing drill holes in the wall?
Yes, there are alternative methods you can use to conceal drill holes in the wall. One option is to use decorative wall plates or switch plates to cover the holes. These can be easily attached over the holes and can add a decorative touch to your wall. Another option is to use peel-and-stick wallpaper or wall decals to cover the holes. These can be applied directly over the holes and can be a fun and creative way to conceal them. Additionally, you can use a decorative tapestry, fabric panel, or hanging plant to cover the holes and add visual interest to your wall.
What is the best way to hide large drill holes in the wall?
Hiding large drill holes in the wall can be a bit more challenging, but there are some solutions you can try. One option is to use a wall patch or repair kit specifically designed for larger holes. These kits typically contain a piece of mesh or patch that can be applied over the hole, then covered with spackling or putty. Once the patch is dry, you can sand it down and paint over it to match the wall. Another option is to use a wall anchor or toggle bolt to cover the hole. These can be inserted into the hole and expanded to provide a secure attachment point for hanging items. It’s important to ensure the anchor or bolt is rated to support the weight of what you plan to hang over the hole.
Video:


Meet Harrison Clayton, a distinguished author and home remodeling enthusiast whose expertise in the realm of renovation is second to none. With a passion for transforming houses into inviting homes, Harrison's writing at https://thehuts-eastbourne.co.uk/ brings a breath of fresh inspiration to the world of home improvement. Whether you're looking to revamp a small corner of your abode or embark on a complete home transformation, Harrison's articles provide the essential expertise and creative flair to turn your visions into reality. So, dive into the captivating world of home remodeling with Harrison Clayton and unlock the full potential of your living space with every word he writes.


