How to Change Drill Direction

Changing the direction of a drill is an essential skill for any DIY enthusiast or professional. Whether you need to switch from drilling clockwise to counterclockwise, or vice versa, understanding the process is crucial for successful drilling. This article will provide you with step-by-step instructions on how to change drill direction, along with some useful tips and tricks to ensure a seamless transition.
Step 1: Verify the Drill Type
Before attempting to change the drill direction, it’s important to determine the type of drill you have. Most drills have a forward (clockwise) and reverse (counterclockwise) direction, which can be controlled by a switch or button on the drill. Consult the drill’s user manual or look for directional arrows on the drill to identify the correct button or switch to use.
Step 2: Locate the Directional Switch
Once you have identified the directional switch/button, locate it on your drill. It is commonly found near the trigger or on the side of the drill. The switch/button might be labeled with arrows indicating the direction of rotation. Flip or push the switch/button according to the desired direction you want the drill to rotate in.

Step 3: Test the New Direction
After changing the drill direction, it’s always a good idea to test it before starting any drilling. Hold the drill firmly and gently squeeze the trigger to check if the drill rotates in the desired direction. Make sure to keep your fingers away from any moving parts and use the appropriate safety precautions.
Tips and Tricks:
– If your drill does not have a directional switch, it may have a two-speed gearbox that allows you to change the rotation direction by adjusting the speed settings.
– Always double-check the drill direction before starting any drilling, as it can prevent accidents and improve the quality of your work.
– If you encounter any difficulties or issues while changing the drill direction, refer to the drill’s user manual or contact the manufacturer for assistance.
By following these simple steps and guidelines, you’ll be able to change the direction of your drill efficiently and safely. Remember to always prioritize safety and double-check the direction before starting any drilling tasks. Happy drilling!
Understanding Drill Direction
Before learning how to change drill direction, it is important to understand the basics of drill direction and its significance.

What is Drill Direction?
Drill direction refers to the clockwise or counterclockwise direction in which a drill bit rotates. It determines whether the drill bit moves in a clockwise or counterclockwise direction when drilling into a material.
Importance of Drill Direction
The drill direction is crucial for achieving desired drilling outcomes. It can impact the efficiency, accuracy, and quality of drilling. Understanding drill direction is essential to choose the appropriate rotation direction and avoid any potential issues.
Clockwise vs. Counterclockwise Drill Direction
The direction of the drill bit’s rotation can vary depending on the drill type and the specific drilling requirements. Here are the key differences between clockwise and counterclockwise drill direction:
- Clockwise Drill Direction: In a clockwise drill direction, the drill bit rotates in a clockwise motion, moving from the left to the right when viewed from above. This is the most common drill direction used in conventional drilling.
- Counterclockwise Drill Direction: In a counterclockwise drill direction, the drill bit rotates in a counterclockwise motion, moving from the right to the left when viewed from above. This drill direction is less common and is primarily used in special applications or drilling reverse-thread screws.
How to Change Drill Direction
To change the drill direction, you need to locate the direction control on your drill. This control can be a switch or a button, depending on the drill model. Follow these steps to change the drill direction:
- Identify the direction control on your drill.
- Refer to the drill’s user manual or the manufacturer’s instructions to understand how to change the drill direction.
- Once you have located the direction control, adjust it according to the desired drill direction (clockwise or counterclockwise).
- Make sure the drill is turned off before changing the drill direction.
- Check the drill’s indicator or LED light to confirm the new drill direction.
Conclusion

Understanding drill direction is crucial for successful drilling. By knowing the basics of drill direction and how to change it, you can ensure optimal drilling performance and achieve the desired results.
Precautions and Safety Measures
1. Wear Protective Gear
Before changing the drill direction or performing any drilling tasks, it is essential to wear the appropriate protective gear. This includes safety goggles to protect your eyes from flying debris, ear protection to reduce noise levels, and gloves to safeguard your hands.
2. Disconnect Power Supply
When changing the direction of a drill, always disconnect the power supply or remove the battery. This precaution is crucial to prevent any accidental start-ups that can lead to injuries.
3. Read the User Manual
It is important to thoroughly read and understand the user manual provided by the manufacturer. The manual contains valuable information on operating the drill safely and correctly. It will also provide instructions specific to your drill model on how to change the drill direction.
4. Choose the Right Drill Bit

Ensure that you choose the appropriate drill bit for the task at hand. Different materials require different types of drill bits. Using the wrong drill bit can lead to the bit getting stuck or breaking, causing damage to the drill and potential injury to the user.
5. Secure the Workpiece
Prior to changing the drill direction, make sure the workpiece is securely clamped or held in place. This will prevent it from moving or being damaged during the drilling process.
6. Keep a Firm Grip
Always maintain a firm grip on the drill when changing its direction. Ensure that your hands are positioned away from the moving parts and switches. This will help prevent accidental slips or falls that can result in injuries.
7. Work in a Well-lit Area
It is important to work in a well-lit area to ensure visibility of the workpiece and drill. Proper lighting will help you accurately position the drill and avoid potential hazards.
8. Check for Obstructions
Prior to changing the drill direction, be cautious of any obstructions in the work area. Clear away any objects or debris that may interfere with the drilling process or cause accidents.

9. Work at a Comfortable Pace
When changing the drill direction, maintain a comfortable and steady pace. Avoid rushing or applying excessive force, as this can compromise control and accuracy.
10. Seek Professional Assistance if Needed
If you are uncertain about how to change the drill direction or encounter any issues while doing so, it is best to seek professional assistance. Avoid attempting to fix or modify the drill on your own, as this can lead to further damage or injury.
By following these precautions and safety measures, you can ensure a safe and successful drill direction change, minimizing the risk of accidents or injuries.
Step-by-Step Guide
1. Prepare the Drill
Before changing the drill direction, make sure that the drill is turned off and unplugged from the power source. This will prevent any accidents or injuries during the process.
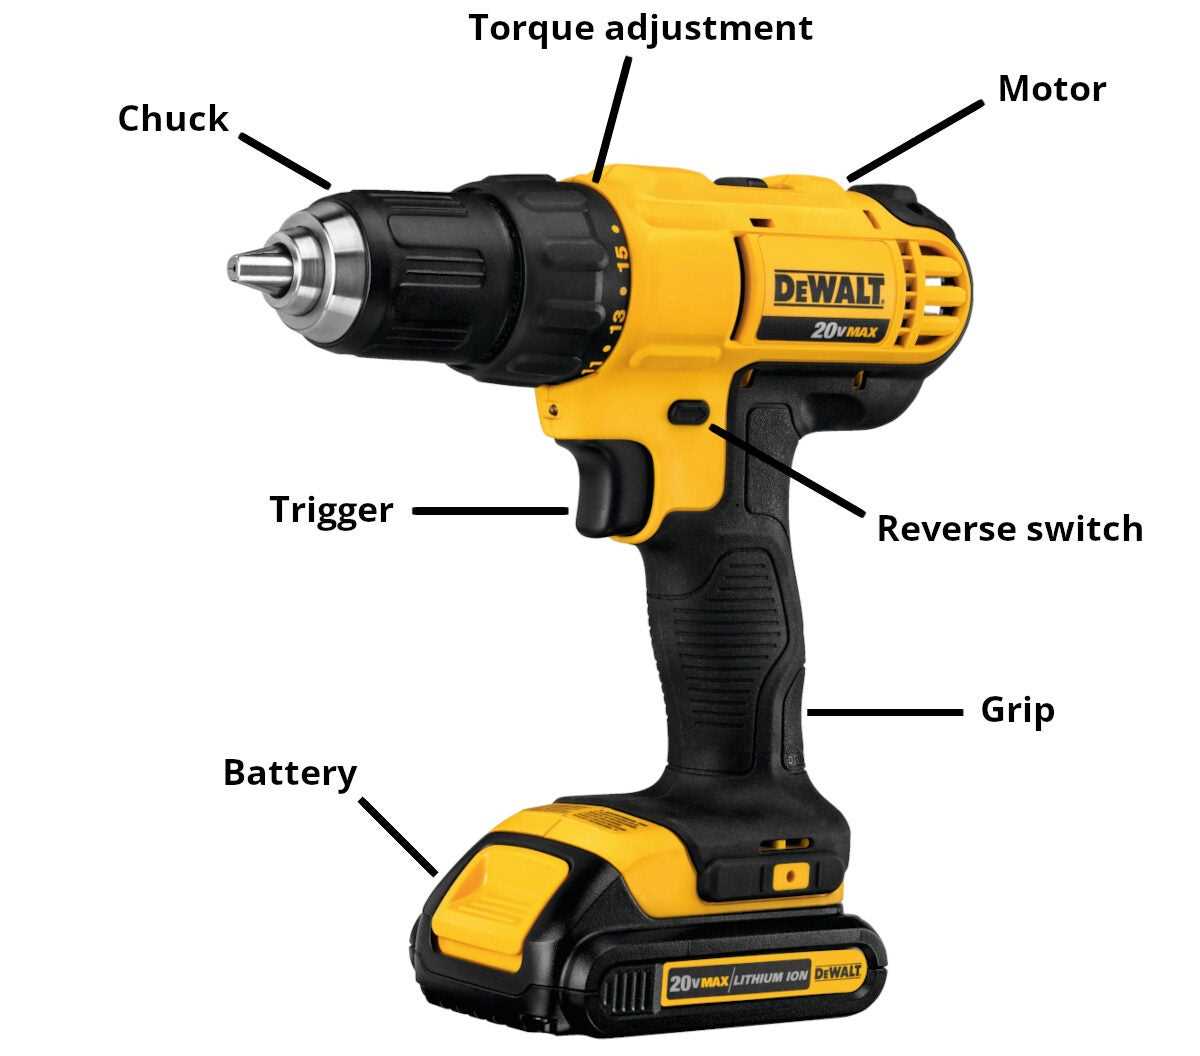
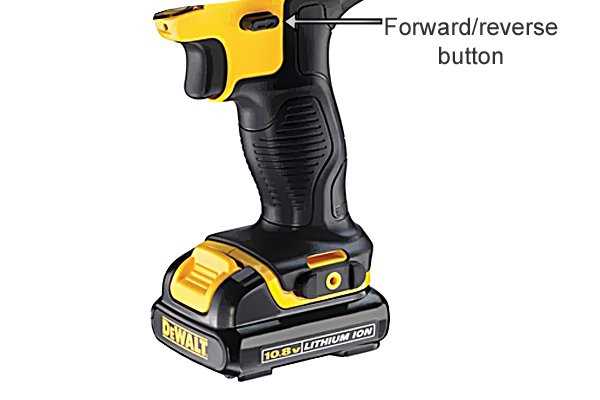
2. Locate the Forward/Reverse Button
Most drills have a forward/reverse button located near the grip. Look for this button, which is typically marked with arrows indicating the direction of rotation.
3. Position the Drill
Hold the drill with one hand on the grip and the other hand on the auxiliary handle, if available. Make sure the drill bit is clear of any obstructions and positioned at the desired starting point.
4. Determine the Current Direction
Check the current direction of the drill before changing it. The direction is typically indicated by an arrow symbol on the drill body or near the forward/reverse button.
5. Press the Forward/Reverse Button
Press the forward/reverse button in the opposite direction of the current drill rotation. For example, if the drill is currently set to rotate clockwise, press the button to change it to counterclockwise rotation.
6. Test the New Direction
After changing the drill direction, test it by gently squeezing the trigger to activate the drill. Observe the rotation of the drill bit to ensure it is now rotating in the desired direction.
7. Adjust the Speed and Torque
If necessary, adjust the speed and torque settings on the drill to suit the specific task at hand. Higher speeds are typically used for drilling, while lower speeds are used for driving screws or other delicate tasks.
8. Continue with the Task
Once the drill is set to the desired direction and speed, you can proceed with your drilling or driving task. Remember to maintain a firm grip on the drill and keep it steady during operation.
9. Return the Drill to Off Position
Once you have completed your drilling or driving task, turn off the drill by releasing the trigger and ensuring it comes to a complete stop. Store the drill in a safe and secure location until you need it again.
Tips and Tricks
1. Use an Adjustable Drill
One of the easiest ways to change drill direction is to use a drill with adjustable settings. These drills typically have a switch or button that allows you to easily switch between forward and reverse directions. This is especially useful when you need to change the direction of your drilling quickly and easily.
2. Use a Drill Bit with a Reversible Design
Some drill bits are designed with a reversible feature, allowing you to change the direction by simply flipping the bit. This eliminates the need to change the drill’s direction and can save you time and effort. Make sure to check if your drill bit has this feature before purchasing or using it.
3. Use the Drill’s Gear switch
Many drills come with a gear switch that allows you to change the speed and direction of rotation. By adjusting the gear switch, you can easily change the rotation direction of the drill. Refer to your drill’s manual to determine how to adjust the gear switch on your specific model.
4. Mark the Drill Direction
If you frequently need to switch between drill directions, it can be helpful to mark the direction on your drill. You can use a permanent marker to mark an arrow or a letter “F” for forward and “R” for reverse. This visual reminder will make it easier for you to quickly identify the drill’s direction and switch accordingly.
5. Practice on Scrap Material
If you’re new to changing drill direction, it can be helpful to practice on scrap material before working on your actual project. This will allow you to get comfortable with changing the direction and ensure that you are confident in your ability to do so before working on your desired material.
6. Always Wear Safety Gear
Regardless of the direction you are drilling, it’s important to always wear the appropriate safety gear. This includes safety glasses, gloves, and ear protection. Additionally, make sure to secure your workpiece and maintain a firm grip on the drill to prevent accidents or injuries.
| Item | Purpose |
|---|---|
| Safety glasses | Protect your eyes from flying debris |
| Gloves | Protect your hands from sharp edges and heat |
| Ear protection | Prevent hearing damage from loud drilling noises |
7. Seek Professional Assistance
If you’re unsure or uncomfortable with changing drill direction, it’s always best to seek professional assistance. A professional can guide you through the process, provide instruction, and ensure that the drilling is done safely and correctly.
Common Mistakes to Avoid
- Not checking the drill’s user manual: Before attempting to change the drill’s direction, it is important to consult the user manual. Each drill model may have specific instructions or requirements for changing the direction.
- Forgetting to disconnect the power source: It is crucial to disconnect the drill from its power source before attempting to change the direction. This will help prevent any accidents or injuries during the process.
- Using excessive force: Trying to force the drill’s direction switch without following the proper steps can cause damage to the drill or its components. Apply appropriate force while following the manufacturer’s instructions.
- Not selecting the correct direction: It is essential to choose the correct direction for the task at hand. Failure to do so can result in ineffective drilling or damage to the material being worked on. Take the time to understand the drilling requirements and select the appropriate direction accordingly.
- Skipping regular maintenance: Neglecting regular drill maintenance can lead to issues with the drill’s direction-changing mechanism. Follow the manufacturer’s guidelines for regular cleaning, lubrication, and inspection to ensure smooth operation.
By avoiding these common mistakes, you can ensure a safe and efficient process while changing the direction of your drill. Always prioritize safety and follow the manufacturer’s guidelines for best results.
Frequently Asked Questions
1. How do I change the drill direction on my power tool?
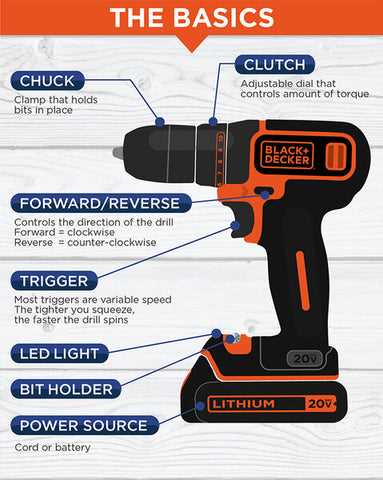
To change the drill direction on your power tool, you will typically find a switch or button located near the handle or trigger. The switch may have a forward and reverse position or may be labeled with arrows indicating the direction of rotation. Simply move the switch or press the button to change the drill direction.
2. Can I change the drill direction while the tool is running?
It is not recommended to change the drill direction while the tool is running. To avoid injury or damage to the tool, always switch off and unplug the power tool before attempting to change the drill direction.
3. Why would I need to change the drill direction?
Changing the drill direction can be useful for various applications. For example, switching to the reverse direction can help remove screws or drill bits from a material, while the forward direction is typically used for drilling or driving screws.
4. Are there any safety precautions I should take when changing the drill direction?

Yes, it is important to follow safety precautions when changing the drill direction. Always switch off and unplug the power tool before making any adjustments. Additionally, be sure to wear appropriate safety gear, such as safety glasses, gloves, and ear protection.
5. Can I change the drill direction on any power tool?
Not all power tools have the ability to change the drill direction. This feature is more commonly found on drills and screwdrivers. Other power tools, such as saws or sanders, may not have a reversible function.
6. Can I damage the power tool by changing the drill direction frequently?
Changing the drill direction should not damage the power tool if done correctly. However, it is always a good idea to consult the user manual or manufacturer’s instructions for specific information on how to change the drill direction and any limitations or precautions.
7. Can I change the drill direction while the tool is in use?
No, it is not recommended to change the drill direction while the tool is in use. Turning off and unplugging the power tool before making any adjustments ensures your safety and prevents any potential damage.
8. How do I know which direction is forward and which is reverse?
To determine which direction is forward and which is reverse, refer to the markings on the tool or the instruction manual. Typically, a forward direction is indicated by an arrow pointing in the same direction as the tool’s rotation, while a reverse direction is indicated by an arrow pointing in the opposite direction.
9. What should I do if the drill direction switch or button is not working?
If the drill direction switch or button is not working, first check if the power tool is properly plugged in and turned on. If it is, the switch or button may be faulty and require professional repair or replacement. Do not attempt to fix the switch or button yourself, as it may lead to further damage or injury.
FAQ:
How can I change the direction of my drill?
To change the direction of your drill, you need to locate the direction switch on the drill. It is usually located near the trigger or on the top of the drill. Simply slide or toggle the switch to change the direction from forward to reverse, or vice versa.
Where is the direction switch on my drill?
The location of the direction switch on your drill may vary depending on the model and brand. However, it is typically located near the trigger or on the top of the drill. It may be labeled with arrows indicating the direction of rotation or with the letters “F” for forward and “R” for reverse.
Can I change the drill direction while it is operating?
No, it is not recommended to change the direction of your drill while it is operating. You should always ensure that the drill is turned off and the bit is not rotating before attempting to change the direction. This is for your safety and to avoid any accidents or damage to the drill.
Why would I need to change the direction of my drill?
There are several reasons why you might need to change the direction of your drill. One common reason is to remove a screw or bolt that is stuck or threaded in the opposite direction. Changing the drill direction to reverse can help you unscrew the fastener. Additionally, some drilling tasks require the use of different drill bits, and changing the direction can make it easier to remove and replace the bits.
Is it difficult to change the direction of a drill?
No, changing the direction of a drill is typically a simple and straightforward process. Once you locate the direction switch, it is just a matter of sliding or toggling it to the desired direction. Most drills have clear markings or indicators to help you determine the correct position for forward and reverse.
Can I use any drill bit in both forward and reverse directions?
No, not all drill bits are meant to be used in both forward and reverse directions. Some drill bits, especially those with cutting edges or designs specific to one direction, may not perform well or may even get damaged if used in the wrong direction. It is important to check the manufacturer’s instructions or guidelines for each drill bit to determine the appropriate direction of use.
What should I do if the direction switch on my drill is not working?
If the direction switch on your drill is not working, there may be a few possible reasons. First, check if the drill is properly plugged in or if the battery is charged. If the power source is not the issue, the switch itself may be faulty and in need of repair or replacement. In this case, it would be best to take your drill to a professional for inspection and repair.
Video:


Meet Harrison Clayton, a distinguished author and home remodeling enthusiast whose expertise in the realm of renovation is second to none. With a passion for transforming houses into inviting homes, Harrison's writing at https://thehuts-eastbourne.co.uk/ brings a breath of fresh inspiration to the world of home improvement. Whether you're looking to revamp a small corner of your abode or embark on a complete home transformation, Harrison's articles provide the essential expertise and creative flair to turn your visions into reality. So, dive into the captivating world of home remodeling with Harrison Clayton and unlock the full potential of your living space with every word he writes.


