How to accurately drill a hole in the center of a rod

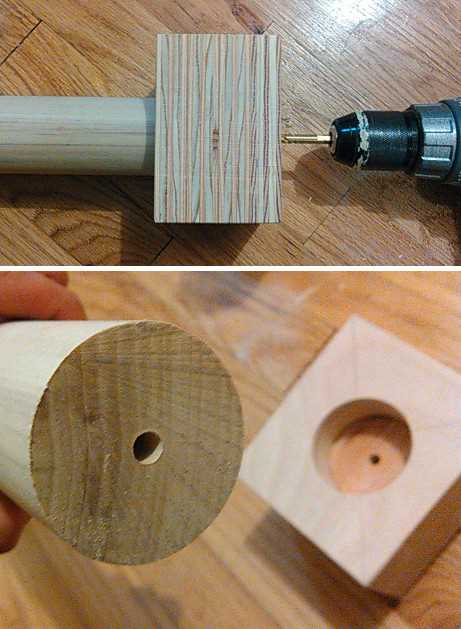
Drilling a hole in the center of a rod may seem like a daunting task, especially if you don’t have the right tools or techniques. However, with the right approach, you can achieve accurate results every time. In this article, we will guide you through the steps to accurately drill a hole in the center of a rod.
Gather the Right Tools
Before you begin, make sure you have the necessary tools. You will need a drill press, a center drill bit, a clamp, and a piece of scrap wood. The drill press is crucial for maintaining accuracy, as it allows you to control the depth and angle of the hole. A center drill bit is designed specifically for drilling center holes, with a pointed tip that helps guide the drill bit into the center of the rod. A clamp and a piece of scrap wood will help secure the rod in place.
Prepare the Rod
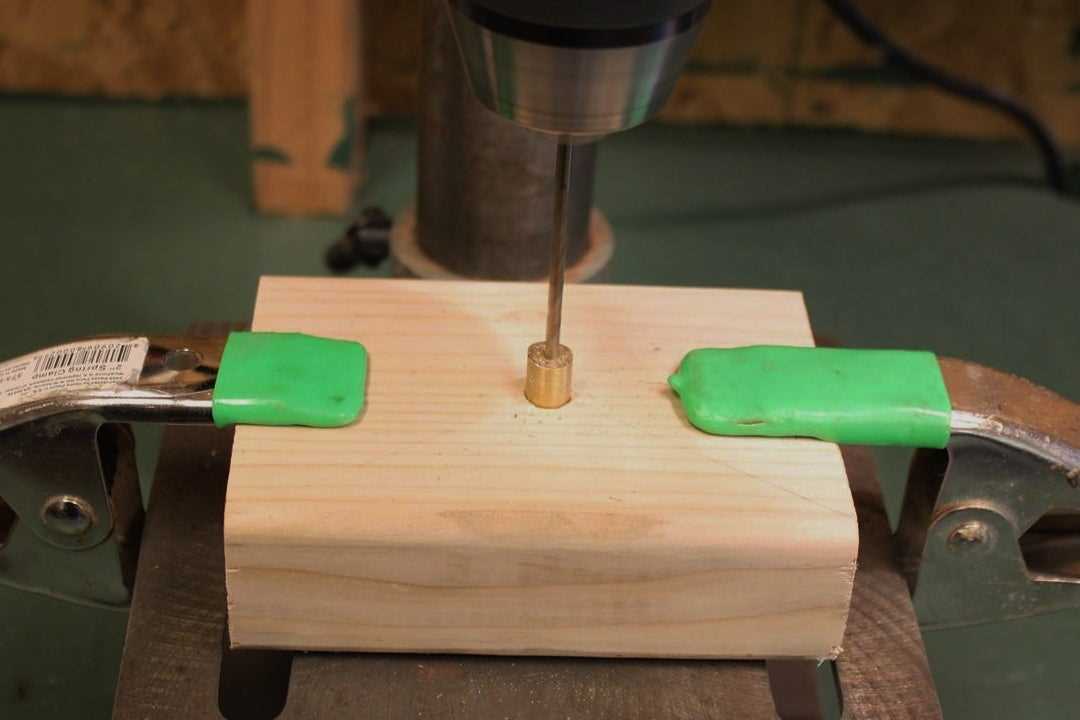
The next step is to prepare the rod for drilling. Start by measuring and marking the center of the rod using a ruler or calipers. This will serve as your guide throughout the drilling process. Once you have marked the center, use the clamp to secure the rod to the drill press table. Place a piece of scrap wood underneath the rod to prevent any damage to the table.
Drill the Hole
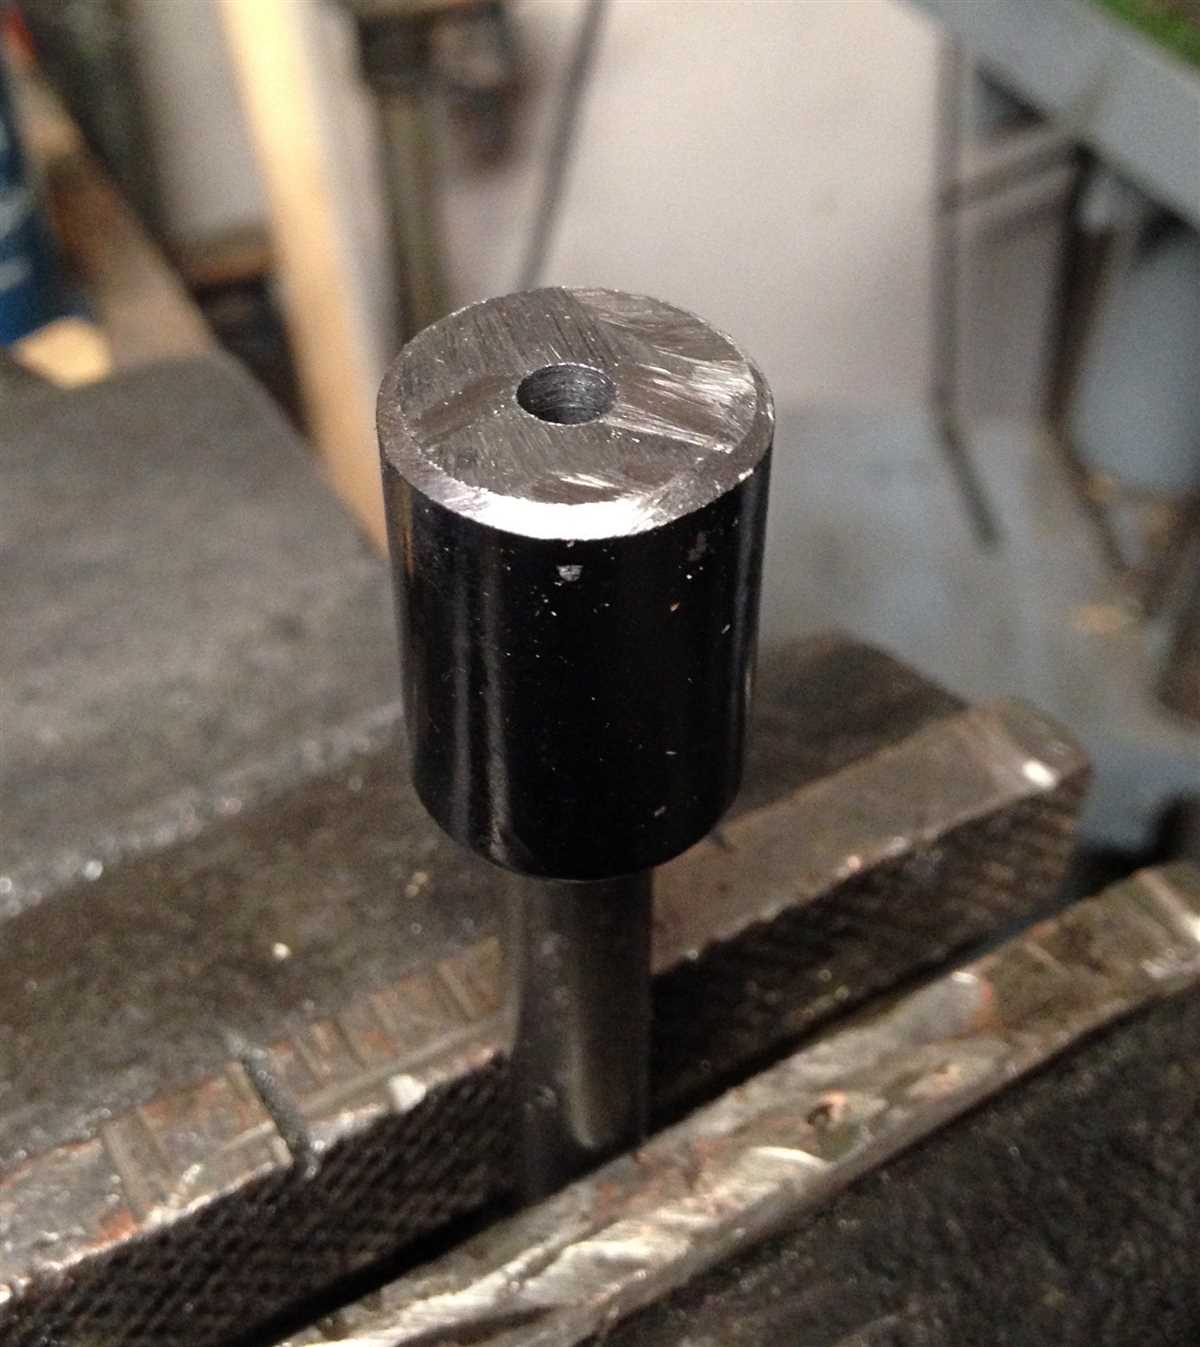
Now that the rod is securely positioned, it’s time to drill the hole. Start by aligning the center drill bit with the marked center point on the rod. Slowly lower the drill bit onto the rod, making sure to keep it perpendicular to the surface. Apply gentle pressure and let the bit do the work. As you drill, periodically raise the drill bit to clear any chips or debris. Take your time and maintain a steady hand to ensure accuracy.

Tip: If you’re drilling a deep hole, you may need to periodically withdraw the bit to clear chips and cool the bit. This will prevent the bit from overheating and ensure a clean hole.
Once the hole is drilled, remove the rod from the drill press and inspect your work. If necessary, use a file or sandpaper to smooth any rough edges around the hole. Congratulate yourself on successfully drilling a hole in the center of a rod!
By following these steps and using the right tools, you can confidently drill a hole in the center of a rod with precision and accuracy. Remember to take your time, double-check your measurements, and practice good technique. With practice, you’ll become a master at drilling perfect center holes!
What is drilling a hole in the center of a rod?
Drilling a hole in the center of a rod refers to the process of creating a perfectly straight and centered hole through the length of a cylindrical object. This technique is commonly used in various industries and applications, such as woodworking, metalworking, and engineering.
The purpose of drilling a hole in the center of a rod is to create a precise opening that can be utilized for various purposes. This can include inserting a dowel, rod, or screw through the hole for structural support or fastening two parts together. Accuracy is crucial to ensure the proper alignment and stability of the overall structure.
To drill a hole in the center of a rod, several steps need to be followed. First, the rod should be securely clamped in a stable position to prevent any movement during the drilling process. Next, a center punch is often used to mark the exact center of the rod, providing a starting point for the drill bit. Then, a suitable drill bit is selected based on the desired hole size and material of the rod. The drill bit is inserted into a drill press or handheld drill, and the hole is carefully drilled straight through the center of the rod.

Proper technique and precautions should be taken during the drilling process to ensure accuracy. This may involve using a drill press with a depth stop to control the hole depth, using a lubricant to cool the drill bit and reduce friction, and drilling at a slow and steady speed to prevent any damage to the rod or the drill bit.
Drilling a hole in the center of a rod requires precision and attention to detail. By following the correct procedures and using the appropriate tools, this task can be successfully accomplished, allowing for the creation of strong and secure connections in various applications.
Choosing the right tools
1. Drill
When drilling a hole in the center of a rod, it’s important to have a drill with a centering mechanism. This will ensure that the hole is drilled exactly in the center. A drill press is recommended for precision drilling, as it provides stability and accuracy.
2. Drill bit
Use a drill bit that matches the diameter of the hole you want to drill. For best results, choose a sharp drill bit made of high-speed steel (HSS) or carbide. These materials are durable and can withstand the force needed to drill through metal rods.
3. Center punch
A center punch is a tool used to create a small indentation in the rod, which will act as a guide for the drill bit. This will help prevent the drill from slipping or drifting off-center while drilling. Use a center punch made of hardened steel for best results.

4. Clamps
To secure the rod in place while drilling, use clamps to hold it securely to your workbench or drill press table. This will help prevent any movement or vibrations that could affect the accuracy of the hole.
5. Measuring tools
Use a ruler or calipers to measure and mark the desired location for the hole. Accurate measurements are crucial to ensure that the hole is drilled in the exact center of the rod.
| Tool | Description |
|---|---|
| Drill | Tool used to create a hole in the rod. |
| Drill bit | Cutting tool used with the drill to remove material and create the hole. |
| Center punch | Tool used to create an indentation on the rod to guide the drill bit. |
| Clamps | Devices used to secure the rod in place during drilling. |
| Measuring tools | Tools used to measure and mark the location for the hole. |
In conclusion, choosing the right tools is essential for accurately drilling a hole in the center of a rod. Ensuring you have the correct drill, drill bit, center punch, clamps, and measuring tools will help achieve precise and satisfactory results.
Essential tools for accurate drilling
When it comes to drilling a hole in the center of a rod, having the right tools is crucial for achieving accurate results. Here are some essential tools that can help you achieve precise and centered holes:

- Center punch: A center punch is a tool that creates a small indentation on the surface of the rod. This indentation serves as a guide for the drill bit, ensuring that it starts drilling in the center of the rod.
- Drill press: A drill press is a stationary machine that provides precision and stability during drilling operations. It allows you to adjust the speed and depth of the drill, ensuring accurate and consistent holes.
- V-block: A V-block is a tool that holds the rod securely in place, allowing you to align it properly before drilling. It comes with a V-shaped groove that centers the rod, ensuring that the hole is drilled in the center.
- Drill chuck: A drill chuck is an accessory that attaches to the drill press and holds the drill bit securely. It ensures that the drill bit remains centered and stable during the drilling process, preventing any deviation from the desired center.
- Calipers: Calipers are precision measuring tools that can help you determine the center point of the rod. By measuring and marking the diameter of the rod, you can easily locate the center and position the drill bit accurately.
By using these essential tools, you can greatly improve your accuracy when drilling a hole in the center of a rod. Remember to always double-check your measurements and alignment before drilling to ensure the best results.
Understanding drill bits and their types
Introduction
Drill bits are cutting tools that are used to create cylindrical holes in various materials, such as wood, metal, and plastic. They are essential for accurate drilling and come in different types for different applications. Understanding the different types of drill bits can help you choose the right one for your specific drilling needs.
Types of drill bits
- Twist drill bits: Twist drill bits are the most common type of drill bits and are used for general-purpose drilling. They have a spiral-shaped groove called flutes that help remove chips and debris as the bit penetrates the material.
- Brad point bits: Brad point bits have a sharp tip and are specially designed for woodworking. They create clean and precise holes and reduce the risk of splintering.
- Spade bits: Spade bits, also known as paddle bits, are used for drilling large and flat-bottomed holes in wood. They have a flat and wide blade with a center point, which helps keep the bit stable during drilling.
- Forstner bits: Forstner bits are ideal for drilling flat-bottomed holes in wood. They have a cylindrical shape with a center point and two flat cutting edges that create a clean and precise hole.
- Masonry bits: Masonry bits are designed to drill holes in materials like concrete, brick, and stone. They have a carbide tip for increased durability and are used with a hammer drill or rotary drill.
- Step bits: Step bits, also known as cone bits or unibits, are used for enlarging holes or creating holes with different diameters. They have a stepped design that allows for multiple hole sizes with a single bit.
Choosing the right drill bit
When selecting a drill bit, consider the material you are drilling into, the desired hole size, and the type of drill you have. Different materials and hole sizes may require different types of drill bits. It’s also important to ensure the drill bit is compatible with your drill’s chuck size.
Conclusion
Understanding the different types of drill bits and their applications can help you achieve accurate and precise drilling results. By selecting the right drill bit for your specific needs, you can ensure a clean and efficient drilling process.
Marking the center
Before drilling the hole in the center of a rod, it is important to accurately mark the center point. There are several methods that can be used to achieve this:

- Visual estimation: This method involves visually inspecting the rod and estimating the center point based on its appearance. However, this method is not very accurate and may lead to imprecise drilling.
- Using a ruler: Using a ruler, measure the length of the rod and divide it by two to find the middle point. Make a small mark on the rod using a pen or a pencil.
- Using a center finder: A center finder is a tool that is specifically designed to locate the center of a cylindrical rod. It typically consists of two prongs that can be adjusted to fit the diameter of the rod. Place the center finder on the rod and adjust the prongs until they touch the rod on both sides. The center point can then be marked using a pen or a pencil.
- Using a center punch: A center punch is a tool that is used to make an indentation on the material, which can serve as a guide for drilling. Place the center punch in the approximate center of the rod and strike it with a hammer to create a small indentation.
Once the center point has been marked using one of these methods, you are ready to proceed with drilling the hole in the center of the rod.
Using a center punch for precise marking
A center punch is a tool that is commonly used for creating an indentation or mark on a workpiece, which serves as a guide for drilling a hole in the center. It is a small handheld tool with a sharp point on one end and a striking end on the other. By using a center punch, you can ensure that the hole you drill is accurate and centered.
Step 1: Set up the workpiece
- Select the rod or workpiece that you want to drill a hole in the center of.
- Secure the rod using clamps or a vise to prevent it from moving during the drilling process.
Step 2: Mark the center position
- Measure the length of the rod and divide it by two to find the center point.
- Place the tip of the center punch on the calculated center point of the rod.
- Hold the center punch perpendicular to the surface of the rod.
- Apply pressure to the striking end of the center punch using a hammer or mallet.
- The sharp point of the center punch will create a small indentation or mark on the surface of the rod, indicating the center position.
Step 3: Drill the hole
- Select a drill bit that matches the desired hole size.
- Insert the drill bit into the chuck of a drill press or a handheld drill.
- Position the drill bit at the center mark created by the center punch.
- Hold the drill firmly and start drilling slowly, applying steady pressure.
- Continue drilling until the hole reaches the desired depth.
Using a center punch for precise marking is an effective technique to ensure accurate drilling of a hole in the center of a rod. By following these steps and using the proper tools and techniques, you can achieve precise results in your drilling projects.
Alternative methods for marking the center
If you don’t have access to a center punch or prefer not to use one, there are several alternative methods you can use to mark the center of a rod.
1. Visual estimation
One option is to visually estimate the center of the rod. This method may not be as accurate as using a center punch, but it can work well for rough drilling jobs or if you don’t need an extremely precise hole.
To visually estimate the center, you can use a ruler or measuring tape to measure the length of the rod. Then divide this length by two to find the center point. Mark this point using a pen or marker.
Note: Visual estimation may not be suitable for very thin or irregularly shaped rods.
2. Measuring from the edges
Another method is to measure the distance from the edges of the rod to find the center point. This method can be more accurate than visual estimation.
- Measure the width or diameter of the rod.
- Divide this measurement by two to find the radius.
- Measure this radius from each edge of the rod and mark the points.
- The center point is where these two marks intersect.
3. Using a center-finding tool
If you frequently need to find the center of rods or other objects, investing in a center-finding tool can be a good option. These tools usually consist of a small metal or plastic device that helps you locate the center accurately.
To use a center-finding tool, you simply place it on top of the rod and adjust it until the tool indicates that you have found the center.
Note: Center-finding tools can be purchased at most hardware stores or online.
4. Using a drill press
If you have access to a drill press, you can use it to accurately find the center of a rod. A drill press typically has a platform with alignment markings that can help you position the rod correctly.
Place the rod on the drill press platform and adjust it until the alignment markings indicate that the rod is centered. Once the rod is properly aligned, you can lower the drill bit and start drilling.
Note: Using a drill press may require some familiarity with its operation and safety precautions.
By using one of these alternative methods, you can still achieve a reasonably accurate hole in the center of a rod, even if you don’t have a center punch available. Choose the method that best suits your needs and the level of accuracy required for your project.
Securing the rod
When drilling a hole in the center of a rod, it is important to secure the rod in place to ensure accuracy and prevent any movement during the drilling process. There are several methods that can be used to secure the rod depending on the tools and equipment available.
Clamping the rod
One common method is to use clamps to secure the rod to a workbench or a drill press table. The clamps should be positioned on both ends of the rod, tightly holding it in place. This will prevent any movement while drilling and ensure that the hole is straight and centered.
Using a vise
Another option is to use a vise to secure the rod. A vise allows you to tightly grip the rod, providing stability and preventing any wobbling during the drilling process. Make sure to position the rod securely in the vise to ensure accuracy when drilling the hole.
Using a center punch
Before securing the rod, it can be helpful to use a center punch to mark the center point of the hole. This indentation will serve as a guide for the drill bit and help ensure that the hole is centered. Place the center punch at the desired location and tap it gently with a hammer to create a small indentation.
Securing with blocks or brackets
If clamps or a vise are not available, you can also use blocks or brackets to secure the rod. Place the rod between two sturdy blocks or inside a bracket and tighten the screws or bolts to secure it in place. This method may require some creativity depending on the shape and size of the rod, but it can be effective in preventing movement during drilling.
Check for stability
Regardless of the method used to secure the rod, always double-check for stability before drilling. Ensure that the rod is tightly secured and there is no wobbling or movement. Confirm that the rod is straight and centered to achieve accurate drilling results.
Using a vise to hold the rod in place
When drilling a hole in the center of a rod, it is important to have a secure and stable hold on the rod to ensure accuracy. One effective method for achieving this is by using a vise to firmly hold the rod in place.
Here are the step-by-step instructions for using a vise to hold the rod:
- Choose a vise: Select a vise that is suitable for the size and shape of your rod. Make sure the vise is capable of securely holding the rod without causing any damage.
- Prepare the vise: Place the vise on a solid workbench or surface, ensuring that it is stable and will not move during the drilling process.
- Open the vise: Loosen the vise jaws and open them wide enough to accommodate the diameter of the rod.
- Position the rod: Carefully insert one end of the rod into the vise jaws, making sure it is centered and aligned with the desired drilling location.
- Tighten the vise: Gradually tighten the vise jaws, applying pressure evenly on both sides of the rod. Ensure that the rod is securely held in place, but avoid overtightening, as it may damage the rod.
- Double-check alignment: Verify that the rod is still centered and aligned properly within the vise jaws before proceeding with drilling.
By using a vise to hold the rod in place, you can minimize the risk of the rod slipping or moving during the drilling process, thereby ensuring greater accuracy in drilling a hole in the center.
Other methods for securing the rod
While using a vise or clamp is the most common way to secure a rod before drilling, there are a few other methods that can be used depending on the situation:
1. Magnetic holder
A magnetic holder can be a convenient option for securing a metal rod during drilling. These holders typically consist of powerful magnets that can securely hold the rod in place. The rod can be easily positioned and adjusted using the magnetic holder.
2. Workbench with holes
Some workbenches come with pre-drilled holes that can be used to secure rods during drilling. These holes can be used in conjunction with clamps or other specialized accessories to hold the rod in place.
3. Tapping the rod
In some cases, tapping the rod can provide a temporary solution for securing it. By carefully using a hammer or mallet to create small dents on the surface of the rod, it can be securely held in place while drilling. However, this method should be used with caution as excessive force can damage the rod.
4. Securing the rod horizontally
If the rod is too long or difficult to secure vertically, it can be placed horizontally on a stable surface, such as a workbench or table. A combination of clamps, magnets, or holes can be used to secure the rod in this position.
5. Using a precision machine
In professional settings or for highly accurate drilling, precision machines such as drill presses or milling machines can be used to secure the rod. These machines have specialized clamps or fixtures that can firmly hold the rod in place during drilling.
It is important to choose the method that best suits the rod and drilling operation, ensuring the rod remains securely in place to achieve accurate drilling.
FAQ:
What tools do I need to accurately drill a hole in the center of a rod?
To accurately drill a hole in the center of a rod, you will need a drill press with a vise, a center finder, a center punch, a drill bit, and a ruler or measuring tape.
What is the importance of drilling a hole in the center of a rod?
Drilling a hole in the center of a rod is important for precise construction and alignment. It ensures that the rod is properly balanced and can be used for various purposes such as mounting or connecting other components.
How can I find the center of a rod before drilling?
To find the center of a rod before drilling, you can use a center finder. This tool allows you to mark the center point on the rod accurately, making it easier to position the drill bit correctly.
Are there any tips for ensuring accuracy while drilling a hole in the center of a rod?
Yes, there are several tips for ensuring accuracy while drilling a hole in the center of a rod. First, make sure to secure the rod tightly in the drill press vise to minimize movement. Secondly, use a center punch to create a small indentation at the center point to guide the drill bit. Lastly, always double-check your measurements and adjust as necessary before drilling.
Video:


Meet Harrison Clayton, a distinguished author and home remodeling enthusiast whose expertise in the realm of renovation is second to none. With a passion for transforming houses into inviting homes, Harrison's writing at https://thehuts-eastbourne.co.uk/ brings a breath of fresh inspiration to the world of home improvement. Whether you're looking to revamp a small corner of your abode or embark on a complete home transformation, Harrison's articles provide the essential expertise and creative flair to turn your visions into reality. So, dive into the captivating world of home remodeling with Harrison Clayton and unlock the full potential of your living space with every word he writes.


