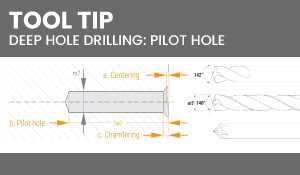
How deep to drill pilot hole?

A pilot hole is a small hole drilled into a material before a larger hole is drilled. It serves as a guide or starting point for the larger hole. Knowing the depth to drill a pilot hole is crucial to ensure successful drilling.
When drilling a pilot hole, the depth depends on several factors including the type of material being drilled and the size of the hole to be drilled. Generally, the depth of a pilot hole is about half the length of the screw or fastener that will be inserted into the hole.
For example, if you are drilling a pilot hole for a 2-inch screw, the depth would be approximately 1 inch. This allows the screw to penetrate the material securely without splitting or causing damage. However, it is important to note that the depth may vary depending on the specific material and screw being used.
Determining the Proper Depth
Drilling a pilot hole to the correct depth is essential for various applications, including woodworking, metalworking, and construction. The depth of the pilot hole will depend on factors such as the type and size of the fastener, the material being drilled, and the specific project requirements. Here are some considerations to determine the proper depth:
1. Fastener Type and Size
The first step in determining the proper pilot hole depth is to consider the type and size of the fastener that will be used. Different fasteners require different hole depths to ensure proper installation and holding power. It is important to consult the manufacturer’s guidelines or reference charts to determine the recommended hole depth for the specific fastener being used.

2. Material Being Drilled
The material being drilled also plays a crucial role in determining the depth of the pilot hole. Softer materials like wood may not require as deep of a pilot hole compared to harder materials like metal or concrete. The goal is to create a hole that is deep enough to securely hold the fastener without compromising the integrity of the material.
3. Project Requirements
The specific requirements of the project will also impact the depth of the pilot hole. For example, if the project involves joining two thick pieces of wood, a longer pilot hole may be necessary to ensure sufficient penetration and a strong joint. On the other hand, if the project requires a flush installation, the pilot hole depth may need to be adjusted accordingly.
4. Test and Adjust
Before drilling the pilot hole, it is always a good idea to conduct a test on a scrap piece of material. This test will help determine the proper depth needed for the specific application. By drilling a test hole and inserting the fastener, you can assess whether the depth is sufficient or if adjustments need to be made.
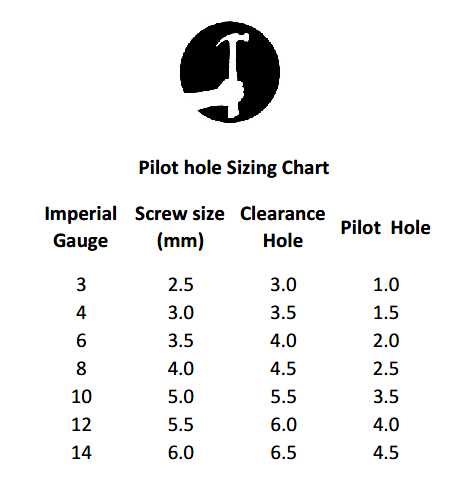
5. Reference Charts
Reference charts can be a helpful tool when determining the proper depth for pilot holes. These charts provide guidance based on the fastener type, size, and material being drilled. They can be found online or in hardware stores and can be used as a reference point to determine the optimal hole depth.
By considering the fastener type and size, material being drilled, project requirements, conducting tests, and using reference charts, you can determine the proper depth for pilot holes. Taking the time to drill the correct depth will ensure a secure and successful outcome for your project.

Factors to Consider
When determining how deep to drill a pilot hole, there are several factors to consider:
1. Material
The type of material you are drilling into will impact the depth of the pilot hole. Softer materials may require a shallower hole, while harder materials may require a deeper hole.
2. Screw Size
The size of the screw you are using will also determine the depth of the pilot hole. Larger screws will require deeper pilot holes to provide the necessary support.
3. Screw Type
The type of screw you are using is another important factor. Different screw types have different requirements for pilot hole depth to ensure proper insertion and stability.
4. Wood Grain
If you are drilling into wood, the direction and pattern of the grain can affect the depth of the pilot hole. It is important to align the pilot hole with the grain to prevent splitting.

5. Fastening Application
The purpose of the fastening application will also impact the depth of the pilot hole. For example, if you are attaching a heavy load, a deeper pilot hole may be necessary to provide adequate strength and support.
6. Desired Appearance
If the appearance of the finished project is important, you may want to consider drilling the pilot hole slightly deeper to ensure the screw head is flush with the surface or countersunk.
7. Manufacturer Instructions
Finally, it is always a good idea to consult the manufacturer’s instructions for the specific screws and materials you are using. They may provide recommended pilot hole depths based on their product specifications.
In summary,
It is important to consider the material, screw size/type, wood grain, fastening application, desired appearance, and manufacturer instructions when determining how deep to drill a pilot hole. Taking these factors into account will help ensure a successful and secure fastening application.

Importance of Accurate Measurements
Accurate measurements are crucial when it comes to drilling pilot holes. Incorrect measurements can lead to various issues, including ineffective drilling, damaged materials, and even safety hazards. It is essential to take the time to measure accurately before drilling the pilot hole to ensure a successful outcome.
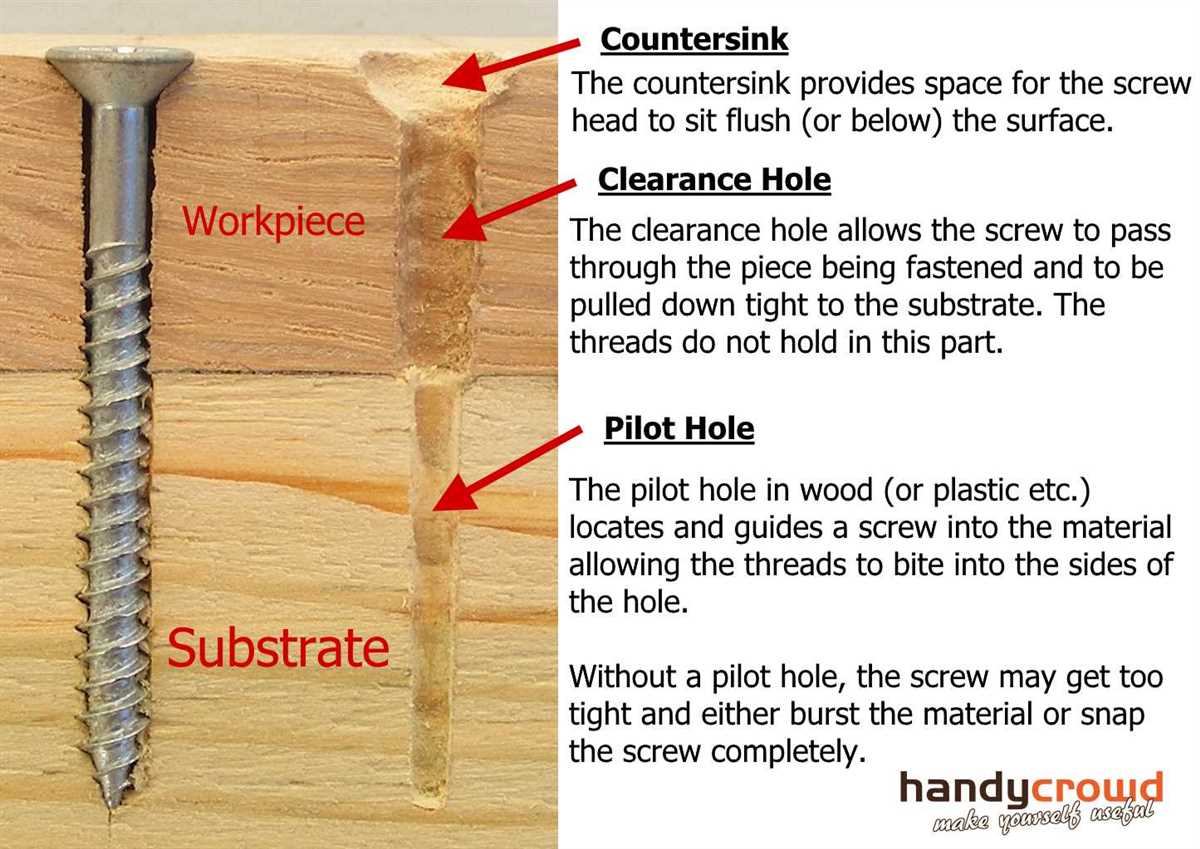
1. Proper Fit
Accurate measurements ensure that the pilot hole is drilled to the correct size, resulting in a proper fit for the screw or fastener being used. If the hole is too small, it will be challenging to insert the screw, and it may not hold securely. On the other hand, if the hole is too large, the screw may not have enough grip, causing it to become loose over time. By measuring accurately, you can ensure a proper fit and a more secure connection.
2. Prevents Damage
Drilling a pilot hole in the wrong location or at the wrong angle can lead to damage to the material being drilled. This damage can be permanent and affect the structural integrity or aesthetics of the object. Accurate measurements help avoid mistakes and ensure that the pilot hole is drilled in the right position and at the correct angle, minimizing the risk of damage.
3. Safety
Accurate measurements also play a significant role in ensuring safety during the drilling process. If the pilot hole is not drilled to the correct depth, it may not provide enough support for the screw or fastener. This can lead to instability and potential accidents, especially in applications where heavy loads or tension are involved. By measuring accurately, you can ensure that the pilot hole provides the necessary support for a safe and secure installation.
4. Time and Cost Savings
Taking accurate measurements before drilling the pilot hole can save both time and money in the long run. If a mistake is made due to improper measurements, it may require additional materials or repairs to fix the issue. This can result in wasted time and increased costs. By measuring accurately upfront, the chances of making mistakes are significantly reduced, leading to a more efficient and cost-effective drilling process.

In conclusion, accurate measurements are essential when it comes to drilling pilot holes. They ensure a proper fit, prevent damage, promote safety, and save both time and money. By taking the time to measure accurately before drilling, you can ensure a successful drilling process and achieve the desired results.
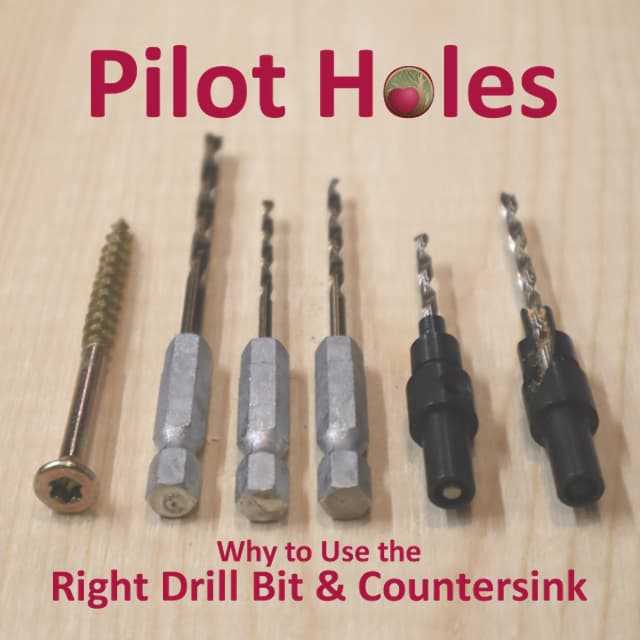
Tools Required for Drilling
When it comes to drilling, having the right tools can make all the difference in the success and ease of the job. Here are some essential tools you will need:
- Power Drill: A power drill is a versatile tool that is used to create holes in various materials. It is important to choose a drill with enough power for the job at hand.
- Drill Bits: Drill bits are the cutting tools that attach to the drill and make the holes. There are various types of drill bits available, each designed for specific materials and hole sizes.
- Pilot Hole Drill Bit: A pilot hole drill bit is a specialized bit used to create a small hole before drilling the main hole. It helps to guide the larger drill bit and prevent the wood from splitting.
- Measuring Tools: Measuring tools such as a tape measure or ruler are essential for accurately marking the drilling location and determining the depth of the pilot hole.
- Clamps or Vice: Clamps or a vice can be used to secure the workpiece in place, preventing it from moving while drilling.
- Safety Gear: Safety goggles and gloves should always be worn during drilling to protect your eyes and hands from flying debris.
Having these tools readily available will ensure that you are well-equipped for any drilling task and can achieve precise and accurate results.
Selecting the Right Drill Bit
Choosing the correct drill bit is essential for achieving successful drilling results. The type of material you are drilling into will determine the best bit to use. Here are some factors to consider when selecting a drill bit:
1. Material Type
The material you are drilling into is one of the most important factors to consider. Different materials require different drill bits to ensure effective drilling. Common materials include:
- Wood: For drilling into wood, a standard twist bit or spade bit is commonly used.
- Metal: HSS (High-Speed Steel) or cobalt bits are suitable for drilling into metals.
- Concrete/Masonry: Concrete drill bits with carbide tips are designed for drilling into concrete or masonry surfaces.
- Glass/Tile: Diamond-tipped bits are recommended for drilling into glass or tile.
2. Drill Bit Size
The size of the hole you need to drill will determine the size of the drill bit required. Drill bits come in various sizes, typically measured in fractions of an inch or millimeters. It’s important to choose a drill bit with the correct diameter for the hole you want to create.
3. Shank Type

The shank of the drill bit is the part that fits into the drill’s chuck. The shank type should match the chuck type on your drill. Most drill bits have straight shanks, but some may have hexagonal or SDS (Slotted Drive System) shanks, which are intended for specific types of drills.
4. Additional Features
Some drill bits may have additional features that enhance their performance. For example, some drill bits have a coating that reduces friction and increases durability. Others may have special flutes designed to remove chips more efficiently.
By considering the material type, required hole size, shank type, and any additional features, you can select the right drill bit for your drilling needs. Choosing the correct drill bit will ensure efficient and precise drilling, saving you time and effort.
Key Features to Look for
- Diameter: Ensure that the pilot hole drill bit has the correct diameter for your needs. The size of the hole required will depend on the type of material and the size of the screw or fastener being used.
- Length: Consider the length of the drill bit. It should be long enough to drill the hole to the desired depth, allowing for the insertion of the screw or fastener without causing damage.
- Material: Choose a pilot hole drill bit made from high-quality materials such as high-speed steel or carbide. These materials offer durability and strength, ensuring that the drill bit can withstand the drilling process without breaking or wearing down quickly.
- Flute Design: Look for a drill bit with a flute design that allows for efficient chip removal. This will prevent clogging and overheating during drilling, improving the effectiveness of the pilot hole drill bit.
- Shank Size: Check the shank size of the drill bit to ensure compatibility with your drilling equipment. The shank should fit securely and firmly into the drill chuck to prevent slipping or wobbling during drilling.
- Point Angle: Consider the point angle of the drill bit. A smaller point angle is ideal for drilling through softer materials, while a larger point angle is better for harder materials.
- Coating: Look for a pilot hole drill bit with a coating, such as titanium or black oxide. Coated drill bits offer increased durability and improved performance by reducing friction and heat buildup during drilling.
By considering these key features when choosing a pilot hole drill bit, you can ensure that you have the right tool for the job. A high-quality drill bit will make the drilling process easier, faster, and more efficient, allowing for precise and accurate pilot holes.
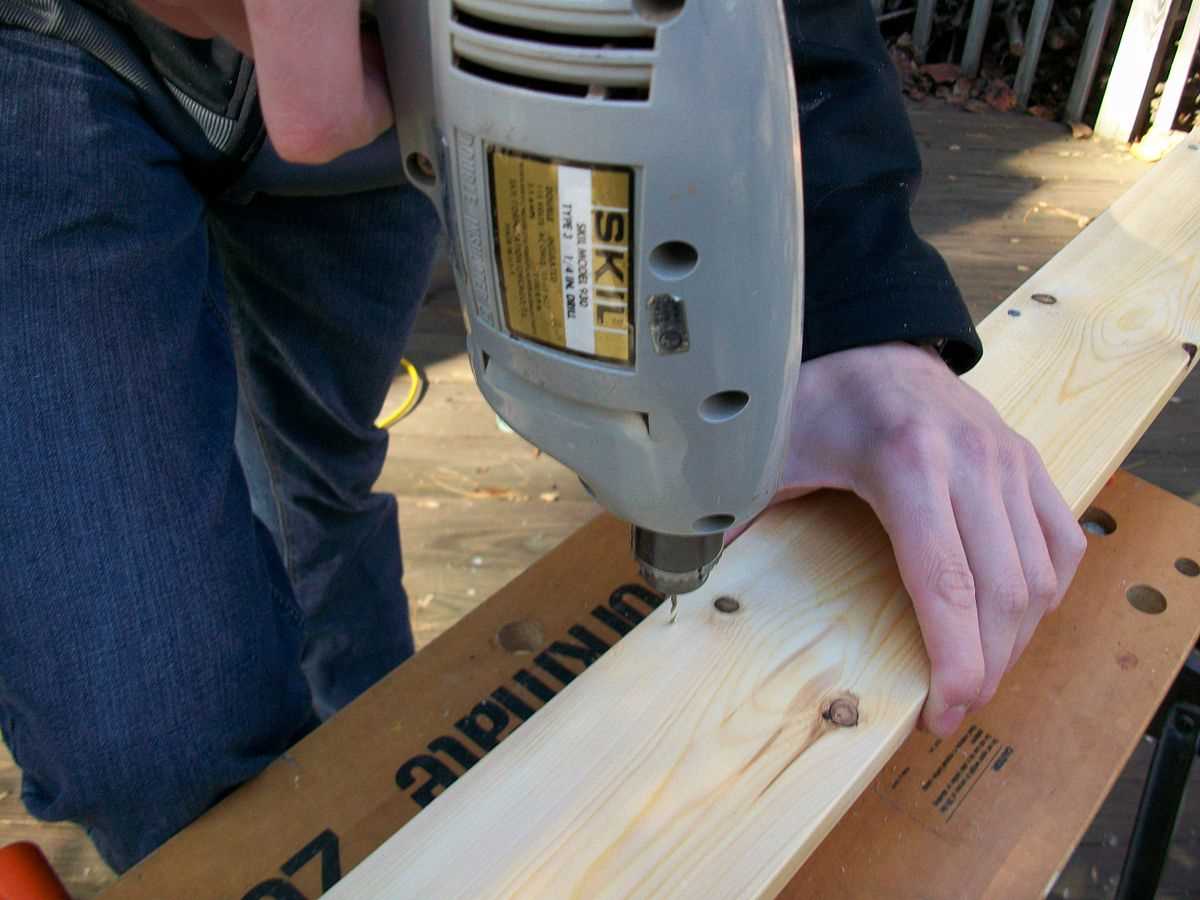
Step-by-Step Pilot Hole Drilling
1. Gather the necessary tools and materials
Before you begin drilling a pilot hole, make sure you have all the necessary tools and materials. You will need a drill with the appropriate bit for the size of the pilot hole, safety goggles, a measuring tape or ruler, and the material you will be drilling into.
2. Determine the size and depth of the pilot hole
Next, determine the size and depth of the pilot hole you need to drill. The size of the hole will depend on the size of the screw or fastener you plan to use. The depth of the hole should be slightly shorter than the length of the screw or fastener.
3. Mark the drilling location
Use a pencil or marker to mark the spot where you will be drilling the pilot hole. Make sure the mark is visible and accurately represents the location you want.
4. Secure the material
If necessary, secure the material you will be drilling into with clamps or any other suitable method. This will prevent it from moving or shifting during the drilling process.
5. Put on safety goggles
Before drilling, always put on a pair of safety goggles to protect your eyes from any flying debris or particles.
6. Start drilling
Insert the appropriate drill bit into your drill. Position the drill bit on the marked spot and hold the drill firmly with both hands. Start drilling at a slow speed to create the initial hole.
7. Drill to the desired depth
Gradually increase the speed of the drill as you continue to drill the pilot hole. Maintain a steady pressure on the drill and drill straight down until you reach the desired depth.
8. Clean the hole
Once you have drilled the pilot hole to the desired depth, remove the drill from the hole. Use a brush or compressed air to clean away any debris or dust from the hole.
9. Test the pilot hole
Before inserting the screw or fastener, test the pilot hole by gently inserting it. It should fit snugly without too much resistance. If the hole is too tight, you may need to drill it slightly larger.
10. Repeat if necessary
If you need to drill additional pilot holes, repeat the previous steps for each hole. Make sure to measure and mark each location accurately.
11. Proceed with your project
Once the pilot holes are drilled and tested, you can proceed with your project. Secure the materials together using screws or fasteners, making sure to align them with the pilot holes.
| Tip: | It’s always a good idea to drill a pilot hole when working with hard or dense materials to prevent splitting or damage. |
|---|
Tips for Successful Drilling
Drilling holes may seem like a simple task, but it requires proper technique and attention to detail to achieve successful results. Follow these tips to ensure a successful drilling experience:
1. Choose the Right Drill Bit
Using the correct drill bit is crucial for achieving clean and precise holes. Different materials require different types of drill bits, such as wood drill bits, masonry drill bits, or metal drill bits. Make sure to select the appropriate bit for the material you are drilling into.
2. Use a Pilot Hole
Creating a pilot hole can help guide the drill bit and prevent it from wandering off course. A pilot hole is a small hole drilled with a thin drill bit before using a larger drill bit. This technique is especially useful when drilling into hard materials like metal or concrete.
3. Mark the Drilling Spot
Before drilling, it is important to accurately mark the spot where the hole needs to be made. Using a pencil or a marker, make a clear and visible mark on the surface to ensure precise drilling and prevent mistakes.
4. Secure Your Workpiece
Ensure that your workpiece is securely clamped or anchored before starting to drill. This will prevent it from moving or slipping during the drilling process, resulting in more accurate holes and reducing the risk of accidents.
5. Apply Steady Pressure
When drilling, apply steady and consistent pressure. Avoid pushing too hard, as this can cause the drill bit to bind or break. Let the drill bit do the work, and maintain a balanced and controlled grip on the drill.
6. Keep the Drill Bit Cool
Drilling can generate heat, especially when drilling into tough materials. To prevent overheating and prolong the life of your drill bit, periodically remove it from the hole to allow it to cool down. You can also use lubricants like oil or water to reduce heat build-up.
7. Clean the Hole
After drilling, remove any debris or chips from the hole to ensure a clean and accurate finish. A vacuum cleaner or brush can be used to clean out the hole effectively.
8. Safety First
Always prioritize safety when drilling. Wear safety glasses to protect your eyes from debris, and consider wearing hearing protection if using a loud or powerful drill. Avoid wearing loose clothing or jewelry that may get caught in the drill.
By following these tips for successful drilling, you can achieve clean, precise, and professional-looking holes in a variety of materials.
FAQ:
What is a pilot hole?
A pilot hole is a small, shallow hole that is drilled before drilling a larger hole. It helps to guide the larger drill and prevent it from wandering off course.
Why do I need to drill a pilot hole?
You need to drill a pilot hole to prevent the larger drill bit from slipping or wandering off course. It also helps to reduce the risk of the wood splitting.
How deep should a pilot hole be?
The depth of a pilot hole depends on the project and the type of wood you are working with. As a general rule, the pilot hole should be about two-thirds of the length of the screw or nail that you will be using.
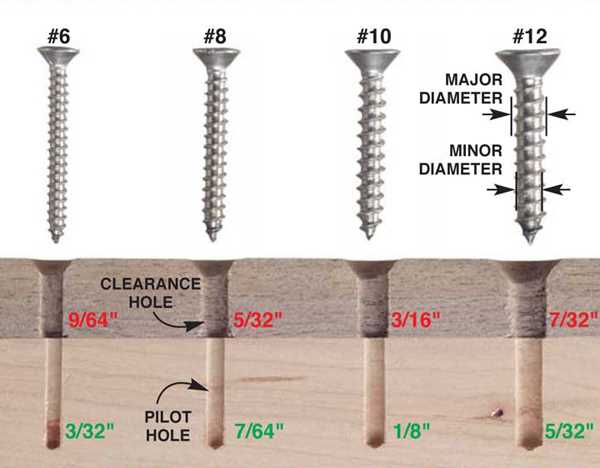
What size drill bit should I use for a pilot hole?
The size of the drill bit for a pilot hole should be slightly smaller than the diameter of the screw or nail. This will allow the screw or nail to go in smoothly without splitting the wood.
Can I skip drilling a pilot hole?
While it is possible to skip drilling a pilot hole, it is generally not recommended. Drilling a pilot hole helps to ensure that your project goes smoothly and reduces the risk of damaging the wood.
Can I use the same size drill bit for the pilot hole and the larger hole?
In most cases, you will need to use a smaller drill bit for the pilot hole and a larger drill bit for the larger hole. This is because the pilot hole is meant to guide the larger drill bit and prevent it from wandering off course.
Are there any exceptions to drilling pilot holes?
There may be some exceptions to drilling pilot holes, depending on the type of wood you are working with and the size of the screw or nail. However, as a general rule, it is best to err on the side of caution and drill a pilot hole.
Video:


Meet Harrison Clayton, a distinguished author and home remodeling enthusiast whose expertise in the realm of renovation is second to none. With a passion for transforming houses into inviting homes, Harrison's writing at https://thehuts-eastbourne.co.uk/ brings a breath of fresh inspiration to the world of home improvement. Whether you're looking to revamp a small corner of your abode or embark on a complete home transformation, Harrison's articles provide the essential expertise and creative flair to turn your visions into reality. So, dive into the captivating world of home remodeling with Harrison Clayton and unlock the full potential of your living space with every word he writes.


