Hooking up a Drill Battery to Power Wheels: A Step-by-Step Guide

Power Wheels, those tiny electric vehicles that children love to ride around in, are a great way to introduce kids to the concept of driving. However, the batteries that come with Power Wheels can be expensive to replace and have a limited lifespan. But what if there was a way to power your child’s Power Wheels using a drill battery? In this step-by-step guide, we’ll show you how to hook up a drill battery to Power Wheels, saving you money and extending the fun for your child.
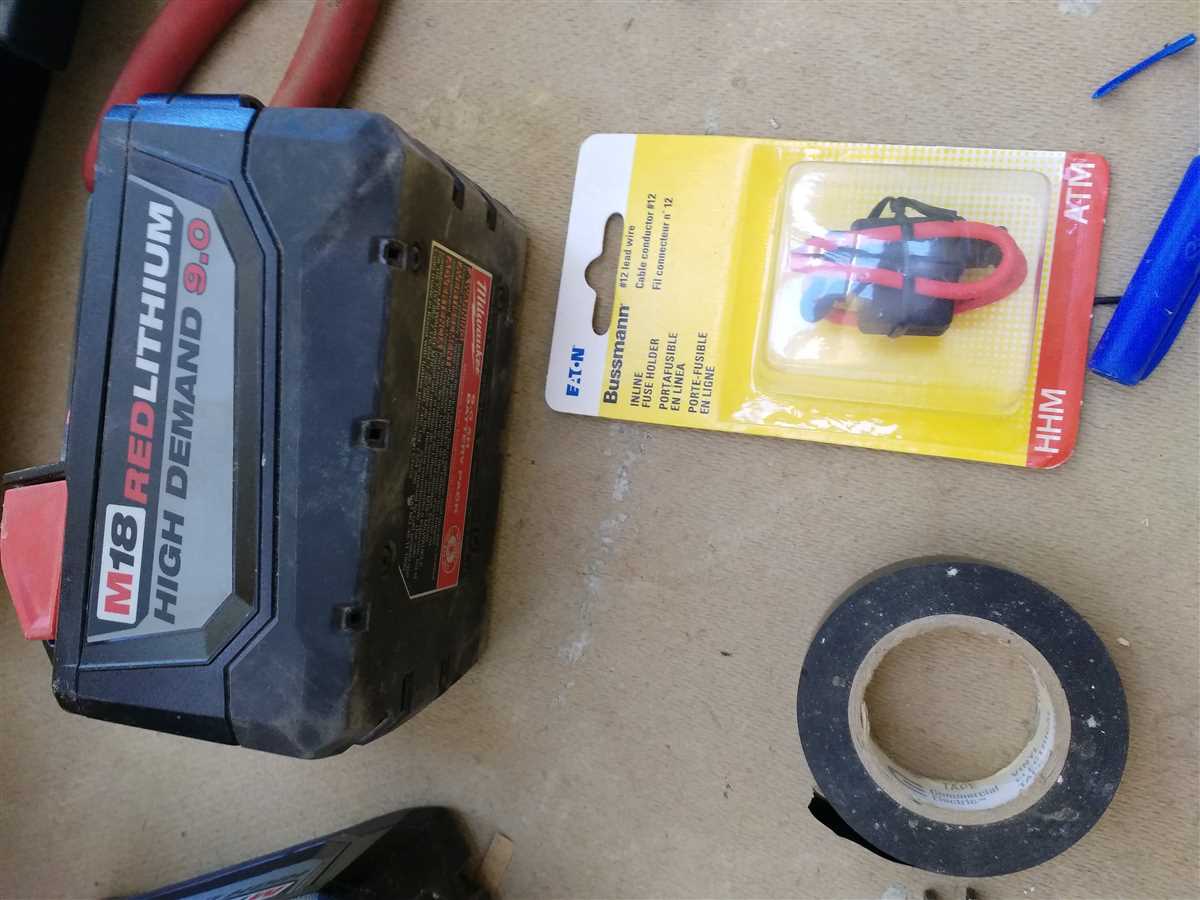
Step 1: Gather the Materials
Before you start, you’ll need to gather a few materials. You’ll need a compatible cordless drill battery, a power wheels battery adapter, a wire stripper, electrical tape, and a screwdriver. Make sure all of your materials are in working order and that the drill battery is fully charged.
Pro tip: It’s important to use a drill battery that is compatible with your Power Wheels. Check the manufacturer’s specifications to ensure compatibility.
Step 2: Disconnect the Power Wheels Battery

To begin the process, locate the battery compartment on your Power Wheels vehicle. Remove the battery from the compartment and disconnect any wires or connectors. Keep the battery in a safe place in case you decide to revert back to using it in the future.
Step 3: Connect the Drill Battery Adapter
Next, take the power wheels battery adapter and connect it to the wires or connectors that were previously connected to the Power Wheels battery. Make sure the connections are secure and tight.
Pro tip: The power wheels battery adapter should have clear markings indicating which wires to connect to the positive and negative terminals of the drill battery.
Step 4: Connect the Drill Battery

Now it’s time to connect the drill battery to the adapter. Insert the positive and negative terminals of the drill battery into the corresponding slots on the adapter. Again, make sure the connections are secure.
Step 5: Secure and Test
Once the drill battery is connected, use electrical tape to secure any loose wires or connections. Double-check that everything is tightly secured and that there are no exposed wires. Then, turn on the Power Wheels vehicle to test if it’s working properly. If everything is working as expected, you’re all set!
Pro tip: It’s a good idea to periodically check the connections and ensure the drill battery is fully charged for optimal performance.
By following this step-by-step guide, you can save money and give new life to your child’s Power Wheels by hooking up a drill battery. Not only will you extend the fun for your child, but you’ll also teach them a valuable lesson about resourcefulness and problem-solving.

Benefits of using a Drill Battery for Power Wheels

- Cost-effective: Using a drill battery to power your power wheels can be a more affordable option compared to purchasing specialized batteries. Drill batteries are readily available and can often be found at a lower cost.
- Compatibility: Most power wheels can be easily adapted to fit a drill battery. The battery’s voltage and wiring can usually be adjusted to match the power wheels’ requirements.
- Portability: Drill batteries are designed to be portable and lightweight. This makes it easier to transport your power wheels and provides flexibility in terms of where you can use them.
- Convenience: With a drill battery, you have the ability to quickly replace a depleted battery with a fully charged one. This means less downtime and more time for your child to enjoy their power wheels.
- Durability: Drill batteries are generally designed to withstand the rigors of heavy use. This means they are built to last and can handle the demands of powering a power wheels vehicle.
Using a drill battery for power wheels offers several benefits, including cost savings, compatibility, portability, convenience, and durability. Consider utilizing a drill battery as an alternative power source for your power wheels to enhance the overall experience.
Necessary Tools and Materials
- Power Wheels toy vehicle
- Drill battery with a compatible voltage
- Battery connector or adapter
- Wire stripper or cutter
- Electrical tape or shrink wrap tubing
- Screwdriver or drill with appropriate bits
- Zip ties or Velcro straps
- Electrical connectors
- Heat gun or hairdryer (for shrink wrap tubing)
Safety Precautions
- Always wear safety goggles and gloves when working with power tools or electrical components. This will help protect your eyes and hands from potential injury.
- Make sure the power wheels toy is turned off and unplugged before beginning any modifications or repairs.
- Inspect the drill battery for any signs of damage or wear before using it. If any damage is found, do not use the battery and replace it with a new one.
- Ensure that the drill battery is fully charged before connecting it to the power wheels. Using a partially charged battery may cause the power wheels to operate at a reduced speed or not at all.
- When connecting the drill battery to the power wheels, ensure that the positive and negative terminals are correctly aligned. Connecting them incorrectly may cause damage to the battery or power wheels.
- Securely fasten all connections between the drill battery and power wheels. Loose connections may result in electrical shorts or other malfunctions.
- During the modification process, make sure to keep all tools and wiring away from water or other liquids. Moisture can cause electrical components to malfunction or become dangerous.
- When operating the power wheels with the drill battery, always monitor the battery’s temperature. If it becomes excessively hot, disconnect it from the power wheels and allow it to cool down before continuing to use it.
- Never leave the power wheels unattended while it is connected to the drill battery. Always supervise children when they are using the modified power wheels to ensure their safety.
- If you are unsure about any aspect of the modification process, consult an experienced electrician or seek professional assistance. It is better to be safe than sorry when working with electricity and power tools.
Step 1: Choose the Right Drill Battery

When hooking up a drill battery to a Power Wheels, it’s important to choose the right battery for the job. The battery should have enough voltage and capacity to power the Power Wheels effectively. Here are some factors to consider when selecting a drill battery:

Voltage
The voltage of the drill battery should match the voltage requirement of the Power Wheels. Most Power Wheels models require a 12-volt battery, so it’s important to select a drill battery with the same voltage.
Capacity
The capacity of the drill battery is measured in ampere-hours (Ah) and determines how long the battery will last before needing to be recharged. It’s important to choose a drill battery with enough capacity to power the Power Wheels for an adequate amount of time. Consider the weight capacity of the Power Wheels and the duration of use when selecting the battery capacity.
Battery Type
There are different types of drill batteries available, such as nickel-cadmium (NiCd), nickel-metal hydride (NiMH), and lithium-ion (Li-ion). Each battery type has its own advantages and disadvantages in terms of capacity, weight, and price. Consider your specific needs and budget when choosing the battery type.
Battery Size
Drill batteries come in various sizes and shapes. Make sure to choose a battery that will easily fit and securely attach to the Power Wheels. Measure the available space in the Power Wheels battery compartment and compare it to the dimensions of the drill battery before making a selection.
By carefully considering these factors, you can choose the right drill battery that will power your Power Wheels effectively and provide an enjoyable ride for your child.

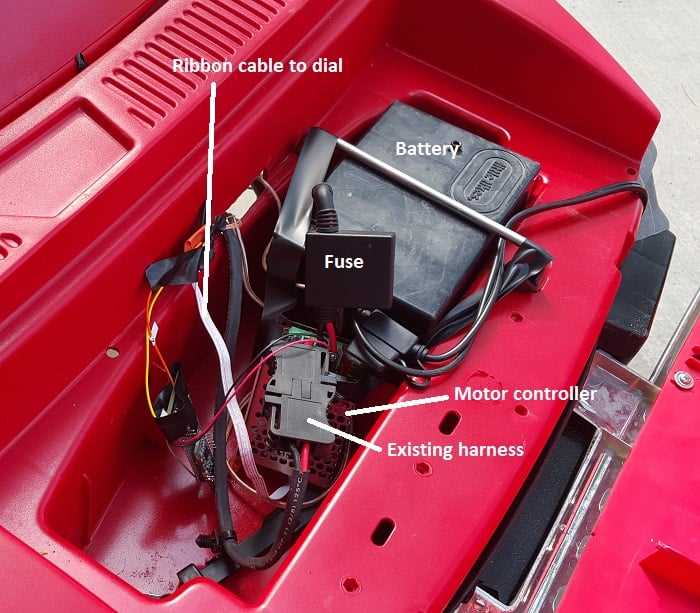
Step 2: Remove the Old Battery

The next step in hooking up a drill battery to power wheels is to remove the old battery from the device. This is a crucial step as it will allow you to properly install the new battery and ensure the proper functioning of the power wheels.
Here are the steps to remove the old battery:
- Make sure the power wheels are turned off and unplugged from any power source.
- Locate the battery compartment, which is usually located at the rear or underneath the power wheels.
- Using a screwdriver or the necessary tool, remove any screws or fasteners securing the battery compartment.
- Once the battery compartment is open, carefully disconnect the wires or connectors attaching the old battery to the power wheels. Take note of how the battery is connected so you can properly connect the new one later.
- Remove the old battery from the battery compartment, making sure to safely dispose of it according to local regulations.
Safely removing the old battery is important to avoid any damage to the power wheels or injury. Make sure to follow the manufacturer’s instructions and safety guidelines when working with batteries.
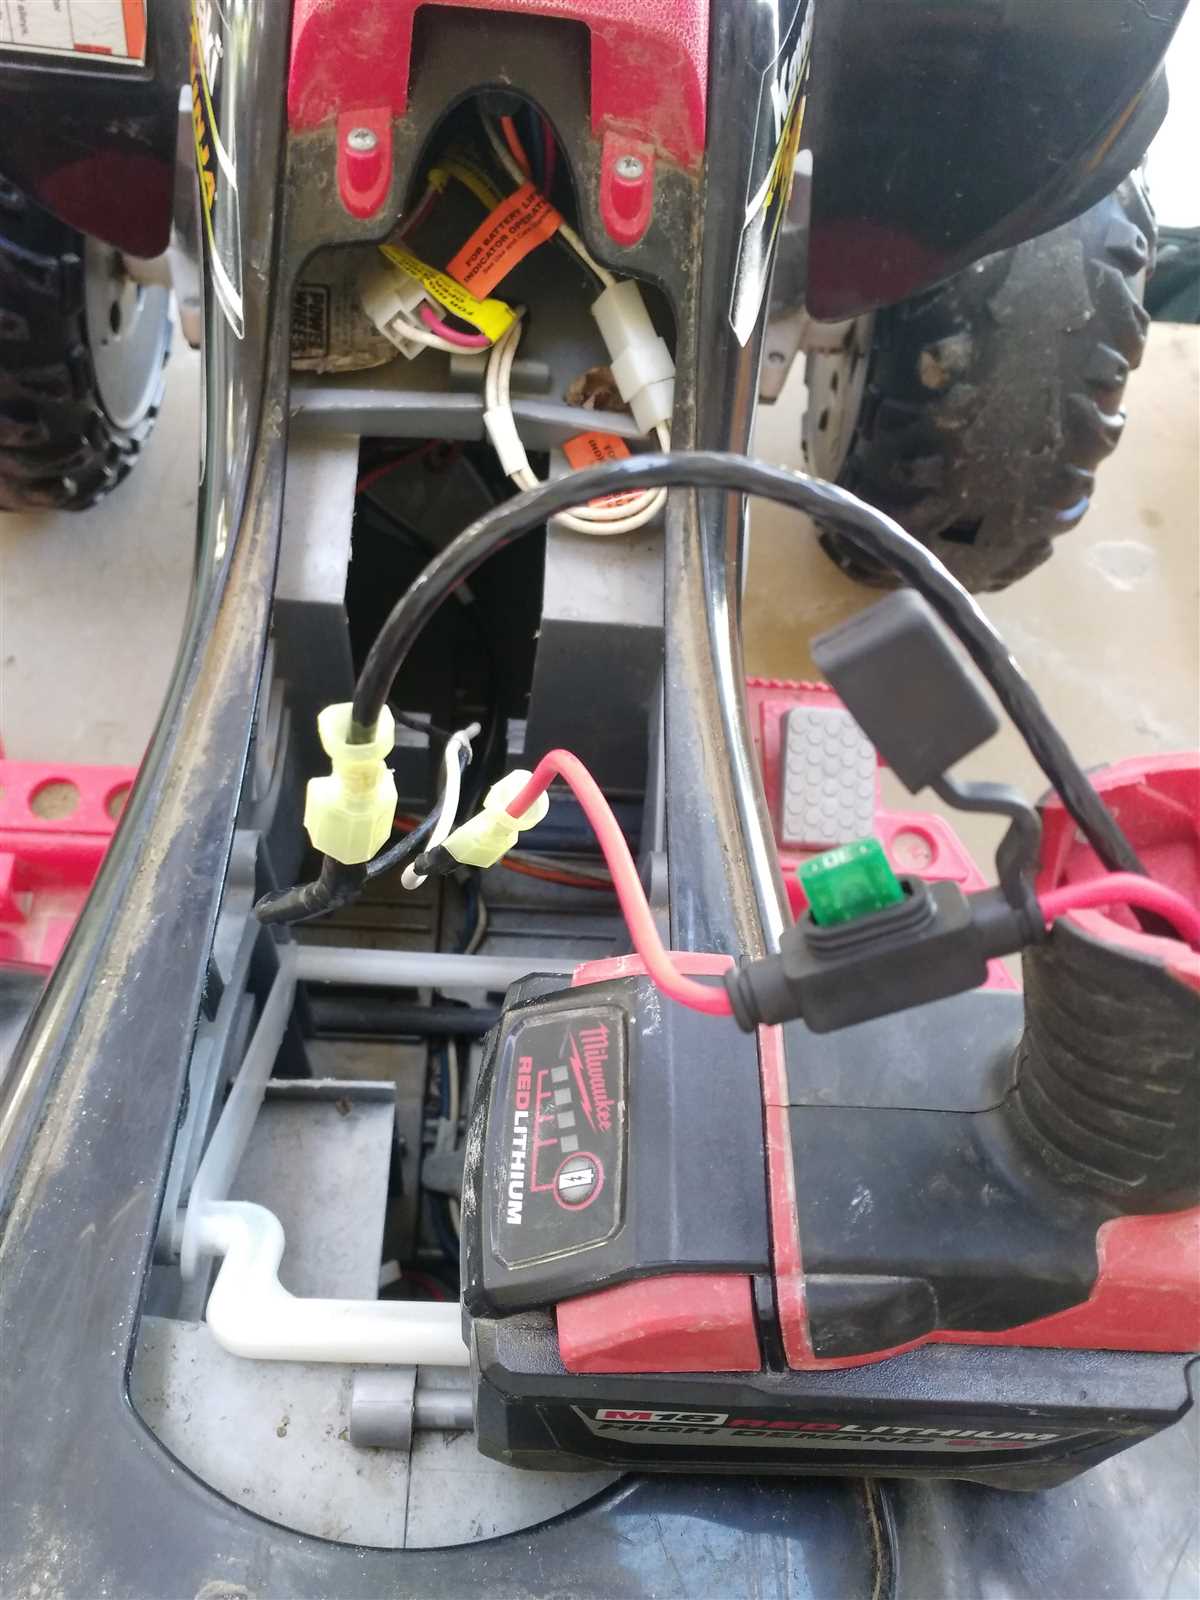
Step 3: Connect the Drill Battery to Power Wheels
Connecting the drill battery to the power wheels is a straightforward process. Follow these steps to complete the connection:
- Locate the positive and negative terminals on the drill battery and the power wheels.
- Take the red wire from the power wheels and connect it to the positive terminal of the drill battery. It is usually marked with a plus (+) symbol.
- Take the black wire from the power wheels and connect it to the negative terminal of the drill battery. It is usually marked with a minus (-) symbol.
- Secure the connections by tightening the screws or using a wrench.
- Make sure there are no loose connections and all wires are properly connected.
Once you have successfully connected the drill battery to the power wheels, you are ready to test it out. Turn on the power switch and see if the power wheels start working. If everything is connected correctly, you should see the power wheels moving when you press the accelerator pedal. If the power wheels do not work, double-check the connections and make sure the drill battery is charged and functioning properly.
Step 4: Test and Enjoy!
Now that you’ve completed the necessary modifications and connections, it’s time to test your new power system for your Power Wheels! Follow these steps to ensure everything is working properly:
1. Double-check the connections
Before turning on the power, make sure that all the connections you made in the previous steps are secure and tight. Inspect the wiring to ensure that there are no loose or exposed wires that could cause a short circuit.
2. Turn on the power
Once you’ve confirmed that everything is connected properly, it’s time to turn on the power. Press the power button on the drill battery or simply connect the wires from the battery to the Power Wheels’ wiring harness.
3. Test the Power Wheels
Take a seat in the Power Wheels and test the acceleration and speed. Make sure that the drill battery is providing enough power to move the vehicle smoothly. If you notice any issues, such as slow acceleration or jerky movements, double-check the connections and troubleshoot accordingly.
4. Enjoy your upgraded Power Wheels!
Once you’ve confirmed that everything is working properly, it’s time to enjoy your upgraded Power Wheels! Take it for a spin around the yard or driveway and experience the added power and speed from the drill battery. Have fun!
FAQ:
Why would I want to hook up a drill battery to power wheels?
Hooking up a drill battery to power wheels can be a great way to give your power wheels extra power and speed. It can also be a cost-effective alternative to purchasing an expensive replacement battery.
What materials do I need to hook up a drill battery to power wheels?
To hook up a drill battery to power wheels, you will need a power wheels vehicle, a compatible drill battery, a voltage regulator, and some basic electrical tools.
Can I use any drill battery to power my power wheels?
No, not all drill batteries are compatible with power wheels. It is important to ensure that the voltage and capacity of the drill battery match the requirements of your power wheels vehicle.
Is it difficult to hook up a drill battery to power wheels?
Hooking up a drill battery to power wheels can be a relatively simple process, especially if you have basic electrical knowledge. However, if you are unsure or uncomfortable working with electrical components, it is recommended to seek assistance from someone with experience.
What are the benefits of using a drill battery instead of a traditional power wheels battery?
Using a drill battery can provide your power wheels with additional power and speed compared to a traditional power wheels battery. Additionally, drill batteries are often more affordable and readily available.
Are there any risks or drawbacks to hooking up a drill battery to power wheels?
There are some risks associated with hooking up a drill battery to power wheels. The drill battery may not have the same built-in safety features as a power wheels battery, such as overcharge protection. It is important to monitor the battery and use caution to avoid overcharging or damaging the power wheels vehicle.
Can I remove the drill battery and use the power wheels normally?
Yes, you can remove the drill battery and use the power wheels with a traditional power wheels battery if desired. Simply disconnect the drill battery and reconnect the original power wheels battery.
Video:


Meet Harrison Clayton, a distinguished author and home remodeling enthusiast whose expertise in the realm of renovation is second to none. With a passion for transforming houses into inviting homes, Harrison's writing at https://thehuts-eastbourne.co.uk/ brings a breath of fresh inspiration to the world of home improvement. Whether you're looking to revamp a small corner of your abode or embark on a complete home transformation, Harrison's articles provide the essential expertise and creative flair to turn your visions into reality. So, dive into the captivating world of home remodeling with Harrison Clayton and unlock the full potential of your living space with every word he writes.


