Easy Techniques for Drilling Dowel Holes Without a Jig

When working on woodworking projects that require dowel joints, it can be frustrating to find yourself without a jig to help guide your drill bit. However, there are several easy techniques that you can use to drill dowel holes without a jig, allowing you to create strong and accurate joints.
Measure twice, drill once. One of the key principles to keep in mind when drilling dowel holes without a jig is accuracy. Take your time to measure and mark the exact location of each dowel hole before drilling. Use a combination square or a marking gauge to ensure that your marks are precise. This extra attention to detail will help you achieve perfectly aligned dowel holes.
Use a drill press or a drill guide. If you have access to a drill press, it can be a great tool to drill dowel holes without a jig. Simply set the depth and position of the hole on the drill press, clamp your workpiece securely, and drill the hole using the press. If you don’t have a drill press, you can also use a drill guide attachment for your handheld drill. These guides provide a stable and straight hole for accurate dowel placement.
Create a homemade guide block. Another option for drilling dowel holes without a jig is to create a homemade guide block. This can be made from a scrap piece of wood, plywood, or even plastic. Use a square or a straight edge to mark the correct position of the hole on the guide block, and then drill a hole slightly larger than your dowel diameter. Place the guide block onto your workpiece, aligning the hole with your mark, and use it as a guide for your drill bit.
Try a dowel center. If you only need to drill one side of the dowel joint, a dowel center can be a helpful tool. A dowel center is a small metal cylinder with a pointy end. Place the dowel center into the hole on one of your workpieces, and then align the other workpiece with the center. Tap the second workpiece gently with a mallet to create an indentation at the exact spot where you need to drill. This indentation will serve as a guide for your drill bit.

While using a jig can make drilling dowel holes easier and more precise, these alternative techniques can be just as effective when a jig is not available. With proper measurement, the right tools, and a little patience, you can achieve accurate dowel holes and create strong joints for your woodworking projects.
The Importance of Dowel Holes in Woodworking Projects
Dowel holes are an essential part of many woodworking projects. They are used to connect two pieces of wood together securely, ensuring strength and stability in the final product. Dowels are cylindrical wooden pins that fit snugly into these holes, creating a tight joint that can withstand a lot of strain.
Alignment and Accuracy
One of the main reasons why dowel holes are important is because they help with alignment and accuracy. When drilling dowel holes, it is crucial to ensure that the holes are precisely aligned on both pieces of wood. This allows the dowels to fit perfectly, creating a strong and seamless joint.
Without properly aligned dowel holes, the joint may be crooked or loose, compromising the structural integrity of the project. This can lead to instability and potential failure over time.

Strength and Stability
Another key reason why dowel holes are important is because they contribute to the overall strength and stability of the woodworking project. When dowels are inserted into the drilled holes, they create a mechanical interlocking bond. This bond increases the surface area of contact between the two pieces of wood, resulting in a stronger joint.
In addition, dowel holes distribute the load evenly across the joint, reducing the stress concentration on any one point. This distributes the weight and force applied to the joint, enhancing its overall durability and longevity.
Versatility and Flexibility
Dowel holes also offer versatility and flexibility in woodworking projects. They allow for easy disassembly and reassembly, making repairs and adjustments more convenient. If a piece of wood needs to be replaced or modified, the dowels can be removed and new holes drilled to accommodate the changes.
In addition, dowel holes can be used in combination with other joining techniques such as glue or screws, providing extra reinforcement and stability. This versatility allows woodworkers to create complex and intricate designs while ensuring the strength and stability of the final product.

Conclusion
Dowel holes play a critical role in woodworking projects. They provide alignment and accuracy, enhance strength and stability, and offer versatility and flexibility. By properly drilling and using dowel holes, woodworkers can create long-lasting and sturdy projects that can withstand the test of time.
Advantages of Using a Jig to Drill Dowel Holes
Drilling dowel holes without a jig can be a challenging task, especially for beginners. However, using a jig to drill dowel holes offers several advantages that can greatly simplify and improve the drilling process.
1. Accuracy
One of the biggest advantages of using a jig is the increased accuracy it provides. A dowel jig is designed to guide the drill bit precisely, ensuring that the hole is drilled at the correct angle and depth. This level of accuracy is difficult to achieve when drilling freehand, especially when working with small or delicate workpieces.
2. Consistency

Using a dowel jig also ensures consistent hole placement and spacing. This is particularly important when joining multiple pieces together using dowels. With a jig, each hole is drilled in the exact same location, resulting in perfectly aligned dowels and a secure joint. Without a jig, it is challenging to achieve the same level of consistency, which can lead to misaligned holes and weak joints.
3. Ease of Use
A dowel jig is designed to be user-friendly and easy to use, even for beginners. It typically features built-in guides and clamps, making it simple to position and secure the workpiece. The drill bit is guided by the jig, eliminating the need for precise hand-eye coordination. This ease of use makes the drilling process faster and more efficient.
4. Versatility
Dowel jigs are available in a variety of sizes and configurations, making them suitable for different project types and sizes. They can accommodate different dowel sizes and hole depths, allowing for versatile use in various woodworking applications. Whether you are working on small-scale projects or large furniture pieces, there is a dowel jig available to meet your needs.
5. Safety
Using a dowel jig can also enhance safety during the drilling process. The jig provides a stable and secure platform for the workpiece, reducing the risk of slipping or movement while drilling. Additionally, the jig helps to control dust and debris, improving visibility and minimizing the potential for accidents or injuries.
In conclusion, while it is possible to drill dowel holes without a jig, using a jig offers several advantages that can greatly enhance the accuracy, consistency, ease of use, versatility, and safety of the drilling process. Investing in a dowel jig is a wise choice for any woodworker, whether they are a beginner or an experienced professional.

Techniques for Drilling Dowel Holes Without a Jig
1. Using a Tape Measure and Pencil
One simple technique for drilling dowel holes without a jig is to use a tape measure and pencil to mark the position of the holes. Measure and mark the desired distance from the edge of the wood piece where you want to drill the hole. Repeat this process for each hole you need to drill.
Advantages:
- Simple and easy to use
- No additional tools required
Disadvantages:
- Requires careful measurement and marking
- Potential for human error
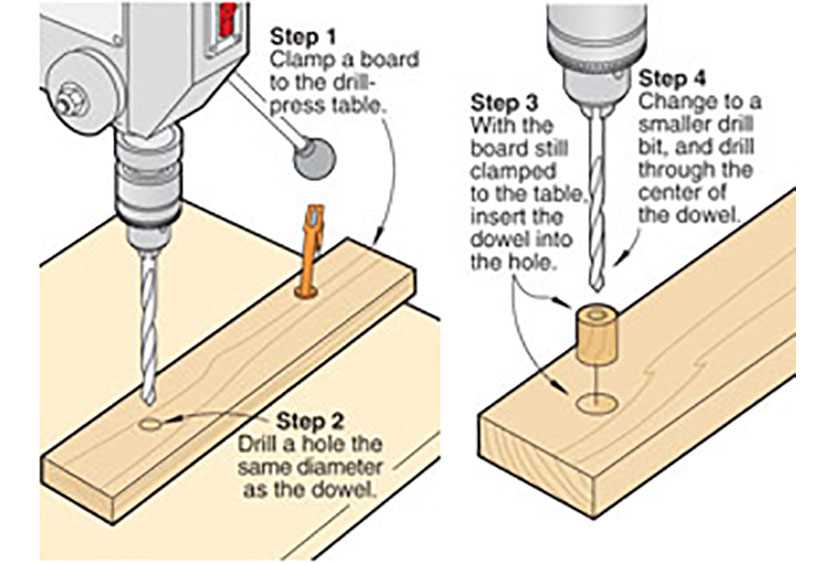
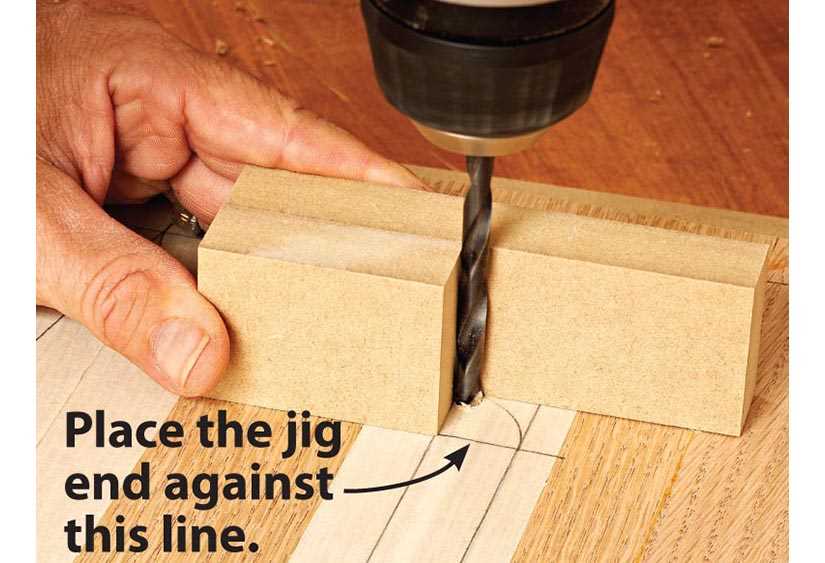
2. Using a Template or Guide Block
An alternative technique is to create a template or guide block that can be used to position the drill bit accurately. This can be done by drilling a hole in a scrap piece of wood, using a dowel as the guide. Place the template or guide block on the workpiece and align it with the desired hole position. Then, use the drilled hole as a guide for drilling the dowel hole.
Advantages:
- Provides a consistent and accurate guide for drilling dowel holes
- Can be easily adjusted for different hole positions
Disadvantages:
- Requires the creation of a template or guide block
- Some additional tools and materials needed
3. Using a Dowel Center or Transfer Punch
If you have access to a dowel center or transfer punch, you can use these tools to accurately mark the position of the dowel hole. Simply insert the dowel center or transfer punch into the existing dowel hole, and then press it against the workpiece. The center or punch will leave a small indentation on the surface, indicating the correct position for drilling the dowel hole.
Advantages:
- Provides a precise guide for drilling dowel holes
- Quick and easy to use
Disadvantages:
- Requires the use of additional tools
- May not be readily available
| Technique | Advantages | Disadvantages |
|---|---|---|
| Using a Tape Measure and Pencil | Simple and easy to use | Requires careful measurement and marking; potential for human error |
| Using a Template or Guide Block | Provides a consistent and accurate guide for drilling dowel holes; can be easily adjusted | Requires the creation of a template or guide block; additional tools and materials needed |
| Using a Dowel Center or Transfer Punch | Provides a precise guide for drilling dowel holes; quick and easy to use | Requires the use of additional tools; may not be readily available |
Using a Drill Press with Depth Stop
If you have access to a drill press with a depth stop feature, it can be a great tool for drilling dowel holes without a jig. The depth stop allows you to set the exact depth of the hole, ensuring consistent and accurate results.
Here are the steps to drill dowel holes using a drill press with a depth stop:
- Choose the correct drill bit: Select a drill bit that matches the size of the dowel you are using. It’s important to use the right size bit to ensure a snug fit.
- Secure your workpiece: Clamp your workpiece securely to the drill press table to prevent it from moving while drilling.
- Adjust the depth stop: Set the depth stop on your drill press to the desired depth. This will prevent the drill bit from drilling beyond the set depth, ensuring consistent hole depth.
- Position the drill bit: Align the drill bit with the marked location where you want to drill the dowel hole.
- Start the drill press: Turn on the drill press and lower the drill bit slowly into the workpiece. Apply steady and even pressure as you drill.
- Drill to the desired depth: As the drill bit reaches the set depth, the depth stop will prevent it from going further. Stop drilling once the desired depth is reached.
- Remove the drill bit: After drilling the hole, lift the drill bit out of the workpiece.
- Repeat for additional holes: If you need to drill more dowel holes, repeat the process for each one, ensuring consistent depth for all holes.
Using a drill press with a depth stop can be a simple and efficient method for drilling dowel holes without a jig. It provides accuracy and consistency, making it easier to achieve professional-looking results.
Hand Drilling with a Guide Block
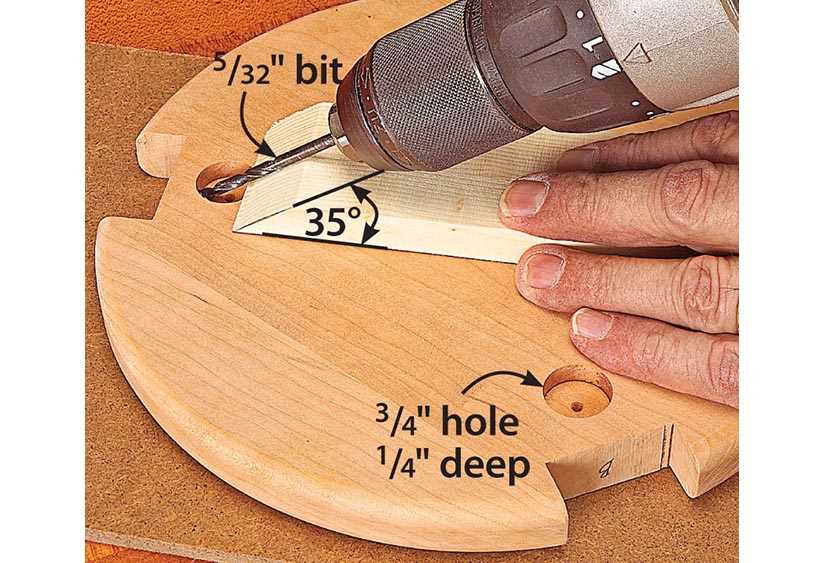
If you don’t have access to a dowel jig, you can still drill dowel holes accurately by using a guide block. A guide block is a simple wooden block with holes drilled at precise angles to guide your drill bit. It can be easily made using scrap wood and a drill press. Here’s how to use a guide block to drill dowel holes by hand:
- Prepare your guide block: Start by selecting a piece of scrap wood that is at least 1 inch thick. Measure and mark the positions where you want to drill your dowel holes. Use a drill press and the appropriate drill bit size to drill the holes at the desired angles. Make sure the holes are deep enough to accommodate the length of the dowels you will be using.
- Position your guide block: Place your guide block on the surface where you want to drill the dowel holes. Make sure it is firmly secured in place, either by using clamps or by pressing it against a wall or workbench.
- Align your drill bit: Insert your drill bit into the first guide hole. Make sure it is aligned with the hole and perpendicular to the surface.
- Drill the dowel hole: Start drilling by applying steady pressure to the drill. Keep the drill bit aligned with the guide hole to ensure a straight hole. Drill to the desired depth, but be careful not to go too deep. Repeat this step for each dowel hole.
- Remove the guide block: Once you have drilled all the dowel holes, remove the guide block from the surface. You can now insert your dowels into the drilled holes, align your pieces, and secure them together using glue or other fasteners.
Using a guide block can help you achieve accurate and straight dowel holes without the need for a dowel jig. It may take some practice to align the drill bit with the guide hole, but with time and patience, you can master this technique and achieve professional results.
Using a Dowel Center Transfer Punch
If you don’t have a dowel jig or dowel center on hand, you can use a dowel center transfer punch to accurately mark dowel hole locations.
A dowel center transfer punch consists of a metal rod with a sharp point on one end and a concave shape on the other end. The concave end is used to mark the center of the dowel hole.
Steps to Use a Dowel Center Transfer Punch
- Prepare the pieces you want to join with dowels. Make sure they are properly aligned and clamped together.
- Choose the size of the dowel center transfer punch that matches the diameter of your dowels.
- Hold the dowel center transfer punch by its handle and place the concave end on the surface of the piece where you want to drill the dowel hole.
- Apply firm pressure and give the dowel center transfer punch a few light taps with a hammer to mark the center of the dowel hole.
- Repeat the process for all the dowel hole locations.
- Once you have marked all the dowel hole centers, remove the clamps and separate the pieces.
Tips for Using a Dowel Center Transfer Punch
- Make sure the dowel center transfer punch is perpendicular to the surface when marking the dowel hole centers. This will ensure accurate hole placement.
- Use a light touch when tapping the dowel center transfer punch with a hammer to avoid damaging the surface.
- Double-check the alignment of the dowel hole centers before drilling to ensure a precise fit.
Using a dowel center transfer punch is a simple and effective way to mark dowel hole locations without the need for a jig or centering tool. With practice, you can achieve accurate results and create strong joints using dowels.
Creating Dowel Holes with a Drill Guide
A drill guide is a helpful tool that ensures accurate drilling when creating dowel holes. Follow these steps to create dowel holes with a drill guide:
- Choose the appropriate size drill bit for your dowels. Make sure the diameter matches the dowels you will be using.
- Attach the drill bit to your drill. Ensure it is securely tightened.
- Place the drill guide on the surface where you want to create the dowel hole. The drill guide should have alignment marks to ensure accurate positioning.
- Align the drill bit with the alignment marks on the drill guide.
- Hold the drill guide firmly in place and begin drilling. Apply steady and even pressure as you drill into the surface.
- Continue drilling until the desired depth is reached. The drill guide will help prevent drilling too deep.
- Repeat the process for all dowel holes you need to create.
A drill guide provides stability and precision, making it easier to create accurate dowel holes. It can be particularly useful when drilling dowel holes in tight or hard-to-reach spaces.
Essential Tools for Drilling Dowel Holes
Drilling dowel holes without a jig requires some basic tools to ensure accuracy and precision. Here are the essential tools you will need:
- Power Drill: A power drill is a versatile tool that can be used for various drilling applications. Look for a drill with adjustable speed settings and a chuck that can accommodate the size of dowel you are using.
- Brad Point Drill Bits: Brad point drill bits are specifically designed for drilling dowel holes. These bits have a sharp point that helps to ensure accurate positioning and a clean entry hole.
- Depth Stop: A depth stop is a useful tool that allows you to set a specific drilling depth. This ensures that all of your dowel holes are drilled to the same depth, resulting in consistent joint strength.
- Clamps: Clamps are essential for securing your workpiece in place while drilling dowel holes. They help to prevent movement and ensure accurate hole placement.
- Marking Tool: A marking tool, such as a pencil or marking knife, is necessary for marking the exact location of each dowel hole. This helps to ensure the alignment of the mating pieces.
- Tape Measure or Ruler: Accurate measurements are crucial when drilling dowel holes. A tape measure or ruler will help you determine the correct spacing and positioning of your holes.
In addition to these tools, it is also important to have a clean and organized workspace. Clear any clutter and ensure that you have enough space to maneuver your drill and workpiece. Remember to always wear appropriate safety gear, such as safety glasses, when using power tools.
Drill Press
A drill press is a powerful and versatile tool that can be used to drill dowel holes without a jig. Here are some easy techniques to use with a drill press:
1. Setup
Before starting, make sure your drill press is properly set up and securely anchored to a workbench or mounted on a stand. Ensure that the drill bit is compatible with the size of the dowel you will be using.
2. Depth Setting
Using the depth stop on the drill press, set the desired depth for your dowel hole. This will help ensure consistent and accurate drilling for each hole.
3. Clamping
To prevent movement and ensure clean and accurate drilling, clamp the workpiece securely to the drill press table. This will help maintain stability and prevent the workpiece from shifting during the drilling process.
4. Marking
To ensure precision, mark the locations of the dowel holes on your workpiece with a pencil or marking gauge. This will serve as a guide for drilling and help you position the workpiece correctly under the drill press.
5. Slow Speed
Start the drill press at a slow speed to minimize the risk of tear-out or splintering. Once the hole is established, gradually increase the speed to complete the drilling process smoothly.
6. Pilot Holes
In some cases, especially with hardwoods or larger dowels, it can be helpful to drill a small pilot hole before drilling the final dowel hole. This will make it easier to align the larger drill bit and reduce the risk of splitting the wood.
7. Test Cuts
Before drilling into your final workpiece, it’s a good practice to perform test cuts on scraps of the same material. This will allow you to adjust the drill press settings and technique if necessary, ensuring clean and accurate holes in the final piece.
8. Clearing Chips
As you drill, periodically raise the drill bit to clear away wood chips from the hole. This will help prevent clogging and overheating of the drill bit, ensuring smooth and efficient drilling.
9. Sanding
After drilling the dowel holes, it may be necessary to sand the edges or interior of the holes to remove any roughness or splintering. This will ensure a clean and precise fit for the dowels.
By following these simple techniques and using a drill press, you can easily drill dowel holes without the need for a jig. The drill press provides the power, stability, and accuracy needed to achieve professional results.
Dowel Center Transfer Punch
The dowel center transfer punch is a simple tool that can help you accurately mark the location for drilling dowel holes without the use of a jig. It is often used in woodworking projects to ensure precise alignment when joining two pieces of wood together.
To use the dowel center transfer punch, follow these steps:
- Step 1: Start by inserting the dowel center transfer punch into one of the dowel holes.
- Step 2: Apply firm pressure and tap the end of the transfer punch with a mallet or a hammer. This will leave an indentation on the surface of the second piece of wood, marking the exact center of the dowel hole.
- Step 3: Repeat the process for the remaining dowel holes.
Once you have marked the locations for all the dowel holes, you can then proceed to drill the holes using a drill bit of the appropriate size.
The dowel center transfer punch is a handy tool to have in your woodworking toolbox, as it can save you time and effort when drilling dowel holes. It ensures that your dowel holes are accurately aligned, resulting in strong and aesthetically pleasing joints.
Here are some key advantages of using a dowel center transfer punch:
- Easy to use
- Provides precise alignment
- Saves time and effort
- Ensures strong joints
Overall, the dowel center transfer punch is an essential tool for any woodworker who frequently works with dowel joinery. It is a simple yet effective way to achieve accurate and reliable dowel hole placement without the need for a jig.
FAQ:
What are some easy techniques for drilling dowel holes without a jig?
There are several techniques you can try. One method is to use a drill press with a depth stop to ensure consistent drilling depth. Another method is to mark the center points on both pieces of wood and use a drill bit that matches the diameter of the dowel. You can also use a self-centering doweling jig or make your own guide by clamping a piece of wood with a hole drilled through it onto the workpiece.
Can I use a drill press without a depth stop to drill dowel holes?
Yes, if you don’t have a drill press with a depth stop, you can still use a drill press to drill dowel holes. Just make sure to mark the desired drilling depth on the drill bit with a piece of tape or a marker. This way, you can control how far you drill into the wood and ensure consistent hole depth.
What is a self-centering doweling jig?
A self-centering doweling jig is a tool that helps you drill accurate dowel holes without the need for precise measurements or marking. It consists of a guide with multiple holes of different sizes and a centering pin. By placing the guide on the workpiece, inserting the centering pin into the existing hole or mark, and drilling through the appropriate guide hole, you can create perfectly centered dowel holes.
How can I make my own doweling guide without buying a jig?
If you don’t have a doweling jig, you can easily make a guide using a scrap piece of wood and a drill bit that matches the diameter of the dowel. First, clamp the piece of wood onto the workpiece in the desired drilling location. Then, drill a hole through the guide piece and into the workpiece. This will act as a guide for the drill bit and ensure accurate hole placement.
Are there any other methods for drilling dowel holes without a jig?
Yes, besides using a drill press or making your own guide, you can also try using a drill press vise to hold the workpiece in place while drilling. Another option is to use a handheld drill with a piece of tape wrapped around the drill bit to act as a depth stop. Whichever method you choose, make sure to take your time and drill slowly to avoid any mistakes.
What tools do I need to drill dowel holes without a jig?
To drill dowel holes without a jig, you will need a drill, drill bits in various sizes (including one that matches the diameter of the dowel), clamps or a drill press vise to hold the workpiece, and a depth stop (which can be a piece of tape or a marker).
Video:

Harrison Clayton
Meet Harrison Clayton, a distinguished author and home remodeling enthusiast whose expertise in the realm of renovation is second to none. With a passion for transforming houses into inviting homes, Harrison's writing at https://thehuts-eastbourne.co.uk/ brings a breath of fresh inspiration to the world of home improvement. Whether you're looking to revamp a small corner of your abode or embark on a complete home transformation, Harrison's articles provide the essential expertise and creative flair to turn your visions into reality. So, dive into the captivating world of home remodeling with Harrison Clayton and unlock the full potential of your living space with every word he writes.