Easy Steps to Drill a Hole in a Granite Countertop

Drilling a hole in a granite countertop may seem like a daunting task, but with the right tools and techniques, it can be a straightforward process. Whether you need to install a new faucet or create a hole for an electrical outlet, following these easy steps will help you get the job done efficiently and safely.
Step 1: Gather the necessary tools and materials. Before you begin, make sure you have all the tools and materials you’ll need. These include a diamond-tipped hole saw, an electric drill, a template, masking tape, a spray bottle with water, and safety goggles. It’s essential to use a diamond-tipped hole saw specially designed for drilling through granite, as other types of saws may not be effective.
Step 2: Prepare the countertop. Start by cleaning the area where you will be drilling the hole. Wipe down the countertop to remove any dirt or debris that may interfere with the drilling process. Next, use masking tape to mark the area where the hole will be located. This will help prevent the drill from slipping and provide a guide for the saw.
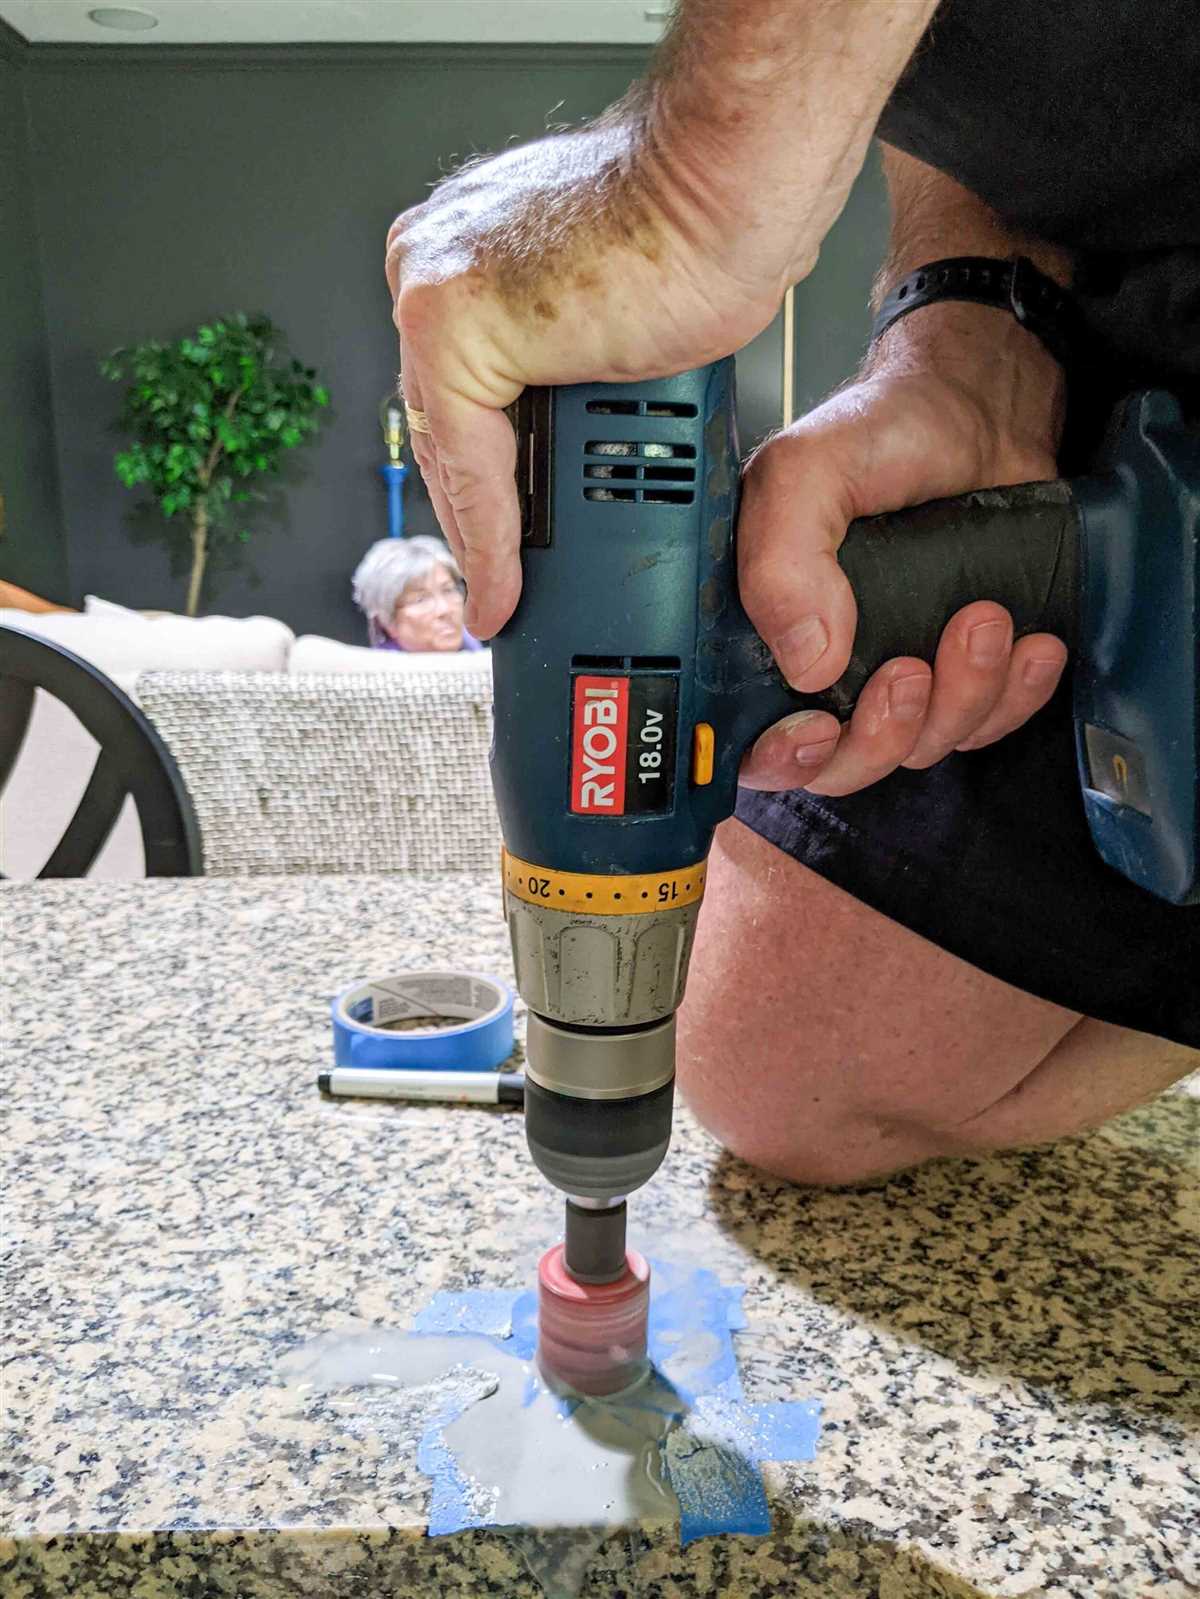
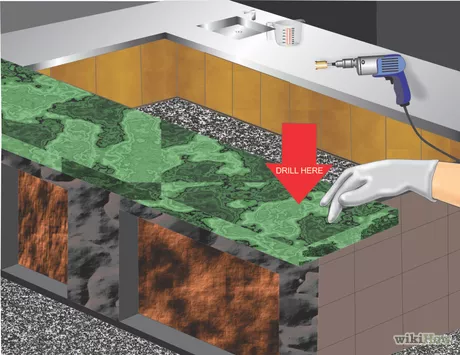
Step 3: Apply water and drill the hole. Wet the surface of the granite with water from the spray bottle. This will help cool down the diamond-tipped hole saw and prevent the stone from cracking due to heat generated during the drilling process. Place the hole saw on the marked area and start drilling at a slow speed. Apply gentle pressure but let the saw do the work. Continue drilling until you’ve reached the desired depth.
Step 4: Clean up and finish. Once you’ve drilled the hole, turn off the drill and carefully remove the saw. Clean up any debris and wipe down the countertop with a damp cloth. You may need to use a diamond file or sandpaper to smooth the edges of the hole. Finally, remove the masking tape and admire your handiwork. Your granite countertop now has a perfectly drilled hole!

Note: If you’re uncertain about drilling the hole yourself, it’s always best to consult a professional. They will have the expertise and experience to ensure the job is done correctly and without causing any damage to your countertop.
Drilling a hole in a granite countertop doesn’t have to be a complicated task. By following these easy steps and taking the necessary precautions, you can successfully drill a hole in your countertop and complete your home improvement project with confidence.
Preparing the Granite Countertop
Before you start drilling a hole in a granite countertop, it is important to properly prepare the area. Here are some easy steps to ensure that your countertop is ready for drilling:
- Measure and mark the location: Use a tape measure and pencil to mark the desired location for the hole on the granite countertop. Make sure to measure carefully and double-check your markings before proceeding.
- Clear the area: Remove any objects or debris from the countertop surface. This will prevent anything from getting in the way while drilling and ensure a clean, smooth hole.
- Protect the surrounding area: Cover the surrounding area of the countertop with a drop cloth or masking tape. This will prevent any accidental damage to other parts of the countertop and make cleanup easier.
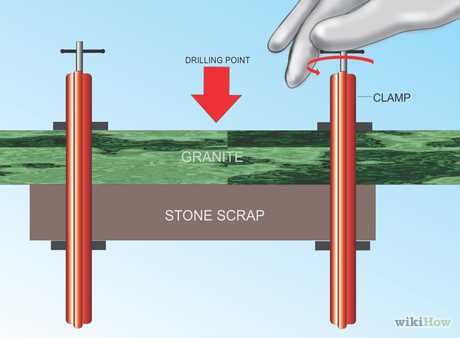
- Secure the countertop: If your countertop is not securely mounted to a cabinet or support structure, you may need to use clamps or other methods to hold it in place during the drilling process. This will prevent the countertop from moving or shifting while you are drilling.
- Attach a diamond drill bit: Depending on the size of the hole you want to drill, choose an appropriate diamond drill bit. Attach the drill bit to your drill according to the manufacturer’s instructions.
- Apply water as a lubricant: It is important to use water as a lubricant when drilling into granite. This will keep the drill bit cool and prevent the granite from cracking or chipping. You can either use a spray bottle to mist the area with water while drilling or have a steady stream of water flowing onto the drilling area.
- Start drilling: Position the drill bit over the marked location and gently start drilling into the granite countertop. Apply steady and even pressure, but be careful not to push too hard or apply excessive force. Let the drill bit do the work and maintain a slow and controlled drilling speed.
Following these preparation steps will help ensure that your granite countertop is ready for drilling and that you achieve the desired results. It is important to take your time and work carefully to avoid any accidental damage to the countertop.
Choosing the Right Drill Bit
When drilling a hole in a granite countertop, it is essential to choose the right drill bit. Using the wrong drill bit can result in a dull and ineffective cut, or even damage to the countertop itself. Here are some factors to consider when selecting a drill bit:
1. Material

Granite is an extremely hard material, so it requires a drill bit that is specifically designed to cut through it. The most common type of drill bit used for drilling granite is a diamond drill bit. Diamond drill bits are made with a cutting edge that features diamond grit, which is highly effective at cutting through the hard granite surface.
2. Size
The size of the hole you need to drill will determine the size of the drill bit you should choose. Diamond drill bits for granite countertops come in a variety of sizes, ranging from small diameters for delicate tasks to larger diameters for more substantial holes. Make sure to measure the diameter of the hole you need before purchasing a drill bit.
3. Wet or Dry Drilling
Granite is a dense material that generates a significant amount of heat when drilling. To prevent overheating and potential damage to the countertop, it is recommended to use a diamond drill bit for wet drilling. Wet drilling involves using water or a coolant to cool down the drill bit and lubricate the cutting process. Some diamond drill bits are specifically designed for wet drilling and feature slots or channels for water flow.
4. Quality
When it comes to diamond drill bits, quality matters. High-quality drill bits are made with high-grade diamond grit and are engineered to last longer and provide better cutting performance. Invest in a good quality drill bit to ensure clean and precise cuts on your granite countertop.

5. Speed and Feed Rate
Drilling granite requires patience and control. It is important to choose a drill bit that is suitable for the speed and feed rate of your drill. The ideal speed and feed rate may vary depending on the specific granite and the drill you are using. Refer to the manufacturer’s recommendations or consult with a professional if you are unsure.
6. Safety Considerations
Always prioritize safety when drilling granite. Wear safety glasses to protect your eyes from flying debris, gloves to protect your hands, and a dust mask to prevent inhaling granite dust. Follow proper safety guidelines and instructions to avoid accidents or injuries.
By considering these factors and choosing the right drill bit, you can ensure a successful drilling process and achieve clean and precise holes in your granite countertop.
Marking the Hole Location
Before drilling a hole in a granite countertop, it is important to mark the exact location where the hole will be. This will ensure that the hole is placed correctly and in the desired position.

Here are the steps to mark the hole location:
- Clean the countertop: Use a mild cleaner or soap and water to clean the area where the hole will be drilled. This will remove any dirt or debris that may interfere with marking the hole location.
- Measure and mark the center: Use a tape measure or ruler to measure the desired distance from the edge of the countertop to the center of the hole. Make a small mark with a pencil or marker at this point.
- Use a template: If you are drilling multiple holes, it may be helpful to create a template out of cardboard or paper. Place the template on the countertop and use it as a guide to mark the location of each hole.
- Double-check the measurements: Before proceeding, double-check the measurements and marks to ensure they are accurate. This will help prevent any mistakes or misalignments during the drilling process.
Once you have marked the hole location, you are ready to proceed with drilling the hole in the granite countertop.
Creating a Pilot Hole
Before drilling a larger hole in the granite countertop, it is important to create a pilot hole. A pilot hole is a small hole that helps guide the drill bit and prevent the granite from cracking or chipping. Follow these steps to create a pilot hole:
- Choose the desired location for the hole on the granite countertop. Mark the spot with a pencil or masking tape.
- Attach a small diamond-tipped or carbide-tipped drill bit to your drill. These types of drill bits are specifically designed for drilling into hard materials like granite.
- Put on safety glasses and a dust mask to protect yourself from flying debris.
- Hold the drill perpendicular to the granite surface and position the tip of the drill bit on the marked spot.
- Apply gentle pressure and start drilling at a slow speed. Let the drill do the work and avoid forcing it.
- Continue drilling until the pilot hole is approximately 1/4 to 1/2 inch deep. This depth will depend on the size of the final hole you need.
- Periodically stop drilling to clear away any dust or debris from the pilot hole.
Once the pilot hole is created, you can proceed to drill the larger hole in the granite countertop using the appropriate size of drill bit. Remember to take your time and apply steady pressure, letting the drill bit do the work. Keep the drill bit and granite surface lubricated with water to prevent overheating and ensure a smooth drilling process.

Drilling the Main Hole
Now that you have marked the spot where you want to drill your hole, it’s time to start drilling. Follow these steps to drill the main hole in your granite countertop:
- Put on your safety glasses and gloves to protect yourself from any debris or fragments that may fly off during the drilling process.
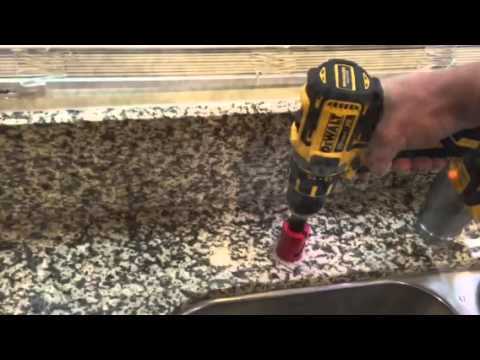
- Attach a diamond-tipped hole saw bit to your drill. Make sure it is securely fastened.
- Place a piece of masking tape on the countertop to minimize the risk of chipping or cracking the granite.
- Position the drill bit over the marked spot on the tape.
- Apply steady pressure and begin drilling slowly. Be patient and avoid exerting too much force, as this can cause damage to the countertop.
- Periodically pull the drill bit out to clear away any dust or debris and to prevent overheating.
- Continue drilling until you have reached the desired depth. This may take some time, depending on the thickness of your granite countertop.
- Once the hole is drilled, remove the masking tape and clean any remaining debris from the countertop.
Remember to take breaks as needed to prevent overheating and to give yourself a rest. It’s important to maintain a slow, steady pace to avoid damaging the countertop. Once the main hole is drilled, you can move on to enlarging it if necessary.
Using Water for Cooling
When drilling a hole in a granite countertop, it’s important to keep the drill bit cool to prevent it from overheating and losing its sharpness. One effective way to achieve this is by using water for cooling. Water is a great conductor of heat and can dissipate the heat generated by the friction between the drill bit and the granite surface.
Here are some easy steps to use water for cooling while drilling a hole in a granite countertop:
- Prepare the drilling area: Begin by placing a piece of scrap wood or a block of wood under the granite countertop to provide support and prevent any damage to the surface underneath. This will also help elevate the area that needs to be drilled, making it easier to access.
- Mark the drilling spot: Use a marker or a pencil to mark the spot where the hole needs to be drilled. Ensure that the mark is clearly visible and accurately placed.
- Create a dam: To contain the water during the drilling process, create a small dam around the drilling spot using plumber’s putty or modeling clay. This will help prevent the water from running all over the countertop.
- Set up a drip system: Attach a small piece of flexible plastic tubing to the drill bit, near the tip. Position the other end of the tubing in a container filled with water. This will create a drip system that continuously supplies water to the drilling area.
- Start drilling: Begin drilling the hole in the marked spot. The water from the drip system will flow onto the drill bit and the granite surface, keeping them cool. Make sure to apply gentle and steady pressure while drilling, allowing the drill bit to do the work.
- Monitor the water flow: Continuously monitor the flow of water during the drilling process. Ensure that the water is reaching the drill bit and the drilling spot. Adjust the water flow as needed to maintain proper cooling.
- Clean up: After drilling the hole, carefully remove the dam created using plumber’s putty or modeling clay. Clean any excess water from the countertop surface and dry it thoroughly.
Using water for cooling while drilling a hole in a granite countertop is a simple yet effective method to prevent overheating and maintain the sharpness of the drill bit. Following these steps will help you drill a clean and precise hole without damaging the granite surface. Remember to always exercise caution and wear appropriate safety gear when working with power tools.
Cleaning Up the Dust
After drilling a hole in a granite countertop, it is essential to clean up the dust to ensure a clean and smooth surface. Here are some easy steps to clean up the dust effectively:
Materials Needed:
- Soft cloth or sponge
- Clean water
- Mild dish soap
- Vacuum cleaner with a brush attachment
Steps to Clean Up the Dust:
- Start by removing any loose debris or dust particles using a soft cloth or sponge. Gently wipe the surface of the countertop to eliminate as much loose dust as possible.
- Prepare a cleaning solution by mixing a few drops of mild dish soap with clean water in a small bowl or bucket.
- Wet the soft cloth or sponge with the cleaning solution. Make sure it is not dripping wet but slightly damp.
- Gently wipe the entire surface of the countertop to remove any remaining dust and dirt. Pay extra attention to the drilled hole area to ensure all the dust is removed.
- Rinse the cloth or sponge with clean water and wring it out to remove any soap residue.
- Go over the countertop once again with the damp cloth or sponge to remove any soap residue and ensure a clean finish.
- Dry the countertop thoroughly using a soft cloth to prevent any water spots from forming.
- If there is still visible dust or residue, use a vacuum cleaner with a brush attachment to carefully clean the surface. Move the brush attachment gently in circular motions to suction up any remaining dust particles.
By following these steps, you can effectively clean up the dust after drilling a hole in a granite countertop. This will leave your countertop clean and ready for further use.
Finishing and Polishing

After drilling the hole in your granite countertop, the next step is to finish and polish the surface to achieve a seamless and professional look.
Here are the steps to finish and polish the granite countertop:
- Clean the surface: Before starting the finishing and polishing process, make sure to clean the surface of the countertop thoroughly. Use a gentle cleanser and a soft cloth to remove any dust, debris, or residue.
- Apply a granite sealer: To protect the granite from stains and moisture, apply a granite sealer according to the manufacturer’s instructions. This will help keep your countertop looking its best for years to come.
- Sand the edges: Use a fine-grit sandpaper or a sanding block to smooth out any rough edges around the drilled hole. Be careful not to scratch the surrounding area while sanding.
- Polish the surface: To achieve a glossy finish, use a granite polishing compound. Apply the compound to the countertop with a soft cloth and then gently buff the surface in a circular motion. Continue polishing until you achieve the desired shine.
- Remove any residue: After polishing, use a clean cloth to remove any excess polishing compound or residue from the countertop. Make sure to wipe the surface thoroughly to avoid streaks or smudges.
Following these steps will help you achieve a professional and polished look for your granite countertop. Remember to take your time and be gentle while sanding and polishing to avoid damaging the surface. With proper care and maintenance, your countertop will remain beautiful and durable for years to come.
FAQ:
What equipment do I need to drill a hole in a granite countertop?
You will need a diamond drill bit, a power drill, water, and a guide template.
How do I choose the right sized diamond drill bit?
To choose the right sized diamond drill bit, measure the diameter of the hole you need to drill and select a drill bit that matches that size.
Do I need to use water when drilling into a granite countertop?
Yes, it is important to use water while drilling into a granite countertop to lubricate the drill bit and prevent it from overheating.
Can I use a regular drill bit to drill into a granite countertop?
No, you cannot use a regular drill bit to drill into a granite countertop. You need to use a diamond drill bit specifically designed for drilling into hard materials like granite.
What is the purpose of a guide template when drilling into a granite countertop?
A guide template helps ensure that you drill the hole in the right location and at the right angle. It serves as a guide for the drill bit.
Video:


Harrison Clayton
Meet Harrison Clayton, a distinguished author and home remodeling enthusiast whose expertise in the realm of renovation is second to none. With a passion for transforming houses into inviting homes, Harrison's writing at https://thehuts-eastbourne.co.uk/ brings a breath of fresh inspiration to the world of home improvement. Whether you're looking to revamp a small corner of your abode or embark on a complete home transformation, Harrison's articles provide the essential expertise and creative flair to turn your visions into reality. So, dive into the captivating world of home remodeling with Harrison Clayton and unlock the full potential of your living space with every word he writes.


