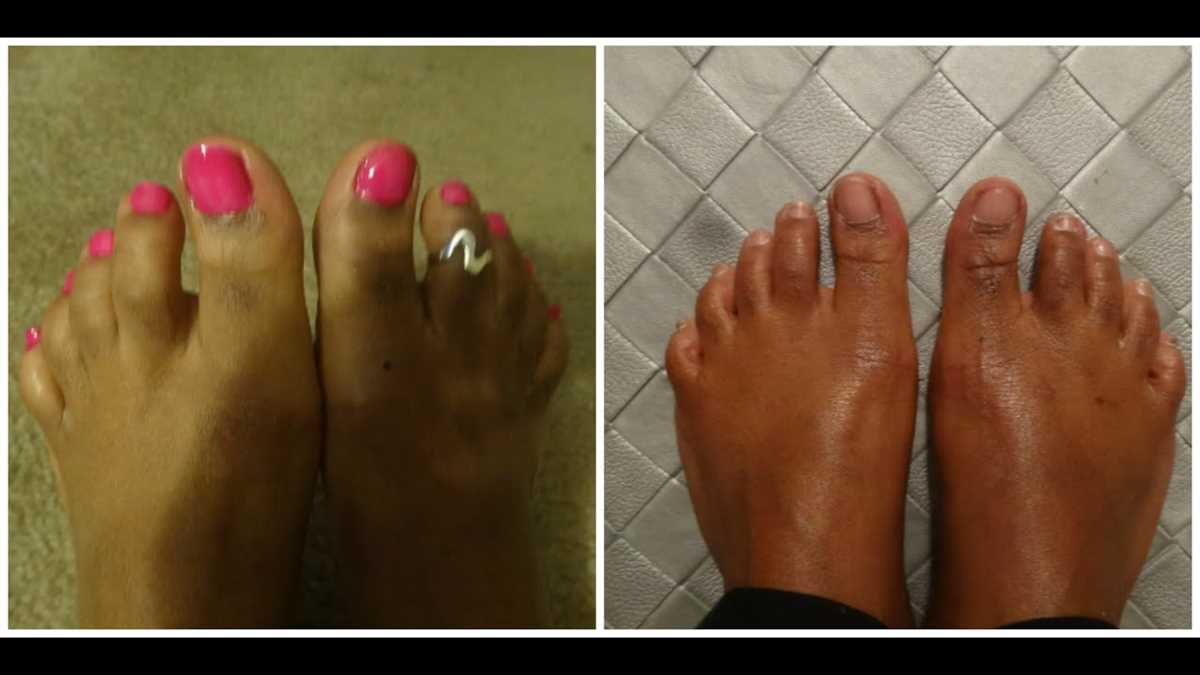
Easy and Safe Ways to Remove Gel Polish from Toes Without a Drill

If you love gel polish but dread the removal process, don’t worry – you’re not alone. Many people find it difficult to remove gel polish from their toes without using a drill. However, there are alternative methods that are easy and safe to use, saving you time, money, and potential damage to your nails. In this article, we will explore some of these methods and provide you with step-by-step instructions on how to remove gel polish from your toes without a drill.
One of the easiest and most effective methods to remove gel polish from your toes without a drill is by using acetone and aluminum foil. Start by soaking a cotton ball or pad in acetone and placing it directly on top of your gel-polished toenail. Then, wrap the cotton ball tightly with a small piece of aluminum foil to create a seal around your toe. Leave it on for about 10-15 minutes, allowing the acetone to penetrate the gel polish and break it down. After the time is up, gently remove the foil and cotton ball, and use a wooden stick or cuticle pusher to gently scrape off the softened gel polish. Repeat this process for each gel-polished toenail.
Another alternative method to safely remove gel polish from your toes is by using a gel polish remover kit. These kits typically include a specially formulated solution that helps break down the gel polish, as well as tools such as nail clips or caps to secure the solution in place. To use this method, simply apply the gel polish remover solution to your toenails, secure the nail clips or caps, and leave them on for the recommended amount of time. Afterward, remove the clips or caps and gently scrape off the gel polish using a wooden stick or cuticle pusher. This method is effective and requires minimal effort.
Now that you know some easy and safe ways to remove gel polish from your toes without a drill, you can enjoy the benefits of gel polish without worrying about the removal process. Remember to always prioritize the health and safety of your nails, and choose the method that works best for you. With a little patience and the right techniques, you can maintain beautiful and healthy toes even after removing gel polish.
Why You Should Remove Gel Polish from Toes Safely
Gel polish has become increasingly popular in recent years due to its long-lasting and durable nature. It is a great option for those who want to have beautifully painted toes for an extended period of time without the need for constant touch-ups. However, it is important to remove gel polish from toes safely to avoid any damage or harm to your nails and skin.

Prolonged Wear Can Cause Damage
While gel polish is designed to be long-lasting, leaving it on your toes for an extended period of time can lead to damage. The continuously applied pressure on your nails from socks, shoes, and everyday activities can cause the gel polish to chip or peel, which can lead to water seepage and potential infections.
Additionally, prolonged wear can cause your nails to become weak, brittle, and prone to breakage. This can be particularly problematic if you regularly wear closed-toe shoes, as they can further exacerbate the pressure and friction on your nails.
Safe Removal Preserves Nail Health
Safely removing gel polish from your toes is crucial to maintaining the health and strength of your nails. If the gel polish is not properly removed, you risk peeling or scraping off the top layer of your nails, leaving them thin and weak.
Using safe removal techniques, such as soaking the nails in acetone or using gel polish remover wraps, ensures that the gel polish loosens and lifts off without causing damage to the nails. This allows your nails to remain healthy and strong, ready for a new gel polish application or simply a break to breathe and rejuvenate.
Avoiding Skin Irritation and Sensitivity
Improper removal of gel polish can lead to skin irritation and sensitivity. Harsh scraping or filing techniques can damage the delicate skin around your nails, causing redness, inflammation, and discomfort.

By following a safe gel polish removal process, you can minimize the risk of skin irritation and sensitivity. Using cotton pads or foil wraps soaked in acetone, gentle pressure can be applied to loosen the gel polish without causing harm to the surrounding skin.
It is also important to moisturize your nails and cuticles after gel polish removal to keep them hydrated and prevent dryness or cracking.
Conclusion
Removing gel polish from toes safely is essential to protect the health and integrity of your nails and skin. Prolonged wear can cause damage, and improper removal techniques can lead to weakened nails and skin irritation. By following safe removal methods and giving your nails time to recover between gel polish applications, you can enjoy beautiful, healthy toes.
Step-by-Step Guide to Removing Gel Polish from Toes
Materials Needed:
- Acetone
- Cotton balls or pads
- Tin foil
- Orange stick or cuticle pusher
- Nail file or buffer
- Moisturizer or cuticle oil
Step 1: Prep the nails

Start by filing the top layer of the gel polish to remove the shine and break the seal. Be careful not to file too much, as this can damage the natural nail.
Step 2: Soak cotton balls or pads in acetone
Take a cotton ball or pad and saturate it with acetone. Make sure you have enough to completely cover your toenail.
Step 3: Place soaked cotton on the toes
Place the acetone-soaked cotton ball or pad onto the toenail, making sure it covers the entire nail. Repeat this step for each toe you are treating.

Step 4: Wrap toes in tin foil
Wrap each toe with the acetone-soaked cotton ball or pad in tin foil. This helps to hold the cotton in place and prevents the acetone from evaporating too quickly.
Step 5: Wait for 15-20 minutes
Allow the acetone to work its magic on the gel polish by leaving the wrapped toes on for 15-20 minutes. You can use this time to relax and catch up on your favorite TV show or read a book!
Step 6: Remove the foil and cotton

After the waiting time is up, carefully remove the tin foil and cotton from each toe. The gel polish should be visibly softened and lifting off the nail.
Step 7: Gently push off the gel polish
Use an orange stick or cuticle pusher to gently push off the softened gel polish from your nails. Be careful not to force it or scrape too hard, as this can damage the nail bed.
Step 8: Buff and moisturize
Once all the gel polish is removed, use a nail file or buffer to smooth out any rough edges or residue. Finish by applying a moisturizer or cuticle oil to nourish and hydrate your nails and skin.
Step 9: Repeat if necessary
If there is still some gel polish remaining or if you have multiple layers, you may need to repeat the soaking and removal process. Just be sure to give your nails a break in between to avoid excessive drying or damage.
Step 10: Finish with clean, healthy toenails
Now that your gel polish is successfully removed, take a moment to admire your clean and healthy-looking toenails. You can choose to apply a fresh coat of polish or leave them bare for a natural look.
With this step-by-step guide, you can easily and safely remove gel polish from your toenails without the need for a drill or professional help. Just remember to take your time and be gentle with your nails to keep them in the best possible condition.
Gather Your Supplies
Before you begin removing gel polish from your toes, gather all the necessary supplies. Having everything ready will make the process easier and more efficient.
Here’s what you’ll need:
- Acetone or gel polish remover
- Cotton pads or balls
- Tin foil or nail clips
- Emery board or nail file
- Cuticle pusher or orangewood stick
- Moisturizer or cuticle oil
- Protective gloves (optional)
Make sure the acetone or gel polish remover is specifically formulated for removing gel nail polish.
You can find these supplies at your local beauty supply store or online. Having everything on hand will save you time and make the process smoother.
Prepare Your Toes
To ensure a smooth and easy gel polish removal process, it is important to properly prepare your toes beforehand. Follow these steps to get your toes ready:
- Start by removing any existing nail polish from your toes using a non-acetone nail polish remover. Make sure to thoroughly clean all the nails to ensure that there is no residue left.
- Trim and file your nails to your desired length and shape. This will help in preventing any snagging or discomfort during the gel polish removal process.
- Prepare a bowl or basin of warm water and add a few drops of gentle soap. Soak your feet in the warm soapy water for about 10-15 minutes. This will help soften the gel polish and make it easier to remove.
- After soaking, gently pat your feet dry with a towel and inspect the condition of your nails. If there are any cuticles or hangnails, use a cuticle pusher or a cuticle remover tool to push back or remove them.
- Apply a thin layer of petroleum jelly or cuticle oil to the skin surrounding your nails. This will create a protective barrier and prevent the acetone from drying out your skin.
Once you have prepared your toes, you are ready to start the gel polish removal process using one of the safe and easy methods mentioned in this article.
Soak Your Toes
Soaking your toes is one of the easiest and safest ways to remove gel polish without using a drill. This method involves soaking your toes in a mixture of acetone and warm water, which helps to soften the gel polish and make it easier to remove.
What You’ll Need:
- A shallow basin or bowl
- Acetone nail polish remover
- Warm water
- A towel
- Cotton balls or paper towels
Step-by-step Guide:
- Fill the shallow basin or bowl with enough warm water to cover your toes.
- Add a few tablespoons of acetone nail polish remover to the warm water and mix it well.
- Place your feet in the basin or bowl, making sure the gel-polished toes are fully submerged in the acetone mixture.
- Allow your toes to soak for about 10 to 15 minutes. You can use this time to relax and unwind.
- After the soaking time, use a towel to gently remove your feet from the basin or bowl.
- Take a cotton ball or paper towel and gently rub it over the gel polish on your toes. The gel polish should start to peel off or loosen.
- If necessary, use a gentle scraping tool, such as a cuticle pusher or an orangewood stick, to help remove any stubborn gel polish.
- Repeat this process for each gel-polished toe until all the gel polish is removed.
- Once all the gel polish is removed, wash your feet with warm water and soap to remove any residue.
Remember to moisturize your feet after removing the gel polish to keep them hydrated and prevent dryness. Soaking your toes is a gentle and effective method for removing gel polish without the need for a drill. Give it a try and enjoy clean, polish-free toes!
Gently Scrape Off Gel Polish
To remove gel polish from your toes without a drill, you can opt for the gentle and effective method of scraping it off. This method requires a few tools and a delicate touch to safely remove the gel polish without causing any damage to your nails.
Here’s how you can gently scrape off gel polish from your toes:
- Gather the necessary tools: To scrape off gel polish, you will need an orange stick or a cuticle pusher, a nail file with a gentle grit, a bowl of warm water, and a towel or wipes for drying your toes.
- Prep your toes: Before you begin, make sure to wash your hands and feet thoroughly. Clip your nails, filing them to your desired length and shape. This will prevent the gel polish from catching on any jagged edges.
- Soak your toes: Fill a bowl with warm water and soak your toes for about five minutes. This will help soften the gel polish, making it easier to scrape off.
- Gently scrape off the gel polish: After soaking, pat your toes dry with a towel or wipes. Take the orange stick or cuticle pusher and carefully start scraping the gel polish from the edge of your nail. Be cautious not to apply too much pressure or scrape too aggressively, as this can damage your nails.
- File away any residue: Once you have successfully scraped off the gel polish, use a nail file with a gentle grit to remove any remaining residue. Gently buff your nails to smoothen them out.
- Moisturize your toes: After removing the gel polish, it’s essential to moisturize your toes and cuticles. Apply a nourishing cuticle oil or a moisturizing lotion to keep your nails and skin hydrated.
This gentle scraping method allows you to safely remove gel polish from your toes without the need for a drill. Remember to take your time and be gentle to avoid any damage or discomfort. If you encounter any difficulties or stubborn gel polish, it’s advisable to seek assistance from a professional nail technician.
Buff and Shape Your Nails
When removing gel polish from your toes, it’s important to also buff and shape your nails to ensure they are looking their best. Here are some easy steps to follow to buff and shape your nails at home:
1. Gather the necessary supplies
Before you start buffing and shaping your nails, make sure you have all the necessary supplies. You will need a nail buffer, a nail file with different grits (coarse, medium, and fine), and a cuticle pusher or orange stick.
2. Start by filing your nails
Using the coarse side of the nail file, gently file your nails to your desired shape. If you prefer square nails, file them straight across. If you prefer round nails, file them in a curved shape. Be careful not to file too aggressively or you may damage your nails. Once you have achieved your desired shape, switch to the medium grit and then the fine grit to smooth out any rough edges.
3. Buff your nails
After filing, it’s time to buff your nails to give them a smooth and shiny finish. Take your nail buffer and gently rub it across the surface of your nails in a back-and-forth motion. This will help to remove any ridges or imperfections, giving your nails a polished look. Be careful not to buff too much, as this can weaken your nails.
4. Push back your cuticles
Using a cuticle pusher or orange stick, gently push back your cuticles. This will create a clean and neat look for your nails. Be careful not to cut your cuticles, as this can lead to infections or damage to the nail bed.
5. Moisturize and protect
After buffing and shaping your nails, it’s important to moisturize them to keep them healthy and hydrated. Apply a cuticle oil or a moisturizing cream to your nails and cuticles. This will help to nourish and protect your nails. Additionally, consider applying a base coat before applying any nail polish to further protect your nails.
By following these simple steps, you can easily and safely buff and shape your nails at home. Remember to be gentle and take your time to achieve the best results. Happy nail care!
Moisturize Your Toes
After removing the gel polish from your toes, it’s important to moisturize them to keep them hydrated and healthy. Here are some ways you can moisturize your toes:
- Apply a foot cream: Look for a moisturizing foot cream that contains ingredients like shea butter, coconut oil, or hyaluronic acid. Apply a generous amount of cream to your toes and massage it in gently. This will help to nourish and soften your skin.
- Use a moisturizing oil: Another option is to use a moisturizing oil, such as jojoba oil or almond oil. Apply a few drops of oil to your toes and massage it in. Oils can help to lock in moisture and prevent dryness.
- Try a foot mask: Foot masks are a great way to deeply moisturize your toes. Look for a foot mask that contains moisturizing ingredients like glycerin or aloe vera. Apply the mask to your toes, leave it on for the recommended amount of time, and then remove it. Your toes will feel soft and hydrated afterwards.
Remember to moisturize your toes regularly, especially after removing gel polish, to keep your skin healthy and prevent dryness and cracking.
Protect and Prevent
1. Use a base coat:
Before applying gel polish, always start with a clear base coat. This will create a protective layer between your nails and the pigmented polish, preventing staining and damage.
2. Avoid picking at your polish:
It can be tempting to pick at chipped or peeling gel polish, but try to resist the urge. Picking can damage the top layer of your nails and make removal more difficult.
3. Remove gel polish properly:
When it’s time to remove your gel polish, always follow the proper removal process. Soaking your nails in acetone or using a gel polish remover specifically designed for the task will help prevent damage to your nails.
4. Keep nails hydrated:
Dry and brittle nails are more prone to damage, so make sure to keep your nails hydrated. Apply cuticle oil regularly and use a moisturizing hand cream to nourish your nails and cuticles.
5. Limit gel polish applications:
Gel polish can be tough on your nails, so try to limit how often you apply it. Give your nails some time to breathe and recover between gel polish applications to maintain their health.
6. Use a gentle nail file:
If you need to shape or file your nails, use a gentle nail file to minimize damage. Avoid using rough, metal files that can cause splintering or peeling.
7. Avoid excessive nail treatments:
Constantly exposing your nails to harsh chemicals and treatments can weaken them. Try to limit the use of nail hardeners, acrylics, gels, and other products that can damage your nails.
8. Protect nails during household chores:
When doing household chores such as washing dishes or cleaning, protect your nails by wearing gloves. This will prevent them from coming into contact with harsh chemicals and water, which can weaken the nail bed.
9. Maintain a healthy diet:
A healthy diet rich in vitamins and minerals can promote nail health. Make sure to include foods that are high in protein, biotin, and omega-3 fatty acids to keep your nails strong and healthy.
10. Seek professional help if needed:
If you’re struggling with nail damage or have concerns about the condition of your nails, don’t hesitate to seek the help of a professional nail technician or dermatologist. They can provide guidance and treatments to help restore and protect your nails.
Seek Professional Help if Needed
If you are unsure about removing gel polish from your toes or if you have any concerns, it is always best to seek professional help. A trained nail technician or podiatrist will have the expertise and proper tools to safely remove the gel polish without causing damage to your nails or skin.
Professional nail technicians have experience in handling gel polish removal and can ensure that the process is done correctly. They will use specialized tools and techniques to gently remove the gel polish, minimizing the risk of damage to your natural nails.
If you have any underlying nail conditions or medical issues, it is especially important to consult a professional. They will be able to assess your situation and provide personalized advice and treatment options.
Remember that improper gel polish removal can lead to nail damage, including nail thinning, peeling, or brittleness. It is better to be safe than sorry when it comes to your nail health, so don’t hesitate to reach out to a professional if you have any doubts.
Additionally, seeking professional help can also be beneficial if you are short on time or simply prefer to have your gel polish removed by a trained specialist. They can efficiently and effectively remove the polish, allowing you to save time and effort.
Overall, while there are easy and safe methods to remove gel polish from your toes at home, professional assistance is always a reliable option. They can provide expert guidance and ensure that your gel polish is removed without any negative effects on your nails.
FAQ:
What is gel polish?
Gel polish is a type of nail polish that is cured under a UV or LED lamp. It is known for its long-lasting and chip-resistant properties.
Can I remove gel polish from my toes without using a drill?
Yes, you can remove gel polish from your toes without using a drill. There are several easy and safe methods you can try at home.
What are some easy ways to remove gel polish from toes?
One easy way to remove gel polish from toes is to soak your feet in warm water and gently peel off the polish. Another method is to use acetone and aluminum foil to wrap your toes and let it sit for a few minutes before removing the polish.
Is it safe to remove gel polish without a drill?
Yes, it is safe to remove gel polish without a drill. Using gentle methods like soaking your feet or using acetone will not damage your nails if done correctly.
What can I use instead of a drill to remove gel polish from my toes?
Instead of a drill, you can use other tools like a cuticle pusher or an orange stick to gently scrape off the gel polish from your toes.
How long does it take to remove gel polish from toes without a drill?
The time it takes to remove gel polish from toes without a drill can vary depending on the method you choose and the thickness of the polish. It can take anywhere from 15 minutes to an hour.
Are there any alternative methods to remove gel polish from toes?
Yes, besides soaking your feet and using acetone, you can also try using a gel polish remover solution or using a gel polish peel-off base coat for easy removal.
Video:

Meet Harrison Clayton, a distinguished author and home remodeling enthusiast whose expertise in the realm of renovation is second to none. With a passion for transforming houses into inviting homes, Harrison's writing at https://thehuts-eastbourne.co.uk/ brings a breath of fresh inspiration to the world of home improvement. Whether you're looking to revamp a small corner of your abode or embark on a complete home transformation, Harrison's articles provide the essential expertise and creative flair to turn your visions into reality. So, dive into the captivating world of home remodeling with Harrison Clayton and unlock the full potential of your living space with every word he writes.