Drilling into acrylic: A step-by-step guide

Acrylic, a popular material known for its versatility and durability, is a common choice for various DIY projects and home improvements. Whether you’re working on a craft project or installing a new shelf, drilling into acrylic may seem intimidating at first. However, with the right tools and techniques, you can easily achieve clean and precise holes in this sturdy material.
Before you begin, it’s important to gather the necessary materials. You will need a drill with a drill bit specifically designed for acrylic, such as a brad point bit or a diamond-coated bit. Additionally, you’ll need a piece of scrap acrylic to practice on, a clamp to secure the acrylic, masking tape to prevent cracking, and safety goggles for eye protection.
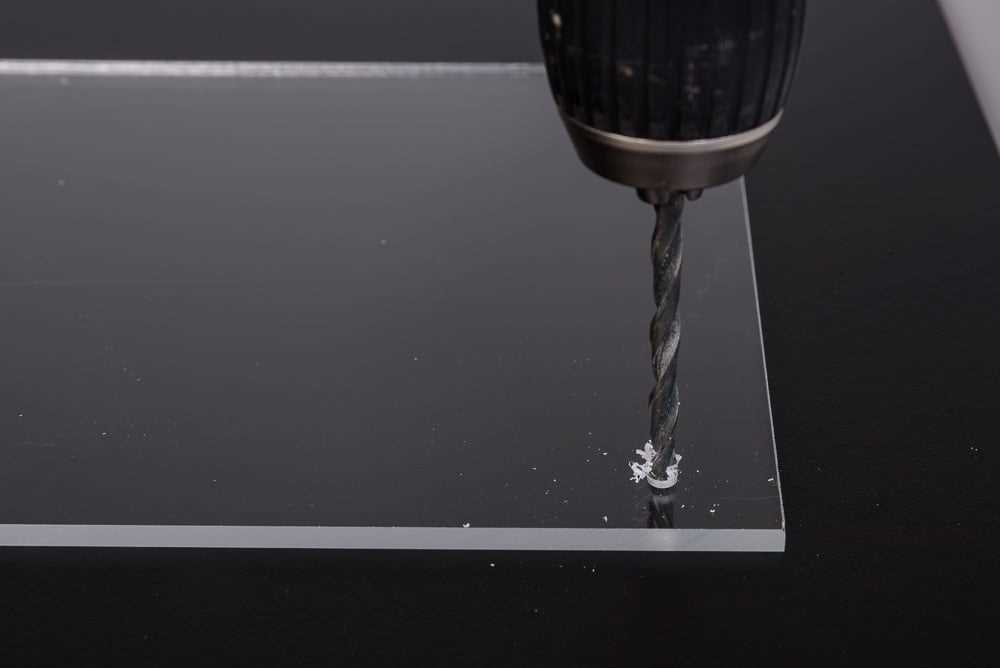
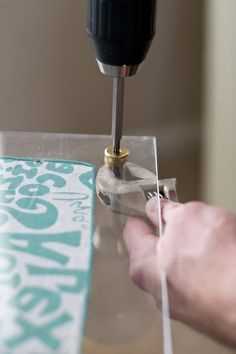
The first step in drilling into acrylic is to mark the spot where you want to drill. Use a pencil or a marker to make a small dot on the surface of the acrylic. Next, secure the acrylic piece in place using a clamp to prevent it from moving while you drill. This will ensure accurate and clean holes without any unwanted marks.
Once you’re ready to start drilling, it’s important to use a slow speed setting on your drill. Acrylic is prone to melting or chipping if drilled too quickly. Apply firm but gentle pressure on the drill as you begin to create the hole. It’s important to let the drill bit do the work and avoid pushing too hard, as this can cause the acrylic to crack.
To minimize the risk of cracking or chipping, it’s recommended to place a piece of masking tape over the area where you’ll be drilling. This will help to stabilize the acrylic and reduce vibrations. Start drilling at a slow speed and gradually increase it as you make progress. Take breaks periodically to prevent the acrylic from overheating.

Once you have drilled through the acrylic, remove any remaining tape and dust. Use a clean cloth or a brush to wipe away any debris. If the hole is not as clean as you would like, you can use a deburring tool or a file to smoothen the edges. This will give your project a professional and finished appearance.
With these step-by-step instructions, drilling into acrylic doesn’t have to be a daunting task. By taking the proper precautions and using the right tools, you can achieve precise and clean holes in acrylic for all your DIY projects.
Choosing the Right Tools
When it comes to drilling into acrylic, it is crucial to use the right tools to avoid causing damage to the material. Here are some key tools you will need:
1. Drill bits
It is important to choose drill bits that are specifically designed for drilling into acrylic. These bits have a sharp cutting edge and a low spiral angle, which helps to reduce the risk of chipping or cracking the acrylic. Carbide-tipped bits or diamond-coated bits are commonly used for drilling acrylic.
2. Drill machine
A drill machine with adjustable speed and torque settings is recommended for drilling into acrylic. This will allow you to control the drilling process and prevent excessive force or heat buildup that could damage the acrylic.

3. Clamps
Using clamps to secure the acrylic sheet in place during drilling is essential to ensure stability and prevent the material from shifting. You can use C-clamps or spring clamps to hold the acrylic firmly in position.
4. Lubricant
Applying a lubricant, such as cutting oil or water, to the drill bits can help to reduce friction and heat during the drilling process. This can prevent the acrylic from melting or cracking due to excessive heat buildup.
5. Safety gear
Always wear safety gear, including safety glasses and gloves, when drilling into acrylic. This will protect your eyes and hands from flying debris and ensure your safety during the drilling process.
By using the right tools and taking necessary precautions, you can drill into acrylic successfully and achieve clean and precise holes without damaging the material.

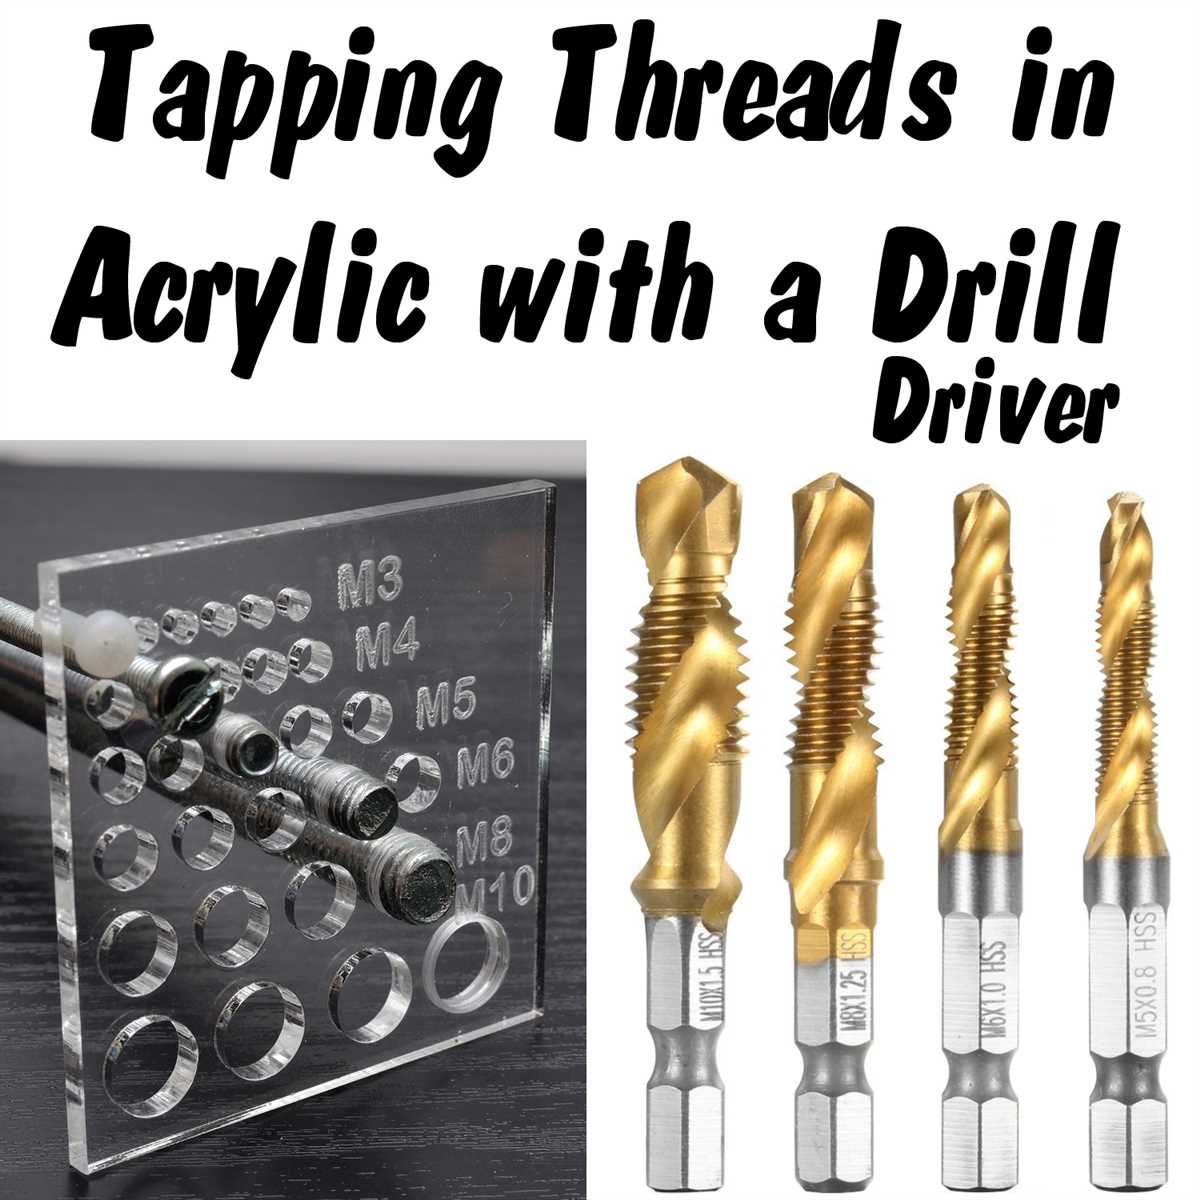
Selection of Drill Bits
Choosing the right drill bit is crucial when drilling into acrylic. The wrong drill bit can cause cracks, chips, or melting of the material. Here are some tips to help you select the appropriate drill bit for acrylic:
- High-speed steel (HSS) or carbide drill bits: These are the most commonly used drill bits for drilling acrylic. HSS and carbide drill bits are known for their durability and can withstand the heat generated during the drilling process.
- Size of the drill bit: The size of the drill bit should be chosen according to the size of the hole you need to drill. Smaller holes require smaller drill bits, while larger holes need larger drill bits. Make sure to measure the diameter of the hole accurately before selecting the drill bit.
- Straight fluted drill bits: Straight fluted drill bits work well for drilling into acrylic. The straight flutes help in the evacuation of chips and prevent them from clogging the hole.
- Sharp cutting edges: Look for drill bits with sharp cutting edges. Dull or worn-out drill bits can cause rough drilling and increase the chances of material damage.
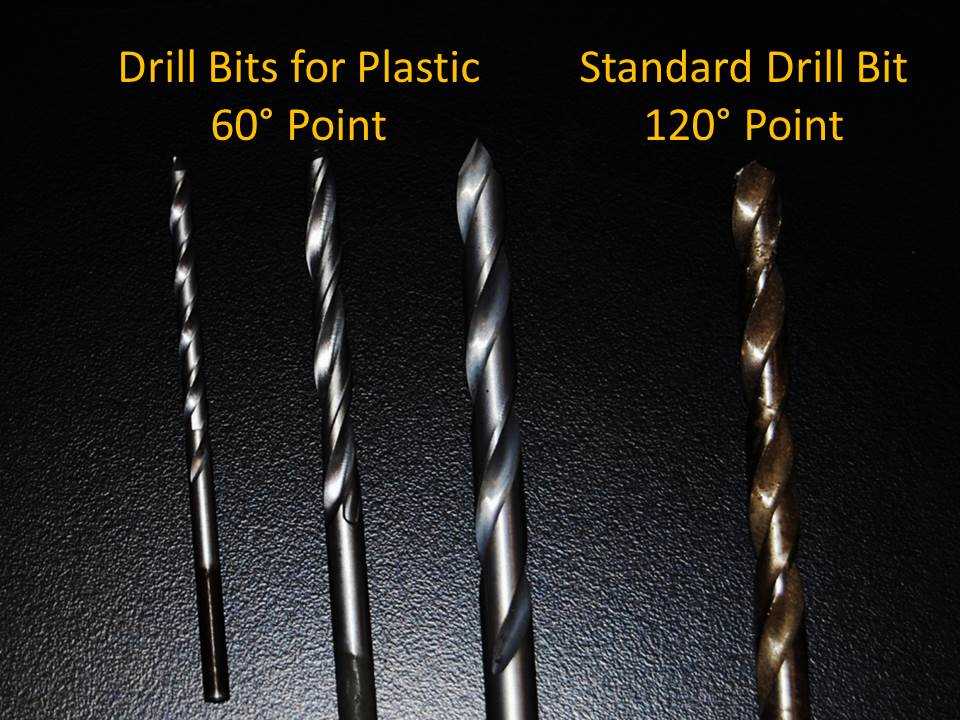
- Point angle: Drill bits with a sharp point angle of 60 degrees or less are recommended for drilling acrylic. This angle helps in reducing the pressure applied on the material during drilling, thereby reducing the risk of cracks or melting.
- Coated drill bits: Coated drill bits, such as titanium or cobalt-coated bits, can provide additional protection and prolong the lifespan of the drill bit. These coatings reduce friction and heat buildup, which can be beneficial when drilling into acrylic.
It is important to remember to use a steady hand and a slow drilling speed when working with acrylic. Applying too much pressure or drilling at a high speed can lead to material damage. Always wear safety goggles and a face mask to protect yourself from flying debris.
By selecting the right drill bit and following proper drilling techniques, you can achieve clean and precise holes in acrylic without any damage.
Power Tools vs. Hand Tools
Benefits of Power Tools
- Efficiency: Power tools are generally faster and more efficient than hand tools. They can complete tasks in a fraction of the time it would take with manual tools.
- Power: Power tools are able to tackle tougher materials and more difficult tasks. They have the strength and force necessary for heavy-duty drilling and cutting.
- Precision: Many power tools have built-in features that provide precise measurements and cuts. This helps ensure accuracy and a professional finish.
- Versatility: Power tools come in a wide variety of options, each designed to perform specific tasks. This versatility allows for a greater range of potential projects and applications.
- Less physical strain: Power tools require less physical effort to operate compared to hand tools. This can reduce fatigue and strain on the user’s body, allowing them to work for longer periods without discomfort.
Advantages of Hand Tools
- Portability: Hand tools are generally smaller and lighter than power tools, making them easier to transport and use in different locations.
- Precision: Some tasks, such as fine detailing or delicate work, may require the precision that can only be achieved with hand tools. Their manual control allows for greater sensitivity and finesse.
- No power source needed: Hand tools do not require electricity or batteries to operate. This makes them ideal for remote or off-grid projects.
- Quieter operation: Unlike power tools, hand tools produce less noise, which can be advantageous in sensitive environments or when working in close proximity to others.
- Lower cost: Hand tools are generally more affordable than power tools, making them a more budget-friendly option for those on a tight budget or who only require occasional use.
When it comes to choosing between power tools and hand tools, the decision ultimately depends on the specific project, the user’s preferences, and the available resources. Power tools offer greater speed, power, and efficiency, making them ideal for larger, complex tasks. On the other hand, hand tools provide precision, portability, and a more budget-friendly option. It’s important to assess the requirements of the project and determine which tool best suits the needs and capabilities of the user.
Preparing the Acrylic
Cleaning the Acrylic
Before you begin drilling into the acrylic, it’s important to ensure that the surface is clean and free from any debris or oils. This will help prevent any damage to the material and ensure a smooth drilling process.

To clean the acrylic, you can use a mild soap or acrylic cleaner and a soft cloth or sponge. Gently wipe down the surface of the acrylic, paying extra attention to any areas that may have accumulated dirt or dust.
Once you have cleaned the acrylic, rinse it thoroughly with clean water to remove any residue from the soap or cleaner. Make sure to dry the acrylic completely before proceeding to the next step.
Marking the Drill Points
Before you start drilling, it’s essential to mark the drill points on the acrylic. This will help ensure accurate placement and prevent any mistakes during the drilling process.
- Measure and mark the desired locations for the drill holes on the acrylic. You can use a ruler or measuring tape to obtain precise measurements.
- Use a permanent marker or a sharp pencil to make small dots or marks on the acrylic at the designated drill points. Make sure the marks are clearly visible and will not be covered up during the drilling process.
Securing the Acrylic
To prevent the acrylic from cracking or splintering during drilling, it’s important to secure it properly. Here are a few methods you can use to secure the acrylic while drilling:

- Clamping: If you have a clamp or vise, you can secure the acrylic by gently tightening the clamp around the edges of the material. Make sure not to overtighten the clamp, as this may cause damage to the acrylic.
- Backing Material: Placing a piece of scrap wood or another sturdy material behind the acrylic can help provide support and prevent cracking or chipping. Simply position the backing material against the area you plan to drill and hold it firmly in place.
- Masking Tape: Applying masking tape over the drill points can help prevent the drill bit from slipping during drilling. The tape provides a better grip and protects the surface of the acrylic from scratches.
Choosing the Right Drill Bit
Selecting the appropriate drill bit is crucial for drilling into acrylic. Using the wrong bit may cause the material to crack, chip, or melt. To ensure successful drilling, it’s recommended to use a drill bit specifically designed for acrylic or plastic.
Look for drill bits with a sharp point and a low flute count. These types of bits provide better control and reduce the risk of cracking or chipping. Avoid using drill bits with a wide, aggressive thread, as they can cause the material to melt or warp.
It’s also important to choose the right size drill bit for the desired hole. Measure the diameter of the screws or fittings you plan to use, and select a drill bit that matches or is slightly larger in size.
Measuring and Marking
Before drilling into acrylic, it is important to measure and mark the desired location accurately. This ensures that the holes are evenly spaced and in the correct position.
Here are the steps to measure and mark the acrylic:
- Identify the drilling area: Determine where the holes need to be drilled on the acrylic sheet. Use a pencil or marker to make small marks on the surface as a guide.
- Measure and mark: Use a ruler or measuring tape to measure the distance between the marks. Ensure that the measurements are consistent and precise.
- Use a straight edge: If drilling multiple holes in a straight line, use a straight edge, such as a ruler or a piece of wood, to connect the marks and create a straight line.
- Create a template: If drilling holes in a specific pattern or shape, create a template out of paper or cardboard. Place the template on the acrylic and mark the hole locations accordingly.
By taking the time to measure and mark the acrylic correctly, the drilling process will be much smoother and more accurate. This helps to prevent any mistakes or misalignment, ensuring a professional-looking end result.
Securing the Acrylic
Step 1: Choose a work surface
Before securing the acrylic, it is important to choose a suitable work surface. The work surface should be sturdy and stable, and preferably made of a material that won’t get damaged by the drilling process, such as wood or plastic.
Step 2: Mark the drilling spots
Using a marker or a pencil, mark the drilling spots on the acrylic sheet. Measure and mark the spots accurately, ensuring that they are evenly spaced and aligned according to your desired design.
Step 3: Use clamps or a vice
To secure the acrylic sheet in place, use clamps or a vice. Place the sheet on the work surface and position the clamps or vice jaws on the edges of the sheet. Tighten the clamps or vice to secure the acrylic in place, making sure that it is held tightly and won’t move during the drilling process.
Step 4: Protect the surface
Before drilling, it is important to protect the surface of the acrylic sheet from scratches or damage. Place a scrap piece of acrylic or plywood underneath the sheet to act as a sacrificial surface. This will help prevent any tear-out or chipping that may occur when drilling through the acrylic.
Step 5: Ready to drill
Once the acrylic sheet is securely clamped and the surface is protected, you are ready to start drilling. Make sure you have chosen the right drill bit for acrylic and set your drill to the appropriate speed. Use steady pressure and drill slowly to avoid cracking or shattering the acrylic.
Step 6: Clean up
After drilling the desired holes, remove the clamps or vice and clean up any debris or dust. Carefully remove the protective scrap piece from underneath the acrylic sheet. Inspect the drilled holes to ensure they are clean and smooth, and make any necessary adjustments or refinements if needed.
Following these steps will help you securely position and protect the acrylic sheet while drilling. With proper technique and precautions, you can achieve clean and precise holes in acrylic for your desired project.
Drilling Techniques
When drilling into acrylic, it is important to use the correct techniques to avoid cracking or shattering the material. Here are some guidelines to follow when drilling into acrylic:
1. Use the Right Drill Bit
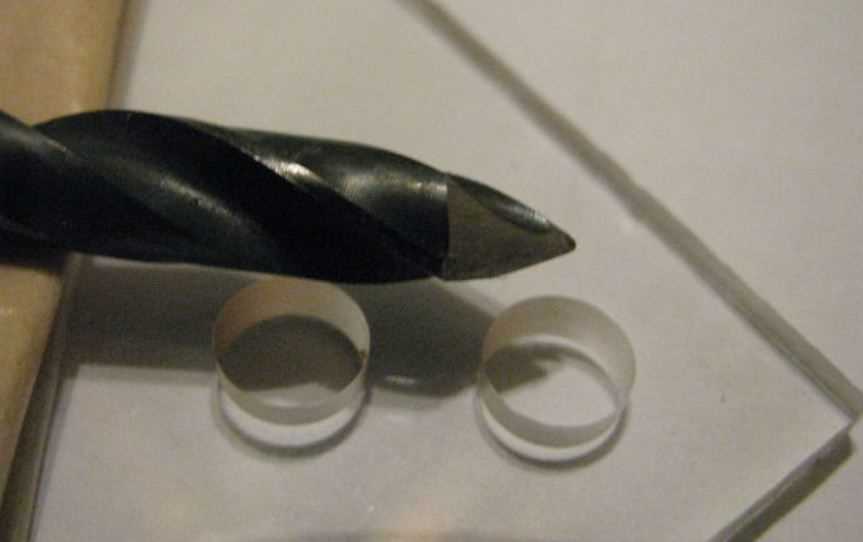
Acrylic is a relatively soft material, so it is important to use a drill bit that is designed specifically for drilling into acrylic. A spiral point or brad-point drill bit is recommended, as they are designed to reduce the risk of chipping or cracking the material.
2. Start with a Pilot Hole
Before drilling a larger hole, it is a good idea to start with a pilot hole. This will help guide the drill bit and prevent it from slipping or wandering off track. Use a smaller drill bit than the size of the final hole you need, and drill the pilot hole at a slow speed to minimize heat buildup.
3. Use a Clamping or Support System
When drilling into acrylic, it is important to secure the material in place to prevent it from cracking or shifting during the drilling process. Use clamps or a support system to hold the acrylic firmly in place, ensuring that it is stable and will not move when pressure is applied.
4. Drill at a Slow Speed
Drilling into acrylic at a high speed can generate heat, which can cause the material to melt or crack. To avoid this, it is recommended to drill at a slow speed, starting with the pilot hole and gradually increasing the speed as you drill the larger hole.
5. Use Light Pressure
When drilling into acrylic, it is important to use light pressure to avoid putting too much stress on the material. Applying excessive force can lead to cracking or shattering. Let the drill bit do the work, and avoid forcing it through the acrylic.
6. Use Coolant or Lubricant
Using a coolant or lubricant can help dissipate heat and reduce the risk of melting or cracking the acrylic. Apply a small amount of coolant or lubricant to the drill bit and the drilling area to keep the temperature down and ensure smooth drilling.
7. Clean the Drill Bit and Acrylic
After drilling, clean the drill bit and the acrylic to remove any debris or acrylic shavings. This will help prevent contamination and ensure a smooth finish. Use a clean cloth or a soft brush to gently wipe away any remaining debris.
By following these drilling techniques, you can successfully drill into acrylic without damaging or compromising the material. Remember to take your time, use the right tools, and work with caution to achieve the desired results.
Pilot Hole
Before drilling into acrylic, it is important to create a pilot hole. A pilot hole is a small hole that acts as a guide for the drill bit, ensuring that the hole is drilled in the correct position and at the desired angle.
To create a pilot hole, follow these steps:
- Choose the appropriate size of drill bit for your pilot hole. The size of the drill bit should be smaller than the final hole size you want to achieve.
- Secure the acrylic piece in place using clamps or a vise to prevent it from moving while drilling.
- Select the location where you want to drill the hole and mark it with a pencil or a marker. Double-check the placement to ensure accuracy.
- Position the drill bit at a 90-degree angle to the acrylic surface, aligning it with the marked spot. Apply gentle pressure to the drill bit and start drilling slowly. It is important to start off with a slow speed to prevent the acrylic from cracking or shattering.
- Continue drilling until the pilot hole is complete. Take breaks if needed to prevent the acrylic from overheating. Remove any acrylic chips or dust that may accumulate during the drilling process.
- Once the pilot hole is finished, you can proceed to enlarge it with a larger drill bit to achieve the desired hole size. Remember to use slow and steady pressure while drilling to avoid damaging the acrylic.
Creating a pilot hole before drilling into acrylic is an essential step that helps ensure accurate and clean holes. By following these steps, you can successfully create a pilot hole and proceed with drilling into acrylic.
Drilling at the Correct Speed
When drilling into acrylic, it is important to use the correct drilling speed to prevent cracking or melting of the material. The drilling speed will vary depending on the thickness of the acrylic and the type of drill bit being used.
1. Determine the Thickness of the Acrylic
The first step is to determine the thickness of the acrylic you are drilling into. This is important because the thickness will affect the drilling speed. Thicker acrylic will require a slower drilling speed, while thinner acrylic can be drilled at a faster speed.
2. Refer to the Manufacturer’s Guidelines
Check the manufacturer’s guidelines or instructions for the acrylic you are working with. They may provide specific recommendations for drilling speeds based on the thickness of the material. Following these guidelines will help ensure that you are drilling at the correct speed.
3. Start at a Slow Speed
It is always best to start drilling at a slow speed and gradually increase the speed if needed. This will allow you to have better control and reduce the risk of cracking or overheating the acrylic. If you notice any signs of melting or chipping, reduce the drilling speed immediately.
4. Use the Correct Drill Bit
Using the correct drill bit is essential for drilling acrylic. A drill bit specifically designed for acrylic or plastic materials will have a sharper tip and a higher flute count. These features will help prevent chipping and create clean holes. Make sure to choose the right drill bit for the job.
5. Use Lubrication
Applying a small amount of lubrication, such as a lubricating oil or water, can help reduce heat and friction while drilling. This will help prevent the acrylic from melting or cracking. Apply the lubrication directly to the drill bit and the drilling area. Be careful not to use too much lubrication as it may interfere with the drilling process.
6. Work in Short Bursts
When drilling into acrylic, it is recommended to work in short bursts instead of applying continuous pressure. This allows the acrylic to cool down and prevents overheating. Drill a small section, then release pressure and allow the acrylic to cool before continuing. This will help maintain the integrity of the material and minimize the risk of damage.
By following these guidelines and drilling at the correct speed, you can ensure successful drilling into acrylic without damaging the material.
Drilling at the Correct Angle
When drilling into acrylic, it is crucial to drill at the correct angle in order to avoid cracking or chipping the material. Here are some important tips to keep in mind:
- Choose the right drill bit: Use a drill bit specifically designed for acrylic. These bits have a sharp point and a flute design that helps to reduce the risk of chipping.
- Mark your drilling spot: Before you begin drilling, use a pencil or a marker to mark the spot where you want to drill. This will ensure that you drill at the correct location.
- Secure the acrylic: Place the acrylic sheet on a sturdy surface and clamp it down if possible. This will prevent it from moving or vibrating while you drill.
- Start with a pilot hole: It’s a good idea to start with a small pilot hole before drilling the full-sized hole. This will help to guide the drill bit and reduce the risk of the acrylic cracking.
- Drill slowly and steadily: When drilling, apply gentle pressure and maintain a slow and steady speed. This will help to prevent the acrylic from overheating and reduce the risk of chipping or cracking.
- Use a backing material: If you are drilling through a thin piece of acrylic, place a piece of scrap wood or another sturdy material underneath it. This will help to support the acrylic and prevent it from cracking or breaking.
By following these tips and drilling at the correct angle, you can successfully drill into acrylic without damaging the material. Take your time, use the right tools, and be mindful of the pressure you apply to ensure a clean and precise hole.
FAQ:
What are the necessary steps to drill into acrylic?
The necessary steps to drill into acrylic include selecting the right drill bit, marking the drilling spot, clamping the acrylic, using a pilot hole, drilling at a slow speed, and using consistent pressure.
What type of drill bit should be used for drilling into acrylic?
For drilling into acrylic, it is recommended to use a drill bit specifically designed for plastics or acrylics. These drill bits have a sharper point and are made from materials that reduce the chance of cracking or melting the acrylic.
How should I mark the drilling spot on acrylic?
To mark the drilling spot on acrylic, you can use a marker or a piece of tape. Place the mark or tape where you want to drill the hole, ensuring it is securely in place and will not move during drilling.
What precautions should I take when drilling into acrylic?
When drilling into acrylic, it is important to wear safety goggles to protect your eyes from debris. Additionally, drilling at a slow speed and using consistent pressure can help prevent cracking or melting of the acrylic. It is also a good idea to start with a small pilot hole before drilling the final size hole.
Video:


Meet Harrison Clayton, a distinguished author and home remodeling enthusiast whose expertise in the realm of renovation is second to none. With a passion for transforming houses into inviting homes, Harrison's writing at https://thehuts-eastbourne.co.uk/ brings a breath of fresh inspiration to the world of home improvement. Whether you're looking to revamp a small corner of your abode or embark on a complete home transformation, Harrison's articles provide the essential expertise and creative flair to turn your visions into reality. So, dive into the captivating world of home remodeling with Harrison Clayton and unlock the full potential of your living space with every word he writes.


