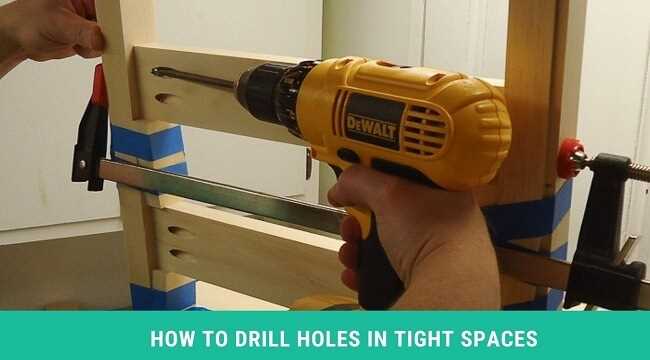
Drilling in a Tight Corner: Tips and Tricks for Getting the Job Done

Drilling can sometimes be a challenging task, especially when you find yourself in a tight corner. Whether you’re working on a home improvement project or a professional job, it’s important to have the right techniques and tools to get the job done efficiently and accurately.
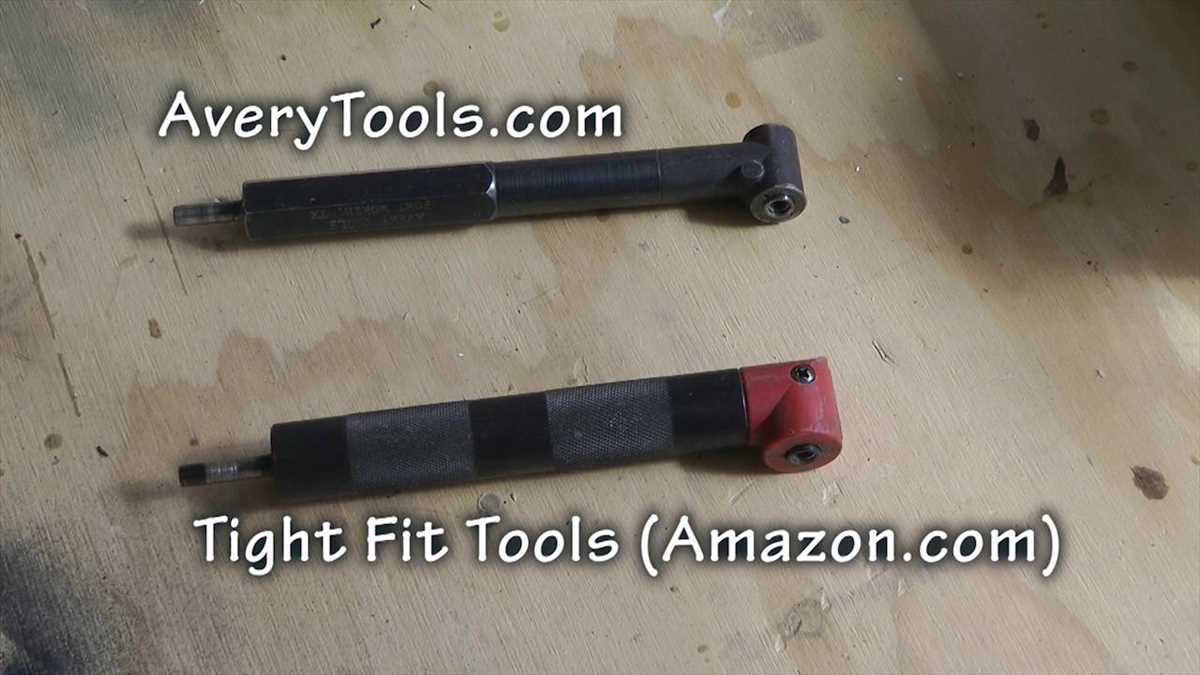
One of the first tips for drilling in a tight corner is to use a flexible extension shaft. This allows you to access hard-to-reach areas without straining yourself or damaging the surrounding surfaces. Additionally, using a right-angle attachment can also be helpful in situations where the drill itself cannot fit comfortably in the corner.
Another important consideration is the type of drill bit you use. When drilling in a tight corner, it’s crucial to choose a bit with a shorter length to ensure better control and precision. Additionally, opting for a smaller diameter can also help prevent any accidents or unwanted damages to the surrounding area.
To further enhance your drilling experience in a tight corner, consider using a pilot hole. This involves drilling a small hole as a guide before drilling the actual hole. This technique not only helps you maintain accuracy but also reduces the chances of the drill bit slipping or wandering off course.
In conclusion, drilling in a tight corner requires a combination of proper techniques and the right tools. By using flexible extension shafts, right-angle attachments, appropriate drill bits, and pilot holes, you can ensure that your drilling job is executed efficiently, safely, and without unnecessary damages.

The Importance of Drilling in Tight Corners
When it comes to drilling, there are times when you may find yourself needing to work in tight corners. While this can be a challenging task, mastering the art of drilling in tight corners is essential for many construction and DIY projects. Here are a few reasons why drilling in tight corners is important:
Precision and Accuracy
Working in tight corners often requires a higher level of precision and accuracy. These areas may be difficult to reach and maneuver, making it crucial to ensure that each hole is drilled in the correct spot. Precision is important to maintain the alignment and structural integrity of the project.
Space Optimization
Tight corners often present limited space for maneuvering. By drilling in these areas, you can maximize the available space and create functional designs. This is particularly important in situations where every inch counts, such as when installing shelves or cabinets in a small room.
Professionalism and Aesthetics
Drilling in tight corners can help create a more professional and polished look. By neatly drilling holes in obscure or hard-to-reach places, you can hide unsightly cables, pipes, or other components, giving your project a clean and seamless appearance.
Multifunctionality
By mastering the technique of drilling in tight corners, you can expand your versatility as a DIYer or construction worker. Being able to work in small and challenging spaces opens up a whole new range of project possibilities. You can tackle unconventional designs and find unique solutions to common problems.

Challenges and Skills
Drilling in tight corners presents its own set of challenges that require specific skills and techniques to overcome. By practicing and honing your skills in this area, you can become a more well-rounded and capable worker. These skills can be useful in various other aspects of construction, maintenance, and repair work.
In conclusion, drilling in tight corners is an important skill to master in the construction and DIY world. It requires precision, space optimization, professionalism, and offers new project possibilities. By embracing the challenges and developing the necessary skills, you can become a more versatile and capable worker.
Planning and Preparation
1. Assess the Corner
Before you start drilling in a tight corner, it’s important to assess the space and understand the specific challenges you may face. Consider factors such as the angle of the corner, the materials you will be drilling into, and any obstacles that may be present.
2. Choose the Right Drill and Bits
Using the right drill and drill bits can make a big difference when drilling in a tight corner. Consider the size and type of hole you need to make, as well as the materials you will be drilling into. Make sure to use drill bits that are specifically designed for the materials you are working with.

3. Mark Your Hole
Before drilling, mark the location of the hole you want to create. This will help ensure accuracy and help you avoid potential mistakes or damage. Use a pencil or a marker to clearly mark the spot.
4. Clear the Area
Before drilling, make sure the area around the corner is clear of any obstructions or debris. This will allow you to have a clear and unobstructed workspace, minimizing the risk of accidents or damage.
5. Use a Guide
Using a guide can greatly improve your accuracy and control when drilling in a tight corner. A guide can be as simple as a piece of scrap wood or as complex as a specialized drilling guide. It will help keep your drill bit aligned and prevent it from wandering off course.
6. Gradually Increase Drill Speed
When drilling in a tight corner, it’s important to start at a slower speed and gradually increase the speed as you go. This will help prevent any sudden movements or jerks that could cause damage or injuries.
7. Use Proper Safety Equipment
Always use proper safety equipment, such as safety goggles, gloves, and ear protection, when drilling in a tight corner. This will help protect you from potential hazards, such as flying debris or noise damage.

8. Keep a Firm Grip
When drilling in a tight corner, it’s important to maintain a firm grip on the drill. This will help you maintain control and prevent any unexpected movements or slips.
9. Take Breaks and Stay Hydrated
Drilling in a tight corner can be physically demanding, especially if you’re working in a confined space. Take regular breaks to rest and stay hydrated to avoid fatigue and maintain focus.
10. Clean Up Afterward
Once you’ve finished drilling, make sure to clean up any debris or dust that may have accumulated. This will help prevent accidents and keep your workspace clean and organized.
Selecting the Right Drill and Bits
When it comes to drilling in tight corners, selecting the right drill and bits is crucial for getting the job done effectively. Here are some tips and tricks for choosing the best tools for the task:

1. Drill Selection
When working in tight corners, it is important to choose a drill that is small and compact. A cordless drill is often the best option, as it allows for greater maneuverability. Look for a drill that has a slim profile, lightweight design, and a short length to make drilling in tight corners easier.
2. Drill Speed
The speed of the drill is another important factor to consider. When drilling in tight corners, it is recommended to use a drill with variable speed control. This allows you to adjust the speed based on the material you are drilling into and the size of the hole you need. Slow speeds are usually better for tighter corners, as they provide more control and reduce the risk of accidents.
3. Bit Type
Selecting the right drill bit is essential for drilling in tight corners. For wood, a twist bit or spade bit is commonly used. For metal, a cobalt or titanium drill bit is recommended, as they are more durable and can withstand the heat generated while drilling. Consider using a shorter drill bit or an extension bit to reach into tight corners without compromising drilling performance.
4. Bit Size
Choosing the right bit size is also crucial for drilling in tight corners. Too large of a bit can make it difficult to maneuver and may cause damage to the surrounding area. Before drilling, measure the space available and select a bit that fits comfortably without excessive pressure. If necessary, start with a smaller pilot hole and gradually increase the size until you reach the desired diameter.
5. Accessories
Consider using accessories such as drill guides or angle attachments to help you navigate and stabilize the drill in tight corners. These tools can provide additional support and precision, making it easier to drill accurately in confined areas.

By selecting the right drill and bits for the job, you can ensure efficient and successful drilling in tight corners. Remember to always prioritize safety and follow the manufacturer’s instructions for your specific tools.
Measuring and Marking the Corner
Before you start drilling in a tight corner, it’s important to accurately measure and mark the spot where you will be drilling. This will help ensure that you drill in the right place and avoid any mistakes or accidents.
Here are some tips and tricks for measuring and marking the corner:
- Use a measuring tape: Start by measuring the distance from the edge of the corner to the spot where you want to drill. Use a measuring tape to get an accurate measurement and write it down.
- Mark the spot with a pencil: Once you have the measurement, use a pencil to mark the spot on the corner where you will be drilling. Make sure the mark is clear and easy to see.
- Double check the measurements: Before you start drilling, double check your measurements to make sure everything is correct. Use the measuring tape again to verify the distance and compare it to your initial measurement.
It’s also important to consider any other factors that may affect your drilling, such as the depth of the hole or the type of material you’re drilling into. Take these factors into account when measuring and marking the corner.
By taking the time to accurately measure and mark the corner, you can ensure that your drilling job is done correctly and safely. It’s always better to be precise and careful when working in tight corners to avoid any unnecessary problems.
Drilling Techniques
1. Pre-drilling
Pre-drilling is an essential step when drilling in tight corners. It involves creating a pilot hole before drilling the actual hole. This pilot hole serves as a guide for the drill bit and helps prevent the drill from slipping or wandering off course. Use a smaller drill bit than the desired hole size for the pilot hole.
2. Angle drilling
When drilling in a tight corner, it may be necessary to drill at an angle. This can be achieved by adjusting the angle of the drill bit or by using an angled adaptor or extension. Angle drilling allows you to reach areas that are difficult to access with a straight drill bit.
3. Slow and steady
When drilling in a tight corner, it is important to take your time and drill slowly and steadily. Applying excessive force or drilling too quickly can result in the drill bit slipping or breaking. Use a low speed setting on your drill and maintain a consistent pressure while drilling.
4. Lubrication
Using lubrication can help reduce friction and heat buildup when drilling in a tight corner. Apply a small amount of cutting oil or lubricating spray to the drill bit before drilling. This will help extend the life of the drill bit and prevent it from getting stuck or overheating.
5. Proper positioning
Positioning is crucial when drilling in a tight corner. Make sure the drill is aligned properly with the target area to avoid damage or a skewed hole. It may be necessary to use a mirror or a camera to get a better view of the drilling area. Take your time to carefully position the drill before drilling.
6. Safety precautions
When drilling in a tight corner, it is important to take the necessary safety precautions. Wear safety goggles to protect your eyes from flying debris. Use earplugs or earmuffs to protect your hearing from the noise generated by the drill. Always read and follow the safety guidelines provided by the drill manufacturer.
| Pros | Cons |
|---|---|
| Allows drilling in hard-to-reach areas | Requires more careful positioning and technique |
| Reduces the risk of drill bit slipping | May require specialized tools or adaptors |
| Helps prevent damage to surrounding surfaces | Drilling at an angle may affect the integrity of the hole |
By utilizing these drilling techniques and following the necessary safety precautions, you can successfully drill in tight corners and get the job done efficiently. Remember to use the right tools and take your time to ensure accurate and precise drilling.
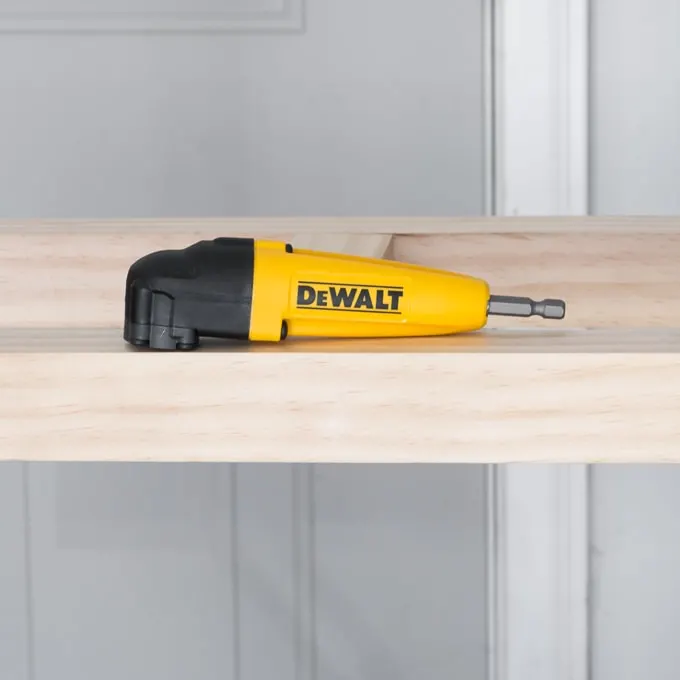
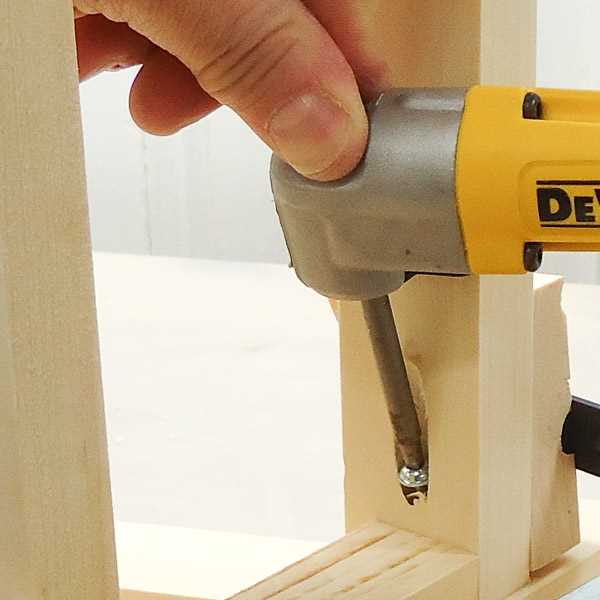
Using a Right-Angle Drill Attachment
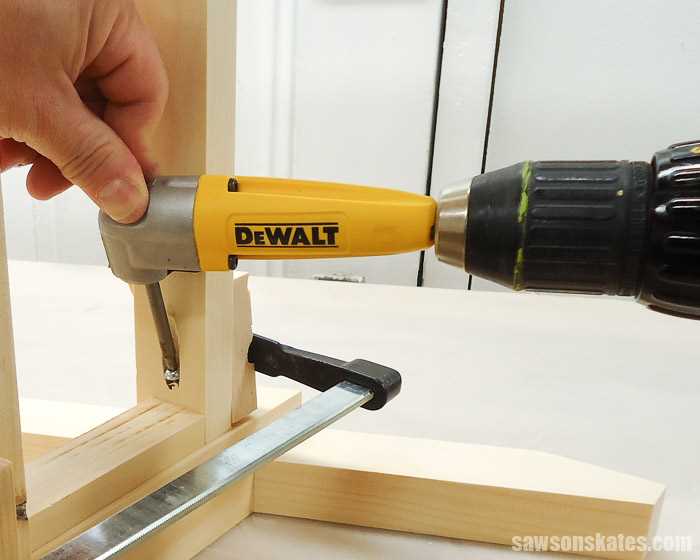
A right-angle drill attachment is a versatile tool that can be incredibly useful when drilling in tight corners or confined spaces. This attachment essentially allows you to bend the drill bit at a 90-degree angle, giving you the flexibility to reach areas that would otherwise be inaccessible with a regular drill.
Benefits of Using a Right-Angle Drill Attachment
- Improved Accessibility: The main advantage of using a right-angle drill attachment is the ability to access narrow and tight spaces. This can be particularly useful when working in cabinets, behind appliances, or in other hard-to-reach areas.
- Increased Versatility: With a right-angle drill attachment, you can easily switch between drilling, driving screws, or other tasks, making it a versatile tool for a variety of projects.
- Reduced Strain: Working in tight corners can be physically demanding, as it often requires awkward body positions. Using a right-angle drill attachment helps reduce strain on your arms, shoulders, and back, making the task more comfortable and less tiring.
- Precision and Control: The right-angle drill attachment allows for precise drilling in tight spaces, ensuring accuracy and control, even in challenging positions.
Tips for Using a Right-Angle Drill Attachment
Here are some tips to keep in mind when using a right-angle drill attachment:
- Select the Right Attachment: Make sure to choose a right-angle drill attachment that is compatible with your drill. Different models may have varying sizes and specifications, so check the manufacturer’s recommendations before purchasing.
- Secure the Attachment Properly: Before using the attachment, ensure that it is securely fastened to the drill. Loose attachments can cause wobbling or slippage, compromising the accuracy and safety of your drilling.
- Use the Right Drill Bits: Depending on the material you are drilling into, select the appropriate drill bits. Using the wrong bit can result in inefficient drilling or damage the attachment.
- Work Slowly and Carefully: When drilling in tight spaces, it’s essential to work slowly and carefully to avoid accidental damage or injury. Take your time and maintain control over the drill throughout the process.
- Take Breaks if Needed: Working in confined spaces can be physically demanding. If you feel fatigued or strained, take regular breaks to rest and prevent injuries.
By using a right-angle drill attachment and following these tips, you’ll be able to tackle drilling tasks in tight corners with ease and precision.
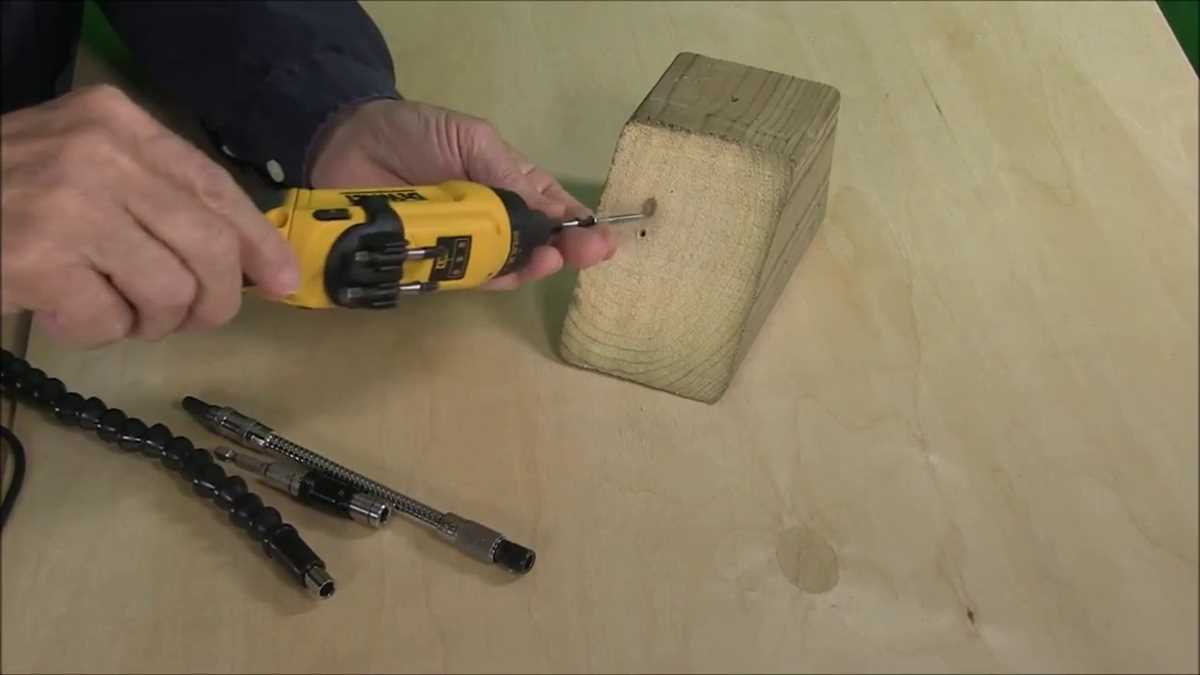
Utilizing Flexible Drill Extensions
When faced with drilling in tight corners or hard-to-reach areas, a flexible drill extension can be a handy tool to have in your toolbox. These extensions are designed to provide greater access and maneuverability, making it easier to tackle drilling tasks in cramped spaces. Here are some tips and tricks for effectively utilizing flexible drill extensions:
1. Choose the Right Extension
Flexible drill extensions come in various lengths and diameters, so it’s important to select the right one for your specific needs. Consider the depth and angle of the area you need to access, as well as the size of the drill bit you’ll be using. A longer extension may be necessary for reaching deep corners, while a narrower diameter may be required for tighter spaces.
2. Secure the Extension Properly
- Tighten the Chuck: Before connecting the extension to your drill, ensure that the chuck is securely tightened. This will prevent the extension from wobbling or coming loose during operation.
- Attach the Extension: Insert one end of the extension into the drill chuck and tighten it securely. Then, insert the drill bit into the other end of the extension and tighten it as well. Make sure both connections are tight to prevent any movement or slippage.
3. Maintain Stability
When using a flexible drill extension, it’s important to maintain stability to ensure accurate drilling. Here are some tips to help you achieve stability:
- Use Two Hands: Hold the drill with both hands, one hand on the body of the drill and the other on the extension, near the area being drilled.
- Apply Even Pressure: Apply equal pressure while drilling to prevent the extension from bending or flexing excessively.
- Use a Support Arm: If possible, use a support arm or brace to provide additional stability and control. This can be particularly useful when drilling in challenging positions.
4. Pay Attention to Speed and Torque
Drilling in tight corners can put extra strain on your drill and extension, so it’s important to pay attention to speed and torque settings. Start at a lower speed and gradually increase if needed. Too high of a speed or torque can cause the extension to whip or buckle, potentially leading to accidents or damage.
5. Regularly Inspect and Maintain
Flexible drill extensions are prone to wear and tear, especially if used frequently. Regularly inspect the extension for any signs of damage or fatigue, such as cracks or fraying. If any issues are detected, replace the extension immediately to ensure safe and efficient drilling.
By following these tips and utilizing flexible drill extensions correctly, you can effectively tackle drilling tasks in tight corners and hard-to-reach areas. Always prioritize safety and practice proper maintenance to ensure the longevity of your tools and equipment.
Tips for Success
1. Choose the right drill bit
When drilling in a tight corner, it’s important to select a drill bit that is suitable for the material you are drilling into. Different materials require different types of drill bits, so make sure you have the right one for the job. A drill bit with a sharp point and flutes to help clear away debris is ideal for drilling in tight spaces.
2. Use a flexible extension
Using a flexible extension can be extremely helpful when drilling in a tight corner. This tool allows you to reach difficult angles and positions that a regular drill may not be able to access. Make sure to use a high-quality flexible extension to ensure precision and control during the drilling process.
3. Mark the drilling spot
Before you start drilling, it’s essential to mark the exact spot where you want to drill. This will help you stay on track and avoid any mistakes. Use a pencil or marker to make a clear and visible mark on the surface, ensuring that it aligns with your desired drilling location.
4. Use a pilot hole
If you’re drilling into a hard material or working with a larger drill bit, it’s a good idea to start with a pilot hole. A pilot hole is a smaller hole that serves as a guide for the drill bit. It helps to prevent the drill bit from wandering or slipping when you begin drilling. This technique is especially useful when drilling in tight corners, where precision is crucial.
5. Work slowly and steadily
Drilling in a tight corner requires patience and a steady hand. Take your time and work slowly to ensure accuracy and prevent any damage. Applying too much pressure or rushing the drilling process can lead to mistakes or accidents. Remember to let the drill bit do the work, and avoid forcing it through the material.
6. Keep safety in mind
Always prioritize safety when drilling, especially in tight corners where visibility and maneuverability may be limited. Wear protective goggles to shield your eyes from debris, and ensure a secure grip on the drill. Additionally, be cautious of any electrical wires or pipes that may be hidden in the walls.
By following these tips, you can increase your chances of success when drilling in tight corners. Remember to exercise caution, choose the right tools, and work methodically to achieve the desired results.
Applying Lubrication for Smooth Drilling
When drilling in a tight corner, it’s essential to have the right lubrication to ensure smooth and efficient drilling. Applying lubrication not only helps to reduce friction but also prolongs the life of your drill bits and prevents overheating. Here are some tips on how to apply lubrication for smooth drilling:
1. Choose the right lubricant
There are various types of lubricants available for drilling, including cutting oils, drilling compounds, and lubricating sprays. It’s important to choose the right lubricant based on the material you are drilling and the type of drill bits you are using. For example, cutting oils are suitable for metal drilling, while drilling compounds are ideal for masonry drilling.
2. Apply the lubricant directly to the drilling area
Before starting the drilling process, apply a small amount of lubricant directly to the drilling area. This can be done by using a brush or by simply squeezing a few drops of lubricant onto the surface. Make sure that the lubricant covers the entire drilling area for maximum effectiveness.
3. Re-apply lubricant during drilling
As you continue drilling, it’s necessary to re-apply lubricant to the drilling area to maintain smooth and effortless drilling. This is especially important when drilling through hard materials or when drilling for an extended period. Keep a container of lubricant nearby and apply it every few minutes or as needed.
4. Use lubrication accessories
In addition to applying lubricant directly to the drilling area, you can also use lubrication accessories to enhance the effectiveness of the lubricant. For example, using a lubricant applicator tool or a lubrication system can help distribute the lubricant evenly and ensure thorough coverage.
5. Clean and maintain your drill bits
After drilling, it’s important to clean and maintain your drill bits to remove any residue or buildup. This can be done by wiping them with a clean cloth or using a wire brush to remove stubborn debris. Applying a small amount of lubricant to the drill bits before storing them can also help prevent rust and corrosion.
By following these tips and applying lubrication effectively, you can ensure smooth drilling in tight corners and achieve better results. Remember to choose the right lubricant, apply it directly to the drilling area, re-apply as needed, use lubrication accessories, and clean and maintain your drill bits for optimal performance.
Taking Breaks to Avoid Overheating
Why Taking Breaks is Important
When drilling in a tight corner, overheating can be a serious concern. Overheating can lead to damage to both the tool being used and the surface being drilled into. It can also cause discomfort or even injury to the person operating the drill. Taking breaks is essential to prevent overheating and ensure a safe and efficient drilling process.
How Often Should You Take Breaks?
The frequency of breaks will depend on several factors, including the type of material being drilled, the power of the drill, and the ambient temperature. As a general rule, it is recommended to take a break every 5-10 minutes of continuous drilling. However, if you notice any signs of overheating, such as smoke or excessive heat coming from the drill or surface, it is important to stop immediately and allow everything to cool down before continuing.
What to Do During Breaks
During breaks, it is important to take steps to cool down both the drill and the surface being drilled into. Some recommended actions to take during breaks include:
- Turning off the drill and setting it aside in a safe location
- Using a cool, damp cloth to wipe down the drill and remove any excess heat
- Allowing the surface to cool down by either blowing air over it or using a fan
- Drinking plenty of water to stay hydrated and regulate body temperature
It is also important to use breaks as an opportunity to assess the drilling progress and make any necessary adjustments. This includes checking the alignment of the drill, inspecting the surface for any damage or warping, and ensuring that the drill bit is in good condition.
Preventing Overheating
In addition to taking regular breaks, there are several other measures you can take to prevent overheating during drilling in a tight corner:
- Use a drilling lubricant or coolant to reduce friction and dissipate heat
- Choose the right drill bit for the material being drilled to minimize stress on the tool
- Keep the drill in good working condition by cleaning and maintaining it regularly
- Avoid excessive pressure or force when drilling, as this can generate more heat
Conclusion
Taking breaks while drilling in a tight corner is essential to prevent overheating and ensure a safe and successful drilling process. By following the recommended guidelines for break frequency and taking appropriate cooling measures, you can avoid damage to the tool, surface, and yourself, and complete the job efficiently.
FAQ:
What is drilling in a tight corner?
Drilling in a tight corner refers to the process of drilling holes in areas that are difficult to access due to their tight or confined nature.
Why is drilling in a tight corner challenging?
Drilling in a tight corner can be challenging because it often requires specialized equipment and techniques to access the area and position the drill properly. Additionally, there may be limited space to maneuver the drill and obstacles that can hinder the drilling process.
What are some tips for drilling in a tight corner?
Some tips for drilling in a tight corner include using a flexible drill extension, selecting a drill with a compact design, using a swivel head drill, using a right-angle attachment, and using a smaller drill bit.
Are there any safety precautions to consider when drilling in a tight corner?
Yes, when drilling in a tight corner, it is important to wear safety goggles to protect your eyes from flying debris. It is also advisable to use a secure grip when holding the drill and to work slowly and carefully to avoid accidents.
Can you provide some specific examples of when drilling in a tight corner would be necessary?
Sure! Some specific examples of when drilling in a tight corner would be necessary include drilling holes for electrical wiring in confined spaces, drilling holes in furniture or cabinets for hardware installation, and drilling holes in car panels for repairs.
What are the benefits of using a flexible drill extension when drilling in a tight corner?
Using a flexible drill extension allows for greater flexibility and maneuverability when drilling in a tight corner. It allows you to access areas that may be difficult to reach with a standard drill and provides more control and precision during the drilling process.
Video:

Best Wire Welder For The Money

Meet Harrison Clayton, a distinguished author and home remodeling enthusiast whose expertise in the realm of renovation is second to none. With a passion for transforming houses into inviting homes, Harrison's writing at https://thehuts-eastbourne.co.uk/ brings a breath of fresh inspiration to the world of home improvement. Whether you're looking to revamp a small corner of your abode or embark on a complete home transformation, Harrison's articles provide the essential expertise and creative flair to turn your visions into reality. So, dive into the captivating world of home remodeling with Harrison Clayton and unlock the full potential of your living space with every word he writes.


