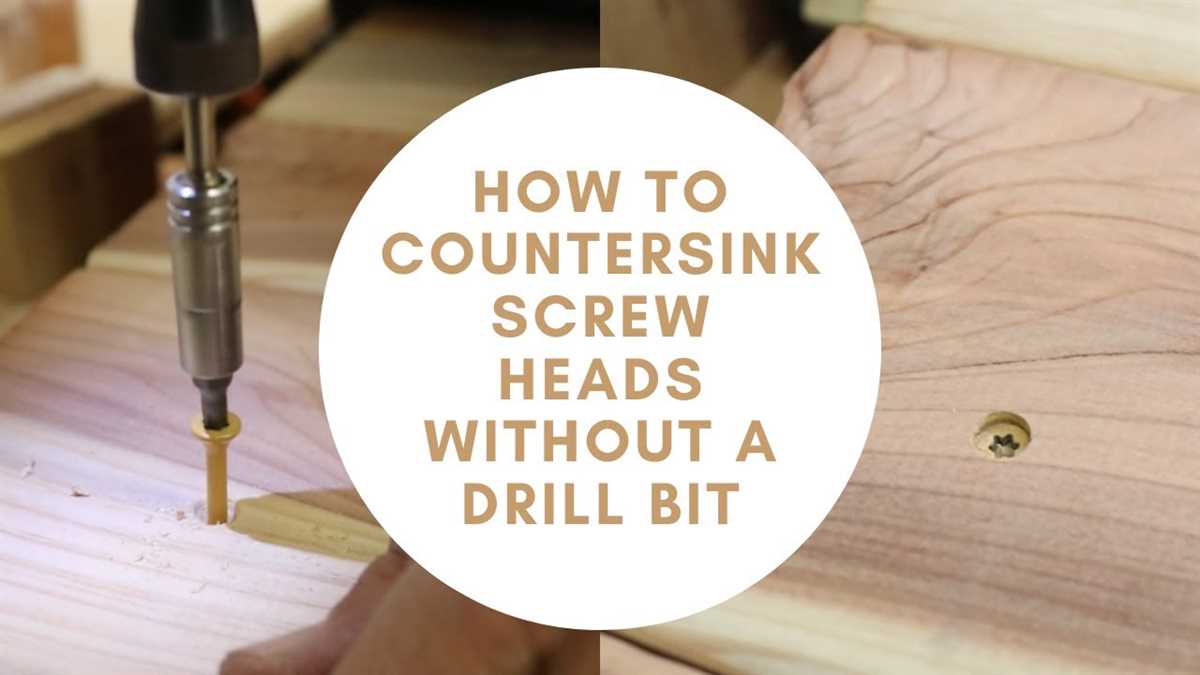
Drilling Countersink Holes: A Step-by-Step Guide

When it comes to woodworking or metalworking projects, countersink holes are an essential element to create a professional-looking finish. Countersinking involves drilling a hole with a wider mouth that allows the screw head to sit flush or below the surface of the material. This not only adds a polished look to your work, but it also prevents the screw from protruding and potentially causing damage or hazards.
This step-by-step guide will walk you through the process of drilling countersink holes, ensuring you achieve precise and clean results every time. From selecting the right drill bit to properly setting up your drill, this guide covers all the necessary steps for a flawless finish.
1. Choose the Correct Drill Bit
The first step in drilling countersink holes is selecting the appropriate drill bit. Countersink drill bits are specifically designed with a conical shape that allows for a wider mouth at the top. This tapered shape creates the perfect indentation for the screw head to sit flush or below the surface. It’s important to choose a drill bit that matches the size and material of your screw to ensure a proper fit.
2. Mark the Hole Locations

Before you begin drilling, it’s crucial to mark the exact location of each countersink hole. This ensures consistent spacing and a professional finish. Use a pencil or a center punch to make a small indentation at each desired location.
3. Set up Your Drill
Next, secure the appropriate countersink drill bit into your drill chuck. Make sure it is firmly tightened to prevent any wobbling or slipping during the drilling process. Adjust the drill speed based on the material you are working with. Lower speeds are recommended for wood, while higher speeds may be necessary for metal.
4. Start Drilling
Position the drill bit directly over the marked indentation and apply pressure to start drilling. Use a steady and controlled motion to guide the drill bit into the material. Go slowly to prevent any splitting or rough edges. Continue drilling until the desired depth is reached, ensuring the screw head will sit flush or below the surface.

5. Clean and Sand
Once all the countersink holes are drilled, it’s important to clean up any loose debris or wood chips. Use a brush or air compressor to remove any debris from the holes, ensuring a clean surface for the screws. If necessary, use sandpaper or a sanding block to lightly smooth the edges of the holes for a seamless finish.
By following this step-by-step guide, you’ll be able to confidently drill countersink holes in your woodworking or metalworking projects. Take your time, select the right tools, and you’ll achieve professional results every time.
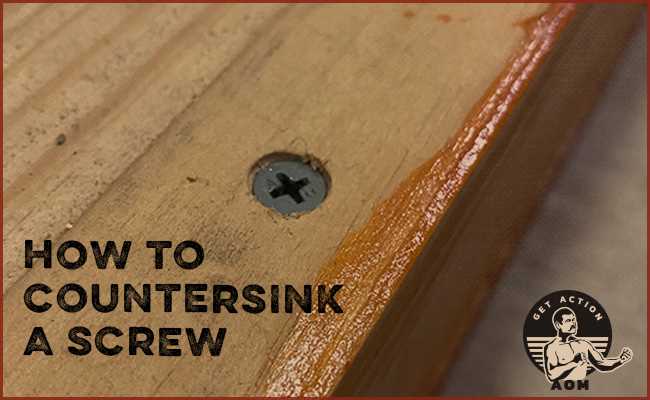
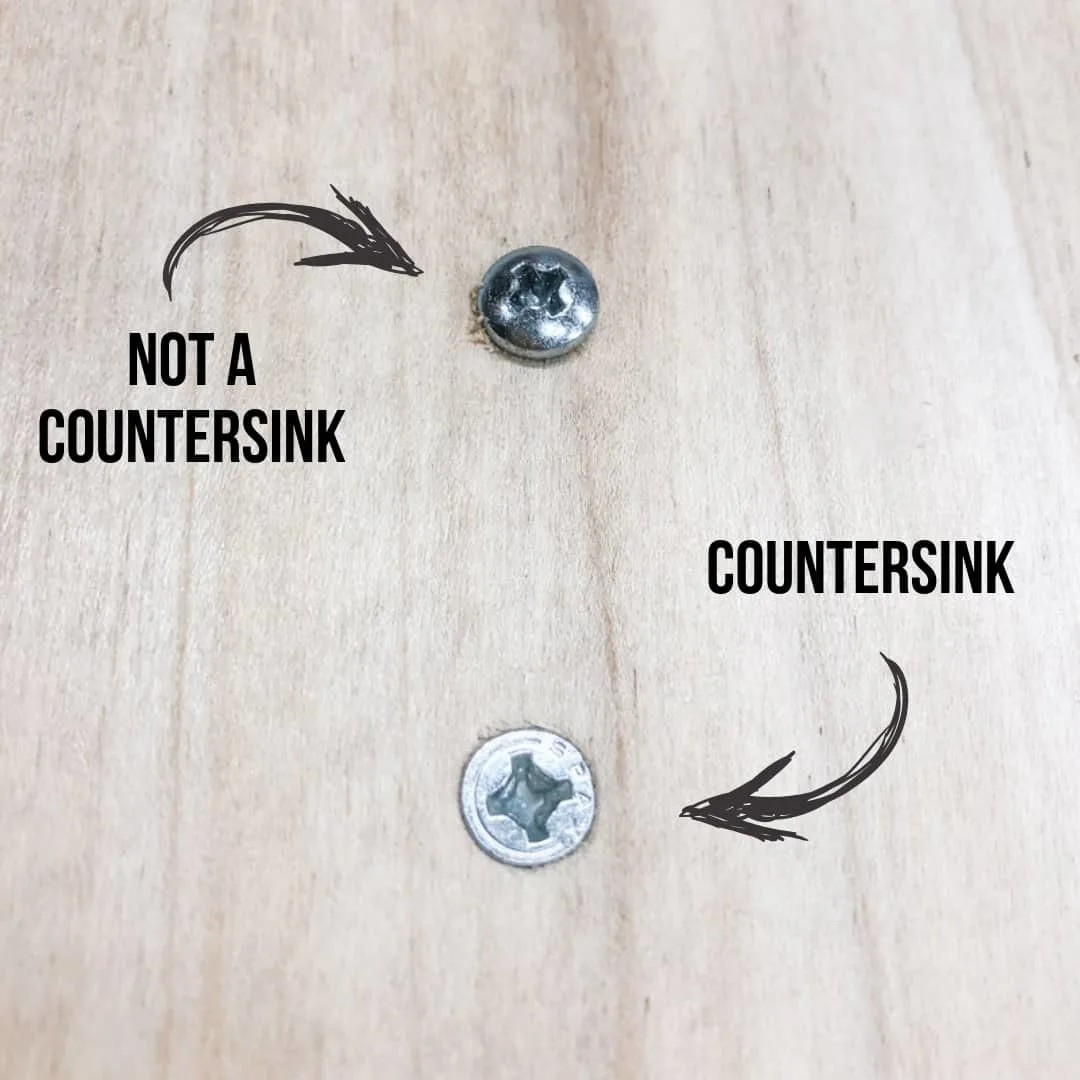
What Is a Countersink Hole?
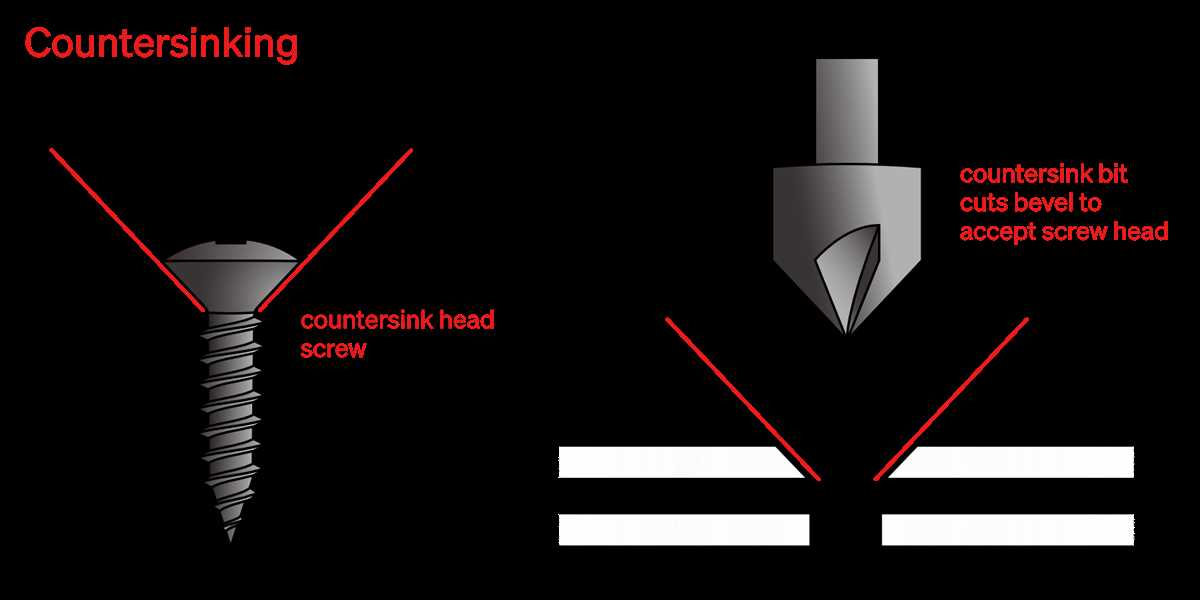
A countersink hole is a type of hole that is drilled into a material in order to allow a screw or bolt to sit flush with the surface. It is a conical hole with a wider opening at the top and a narrower opening at the bottom. The purpose of a countersink hole is to create a recessed area for the screw or bolt head to sit, so that it is not protruding above the surface. This allows for a smooth and flush finish, with no obstructions or sharp edges.
Countersink holes are commonly used in woodworking, metalworking, and other industries where screws and bolts are used to fasten materials together. They can be drilled in a variety of materials, including wood, metal, plastic, and composite materials.

Countersink holes can be created using specific tools, such as a countersink drill bit or a combination drill and countersink bit. These tools are designed to create the tapered shape of the hole, allowing the screw or bolt to sit flush with the surface. The size of the countersink hole will depend on the size of the screw or bolt being used.
In addition to allowing for a flush finish, countersink holes also serve the purpose of preventing the material from splitting or cracking when the screw or bolt is tightened. By creating a recessed area for the screw or bolt head, the material is more evenly distributed and less likely to be damaged.
Why Do You Need Countersink Holes?
A countersink hole is a conical-shaped hole that is wider at the top and narrower at the bottom. Countersink holes are commonly used in woodworking, metalworking, and other industries to provide a recessed or flush surface for screws, bolts, or rivets.
1. Flush and Professional Finish
One of the main reasons why you need countersink holes is to achieve a flush and professional finish. When a screw or bolt is inserted into a countersink hole, it sits flush with the surface, creating a clean and seamless appearance. This is particularly important for aesthetic purposes and when working on projects that require a high level of craftsmanship.
2. Prevents Splitting and Cracking
Countersink holes also play a vital role in preventing splitting and cracking of materials. When you drive a screw or bolt into a material without a countersink hole, the pressure from the fastener can cause the material to split or crack. By creating a countersink hole, you allow the fastener to sit below the surface, reducing the risk of damage to the material.

3. Improved Fastening Strength
Countersink holes provide improved fastening strength compared to simply driving a screw or bolt into a material without a countersink. By creating a recessed area for the fastener, the head of the screw or bolt is able to sit securely in the countersink hole, creating a stronger and more stable connection. This is especially important when working with softer materials or when joining two pieces of material together.
4. Easy Removal and Replacement
Another advantage of having countersink holes is the ease of removal and replacement. If you ever need to remove a screw or bolt, having a countersink hole allows you to easily access the fastener without damaging the surrounding material. This can be particularly useful when making repairs, adjustments, or modifications to a project.
5. Enhanced Safety
Countersink holes also contribute to enhanced safety in certain applications. By recessing the head of a fastener, you minimize the risk of snagging or catching on protruding screws or bolts, reducing the potential for injuries or accidents.
In summary, countersink holes are needed to achieve a flush and professional finish, prevent splitting and cracking, provide improved fastening strength, allow for easy removal and replacement, and enhance safety in various applications. Whether you are working on woodworking or metalworking projects, incorporating countersink holes into your work can greatly improve the overall quality and functionality of your finished product.
Tools Required for Drilling Countersink Holes

When drilling countersink holes, it is important to have the right tools in order to achieve precise and professional results. Here are the essential tools you will need:
- Drill: A power drill is necessary for drilling the holes. Choose a drill that is appropriate for the size and material of the workpiece.
- Countersink bit: A countersink bit is specifically designed to create the conical shape needed for countersink holes. It typically has a tapered point and fluted edges.
- Workpiece: The material or object that you will be drilling holes into. It could be wood, metal, or plastic.
- Clamps: Clamps are useful to secure the workpiece in place, preventing any movement or vibrations while drilling.
- Drill press (optional): While not necessary, a drill press can provide more accuracy and stability when drilling countersink holes, especially for larger workpieces.
- Depth stop (optional): A depth stop is a device that can be attached to the drill to limit the depth of the hole, ensuring consistent and uniform countersinks.
Having these tools ready before you begin drilling countersink holes will make the process much easier and help you achieve professional-looking results. Always remember to wear appropriate safety gear, such as goggles and gloves, and follow proper drilling techniques to avoid accidents.
Step 1: Marking the Hole Location
Before you start drilling the countersink hole, it’s important to accurately mark the location where the hole needs to be drilled. This will ensure that the hole is placed exactly where it’s needed and allow for precise results.
To mark the hole location, you can follow these steps:
- Measure and mark the desired location on the surface where the hole needs to be drilled using a ruler or a measuring tape.
- Use a center punch to create a small indentation at the center of the marked location. This will provide a starting point for the drill bit and prevent it from slipping.
- If you’re working with a metal surface, you can use a punch or a nail to create the indentation.
It’s important to be as accurate as possible when marking the hole location, especially if you’re drilling multiple holes or if the holes need to be aligned with other elements. Taking the time to properly mark the hole location will save you time and ensure a professional-looking result.
Step 2: Choosing the Right Drill Bit
Choosing the right drill bit is crucial in order to achieve clean and precise counter sinks. The type of material you are working with will determine the type of drill bit you should use.
1. Standard twist drill bit
A standard twist drill bit, also known as a twist drill or a drilling bit, is the most common type of drill bit used for countersinking holes. It has a pointed tip and flutes along its body, allowing it to penetrate the material and remove the chips as it rotates.
Twist drill bits are suitable for use on various materials such as wood, plastic, and soft metals like aluminum and brass. However, they may not be as effective on harder materials like steel or cast iron.
2. Countersink bit
A countersink bit is specifically designed for creating countersink holes. It has a conical shape with a flat bottom and can also be used to remove burrs or chamfer the edges of a drilled hole.
Countersink bits are available in various angles, typically 60 or 90 degrees, depending on the desired shape and size of the countersink hole. They are commonly used in woodworking and metalworking applications.
3. Combination drill and countersink bit
A combination drill and countersink bit combines the features of a twist drill bit and a countersink bit into a single tool. It has a twist drill bit at the center, surrounded by a conical countersink shape.
These bits are convenient for quick and efficient drilling and countersinking in one step. They are commonly used when a chamfered hole is required for flush mounting screws.
4. Specialty drill bits
In addition to the standard options, there are also specialty drill bits available for specific applications. For example, there are step drill bits that can create multiple-sized holes in a single operation, or brad point bits that are designed for clean and precise drilling in wood.
When choosing a specialty drill bit, consider the specific requirements of your project to ensure optimal results.
5. Size and speed considerations
When selecting a drill bit, it is important to consider the size of the hole you need to create. The drill bit should have a diameter slightly smaller than the desired size of the countersink hole.
Additionally, consider the speed at which you will be drilling. For softer materials, a higher drill speed is usually recommended, while slower speeds are better for harder materials.
| Type | Materials | Advantages | Disadvantages |
|---|---|---|---|
| Standard twist drill bit | Wood, plastic, soft metals | Common and versatile | May not be effective on harder materials |
| Countersink bit | Wood, metal | Specially designed for countersinking | May require separate drilling and countersinking |
| Combination drill and countersink bit | Various materials | Efficient and convenient | May not be suitable for all applications |
| Specialty drill bits | Specific applications | Designed for specific needs | Limited versatility |
By considering the material, size, and speed requirements, you can choose the right drill bit for your countersinking needs. Remember to always wear appropriate safety gear and follow recommended drilling practices for optimal results.
Step 3: Drilling the Countersink Hole
Once you have marked the center point for the countersink hole, you are ready to start drilling. Follow these steps to drill the countersink hole:
Tools and Materials You Will Need:
- Drill
- Countersink bit
- Center punch
- Ruler
- Protective eyewear
Instructions:
- Attach the correct size of countersink bit to your drill. Make sure it matches the size of the screw head you will be using.
- Put on protective eyewear to ensure your safety while drilling.
- Position the drill over the marked center point on your material.
- Apply light pressure and start drilling slowly. Keep the drill bit perpendicular to the surface to ensure a straight hole.
- Continue drilling until you have reached the desired depth for the countersink hole.
- Once you have drilled the countersink hole, remove the drill bit from the material and set your drill aside.
Note: It is important to check the depth of the countersink hole regularly while drilling to ensure accuracy. You can use a ruler or depth gauge to measure the depth of the hole.
Tip: If you are drilling multiple countersink holes, it can be helpful to use a template or a jig to ensure consistent hole placement and depth.
| Screw Size (#) | Countersink Hole Depth (inches) |
|---|---|
| #4 | 1/16 |
| #6 | 3/32 |
| #8 | 7/64 |
| #10 | 1/8 |
Step 4: Checking the Depth of the Hole
Once you have drilled the countersink hole, it is essential to check its depth to ensure proper seating of the screw head. This step is crucial to avoid any issues with the wood surface or the screw head protruding above the material.
To check the depth of the hole, follow these steps:
- Place a reliable depth gauge onto the countersink hole. The depth gauge can be a specialized tool or a calibrated ruler.
- Gently and slowly lower the gauge into the hole until it rests firmly on the bottom surface. Make sure not to force the gauge, as that could damage the hole or give inaccurate measurements.
- Read the measurement on the depth gauge or ruler, taking note of the depth in millimeters or inches.
It is crucial to compare the measured depth with the requirements specified for your project. If the depth is shallow, you may need to drill further to achieve the desired depth. Conversely, if the depth is excessive, you may need to fill the hole partially with a suitable material to ensure proper screw seating.
Note: The accuracy of the countersink hole depth is vital to ensure optimal screw seating and a clean finish. Taking the time to check and adjust the depth as necessary will result in a professional-looking and structurally sound final product.
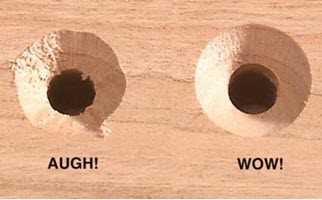
Step 5: Removing Any Burrs
After drilling the countersink holes, it’s important to remove any burrs that may have formed around the holes. These burrs can affect the appearance of the finished product and can also make it difficult to properly seat the screws or fasteners.
To remove the burrs, you will need a deburring tool or a countersink deburring bit. These tools are designed to smooth out the edges of the holes and remove any sharp or rough edges.
Here are the steps to remove the burrs:
- Inspect the holes: Take a close look at the countersink holes to identify any burrs or rough edges. Use a flashlight if necessary to clearly see the edges of the holes.
- Select the deburring tool: Choose the appropriate deburring tool based on the size of the countersink holes and the material you are working with. There are different deburring tools available, so make sure to select the right one for your project.
- Prepare the tool: If using a deburring tool, make sure it is set to the correct speed and securely fastened to your drill or rotary tool. If using a countersink deburring bit, ensure it is properly aligned and tightened in the chuck of your drill.
- Deburr the holes: Place the deburring tool or countersink deburring bit into the first hole and gently apply pressure while rotating the tool. Move it around the edge of the hole to remove any burrs or rough edges. Repeat this process for each countersink hole.
- Clean the holes: Once all the burrs have been removed, use a brush or cloth to clean out any debris or metal shavings from the holes. This will help ensure a clean and smooth surface for proper screw or fastener alignment.
Once the burrs are removed and the holes are cleaned, you are now ready to proceed with your project. Remember to always wear safety goggles and gloves when working with power tools to protect yourself from any potential hazards.
Additional Tips for Drilling Countersink Holes
1. Choose the Right Countersink Bit
When drilling countersink holes, it is important to choose the right countersink bit for your project. Countersink bits come in different sizes and angles, so make sure to select one that matches the size and angle requirements of your screws or bolts. Using the wrong countersink bit can result in poorly countersunk holes.
2. Use a Pilot Hole
Before drilling the countersink hole, it is recommended to create a small pilot hole for guidance. This will help ensure that the countersink hole is centered and aligned properly with the screw or bolt. Use a drill bit that is slightly smaller than the diameter of the screw or bolt to create the pilot hole.
3. Mark the Depth
To ensure consistent countersink depths, it is helpful to mark the desired depth on the countersink bit using a piece of tape. This will act as a guide and prevent you from drilling too deep or not deep enough. Simply wrap the tape around the bit at the desired depth and use it as a reference while drilling.
4. Check for Drill Speed
When drilling countersink holes, it is important to use the right drill speed. Higher speeds can cause the bit to overheat and dull quickly, while slower speeds may not provide enough cutting action. Consult the manufacturer’s instructions or adjust the drill speed based on the material you are working with.
5. Use Clamps or a Vice
For precision drilling, it is recommended to secure your workpiece using clamps or a vice. This will prevent it from moving or vibrating during the drilling process, resulting in more accurate and clean countersink holes.
6. Clean the Holes
After drilling the countersink holes, make sure to clean them thoroughly to remove any debris or burrs. You can use a brush or compressed air to clean out the holes. This will ensure a smooth and proper fit for the screws or bolts.
7. Practice on Scrap Material
If you are new to drilling countersink holes, it is a good idea to practice on scrap material before working on your actual project. This will help you get a feel for the process and allow you to make any adjustments or improvements before drilling into your valuable materials.
8. Maintain Proper Technique
When drilling countersink holes, it is important to maintain proper technique throughout the process. Apply steady, even pressure while drilling and make sure to keep the drill perpendicular to the workpiece to ensure accurate and clean countersinks.
By following these additional tips, you can improve your drilling technique and achieve professional results when drilling countersink holes for your projects.
FAQ:
What is a countersink hole?
A countersink hole is a cone-shaped recess that is drilled into a material, typically metal or wood, to allow the head of a screw or bolt to sit flush with the surface.
Why do I need to use countersink holes?
Countersink holes are used to ensure a flush and neat finish when attaching screws or bolts to a material. They also help prevent the material from splitting or cracking.
What tools do I need to drill countersink holes?
To drill countersink holes, you’ll need a drill, a countersink bit, a center punch, and a hammer. Optionally, you may also need a clamp to secure the material.
What is the process for drilling countersink holes?
The process for drilling countersink holes involves marking the center point for the hole, using a center punch to create a small indentation, positioning the countersink bit in the drill, drilling at a slow speed, and gradually increasing the speed until the desired depth is achieved.
Can I use any type of drill for drilling countersink holes?
While any drill can technically be used for drilling countersink holes, it is recommended to use a drill with adjustable speed settings and a variable clutch to ensure better control over the drilling process.
What materials can I drill countersink holes in?
Countersink holes can be drilled in various materials, including metal, wood, plastic, and composites. However, the drilling technique may need to be adjusted based on the material being drilled.
Video:


Meet Harrison Clayton, a distinguished author and home remodeling enthusiast whose expertise in the realm of renovation is second to none. With a passion for transforming houses into inviting homes, Harrison's writing at https://thehuts-eastbourne.co.uk/ brings a breath of fresh inspiration to the world of home improvement. Whether you're looking to revamp a small corner of your abode or embark on a complete home transformation, Harrison's articles provide the essential expertise and creative flair to turn your visions into reality. So, dive into the captivating world of home remodeling with Harrison Clayton and unlock the full potential of your living space with every word he writes.


