DIY: Drilling Your Own Deep Water Well

Are you tired of relying on public or expensive private water supplies? Have you ever considered drilling your own deep water well? It may sound like a daunting task, but with the right equipment and guidance, drilling your own well can be a cost-effective and rewarding project. In this article, we will explore the DIY approach to drilling a deep water well, including the necessary tools, safety precautions, and step-by-step instructions.
Drilling a deep water well can offer many benefits. Not only can it provide a reliable source of water for drinking, cooking, and irrigation, but it can also increase the value of your property. Imagine the satisfaction of knowing that you have complete control over your water supply, even during times of drought or water restrictions. With the right preparation and equipment, drilling your own well can be a viable solution for homeowners looking to become more self-sufficient.
Before you begin, it’s essential to understand that drilling a well is a complex process that requires specialized equipment and knowledge. It’s crucial to follow local regulations and obtain any necessary permits to ensure that you adhere to safety standards and protect the environment. Additionally, it’s recommended to consult with professionals or experienced well drillers for guidance and advice throughout the drilling process.
In the following sections, we will discuss the tools and materials needed for drilling a deep water well, the safety precautions to be aware of, and a step-by-step guide on how to drill your own well. By following these guidelines and taking the necessary precautions, you can embark on the journey of drilling your own deep water well and enjoy the benefits of having a reliable and independent water source.
The Importance of Water Sources
Water is an essential element for human survival, and having a reliable and clean water source is crucial for maintaining health and well-being. In many parts of the world, access to clean water is a luxury, and people often have to travel long distances or rely on unclean sources to fulfill their daily water needs.

Health Benefits
- Drinking water: Consuming an adequate amount of water is vital for staying hydrated and carrying out various bodily functions. It helps regulate body temperature, lubricates joints, aids digestion, and eliminates waste products.
- Sanitation and hygiene: Access to clean water is essential for maintaining proper sanitation and hygiene practices. It is required for washing hands, cooking, cleaning, and keeping living spaces free from germs and diseases.
Economic Importance
Having a reliable water source is also important for economic development and growth. Water is needed for various industries, including agriculture, manufacturing, and power generation. It is a crucial component in food production, irrigation systems, and energy production.
Environmental Significance
- Ecosystem support: Water sources are essential for supporting diverse ecosystems and maintaining ecological balance. They provide habitats for various species of plants and animals, and play a crucial role in the survival and growth of aquatic life.
- Water cycle: Water sources are an integral part of the water cycle, where water evaporates, condenses, and falls back as precipitation. This cycle helps in redistributing water across the globe and ensuring a continuous supply of fresh water.
Conservation and Sustainability
With the growing population and increasing water demands, it is important to conserve and manage water sources sustainably. This can be achieved through responsible water use, implementing efficient irrigation techniques, reducing water pollution, and promoting water conservation practices.
Conclusion
The importance of water sources cannot be overstated. Access to clean and reliable water sources is essential for human health, economic development, environmental well-being, and overall sustainability. It is crucial to protect and conserve water sources for the benefit of current and future generations.
Benefits of Having Your Own Well
Having your own well offers several benefits for homeowners. Whether you live in a rural area with limited access to municipal water or simply prefer the independence of having your own water source, drilling your own deep water well can be a worthwhile investment. Here are some of the key benefits:
1. Cost Savings
One of the main benefits of having your own well is the potential cost savings. By drilling your own well, you eliminate the need to pay for water from a municipal source or a private water company. This can result in significant savings over time, especially if you have a large household or use a substantial amount of water for irrigation or farming.

2. Control and Independence
Having your own well gives you control over your water supply. You are not dependent on a municipality or private company for your water needs. This can be particularly advantageous during periods of drought or when there are water restrictions in place. With your own well, you can have the peace of mind of knowing that you have a reliable source of water that is not subject to external factors.
3. Quality Control
Another benefit of having your own well is the ability to control the quality of your water. Municipal water sources can sometimes have issues with contamination or additives such as chlorine. With your own well, you can monitor and maintain the quality of your water to ensure it meets your standards. This can be especially important for households with specific water treatment needs or preferences.
4. Sustainable and Eco-Friendly
Drilling your own well promotes sustainability and reduces your environmental impact. Unlike municipal water sources that often require energy-intensive treatment processes, wells provide a natural and renewable source of water. Additionally, using your own well reduces the need for bottled water, which helps reduce plastic waste.
5. Increased Property Value
A final benefit of having your own well is that it can increase the value of your property. The presence of a well can be an attractive feature for potential buyers, especially in areas where access to water is limited. A well-maintained and properly functioning well can add value to your home and make it more appealing to prospective buyers.
In conclusion, drilling your own deep water well offers numerous benefits, including cost savings, control and independence, quality control, sustainability, and increased property value. If you have the necessary resources and permits, considering drilling your own well can be a long-term investment that pays off in multiple ways.

Planning and Preparation
Before starting the process of drilling your own deep water well, it is essential to have a clear plan and make thorough preparations. This will help ensure a successful drilling operation and minimize any potential risks or setbacks.
1. Determine the Water Needs
Begin by assessing your water needs. Calculate the amount of water required for your household or project, taking into consideration factors such as the number of residents or workers, household appliances, and irrigation systems.
2. Research Local Regulations
Check with your local authorities to understand the regulations and permits required for drilling a deep water well. Different areas may have specific rules and guidelines that need to be followed. It is important to comply with these regulations to avoid any legal issues.
3. Locate a Suitable Site
Find a suitable location for your well. Consider factors such as proximity to your property, accessibility, and geological conditions. It is advisable to consult with a professional geologist or hydrogeologist to determine the best site for drilling.
4. Conduct a Water Survey

Before drilling, it is important to conduct a water survey to assess the potential presence of water underground. This can be done by hiring a professional or using specialized equipment to measure the water levels and quality in the area where you plan to drill.
5. Obtain Necessary Equipment
Gather all the necessary equipment for drilling, including a drilling rig, drilling pipes, drill bits, casing, and a water pump. Make sure you have the appropriate tools and safety equipment to carry out the drilling operation effectively and safely.
6. Calculate Costs
Estimate the costs involved in drilling your own deep water well, including equipment, permits, labor, and ongoing maintenance. This will help you budget and plan accordingly.
7. Schedule the Drilling Operation
Set a timeline for the drilling operation, taking into consideration any seasonal factors or weather conditions that may affect the drilling process. It is important to plan the drilling operation during a time when the ground is not too frozen or saturated.

8. Safety Precautions
Always prioritize safety during the drilling process. Follow all safety guidelines and wear appropriate protective gear. Be aware of potential hazards and take necessary precautions to minimize any risks.
9. Assemble a Team
If the drilling operation requires a team of workers, make sure you assemble a skilled and experienced team to carry out the drilling process efficiently. Provide them with proper training and supervision to ensure the safety and success of the operation.
10. Communicate with Local Authorities
Keep local authorities informed about your drilling plans and progress. This will help ensure that you are complying with all regulations and receiving any necessary support or guidance.
By carefully planning and preparing for your DIY deep water well drilling project, you can increase the chances of success while minimizing any potential issues or setbacks.
Determining Well Location
Finding the right location to drill your deep water well is crucial for its success. It requires careful consideration of various factors to determine the best spot for water extraction. Here are some important factors to consider when determining the well location:
1. Water Sources
Identifying potential water sources in your area is the first step in determining the well location. This can be done by researching local geological maps or consulting with hydrologists. Look for natural features like rivers, lakes, or underground aquifers that could serve as potential water sources.
2. Groundwater Levels
Understanding the groundwater levels in your area is essential for determining the depth at which you need to drill your well. This information can be obtained from local groundwater monitoring programs or with the help of a hydrogeologist. An accurate understanding of the local groundwater levels will help ensure that your well reaches a sufficient depth to access water.
3. Land Elevation
Consider the elevation of the land when determining the well location. Ideally, the well should be located at a higher elevation than the surrounding areas to allow for natural flow and prevent contamination. Additionally, higher elevation can provide better water pressure, making it easier to access and distribute water from the well.
4. Distance from Contaminants
Ensure that your well is located at a safe distance from potential sources of contamination. This includes septic tanks, agricultural activities, chemical storage facilities, and industrial areas. Consult local regulations and guidelines to determine the required distance between your well and potential sources of contamination.
5. Accessibility
Consider the accessibility of the well location. It should be easily accessible for drilling equipment, maintenance, and future repairs. Access roads and clearances for large equipment should be taken into account when selecting the well location.
6. Future Development
Anticipate future development plans when determining the well location. Consider factors such as planned construction or infrastructure projects that may affect the well’s accessibility or water quality. It is important to select a location that will remain suitable for water extraction in the long term.
7. Testing
Finally, before commencing drilling, it is advisable to conduct some preliminary testing in the chosen well location. This can include water quality testing, well yield testing, and geological surveys to confirm the viability of the location. The results of these tests can provide valuable information for the drilling process.
By carefully considering these factors and conducting thorough research, you can determine the optimal well location for your deep water well. It is recommended to consult with professionals, such as hydrologists or well drilling experts, to ensure the success and efficiency of your well.
Checking for Permits and Regulations
Before you start drilling your own deep water well, it is important to check for any permits and regulations that may be required in your area. These permits and regulations are in place to protect the groundwater and ensure the safety of your well.
Permits
Check with your local authority or water management district to determine if a permit is required for drilling a well on your property. They will provide you with the necessary paperwork to apply for a permit. Some areas may also require a separate permit for well construction and installation.
Regulations
It is essential to comply with the regulations set forth by your local authority or water management district. These regulations may include well setback distances to prevent contamination, well casing requirements, and specific construction standards.
There may also be regulations regarding the type of pump system you can use, the maximum depth of the well, and ongoing maintenance requirements. Understanding and adhering to these regulations will help ensure the longevity and efficiency of your well.
Consultation
Consider consulting with a professional well driller or contractor who specializes in drilling deep water wells. They will have knowledge of local regulations and can guide you through the permitting process. They can also provide expert advice on the best drilling techniques and equipment to use for your specific location.
Conclusion
By checking for permits and regulations before starting drilling, you can avoid potential legal issues and ensure that your deep water well is constructed safely and in compliance with local guidelines. Remember to consult with professionals if you have any doubts or questions throughout the process.
Choosing the Right Equipment
1. Determine the Well Type
Before selecting equipment for drilling your own deep water well, you need to determine the type of well you want to create. There are two main options: shallow wells and deep wells. Shallow wells typically range from 25 to 50 feet in depth and are suitable for areas with a high water table. On the other hand, deep wells can go as deep as 1000 feet or more and are necessary in areas with a lower water table.
Once you’ve determined the depth of your well, you can move on to selecting the appropriate equipment.
2. Drill Rig
The most important piece of equipment for drilling a deep water well is a drill rig. A drill rig is a machine that is capable of drilling deep into the ground to reach the water table. When choosing a drill rig, consider the depth you need to reach, the type of soil in your area, and your budget.
There are various types of drill rigs available, including rotary rigs, cable tool rigs, and auger rigs. Rotary rigs are the most common choice for deep water drilling, as they use a rotating drill bit to penetrate the ground. Cable tool rigs are typically used for shallow wells and utilize a cable that raises and drops a heavy drill bit to break through the soil. Auger rigs are commonly used for soil sampling and are not suitable for drilling deep water wells.
3. Drill Bits
Drill bits are the cutting tools used by the drill rig to penetrate the ground. The type of drill bit you choose will depend on the type of soil in your area. Harder soils may require diamond drill bits, while softer soils can be drilled using softer materials like carbide. It’s important to have different types and sizes of drill bits on hand to handle various soil conditions.
4. Casing
Casing is the pipe that is inserted into the well after it has been drilled. The casing provides support to the well and prevents it from collapsing. It also helps to protect the water from contamination. The size and material of the casing will depend on the depth and diameter of your well.
5. Other Equipment
In addition to the main equipment mentioned above, there are a few other tools and accessories you may need for drilling your own deep water well. These include a water pump, a generator to power the drill rig, water hoses, and drilling mud. It’s important to have a complete list of all the necessary equipment before starting the drilling process.
Overall, choosing the right equipment for drilling your own deep water well is crucial for a successful project. Take into account the depth of the well, the type of soil, and your budget when making your equipment selections. It’s also recommended to consult with professionals or experienced well drillers to ensure you have everything you need for a safe and efficient drilling process.
Types of Well Drilling Tools
1. Drill Bits
Drill bits are one of the most important tools used in well drilling. They are designed to cut through different types of rocks and soils. There are several types of drill bits available for well drilling, including:
- Diamond drill bits
- Carbide drill bits
- PDC (Polycrystalline Diamond Compact) drill bits
2. Mud Pumps
Mud pumps are used to circulate drilling fluid through the drill pipe to the drill bit. This helps to remove cuttings and cool the drill bit during well drilling. Mud pumps come in different sizes and capacities, depending on the depth and diameter of the well being drilled.
3. Drill Pipes
Drill pipes are hollow steel pipes that connect the drill bit to the surface. They are responsible for transferring the drilling fluid and providing the necessary torque and weight to the drill bit. Drill pipes come in various lengths, diameters, and grades to suit different well drilling conditions.
4. Drill Collars
Drill collars are heavy, thick-walled steel pipes placed between the drill pipes and the drill bit. They add weight to the drill bit, aiding in the penetration of hard rocks and reducing bending of the drill string. Drill collars are typically made of non-magnetic material to prevent interference with downhole electronic instruments.
5. Fishing Tools
Fishing tools are used to recover lost or stuck drill strings and equipment from the wellbore. These tools have various sizes and configurations, including overshots, spears, and mills. Fishing tools require specialized knowledge and skills to operate, as extracting stuck equipment can be challenging.
6. Casing and Cementing Tools
Casing and cementing tools are used to install the well casing and seal the annulus between the casing and the wellbore. This ensures the stability of the well and prevents the contamination of groundwater. Casing tools include casing hangers, centralizers, and float shoes, while cementing tools include cementing plugs and stage collars.
7. Well Logging Tools
Well logging tools are used to obtain data about the subsurface formations during or after well drilling. These tools include wireline logs, MWD (Measurement While Drilling) sensors, and LWD (Logging While Drilling) tools. Well logging provides important information for reservoir evaluation, well performance optimization, and drilling decision making.
8. Well Completion Tools
Well completion tools are used to prepare the well for production after drilling. These tools include packers, tubing, perforating guns, and production valves. Well completion tools ensure the efficient flow of oil or gas from the reservoir to the surface and can be tailored to the specific needs of the well.
| Tool | Function |
|---|---|
| Drill Bits | Cut through rocks and soils |
| Mud Pumps | Circulate drilling fluid |
| Drill Pipes | Transfers fluid and provides torque |
| Drill Collars | Add weight and prevent bending |
| Fishing Tools | Recover lost or stuck equipment |
| Casing and Cementing Tools | Install casing and seal annulus |
| Well Logging Tools | Obtain subsurface data |
| Well Completion Tools | Prepare well for production |
Cost Considerations
Drilling your own deep water well can be a cost-effective solution compared to hiring a professional drilling company. However, there are still certain costs to consider before embarking on a DIY well drilling project.
Equipment Costs
To drill a deep water well, you will need to invest in the necessary equipment, such as a drill rig, pipes, and various drilling bits. The cost of these tools can vary depending on the quality and type of equipment you choose. It’s important to research and compare prices to find the best deal that suits your budget and needs.
Permit and Regulatory Costs
Before drilling a well, you may need to obtain permits or comply with certain regulations set by your local government or water management authorities. These permits and regulatory costs can vary depending on the region and the depth of the well. It’s essential to check with the relevant authorities to determine the requirements and associated costs.
Site Preparation Costs
Preparing the drilling site can also add to the overall cost of drilling a deep water well. This may include clearing vegetation, leveling the ground, or creating access roads for drilling equipment. The cost of site preparation will depend on the condition of the chosen location and the amount of work required.
Maintenance and Repair Costs
Once your deep water well is drilled, it will require regular maintenance and occasional repairs. This can include replacing worn-out parts, repairing leaks, or treating the water for any impurities. It’s important to factor in these ongoing costs when considering the overall expenses of drilling your own well.
Water Testing and Treatment Costs
Before using the water from your well, it’s important to test it for any potential contaminants or impurities. Water testing kits or professional laboratory testing services can incur additional costs. Additionally, if the water needs treatment or filtration to make it potable, there will be additional expenses for purchasing and maintaining the necessary equipment.
| Expense | Cost Range |
|---|---|
| Equipment | $1,000 – $10,000 |
| Permits and Regulations | $100 – $1,000 |
| Site Preparation | $500 – $2,000 |
| Maintenance and Repair | $100 – $500 per year |
| Water Testing and Treatment | $50 – $500 |
It’s important to keep in mind that these cost ranges are only estimates and can vary significantly depending on various factors, including the size and complexity of the well, availability of resources, and geographical location.
Drilling Process
1. Preparing the Equipment
Before you start drilling your own deep water well, it’s important to make sure you have all the necessary equipment. Here are the basic tools you will need:
- Drilling rig
- Drill bit
- Drill pipe
- Water pump
- Well casing
- Well cap
2. Choosing the Drill Site
Once you have gathered your equipment, you need to choose the location for your well. Look for an area with a good source of groundwater and sufficient space for the drilling rig.
It’s also important to check with your local authorities for any regulations or permits required for drilling a well on your property.
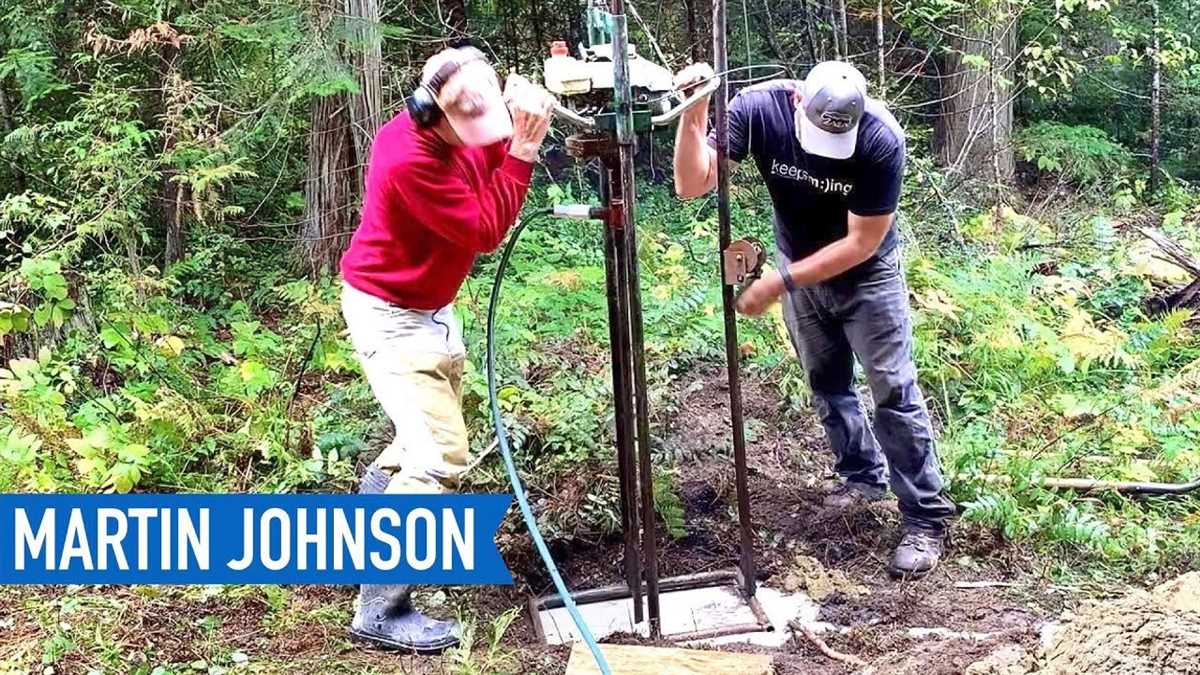
3. Setting up the Drilling Rig
Set up the drilling rig in the chosen location. The rig should be stable and securely anchored to prevent any accidents or injuries during the drilling process.
Attach the drill bit and drill pipe to the rig, ensuring they are properly secured.
4. Starting the Drilling
Begin drilling by slowly rotating the drill bit while applying downward pressure. This will allow the drill bit to slowly penetrate the ground.
As the drilling progresses, periodically remove the drill pipe and flush the hole with water to remove any debris and ensure smooth drilling.
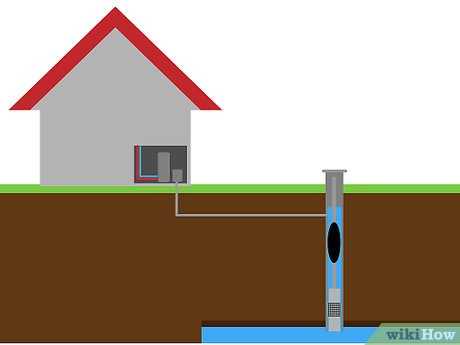
5. Installing the Well Casing
Once you have reached the desired depth, install the well casing. The casing is a protective pipe that prevents the well from collapsing and contaminations from entering the water source.
Lower the casing into the hole and secure it in place using cement or grout. Make sure the casing extends above the ground level to accommodate the well cap.
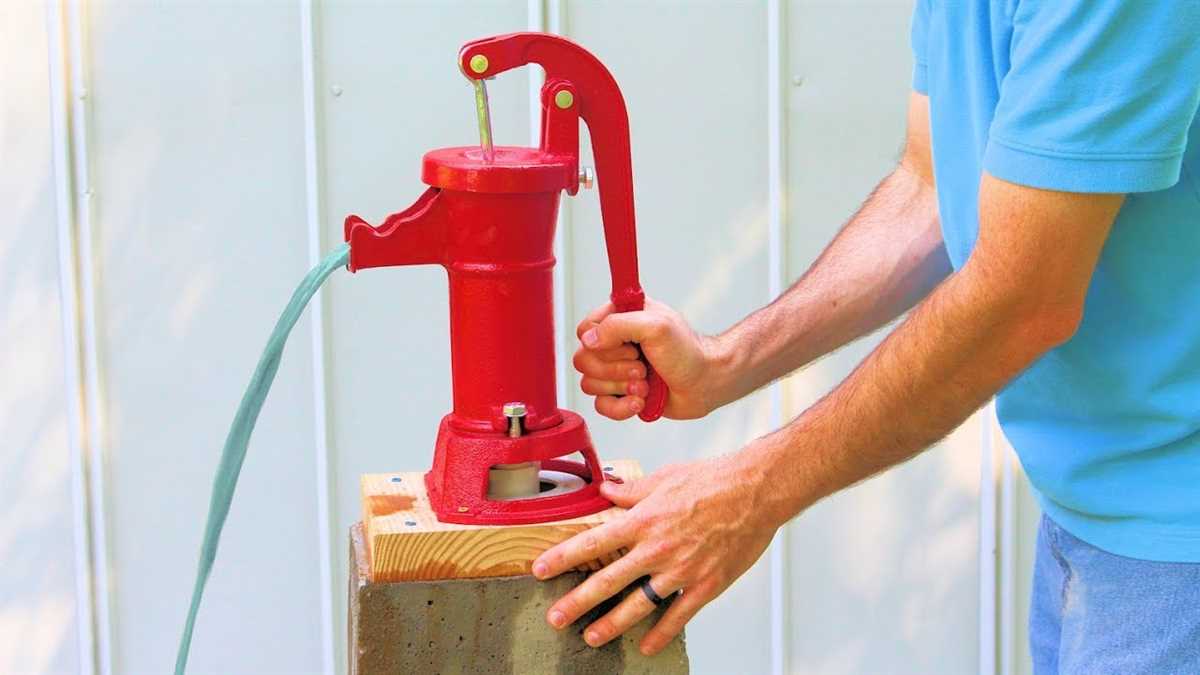
6. Completing the Well
After the casing is installed, complete the well by attaching the water pump and well cap. The water pump will draw water from the well, while the well cap will prevent debris and contaminants from entering the well.
Test the well to ensure proper water flow and quality before using it for any purposes.
7. Maintaining the Well
Regular maintenance of your well is essential to keep it in good working condition. Periodically inspect the well for any signs of damage or contamination.
In addition, it’s important to test the water quality on a regular basis to ensure it is safe for consumption.
8. Safety Measures
When drilling your own deep water well, it’s important to prioritize safety. Follow all safety guidelines provided by the manufacturer of your drilling rig and wear appropriate protective gear.
Be cautious when operating the drilling rig and avoid any unnecessary risks. If you are unsure about any aspect of the drilling process, consult with a professional or seek guidance from experienced well drillers.
| Pros | Cons |
|---|---|
| Cost-effective in the long run | Requires significant upfront investment |
| Provides access to clean and fresh water | Requires technical knowledge and skills |
| Allows greater control over water quality | May encounter challenges in finding sufficient groundwater |
| Independence from municipal water supply | Requires regular maintenance and testing |
Step-by-Step Guide

1. Gather the necessary materials
Gather the following materials before you start drilling your own deep water well:
- Water well drill rig
- Drill pipes
- Drill bits
- Water pump
- Water hoses
- Well casing
- Well screen
- Well cap
- Sand and gravel for well development
2. Choose the drilling location
Select a suitable location for drilling your well. Consider factors such as soil composition, groundwater availability, and distance from existing water sources. Consult local authorities or experts, if necessary, to ensure compliance with regulations and to obtain necessary permits.
3. Set up the drill rig
Set up the drill rig according to the manufacturer’s instructions. Make sure the rig is stable and secure before proceeding with drilling. Connect the water pump and hoses to ensure a continuous water supply for cooling the drill bit and flushing out the cuttings.
4. Start drilling
Lower the drill bit into the borehole and begin drilling. Apply steady downward pressure while rotating the drill pipes to gradually penetrate the ground. Monitor the drilling progress by measuring the depth and checking the cuttings brought up by the drill bit.
5. Install well casing

Once you have reached the desired depth, remove the drill bit and attach the well casing. Lower the casing into the borehole and secure it in place with cement or grout to prevent collapse. Trim the casing to the desired length and make sure it extends above the ground level.
6. Install well screen
Attach the well screen to the bottom of the well casing, allowing water to enter while keeping out debris. Ensure that the screen is securely attached and properly aligned with the perforations in the well casing.
7. Develop the well
Develop the well by pouring sand and gravel into the borehole around the well screen. This helps to filter and stabilize the water flow. Pump water into the well to clean out any remaining cuttings and to clear the well of any obstructions.
8. Install well cap
Finally, install the well cap on top of the well casing to protect the well from contaminants and to provide easy access for maintenance and testing. Make sure the cap is properly sealed to prevent the entry of insects, animals, or pollutants.
9. Test the well
Once the well is fully installed, test the water flow and quality. Run the pump to check the water pressure and flow rate. Collect a water sample and have it tested in a laboratory to ensure its safety and suitability for drinking or other uses.
10. Maintain the well
Maintain your well regularly by inspecting and cleaning the well cap, checking the water level, and monitoring water quality. Schedule professional inspections and maintenance as recommended by experts to ensure the longevity and performance of your well.
FAQ:
What materials do I need to drill my own deep water well?
To drill your own deep water well, you will need a drill rig or a well drilling kit, which typically includes a drill bit, drilling pipes, a pump, and a water tank. You will also need safety equipment such as gloves, goggles, and a hard hat. Additionally, you may need a shovel, a sump pump, and sand or gravel for filling the well.
Is it possible to drill a deep water well without any prior experience?
While it is technically possible to drill a deep water well without any prior experience, it is not recommended. Drilling a well is a complex and potentially dangerous process that requires knowledge and skill. It is best to hire a professional well driller who has the necessary expertise and equipment to ensure the job is done correctly and safely.
How deep should I drill my water well to ensure a reliable water supply?
The depth at which you should drill your water well depends on various factors, such as the geology of the area and the water table level. In general, a well should be drilled deep enough to reach the aquifer, which is the underground layer of rock or sediment that holds water. A professional well driller can assess your specific situation and determine the optimal depth for your well.
Can I use a hand-held drill to drill my own deep water well?
No, a hand-held drill is not suitable for drilling a deep water well. Drilling a well requires a powerful and specialized drill rig or a well drilling kit that is designed for deep drilling. These tools have the necessary horsepower and drilling capacity to penetrate the ground and reach the water source at greater depths.
Video:


Meet Harrison Clayton, a distinguished author and home remodeling enthusiast whose expertise in the realm of renovation is second to none. With a passion for transforming houses into inviting homes, Harrison's writing at https://thehuts-eastbourne.co.uk/ brings a breath of fresh inspiration to the world of home improvement. Whether you're looking to revamp a small corner of your abode or embark on a complete home transformation, Harrison's articles provide the essential expertise and creative flair to turn your visions into reality. So, dive into the captivating world of home remodeling with Harrison Clayton and unlock the full potential of your living space with every word he writes.


