Creating a Drill Down Functionality in Excel

Excel is a powerful tool that allows users to analyze and organize large sets of data. One of the useful features it offers is the ability to create a drill down functionality, which allows users to navigate through different levels of data and access more detailed information. This can be particularly useful when dealing with complex datasets or when presenting data to others.
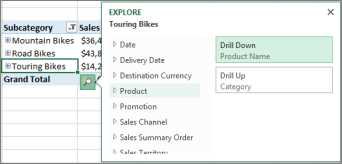
Drill down is a term used to describe the process of breaking down aggregated data into more detailed levels. In Excel, this can be done by creating hierarchical data structures using features such as PivotTables, Slicers, or Grouping. By using these tools, users can easily navigate through different levels of data, revealing more specific information as they go.
For example, let’s say you have a dataset that includes sales data for different products, regions, and time periods. By creating a PivotTable, you can initially display the total sales for each product category. However, by using the drill down functionality, you can then expand each category to see the sales for individual products, and further expand to see the sales for each region and time period.
Using the drill down functionality in Excel can help users uncover insights and identify trends in their data. It allows for a more detailed analysis and provides a clearer understanding of the underlying data. Additionally, it makes it easier to present data to others in a structured and organized way, allowing them to drill down into the data themselves and explore it at their own pace.
What is Drill Down Functionality?
The drill down functionality is a feature in Excel that allows users to analyze data in a hierarchical manner, by expanding or collapsing levels of detail. It is a powerful tool for data analysis and visualization, as it enables users to delve into the details of a dataset and understand the underlying patterns and trends.

Using the drill down functionality, users can start with a high-level summary view of the data and then progressively drill down into more detailed levels of information. This allows for a comprehensive exploration of the data, revealing insights that might not be apparent at first glance.
The drill down functionality is particularly useful when dealing with large datasets, as it allows users to focus on specific subsets of the data without overwhelming them with information. By drilling down into the data, users can narrow their focus and answer specific questions or address specific issues.
Key Features of Drill Down Functionality:
- Expanding and collapsing levels of detail: Users can expand a summary view to reveal more detailed information, or collapse the details to return to a higher-level summary.
- Interactive exploration: Users can interact with the data by selecting specific elements to drill down into, such as categories, subcategories, or time periods.
- Visualization options: Users can choose different visualizations to represent the data at each level of detail, such as charts, graphs, or tables.
- Contextual information: Drill down functionality often provides additional contextual information to help users understand the data at each level, such as tooltips, labels, or descriptions.
Benefits of Drill Down Functionality:
- Deeper insights: By drilling down into the data, users can uncover hidden patterns, trends, and correlations that may not be apparent at a higher level.
- Customizable analysis: Drill down functionality allows users to tailor their analysis to their specific needs, focusing on the aspects of the data that are most relevant to their analysis.
- Enhanced decision-making: With more detailed and comprehensive information, users can make more informed and data-driven decisions.
- Interactive data exploration: Drill down functionality encourages users to interact with the data, enabling a more engaging and exploratory analysis experience.
In summary, the drill down functionality in Excel empowers users to explore and analyze data in a hierarchical manner, providing deeper insights and enabling more informed decision-making.

Why Use Drill Down Functionality in Excel?
- Efficient Data Analysis: The drill down functionality in Excel allows users to quickly and efficiently analyze large amounts of data. By drilling down into specific data points, users can gain more detailed insights and uncover patterns or trends that may not be immediately apparent.
- Better Decision Making: By drilling down into specific data, users can better understand the factors that contribute to certain outcomes or results. This deeper level of analysis can help inform decision-making processes and lead to more informed and strategic actions.
- Identifying Areas for Improvement: Drill down functionality can help identify areas for improvement or potential problems within a dataset. By analyzing data at a granular level, users can pinpoint specific areas that may require attention or further investigation.
- Streamlined Reporting: When presenting complex data to others, drill down functionality can help streamline the reporting process. Users can provide high-level summaries and then allow others to drill down into the details as needed, ensuring that everyone gets the information they need without overwhelming them with unnecessary details.
- Enhanced Data Visualization: Drill down functionality can enhance data visualization by allowing users to interact with graphs, charts, or tables. Users can drill down into specific data points within a visualization, allowing for a more dynamic and engaging analysis experience.
- Time-Saving: By using drill down functionality, users can save time by quickly focusing on the specific data they need to analyze. This eliminates the need to manually filter or sort data, allowing users to spend more time on the analysis itself.
Overall, the drill down functionality in Excel is a powerful tool that can enhance data analysis, decision-making, and reporting processes. Whether you’re working with a large dataset or presenting data to others, using drill down functionality can help you uncover insights, identify areas for improvement, and make more informed decisions.
Step-by-Step Guide
1. Set up your data
First, you need to set up your data in Excel. This can be done by entering your data directly into the cells or by importing data from an external source. Make sure that your data is organized in a tabular format with rows representing individual records and columns representing different attributes or categories.
2. Define your hierarchy
Next, you need to define the hierarchy that you want to create for your drill down functionality. This hierarchy will determine the levels of detail that you can drill down into. For example, if you have a sales data set, you might want to create a hierarchy with levels such as Region, Country, and Product.
3. Create a summary table
To enable drill down functionality, you need to create a summary table that summarizes your data at each level of the hierarchy. This summary table will be used to display the data at the different levels of detail. You can use Excel formulas such as SUM, AVERAGE, and COUNTIFS to aggregate your data in the summary table.

4. Add hyperlinks
Once you have created the summary table, you can add hyperlinks to enable drill down functionality. You can do this by selecting a cell in the summary table and using the “Insert Hyperlink” feature in Excel. In the hyperlink dialog box, you can select the cell or range of cells that you want to drill down into.
5. Format the summary table
To make your drill down functionality more user-friendly, you can format the summary table to make it more visually appealing. You can use Excel’s formatting options to apply colors, borders, and other formatting styles to the cells in the summary table.
6. Test the drill down functionality
Finally, you should test the drill down functionality to make sure that it works as expected. Click on the hyperlinks in the summary table to drill down into the detailed data and verify that the data is displayed correctly. If there are any issues, you can go back and make necessary adjustments to your data or formulas.
7. Customize the drill down functionality
If you want to customize the drill down functionality further, you can explore additional Excel features such as PivotTables, Slicers, and Data Validation. These features allow you to create more advanced drill down functionality, such as filtering data based on specific criteria or creating interactive dashboards.

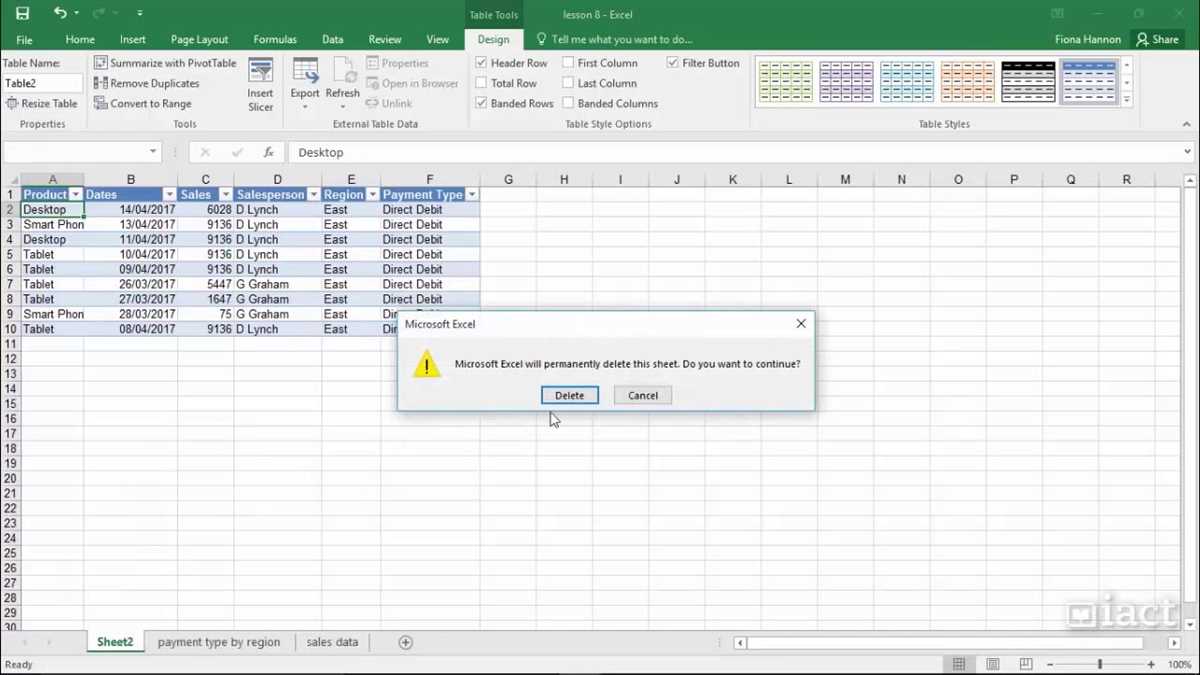
8. Share your drill down functionality
Once you are satisfied with your drill down functionality, you can share your Excel file with others. You can either share the entire file or save the summary table as a standalone worksheet that can be accessed separately. Make sure to provide clear instructions on how to use the drill down functionality.
Step 1: Setting up the Data
To create a drill-down functionality in Excel, you need to first set up the data in a tabular format. This data will serve as the basis for the drill-down feature.
Here are the steps to set up the data:
- Create a table: Start by creating a table with the necessary columns to store your data. Each row in the table represents a unique record or data point.
- Organize your data: Make sure your data is organized in a logical and meaningful way. For example, if you’re analyzing sales data, you might have columns for date, product, quantity sold, and revenue.
- Add hierarchical levels: If you want to create a drill-down functionality, you’ll need to add hierarchical levels to your data. This means that you should have columns that represent different levels of detail. For example, you might have a State column, a City column, and a Store column to drill down from the state level to the store level.
- Assign unique identifiers: In order to create a drill-down functionality, each record in your table should have a unique identifier. This can be a combination of the hierarchical levels or a separate column with unique values.
- Create summary tables: Depending on your needs, you may want to create summary tables that aggregate the data at different hierarchical levels. This will allow you to display summarized information when drilling down into the data.
Once you have set up your data, you can proceed to the next step of creating the drill-down functionality in Excel.
Step 2: Creating the Main Level
Now that we have set up our data, it’s time to create the main level of our drill down functionality. This will be the level that the user sees when they first open the workbook.

To create the main level:
- Select the cell where you want to create the drill down functionality. This will be the cell that the user clicks on to drill down to the next level.
- Go to the “Insert” tab on the Excel ribbon and click on the “Hyperlink” button.
- In the “Insert Hyperlink” dialog box, select “Place in This Document” on the left-hand side.
- In the “Cell Reference” section, select the sheet that contains the next level of data and then select the cell range that corresponds to the next level of data.
- Click “OK” to create the hyperlink.
Repeat this process for each cell that you want to have drill down functionality. Each hyperlink should point to the next level of data.
In addition to creating the hyperlinks, you can also format the cells to indicate that they have drill down functionality. For example, you can change the background color or add an arrow icon. This will make it more obvious to the user that they can drill down into the data.
Once you have created the main level and added the necessary hyperlinks and formatting, you can test the drill down functionality by clicking on the cells. They should take you to the next level of data.
In the next step, we will learn how to create the subsequent levels of data.
Step 3: Adding Drill Down Functionality
1. Creating a Drill Down Button
In order to add drill down functionality to your Excel sheet, you will need to create a button that users can click on to expand or collapse the data. Follow these steps to create a drill down button:
- Select the cell where you want to place the drill down button.
- Go to the “Insert” tab on the Excel ribbon and click on the “Shapes” button.
- Select the shape that you want to use as the button (e.g., a rectangle or an arrow).
- Click and drag on the worksheet to draw the shape.
- Right-click on the shape and select “Edit Text” to add a label to the button (e.g., “Drill Down”).
- Click outside of the shape to finalize the label.
2. Linking the Drill Down Button to the Data
Once you have created the drill down button, you will need to link it to the data that you want to expand or collapse. Follow these steps to link the button to the data:
- Select the cell containing the drill down button.
- Go to the “Formulas” tab on the Excel ribbon and click on the “Define Name” button.
- In the “Name” field, enter a unique name for the drill down button (e.g., “DrillDownButton”).
- In the “Refers to” field, enter the cell range that you want to show or hide when the button is clicked (e.g., A1:D10).
- Click “OK” to save the name.
3. Writing VBA Code to Expand or Collapse the Data
Now that you have created the drill down button and linked it to the data, you will need to write some VBA code to expand or collapse the data when the button is clicked. Follow these steps to write the VBA code:
- Press “Alt + F11” to open the Visual Basic for Applications (VBA) editor.
- In the Project Explorer window, double-click on the sheet where you placed the drill down button.
- In the code window that appears, enter the following VBA code:
“`vba
Private Sub Worksheet_SelectionChange(ByVal Target As Range)
If Not Intersect(Target, Range(“DrillDownButton”)) Is Nothing Then
Range(“DrillDownButton”).EntireRow.Hidden = Not Range(“DrillDownButton”).EntireRow.Hidden
End If
End Sub
“`
Note: Make sure to replace “DrillDownButton” with the name that you assigned to the button in step 2.
4. Testing the Drill Down Functionality
After writing the VBA code, you can test the drill down functionality by clicking on the drill down button. The data linked to the button should expand or collapse depending on its current state.
| Button State | Expanded Data |
|---|---|
| Collapsed | The linked data is hidden from view. |
| Expanded | The linked data is visible. |
By following these steps, you can easily create and implement drill down functionality in Excel. This allows users to navigate through complex datasets and view specific details when needed.
Step 4: Testing and Customizing
Testing the Drill Down Functionality
After setting up the drill down functionality in Excel, it is important to test and validate if the feature is working as expected.
- Select a cell that contains a drill down button.
- Click on the drill down button to expand the data.
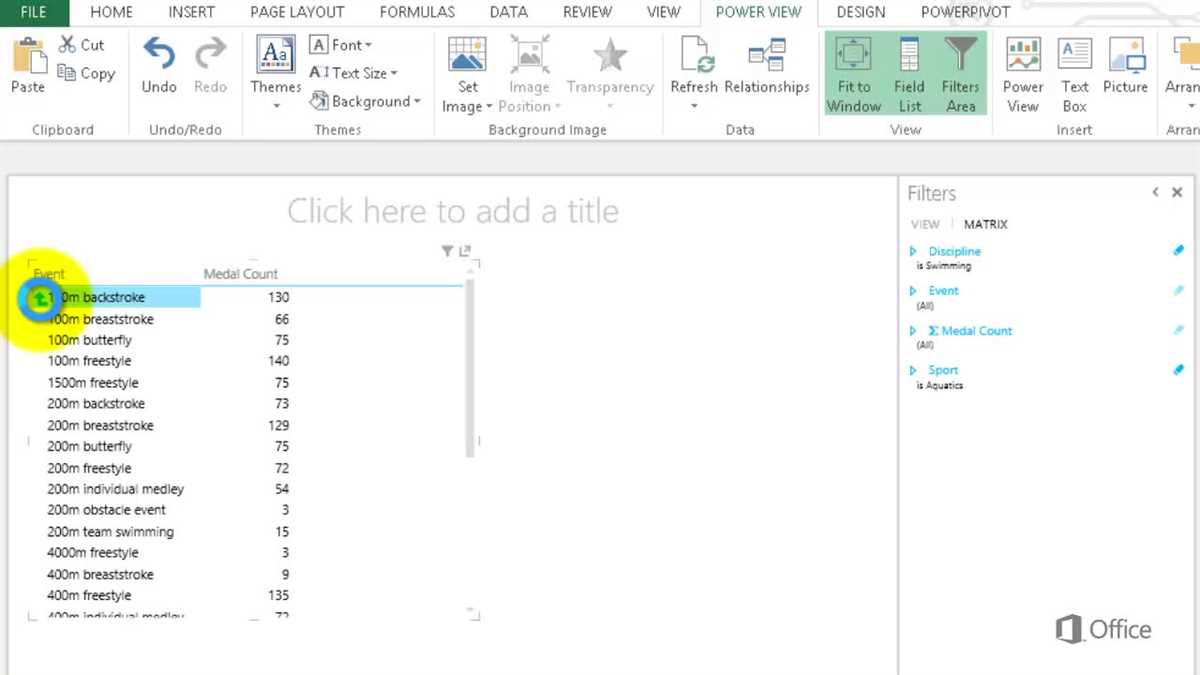
- Verify that the expanded data matches the original data and the drill down button has changed to a drill up button.
- Click on the drill up button to collapse the expanded data.
- Verify that the collapsed data matches the original data and the drill up button has changed back to a drill down button.
Customizing the Drill Down Functionality
Once you have tested the drill down functionality and ensured that it is working properly, you can customize it to better suit your needs.
- Modify the button labels: You can change the text on the drill down and drill up buttons to provide more descriptive labels.
- Change the button appearance: You can modify the button styles, such as font, color, and size, to make them more visually appealing.
- Add conditional formatting: You can use conditional formatting to highlight specific data points or apply visual cues to indicate certain conditions in the drilled down data.
- Create additional drill down levels: Depending on your data structure, you can create multiple levels of drill down to provide a more in-depth analysis.
- Add navigation buttons: If your data is organized in multiple sheets or workbooks, you can add navigation buttons to easily switch between different drill down views.
Conclusion
By testing and customizing the drill down functionality in Excel, you can ensure that it meets your requirements and provides a user-friendly experience for analyzing your data in more detail. With the ability to expand and collapse data levels, you can easily navigate through large datasets and focus on specific areas of interest.
Tips and Best Practices
1. Organize your data
Before implementing a drill-down functionality in Excel, it is crucial to ensure the data is properly organized. This includes organizing it in a table format with clear headers and consistent formatting. An organized dataset will make it easier to create the drill-down feature and ensure accurate results.
2. Use filters to simplify data display
Filters in Excel are a powerful tool that can help simplify the display of data in a drill-down functionality. By using filters, you can enable users to easily select specific criteria to view in more detail, without overwhelming them with excessive data. This improves the user experience and makes it easier to analyze the information.
3. Avoid excessive nesting levels
When creating a drill-down functionality, it is important to strike a balance between providing enough detail and avoiding excessive nesting levels. Excessive nesting can make the drill-down feature confusing and difficult to navigate. It is recommended to limit the number of levels to keep the user interface clear and user-friendly.
4. Create clear and intuitive navigation
The success of a drill-down functionality in Excel heavily relies on its navigation. Make sure to create clear and intuitive navigation options, such as hyperlinks or buttons, that allow users to easily navigate between different levels of detail. This will enhance the usability of the feature and make it more efficient for users to find the information they need.
5. Test your drill-down feature
Before finalizing your drill-down functionality, it is essential to thoroughly test it. Check for any errors, inconsistencies, or performance issues. Test the feature with different datasets and make sure it functions as intended. Testing will help identify and address any issues before releasing the functionality to the end-users.
6. Provide clear instructions and tooltips
When implementing a drill-down functionality in Excel, it is important to provide clear instructions and tooltips to help users navigate and understand how to use the feature. Including tooltips on buttons or cells that trigger the drill-down will provide additional guidance and improve the user experience.
7. Consider the scalability of your solution
If you anticipate that the dataset you’re working with will grow over time, it is important to consider the scalability of your drill-down solution. Ensure that it can handle larger datasets without sacrificing performance. Optimize your formulas, use efficient data structures, and regularly monitor the performance to ensure a smooth experience even as the dataset grows.
Tip 1: Organizing the Data
One of the key steps in creating a drill down functionality in Excel is organizing your data in a clear and structured manner. This will make it easier to navigate and analyze the data at different levels of detail.
Here are a few tips to help you organize your data:
- Use a consistent naming convention: Assign meaningful names to your data sets, columns, and rows. This will make it easier to identify and reference specific data points when drilling down.
- Group related data together: Group similar data points together using a consistent structure. For example, you can organize your data into categories, subcategories, and sub-subcategories. This will help in organizing and analyzing the data at different levels.
- Sort your data: Arrange your data in a logical order, such as alphabetical, numerical, or chronological. Sorting your data will make it easier to find specific information when drilling down.
- Use clear and concise headers: Clearly label your columns and rows with descriptive headers. This will allow you to quickly understand the content of each column or row when examining the data at different levels.
- Add filters: If applicable, add filters to your data to allow for easy filtering and sorting. Filters can help you quickly narrow down the data to specific criteria when drilling down.
By following these tips, you can create a well-organized and structured data set that is easy to navigate and analyze when implementing the drill down functionality in Excel.
Tip 2: Using Conditional Formatting
Conditional formatting is a powerful tool in Excel that allows you to highlight cells based on certain criteria. This can be very useful when creating a drill down functionality in Excel, as it can help you visually identify the data that you want to drill down into.
Here are some tips on how to use conditional formatting effectively:
- Highlighting cells: You can use conditional formatting to highlight cells that meet a certain condition. For example, you can highlight cells that contain a specific value, cells that are higher or lower than a certain value, or cells that belong to a certain category. This can help you quickly identify the data that you want to drill down into.
- Color scales: Another useful feature of conditional formatting is the ability to apply color scales. This allows you to create a gradient of colors based on the values in a range of cells. For example, you can apply a color scale to a column of numbers, with the lowest value being red and the highest value being green. This can help you quickly identify the data that requires further analysis.
- Data bars: Conditional formatting also allows you to add data bars to cells. Data bars are horizontal bars that represent the values in a range of cells. The length of the data bar corresponds to the value in the cell. This can help you visualize the relative values of the data and identify trends or patterns.
Overall, conditional formatting is a powerful feature in Excel that can greatly enhance the drill down functionality. By using different formatting options, you can visually identify the data that you want to focus on and make informed decisions based on the insights you gain.
FAQ:
What is drill down functionality in Excel?
Drill down functionality in Excel allows users to delve into the details of a specific data point by expanding or collapsing rows or columns to view more or less specific information.
How can I create a drill down functionality in Excel?
To create a drill down functionality in Excel, you can use tools such as grouping and outlining to hide or display specific rows or columns of data. You can also utilize Excel’s PivotTables or Data Analysis tools to create interactive reports that allow users to drill down into more detailed data.
What are some benefits of using drill down functionality in Excel?
Using drill down functionality in Excel allows users to quickly analyze and understand complex data sets by providing them with the ability to focus on specific data points of interest. It also enables users to easily navigate through large data sets to identify patterns or outliers.
Can I create drill down functionality in Excel without using macros?
Yes, you can create drill down functionality in Excel without using macros. Excel’s built-in features like grouping, outlining, and PivotTables provide the necessary tools to implement drill down functionality without the need for macros.
What are some limitations of drill down functionality in Excel?
Some limitations of drill down functionality in Excel include the inability to drill down into non-contiguous ranges of data, difficulty in maintaining data integrity when filtering or hiding data, and potential performance issues when dealing with very large data sets.
Can I customize the drill down functionality in Excel to suit my specific needs?
Yes, you can customize the drill down functionality in Excel to suit your specific needs. By using advanced Excel features like VBA (Visual Basic for Applications), you can create custom macros or add-ins to enhance the drill down experience and tailor it to your requirements.
Are there any alternative tools or software that offer drill down functionality?
Yes, there are alternative tools and software that offer drill down functionality. Some popular examples include data visualization platforms like Tableau and Power BI, which provide more advanced and interactive drill down capabilities compared to Excel.
Video:


Meet Harrison Clayton, a distinguished author and home remodeling enthusiast whose expertise in the realm of renovation is second to none. With a passion for transforming houses into inviting homes, Harrison's writing at https://thehuts-eastbourne.co.uk/ brings a breath of fresh inspiration to the world of home improvement. Whether you're looking to revamp a small corner of your abode or embark on a complete home transformation, Harrison's articles provide the essential expertise and creative flair to turn your visions into reality. So, dive into the captivating world of home remodeling with Harrison Clayton and unlock the full potential of your living space with every word he writes.


