Choosing the Right Nail Drill Bit for Gentle Gel Polish Removal

When it comes to removing gel polish, using a nail drill can be a quick and efficient method. However, choosing the right nail drill bit is crucial for a gentle and safe removal process. With so many options available, it can be overwhelming to determine which bit is best suited for your needs.
One of the most important factors to consider when selecting a nail drill bit for gel polish removal is the material. Carbide bits are popular choices due to their durability and ability to quickly remove gel polish without causing damage to the natural nail. These bits are designed to be long-lasting and can handle multiple gel polish removals without losing their effectiveness.
In addition to material, the shape of the nail drill bit is also important. Cone-shaped bits are commonly used for removing gel polish as they allow for precise and gentle removal around the cuticle area. Barrel bits, on the other hand, are more versatile and can be used for both gel polish removal and nail shaping.
It is also important to consider the grit of the nail drill bit. The grit refers to the coarseness of the bit’s surface and can range from fine to coarse. For gel polish removal, a medium or fine grit is recommended as it provides a balance between effectiveness and gentleness. Coarse grit bits can be too harsh on the natural nail, while fine grit bits may take longer to remove the gel polish.
Before using a nail drill bit for gel polish removal, it is important to properly educate yourself on the proper technique and safety precautions. Using the wrong bit or applying too much pressure can cause damage to the natural nail. Always start with a low speed and gradually increase as needed. Remember to prioritize the health and safety of your nails when choosing a nail drill bit for gel polish removal.
Why Gentle Gel Polish Removal is Important
Gel polish has become extremely popular in recent years due to its long-lasting and chip-resistant properties. However, it is important to remove gel polish properly to avoid damaging the natural nail and causing unnecessary pain or discomfort.

Here are a few reasons why gentle gel polish removal is important:
- Preserves the natural nail: Aggressive removal techniques can damage the nail bed and weaken the natural nail. Gentle gel polish removal helps to preserve the health and integrity of the nail, allowing it to grow and remain strong.
- Avoids pain and discomfort: Roughly scraping and filing the gel polish can cause pain, heat, and discomfort to the client. By using gentle removal techniques, you can minimize these unpleasant sensations and create a more positive experience for your clients.
- Reduces the risk of infection: When gel polish is improperly removed, it can leave behind small pieces of polish or residue. This can create an ideal environment for bacteria or fungi to grow, increasing the risk of infection. Gentle removal ensures that all traces of gel polish are thoroughly removed, minimizing the chances of infection.
- Prevents nail thinning and damage: Aggressive removal techniques can thin out the nails and lead to brittleness or damage. Gentle removal is much gentler on the natural nail, making it less prone to breakage or thinning.
Therefore, it is crucial to choose the right nail drill bit for gentle gel polish removal. By using a bit that is designed specifically for gel polish removal, you can ensure a more efficient and gentle removal process, minimizing the potential risks and promoting healthier nails.
Understanding Nail Drill Bits
When it comes to using a nail drill for gentle gel polish removal, it is important to understand the different types of nail drill bits available. Each type of bit is designed for specific purposes and can be used to achieve different results.
1. Carbide Bits
Carbide bits are commonly used for gel polish removal as they are strong and durable. These bits have a coarse grit and are able to quickly and efficiently remove gel polish without causing damage to the natural nail. Carbide bits are available in various shapes such as barrel, cone, and flame, allowing for different areas of the nail to be easily accessed.
2. Diamond Bits
Diamond bits are another popular choice for gel polish removal. These bits have a fine grit and are gentle on the natural nail while still effectively removing the gel polish. Diamond bits are great for precision work as they can easily reach tight areas around the cuticles and sidewalls. They are available in various shapes including flame, tapered, and cylinder.

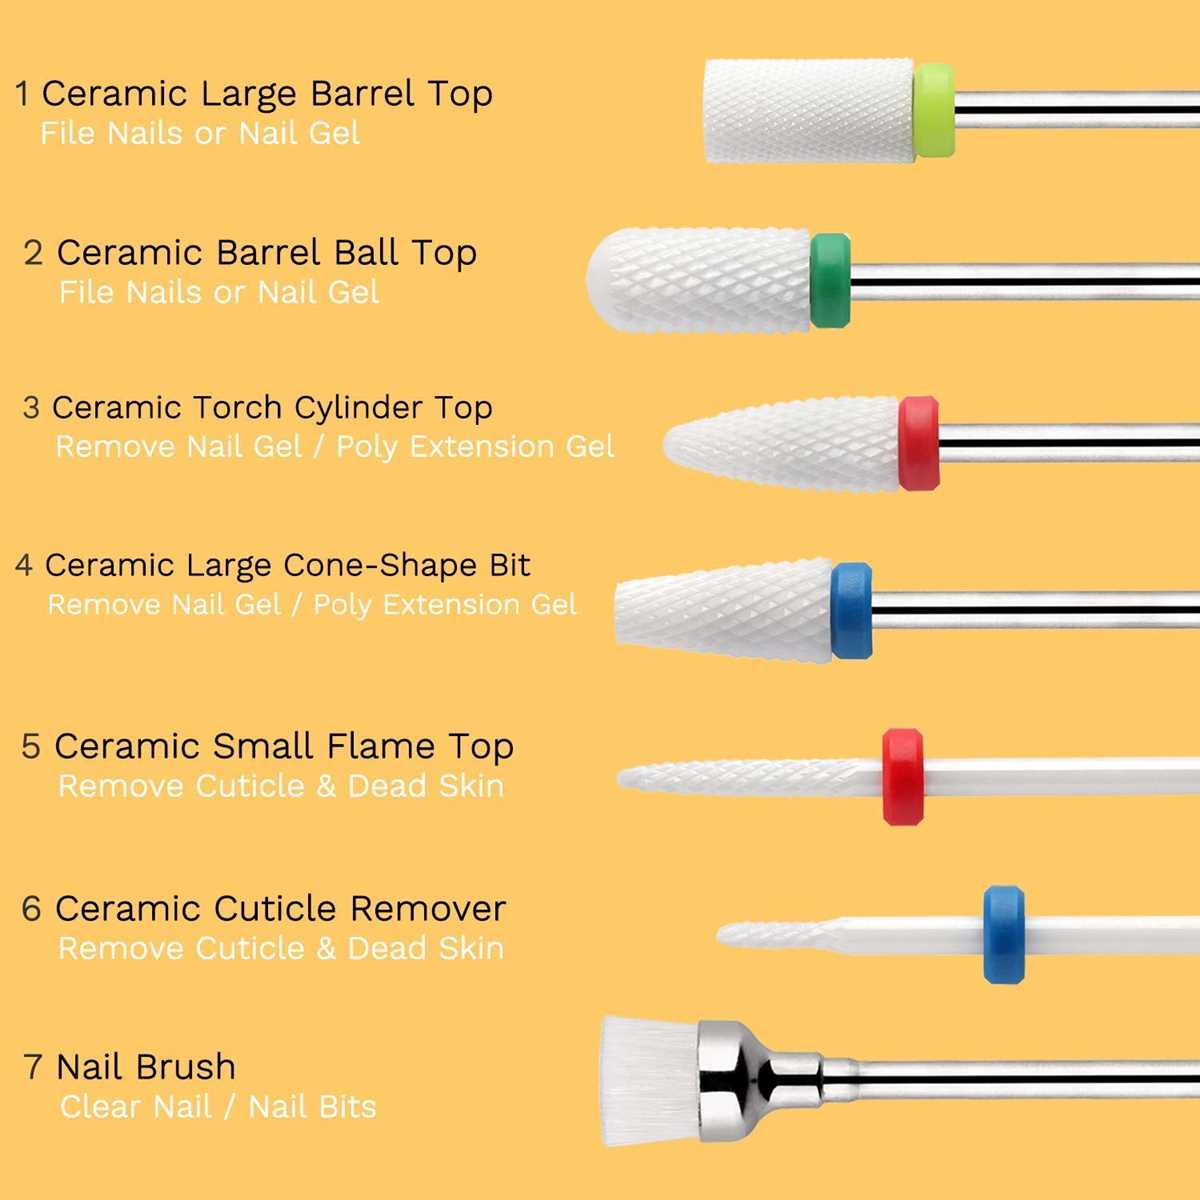
3. Ceramic Bits
Ceramic bits are often used for gentle gel polish removal as they have a smooth surface that minimizes heat and friction. These bits are less abrasive compared to carbide and diamond bits, making them suitable for clients with sensitive nails. Ceramic bits are available in various shapes such as barrel, cone, and flame.
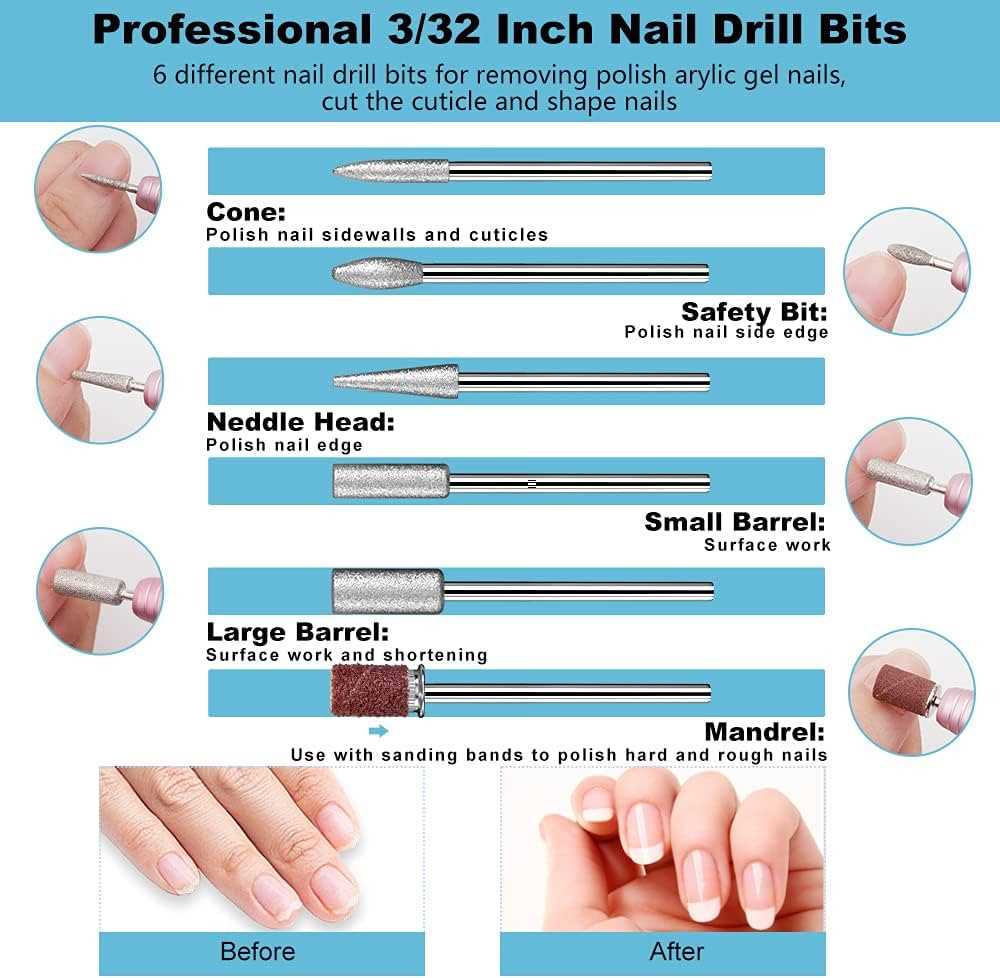
4. Mandrel Bits
Mandrel bits are used with sanding bands to smooth and shape the nails. These bits have a cylindrical shape with a shank that fits into the nail drill’s chuck. The sanding bands are wrapped around the mandrel bit and can be easily replaced when worn out. Mandrel bits are typically used for natural nail prep and shaping, and they can also be used for gel polish removal.
5. Safety Precautions
When using a nail drill, it is important to follow safety precautions to avoid damaging the natural nail. Always start with a low speed and gradually increase as needed. Avoid applying excessive pressure as this can cause heat and friction, leading to discomfort or even damage. Regularly clean and sanitize the nail drill bits to prevent the spread of bacteria or infections.
Overall, understanding the different types of nail drill bits and their purposes is essential for achieving gentle gel polish removal without harming the natural nail. By using the appropriate bit for the task and following safety precautions, you can ensure a successful and comfortable nail care experience for both you and your clients.
Types of Nail Drill Bits
There are several types of nail drill bits available on the market, each designed for a specific purpose. Here are some common types:

-
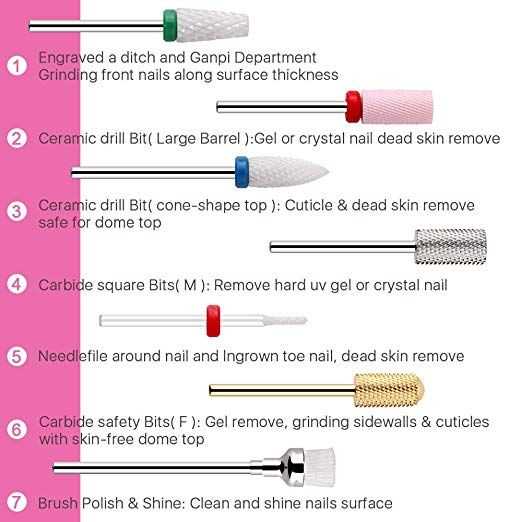
Carbide Bits: These bits are known for their durability and strength. They are designed to remove gel polish, acrylics, and hard gels quickly and efficiently. Carbide bits are available in various shapes, such as round, cone, barrel, and flame. They are suitable for professional use but can be harsh on natural nails if not used properly.
-
Diamond Bits: Diamond bits are made with a coating of synthetic diamonds. They are mainly used for filing and shaping the nail surface. Diamond bits are gentle on natural nails and are great for precision work. They come in various shapes, including cylindrical, flame, and tapered. Diamond bits are less abrasive compared to carbide bits.
-
Sanding Bands: Sanding bands are cylindrical sleeves made of sandpaper. They are commonly used for filing and shaping the nail surface. Sanding bands are gentle on natural nails and are suitable for beginners. They come in various grits, from coarse to fine, depending on the desired level of abrasiveness. It’s important to replace sanding bands frequently to avoid using dull or worn-out ones.
-
Brush Bits: Brush bits are used for cleaning the nail surface and removing debris. They are usually made of nylon bristles and can be used in conjunction with a cleaning solution. Brush bits are gentle on natural nails and are essential for maintaining proper hygiene during a nail service.
-
Pedicure Bits: Pedicure bits are specifically designed for foot care. They are used to remove calluses, corns, and dead skin from the feet. Pedicure bits come in various shapes and can be used on both dry and wet skin. They are a great addition to a professional pedicure service.
It’s important to choose the right nail drill bit based on the desired outcome and the client’s needs. The type of bit used can greatly affect the outcome of a nail service, so it’s crucial to have a variety of options and understand their strengths and limitations.
Factors to Consider
- Type of Gel Polish: The type of gel polish you are working with is an important factor to consider when choosing a nail drill bit for gentle gel polish removal. Different gel polishes have different consistencies and levels of hardness, so you need to select a drill bit that is suitable for the specific gel polish you are working with.
- Safety and Comfort: Another important factor to consider is the safety and comfort of the client. You should choose a drill bit that will not cause any damage or discomfort to the nails or surrounding skin. Look for drill bits with smooth edges and gentle materials that are less likely to cause any harm.
- Efficiency: Efficiency is also an important factor to consider. You want a drill bit that will remove the gel polish quickly and efficiently without causing any unnecessary damage to the nails. Look for drill bits with fine grits that will effectively remove the gel polish without much effort.
- Removal Technique: Consider the removal technique you prefer to use. Some nail technicians prefer to use a filing motion, while others prefer a drilling motion. Choose a drill bit that is suitable for your preferred technique and one that will allow you to remove the gel polish easily and efficiently.
- Compatibility: Ensure that the drill bit you choose is compatible with your nail drill machine. Different drill machines have different sizes and types of drill bits, so make sure you choose a drill bit that will fit your machine properly and securely.
- Price: Finally, consider the price of the drill bit. While it’s important to invest in a high-quality drill bit, you also want to consider your budget. Look for drill bits that offer good value for the price and that will last a long time without needing to be replaced frequently.
Grit Size
The grit size refers to the coarseness or fineness of the abrasive material on the nail drill bit. It is an important factor to consider when choosing a nail drill bit for gentle gel polish removal. The larger the grit number, the finer the material and the lower the abrasiveness.
When removing gel polish, it is best to start with a lower grit size to minimize damage to the natural nail. A grit size of around 180 to 240 is usually recommended for gentle gel polish removal. This finer grit size allows for more control and precision, reducing the risk of over-filing or thinning the natural nail.
However, if the gel polish is thick or heavily applied, a slightly higher grit size, such as 240 to 320, may be needed to effectively remove the product. It is important to assess the thickness and condition of the gel polish before choosing the appropriate grit size.
It is also important to consider the client’s nail type and preferences when selecting the grit size. Some nail types may require a higher grit size for effective removal, while others may be more sensitive and require a lower grit size.

Overall, choosing the right grit size is crucial for gentle gel polish removal. It allows for a gentle and controlled removal process while minimizing damage to the natural nail. Always assess the gel polish thickness, client’s nail type, and preferences before selecting the appropriate grit size for optimal results.
Material
The material of the nail drill bit is an important factor to consider when choosing the right one for gentle gel polish removal. The most common materials used for nail drill bits are:
- Carbide: Carbide nail drill bits are made from a high-quality metal alloy. They are known for their durability and long-lasting performance. Carbide bits are perfect for removing gel polish quickly and efficiently. They are designed to resist heat buildup, reducing the risk of burning the nail or skin.
- Diamond: Diamond drill bits have a diamond coating on the tip. They are extremely durable and can easily remove gel polish without causing any damage to the nail. Diamond drill bits are suitable for professional use and can be used to remove gel polish on natural nails or nail extensions.
- Ceramic: Ceramic nail drill bits are gentle and perfect for removing gel polish without causing any harm to the natural nail. They have a smooth surface and are less abrasive than carbide or diamond bits. Ceramic bits are best suited for natural nails and may not be as effective on nail extensions.
- Silicone: Silicone drill bits are the mildest option and are often used for gentle gel polish removal. They are flexible and gentle on the nail surface, making them ideal for users with sensitive nails or those looking for a more gentle approach to gel polish removal. Silicone bits are not suitable for heavy-duty removal or for thick layers of gel polish.
When choosing the right material for your nail drill bit, consider your skill level, the type of nail you are working on, and the desired outcome. It is also important to keep the drill bit clean and properly sterilized to maintain its performance and avoid the risk of infection.
Shape and Size
The shape and size of nail drill bits play a crucial role in the gentle removal of gel polish. Different shapes and sizes are designed to target specific areas of the nail, ensuring efficient and safe removal.
Cone Bits
Cone bits are tapered and come in various sizes. They are ideal for reaching tight areas such as the sidewalls and cuticles. The pointed end allows you to easily remove gel polish from hard-to-reach places with precision.

Cylinder Bits
Cylinder bits have a straight shape and are available in different diameters. They are suitable for removing gel polish from the surface of the nail. The rounded end allows for smooth and even removal without causing damage to the natural nail.
Flame Bits
Flame bits are shaped like flames or teardrops. They are versatile and can be used for various purposes, including gel polish removal. The rounded edge helps to prevent accidental damage to the nail while effectively removing gel polish.
Drum Bits
Drum bits resemble a cylinder with a rounded top. They are often used to reshape and shorten the nails. However, they can also be used for gel polish removal, especially if you have a large area to work on. The rounded surface minimizes the risk of gouging or scraping the nail.
When choosing a nail drill bit for gel polish removal, consider the shape and size that best suits your needs. It’s important to have a variety of drill bits on hand to ensure you can effectively remove gel polish from different areas of the nail without causing damage.
Choosing the Right Nail Drill Bit
When it comes to gel polish removal, using the right nail drill bit can make all the difference. The right bit ensures a gentle and efficient removal process, minimizing damage to the natural nail. Here are some factors to consider when choosing the right nail drill bit:
1. Material
There are several materials commonly used for nail drill bits, including carbide, ceramic, and diamond. Each material has its own advantages and is suitable for different purposes. Carbide bits are durable and great for removing gel polish, while ceramic bits are gentle and ideal for natural nail work. Diamond bits are known for their versatility and can be used for a variety of tasks.
2. Grit
The grit of a nail drill bit refers to the coarseness or fineness of the abrasive surface. Lower grit numbers indicate a coarser surface, while higher grit numbers indicate a finer one. For gel polish removal, it is recommended to use a bit with a medium grit, around 180 to 240, as it provides a good balance between efficiency and gentleness.
3. Shape
Nail drill bits come in various shapes, including barrel, cone, flame, and cylinder. Each shape is designed for different purposes. When it comes to gel polish removal, a barrel or cylinder-shaped bit is often the best choice. These shapes provide a larger surface area for efficient removal while minimizing contact with the natural nail.
4. Size
The size of a nail drill bit refers to its diameter. Smaller bits are ideal for detailed work and hard-to-reach areas, while larger bits cover a larger surface area and are better suited for quicker removal. For gel polish removal, a medium-sized bit, around 3/32 inch, is usually recommended.
5. Safety Features
When selecting a nail drill bit, it is important to consider safety features such as a rounded or capped tip. These features help prevent accidental injuries and damage to the nail bed.
Overall, choosing the right nail drill bit for gel polish removal involves considering factors such as material, grit, shape, size, and safety features. By selecting the appropriate bit, you can ensure a faster and more gentle removal process, leaving your natural nails in great condition.
Step-by-Step Guide
- Prepare your workspace by cleaning and disinfecting the nail drill and other tools you will be using. Make sure all surfaces are clean and free from any debris.
- Start by gently filing the top layer of the gel polish with a fine-grit nail file. This will help break the seal and make the removal process easier.
- Choose the appropriate nail drill bit for gel polish removal. A medium or fine-grit bit will be the most gentle on the nails. Avoid using coarse-grit bits as they can cause damage.
- Attach the chosen nail drill bit to your nail drill, making sure it is securely in place.
- Apply a small amount of gel polish remover to a lint-free pad or cotton ball.
- Gently place the pad or cotton ball soaked with gel polish remover on the nail and hold it in place for a few seconds. This allows the remover to penetrate the gel polish.
- Turn on the nail drill to a low speed setting and begin gently buffing away the gel polish. Start at the cuticle area and work your way towards the free edge of the nail. Be careful not to apply too much pressure or drill too deeply into the nail.
- Periodically check the progress of the gel polish removal. If any stubborn areas remain, continue buffing gently until all the gel polish is removed. Be patient and take your time to avoid damaging the natural nail.
- Once all the gel polish is removed, wipe the nails clean with a lint-free pad or cotton ball soaked in alcohol. This will remove any residue left behind by the gel polish remover.
- Finish by applying a cuticle oil or moisturizer to hydrate the nails and cuticles.
Tips and Recommendations
1. Start with a Soft Grit Bit
If you’re new to gel polish removal, it’s best to start with a soft grit bit. Soft grit bits are less abrasive and gentle on the nails, making them ideal for beginners. These bits will remove gel polish without causing any damage or pain.
2. Use a Coarse Grit Bit for stubborn Gel Polish
If you have gel polish that’s being stubborn and won’t come off easily, a coarse grit bit can be used. Coarse grit bits are more abrasive and can remove gel polish faster. However, it’s important to be gentle and not apply too much pressure to avoid damaging the nails.
3. Opt for a Diamond Bit for Precise Gel Polish Removal
If you prefer precision when removing gel polish, a diamond bit is a great choice. Diamond bits have a fine grit that allows for precise and controlled removal. These bits are commonly used by professionals and are suitable for both beginners and experienced users.
4. Consider a Tapered Cone Bit for Hard-to-Reach Areas
When working on hard-to-reach areas, such as the sides of the nails or the cuticle area, a tapered cone bit can be very helpful. The tapered shape allows for easy access and precise removal in these tricky spots. This bit is also suitable for removing excess gel polish near the sidewalls and removing product buildup on the nails.
5. Regularly Clean and Sanitize Your Nail Drill Bits
To ensure optimal performance and maintain hygiene, it’s important to clean and sanitize your nail drill bits regularly. After each use, remove any dust or debris from the bits using a brush. Then, sanitize them using a sterilizing solution that is specifically designed for nail tools. This will help prevent the transfer of bacteria or fungus between clients and extend the lifespan of your bits.
6. Invest in High-Quality Nail Drill Bits
Investing in high-quality nail drill bits is essential for effective and gentle gel polish removal. Cheap or low-quality bits can cause damage to the nails or wear out quickly, leading to a less efficient performance. Look for reputable brands and choose bits made from durable materials to ensure long-lasting and reliable use.
7. Test and Adjust the Speed of Your Nail Drill
When using a nail drill for gel polish removal, it’s important to test and adjust the speed according to your comfort level and the task at hand. Start with a lower speed setting and gradually increase it until you find the right balance between effectiveness and gentleness. Avoid using high speeds as they can generate heat and cause discomfort or damage to the nails.
8. Practice Proper Technique and Pressure
Proper technique and pressure are key to gentle gel polish removal. Start by applying gentle pressure to the nail surface and let the drill do the work. Avoid excessive or rough movements that can damage the natural nail. It’s also important to avoid staying in one spot for too long to prevent overheating the nail or causing discomfort.
9. Seek Professional Advice if Needed
If you’re unsure about which nail drill bit to use or how to properly remove gel polish, don’t hesitate to seek professional advice. Nail technicians or experienced beauty professionals can provide valuable guidance and recommendations based on your unique needs and circumstances.
10. Practice and Patience
As with any skill, practice and patience are key to mastering gel polish removal. Take your time to familiarize yourself with different nail drill bits, techniques, and speeds. With practice, you’ll become more confident and efficient in safely removing gel polish while preserving the health and integrity of the natural nails.
FAQ:
What is the best nail drill bit for gel polish removal?
The best nail drill bit for gel polish removal is a fine-grit diamond bit. It gently and efficiently removes gel polish without causing any damage to the nail.
Can I use a coarse-grit nail drill bit for gel polish removal?
No, you should avoid using a coarse-grit nail drill bit for gel polish removal. Coarse-grit bits are more suitable for acrylic nail removal or shaping, and they can cause significant damage to the natural nail if used for gel polish removal.
Is a carbide nail drill bit suitable for gel polish removal?
Yes, a carbide nail drill bit can be used for gel polish removal. However, it is not as gentle as a fine-grit diamond bit and may cause more friction and heat. It is important to use a carbide bit with caution and ensure that it is not used on the nail for too long to avoid any damage.
What shape of nail drill bit is best for gel polish removal?
The best shape of nail drill bit for gel polish removal is a cylindrical or barrel shape. This shape allows for precise and gentle removal of the gel polish without causing any damage to the nail plate.
Can I use a sanding band for gel polish removal?
It is not recommended to use a sanding band for gel polish removal. Sanding bands are more abrasive and can cause damage to the natural nail. It is best to use a fine-grit diamond bit or a carbide bit for gentle and efficient gel polish removal.
How often should I replace the nail drill bit for gel polish removal?
It is recommended to replace the nail drill bit for gel polish removal every 3-6 months, depending on the frequency of use. Over time, the bit can become dull and less effective, and using a dull bit can cause more friction and heat, potentially damaging the natural nail.
Can I use a nail drill bit for gel polish removal on natural nails?
Yes, you can use a nail drill bit for gel polish removal on natural nails. However, it is important to use a gentle and fine-grit diamond bit or a carbide bit to avoid any damage to the natural nail. It is also advisable to use the drill at a low speed and with caution to minimize any potential damage.
Video:


Meet Harrison Clayton, a distinguished author and home remodeling enthusiast whose expertise in the realm of renovation is second to none. With a passion for transforming houses into inviting homes, Harrison's writing at https://thehuts-eastbourne.co.uk/ brings a breath of fresh inspiration to the world of home improvement. Whether you're looking to revamp a small corner of your abode or embark on a complete home transformation, Harrison's articles provide the essential expertise and creative flair to turn your visions into reality. So, dive into the captivating world of home remodeling with Harrison Clayton and unlock the full potential of your living space with every word he writes.


