Choosing the Right Drill Bit Size for Screws: A Definitive Guide

When it comes to woodworking or any other DIY project, one of the most important things to consider is the size of the drill bit you should use for your screws. Using the wrong size can lead to a variety of issues, from stripped screw heads to weak connections. That’s why it’s crucial to have a definitive guide to help you choose the right drill bit size for your screws.
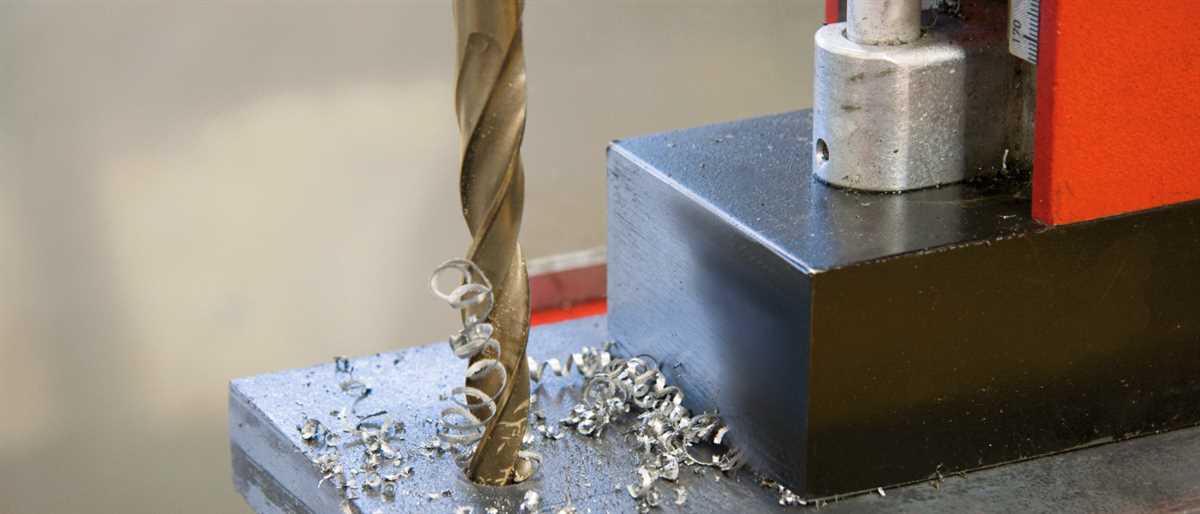
Firstly, it’s important to understand that the size of the drill bit you need will depend on the size of the screw you’re using. In general, you want the hole to be slightly smaller than the diameter of the screw, so that it can grip the wood properly. If the hole is too big, the screw may not hold securely and could become loose over time. On the other hand, if the hole is too small, you may struggle to drive the screw in, risking damage to the screw or the wood.
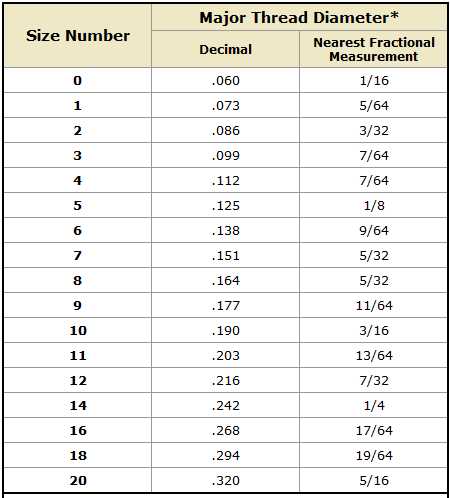
To determine the right drill bit size for your screws, you can consult a drill bit size chart. These charts typically provide a guide for different screw sizes, indicating the corresponding drill bit sizes. It’s important to note that different types of screws may require different drill bit sizes, so be sure to check the specific recommendations for the type of screw you’re using.
Additionally, it’s worth considering the material you’ll be drilling into. If you’re working with soft woods, like pine or cedar, you can typically use a slightly smaller drill bit size. Harder woods, such as oak or maple, may require a slightly larger drill bit size to ensure a secure fit. Similarly, if you’re working with metal or other materials, you may need a different drill bit size altogether.
In summary, choosing the right drill bit size for your screws is essential for ensuring strong and secure connections in your woodworking or DIY projects. By consulting a drill bit size chart and considering the type of screw and material you’re working with, you can confidently select the appropriate drill bit size and avoid any potential issues. Remember, the key is to have a hole that’s slightly smaller than the screw diameter, allowing for a snug and secure fit.

Understanding the Importance of Drill Bit Size for Screws
Choosing the right drill bit size for screws is essential to ensure a proper fit and a secure connection between the screw and the material being drilled into. Using the wrong size drill bit can result in several issues, including stripped screws, weak connections, and damage to the material.
Proper Fit
One of the primary reasons why drill bit size is important is to achieve a proper fit between the screw and the drilled hole. If the drill bit is too large, the screw may not grip the material tightly, leading to a loose connection. On the other hand, if the drill bit is too small, it can cause the material to crack or split when the screw is inserted.
Preventing Stripped Screws
Using the correct size drill bit is crucial in preventing stripped screws. When a drill bit that is too small is used, the screw may not be able to enter the material easily, and excessive force may be required. This can cause the screw to strip the material or the screw head, making it difficult to remove or tighten the screw properly.
Ensuring Strong Connections
Having the right drill bit size ensures a strong connection between the screw and the material. When the hole is properly sized, the screw can dig into the material and create threads, allowing for a secure and durable hold. This is especially important when working with materials that are prone to splitting or cracking, such as wood or plastic.
Preventing Material Damage
Using the correct drill bit size also helps prevent damage to the material being drilled into. If a drill bit that is too large is used, it can cause the material to splinter, chip, or crack. This not only affects the appearance but can also weaken the overall structure and compromise its integrity.

Accuracy and Efficiency
Using the right drill bit size ensures accuracy and efficiency in the drilling process. It allows for precise placement of the screws and reduces the likelihood of errors or mistakes. Additionally, using the correct drill bit size can help save time and effort, as it minimizes the need for adjustments or corrections during the installation process.
| Drill Bit Size | Screw Diameter | Material Thickness |
|---|---|---|
| 1/16 inch | #2 to #4 screws | Thin materials (up to 1/4 inch) |
| 5/64 inch | #6 screws | Thin materials (up to 1/4 inch) |
| 3/32 inch | #8 screws | Medium materials (up to 1/2 inch) |
| 7/64 inch | #10 screws | Medium materials (up to 1/2 inch) |
| 1/8 inch | #12 screws | Thick materials (up to 1 inch or more) |
By understanding the importance of drill bit size for screws, you can ensure successful and reliable installations. Always refer to the recommended drill bit size provided by the screw manufacturer or consult a drilling guide for accurate measurements based on the screw diameter and material thickness.
Factors to Consider When Choosing Drill Bit Size
When choosing the right drill bit size for screws, there are several factors to consider. These factors can help ensure that the drill bit fits the screw properly and that the hole is the right size for the screw to be securely fastened. Here are some of the key factors to keep in mind:
- Screw Size: The first and most obvious factor to consider is the size of the screw itself. Different size screws require different size drill bits to create the appropriate hole. It’s important to choose a drill bit size that matches the screw size to ensure a proper fit.
- Material: The material of the workpiece and the screw itself should also be taken into account when selecting a drill bit size. Harder materials, such as metal or hardwood, may require a larger drill bit size to create a hole that is the right size for the screw.
- Drill Type: The type of drill you are using can also impact the drill bit size you need. For example, if you are using a pilot hole drill bit, you may need to choose a slightly smaller size to create a hole that will guide the larger drill bit used for the final hole.
- Depth of Hole: The desired depth of the hole can also influence the drill bit size. If you want the screw to be flush with the surface of the workpiece, you may need to choose a drill bit that is slightly shorter than the length of the screw to achieve the desired result.
- Fastening Method: Consider how the screw will be fastened. If you are using anchors or plugs, you may need to select a larger drill bit to accommodate the additional material. Additionally, if you plan to countersink the screw, you will need a drill bit size that allows for the countersink bit to fit properly.
- Manufacturer’s Recommendations: Finally, it’s always a good idea to consult the manufacturer’s recommendations for the screw and the workpiece. They may provide specific guidelines on the drill bit size to use for optimal results.
By considering these factors, you can confidently choose the right drill bit size for your screws and ensure proper installation for your projects.
Types of Drill Bits for Different Screw Sizes
When it comes to choosing the right drill bit for your screws, it’s important to consider the size and type of screw you will be using. The right drill bit will ensure a secure and long-lasting connection between your materials. Here are the different types of drill bits you can use for different screw sizes:

1. Twist Drills
- Twist drills are the most common type of drill bit and can be used for a wide range of screw sizes.
- They have a spiral-shaped cutting edge that helps to remove material as you drill.
- Twist drills are available in various sizes and can be used for both wood and metal applications.
2. Spade Bits
- Spade bits, also known as paddle bits, are designed for drilling large holes in wood.
- They have a flat blade with a point in the center and can be used for screw sizes larger than 1/4 inch.
- Spade bits are ideal for creating holes for dowels or for making holes in door hinges.
3. Countersink Bits
- Countersink bits are used to create a recessed hole for a screw head.
- They typically have a conical shape with multiple cutting edges.
- Countersink bits are commonly used in woodworking and are available in various sizes to match different screw sizes.
4. Auger Bits
- Auger bits are designed for drilling deep holes in wood.
- They have a screw-like tip that helps to pull the bit into the material as you drill.
- Auger bits are commonly used for larger screws and can be used with a hand brace or power drill.
5. Brad Point Bits
- Brad point bits, also known as doweling bits, are designed for drilling accurate holes in wood.
- They have a sharp point that helps to guide the bit into the material without wandering.
- Brad point bits are commonly used for small to medium-sized screws and are available in various sizes.
6. Masonry Bits
- Masonry bits are designed for drilling into materials such as concrete, brick, or stone.
- They typically have a carbide tip for added durability and can be used with a hammer drill or rotary drill.
- Masonry bits are available in various sizes to match different screw sizes for masonry applications.
7. Screwdriver Bits
- Screwdriver bits are specifically designed for driving screws.
- They can be used with a power drill or a screwdriver and come in different types, such as Phillips, slotted, or hex.
- Screwdriver bits are available in various sizes to match different screw sizes and types.
Remember, using the right drill bit for your screws is essential for achieving a strong and secure connection. Always refer to the manufacturer’s recommendations for the appropriate drill bit size and type for your specific screw.
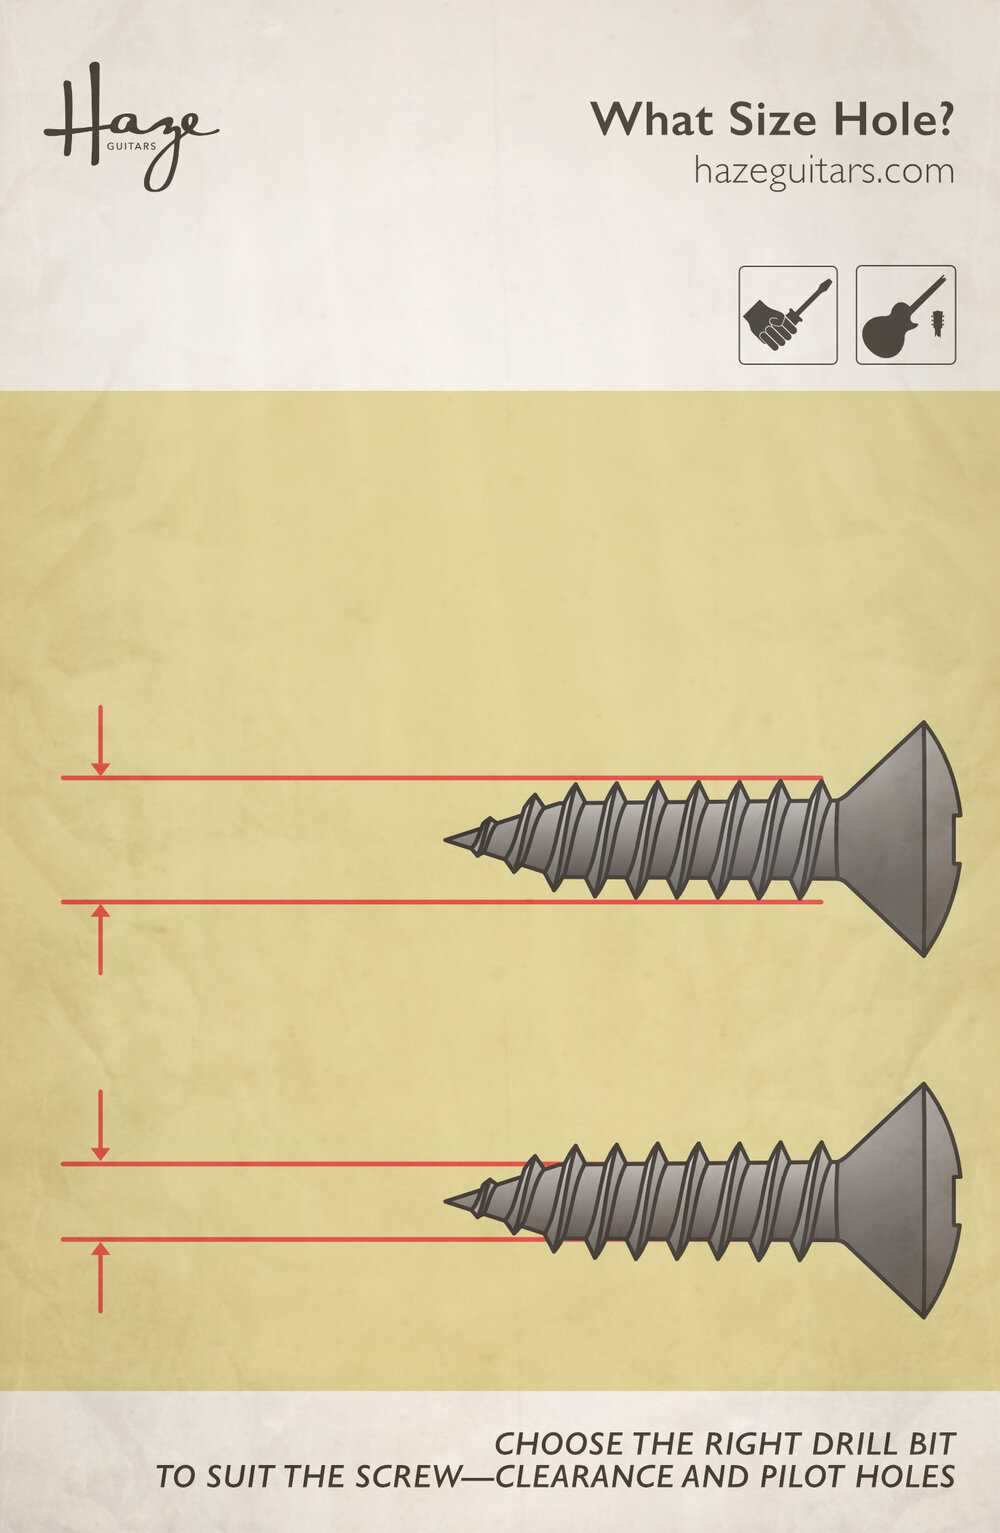
Drilling Pilot Holes: Why It Matters
When it comes to screwing materials together, drilling pilot holes is an essential step that should never be overlooked. A pilot hole is a small hole that is drilled into the material before inserting a screw. This hole serves several important purposes and can greatly affect the overall quality and durability of the project.
1. Prevents Splitting
One of the main reasons why drilling pilot holes is necessary is that it helps to prevent splitting of the material. When a screw is inserted directly into the material without a pilot hole, there is a risk of the material splitting or cracking. This is especially true for wood or other delicate materials. Drilling a pilot hole allows the screw to be inserted without putting excessive pressure on the material, reducing the likelihood of splitting.

2. Ensures Proper Alignment
Another important reason to use pilot holes is to ensure proper alignment of the screw. When a screw is driven into the material without a pilot hole, it can easily go off track and end up in the wrong position. This can lead to a sloppy, uneven appearance or even cause the screw to become stripped or damaged. By drilling a pilot hole, you can guide the screw into the desired location with precision and accuracy.
3. Reduces Risk of Breaking Screws
Drilling pilot holes also reduces the risk of breaking screws. Without a pilot hole, it can be difficult to insert a screw properly into the material. This can result in the screw becoming jammed or overtightened, leading to a broken or damaged screw. By creating a pilot hole, you allow the screw to enter the material smoothly and evenly, reducing the risk of breakage.
4. Improves Holding Power
Lastly, drilling pilot holes can actually improve the holding power of the screw. By creating a small hole that is slightly smaller in diameter than the screw, you create a tighter fit and a stronger bond between the screw and the material. This can improve the overall stability and longevity of the project.
Overall, drilling pilot holes is a crucial step when using screws in any project. It helps prevent splitting, ensures proper alignment, reduces the risk of breaking screws, and improves the holding power of the screw. By taking the time to drill pilot holes, you can greatly enhance the quality and durability of your work.

Common Drill Bit Size Chart for Screw Types
-
Flat Head Screws:
A flat head screw is a type of screw with a flat top and a conical shape. It is commonly used in woodworking projects and is driven into the material using a screwdriver or drill. The drill bit size required for flat head screws depends on the screw size:
Screw Size Drill Bit Size #2 1/16 inch #4 5/64 inch #6 3/32 inch #8 1/8 inch #10 9/64 inch #12 5/32 inch -
Phillips Head Screws:
A Phillips head screw is a type of screw with a cross-shaped indentation on the top. It requires a special tool called a Phillips screwdriver or a drill bit with a Phillips head. The recommended drill bit sizes for Phillips head screws are:
Screw Size Drill Bit Size #2 1/16 inch #4 1/8 inch #6 5/32 inch #8 5/32 inch #10 3/16 inch #12 7/32 inch -
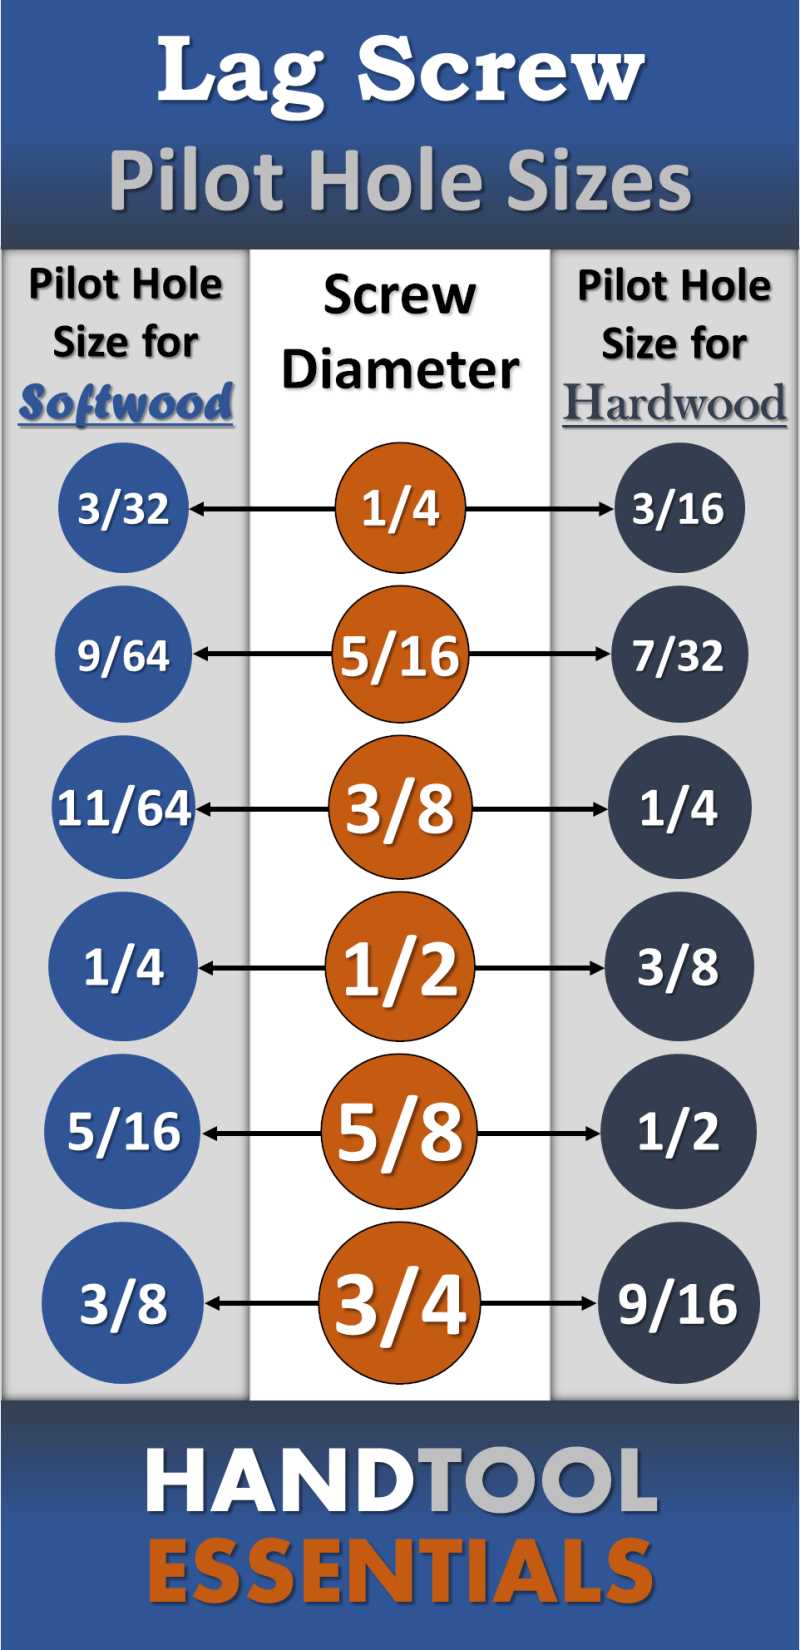
Hex Head Screws:
A hex head screw, also known as a hex bolt, has a hexagonal head and is driven into the material using a wrench or drill bit. The drill bit sizes for hex head screws are:
Screw Size Drill Bit Size 1/4 inch 7/32 inch 5/16 inch 9/32 inch 3/8 inch 5/16 inch 1/2 inch 7/16 inch 5/8 inch 17/32 inch 3/4 inch 5/8 inch
Matching Drill Bit Size to Screw Size: Tips and Techniques
Choosing the correct drill bit size for your screws is crucial to ensuring a secure and efficient installation. Using the wrong size can lead to stripped screws, damaged materials, and a less professional-looking finished project. To help you avoid these common pitfalls, follow these tips and techniques for matching drill bit size to screw size.
1. Take Measurements
Before you start drilling, it’s important to know the exact size of your screws. Measure the diameter of the screw threads using a caliper or ruler. This measurement will help you determine the appropriate drill bit size.
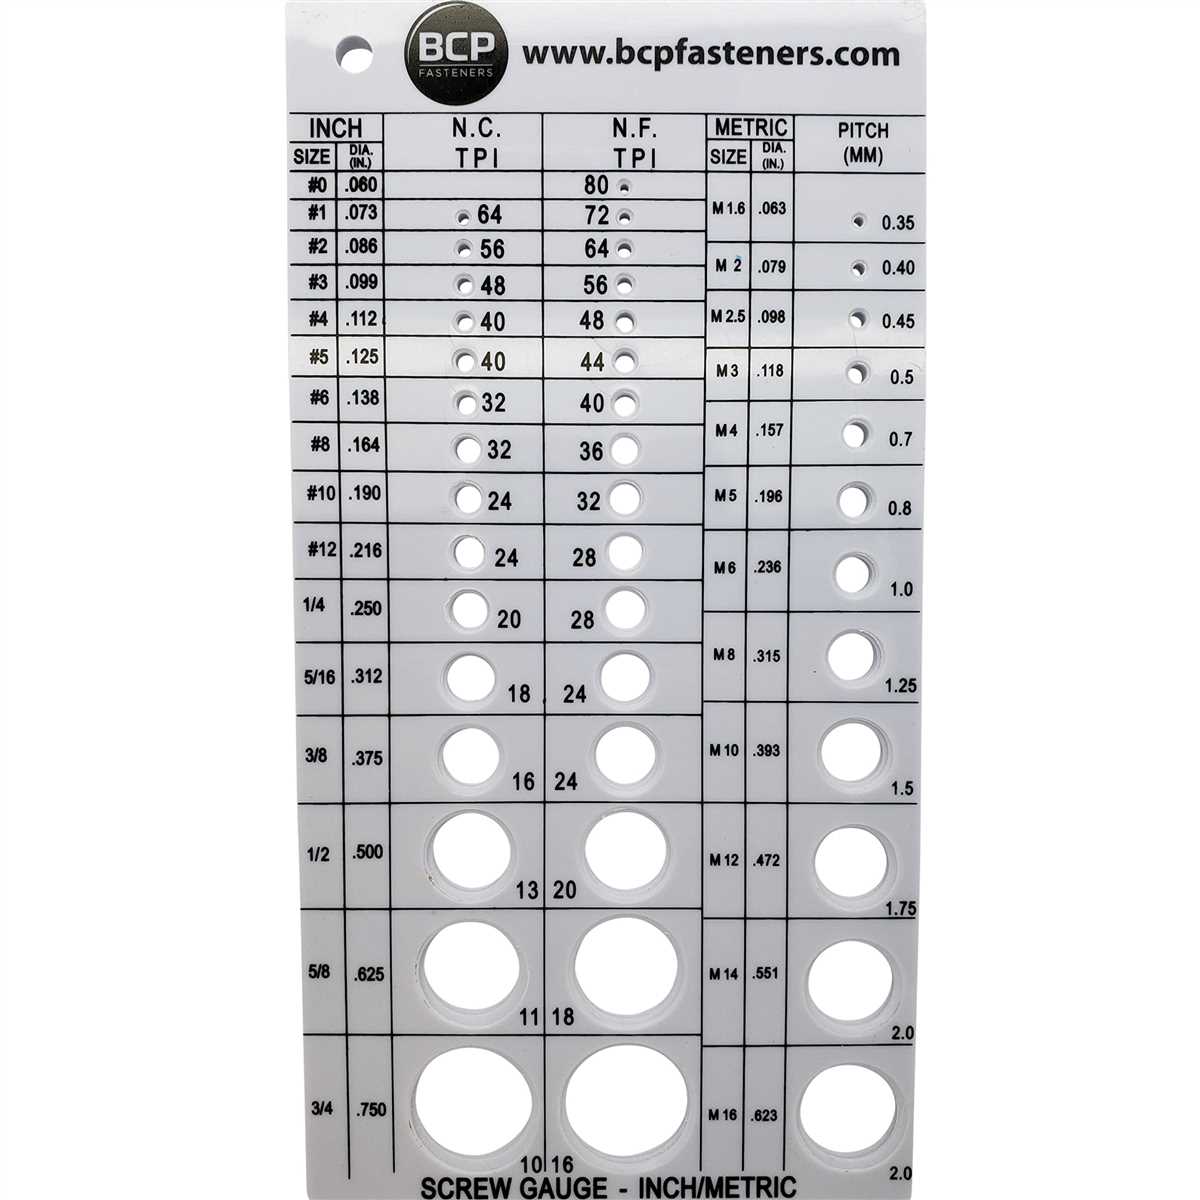
2. Use a Size Chart
Once you have the measurements, refer to a screw size chart to determine the corresponding drill bit size. These charts are widely available online and provide a handy reference for a variety of screw sizes.
3. Consider Material Thickness
When selecting a drill bit size, consider the thickness of the material you are working with. If the material is thin, choose a slightly smaller drill bit to prevent the screw from poking through the other side. For thicker materials, opt for a slightly larger drill bit to ensure a secure fit.
4. Test on Scrap Material
If you’re unsure about the appropriate drill bit size, it’s always a good idea to test on a scrap piece of the same material. This will allow you to make any necessary adjustments before drilling into your actual project.
5. Use Pilot Holes for Hardwoods
When working with hardwoods, it’s often helpful to create pilot holes before inserting screws. Pilot holes prevent the wood from splitting and make it easier to drive the screw in. Use a drill bit slightly smaller than the screw size to create pilot holes.
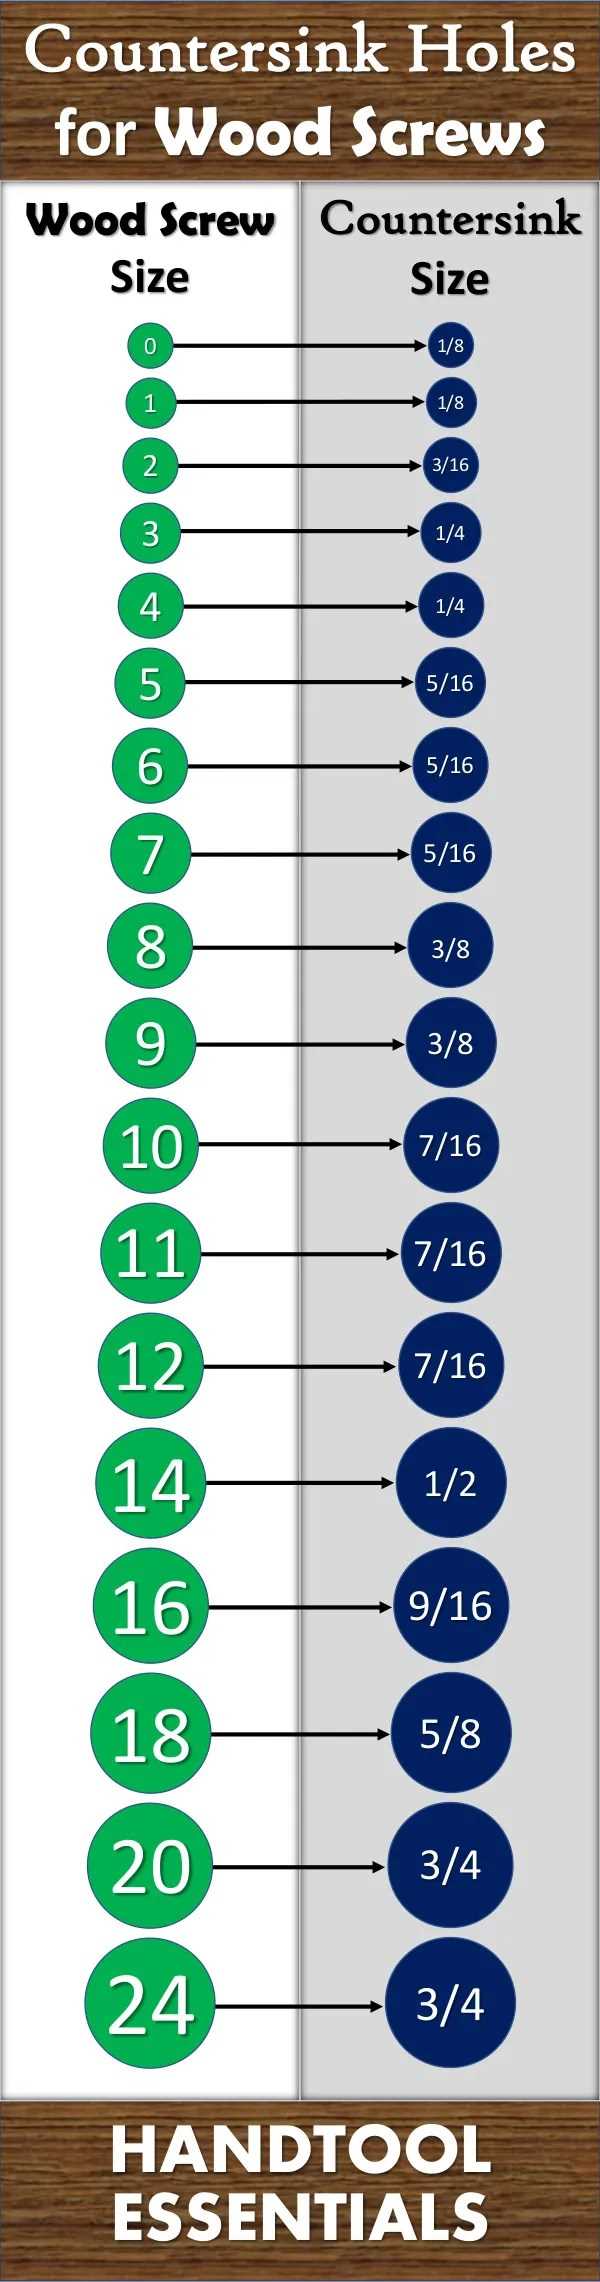
6. Use Countersink Bits for Flush Finishes
If you want a flush finish for your screws, consider using countersink bits. These specialized drill bits create a tapered hole that allows the screw head to sit neatly below the surface of the material. Be sure to select a countersink bit that matches the diameter of the screw head.
7. Test Fit Screws
Before committing to drilling, always do a test fit with your screws. Insert the screw into the pilot hole or drilled opening to ensure a proper fit. If it feels too loose or tight, adjust the drill bit size accordingly.
8. Consider the Screw Material
The type of screw material can also influence the drill bit size. For example, when working with soft materials like plastic or drywall, a smaller drill bit may be sufficient. However, harder materials like metal may require a larger drill bit for a secure connection.
By following these tips and techniques, you can confidently match drill bit size to screw size and achieve professional results with your projects.
Using Drill Stop Collars to Control Depth
Drill stop collars are a useful tool that can be used to control the depth when drilling holes for screws. These collars are small metal rings that can be clamped onto the drill bit to limit the depth of the hole that is being drilled. They are especially helpful when drilling holes for countersunk screws, as it is essential to make sure that the hole is not too deep.
How to Use Drill Stop Collars
- First, choose the appropriate drill bit for your screw. Make sure that the drill bit size matches the size of the screw.
- Slide the drill stop collar onto the drill bit, positioning it at the desired depth. The collar should be tightened securely in place to prevent it from sliding during drilling.
- Insert the drill bit into your drill and tighten it in place.
- Hold the drill steady and begin drilling the hole, applying steady pressure but avoiding excessive force.
- Once the collar reaches the surface of the material being drilled, it will prevent the drill bit from drilling any further, ensuring that the hole is the correct depth.
Benefits of Using Drill Stop Collars
Using drill stop collars offers several benefits, including:
- Precise hole depth control: The drill stop collar allows you to drill holes with consistent depth, ensuring that the screw will be properly seated.
- Prevention of over-drilling: By limiting the depth of the hole, drill stop collars help prevent the drill bit from damaging the material or going through it completely.
- Increased efficiency: With drill stop collars, you can quickly and accurately drill holes to the desired depth, saving time and effort.
- Professional-looking results: Using drill stop collars helps you achieve neat and professional-looking results, as all the screw heads will be flush with the surface of the material.
Choosing the Right Drill Stop Collar
When choosing a drill stop collar, consider the following factors:
- Compatibility: Ensure that the drill stop collar fits the diameter of your drill bit, as different collars are designed for specific bit sizes.
- Adjustability: Look for drill stop collars that offer adjustable settings, allowing you to control the depth with precision.
- Durability: Opt for high-quality drill stop collars made from durable materials, as they will withstand repeated use without breaking or becoming loose.
By using drill stop collars, you can easily control the depth when drilling holes for screws, resulting in more accurate and professional-looking installations.
Regular Maintenance and Care of Drill Bits
Proper maintenance and care of drill bits are essential for optimal performance and longevity. By following these tips, you can ensure that your drill bits remain sharp and effective for a long time.
1. Keep the Drill Bits Clean
After each use, it is important to clean your drill bits thoroughly. Use a stiff brush or a wire brush to remove any debris or buildup from the cutting edges. This will prevent clogging and ensure smooth operation.
2. Lubricate the Drill Bits
Regularly lubricating your drill bits will help reduce friction and heat generated during drilling. Apply a small amount of lubricant, such as cutting oil or a silicone-based lubricant, to the flutes and cutting edges of the drill bits. This will prolong their life and prevent overheating.
3. Sharpen the Drill Bits
Over time, drill bits can become dull and less effective. To maintain their sharpness, it is important to regularly sharpen them. You can use a drill bit sharpener or a bench grinder to sharpen the cutting edges. Follow the manufacturer’s instructions for best results.
4. Store the Drill Bits Properly
When not in use, store your drill bits in a clean, dry, and organized manner. Avoid tossing them in a toolbox or letting them come into contact with other metal tools, as this can cause damage and dull the cutting edges. Consider using a drill bit organizer or a dedicated storage case to keep them safe and easily accessible.
5. Inspect for Damage
Regularly inspect your drill bits for any signs of damage, such as chips or cracks. Damaged drill bits should be replaced immediately, as they can compromise the quality of your work and potentially cause accidents. Replace any damaged bits with new ones to ensure safe and efficient drilling.
6. Use the Right Drill Bit for the Job
Using the correct drill bit for the specific material and task is crucial. Choosing the wrong bit can result in poor performance and excessive wear. Refer to the manufacturer’s recommendations or consult a drilling guide to select the appropriate drill bit size and type for your project.
7. Follow Safe Operating Practices
Finally, always follow safe operating practices when using drill bits. Wear appropriate safety gear, such as safety glasses and gloves, and ensure that the drill is properly secured. Be mindful of your surroundings and avoid excessive force or pressure when drilling. These precautions will not only protect you but also help maintain the integrity of your drill bits.
FAQ:
What is the importance of choosing the right drill bit size for screws?
Choosing the right drill bit size for screws is important because it ensures a proper fit between the screw and the hole. Using the wrong size drill bit can result in a loose fit, causing the screw to not hold securely or causing damage to the material.
How do I know which drill bit size to use for a specific screw?
To determine the right drill bit size for a specific screw, you should refer to the screw manufacturer’s recommended drill bit size. This information is usually provided on the screw packaging or in the product manual.
Can I use a drill bit size that is slightly smaller or larger than the recommended size?
It is generally not recommended to use a drill bit size that is significantly smaller or larger than the recommended size. Using a smaller size may result in a loose fit, while using a larger size may cause the screw to not hold securely or damage the material. It is best to stick to the recommended drill bit size.
What should I do if I don’t have the recommended drill bit size?
If you don’t have the recommended drill bit size, you can try to find a drill bit that is closest in size to the recommended size. It is better to choose a slightly larger size rather than a smaller one to ensure a more secure fit. However, it is always best to use the recommended drill bit size if possible.
Are there any other factors to consider when choosing the right drill bit size for screws?
Yes, there are a few other factors to consider when choosing the right drill bit size for screws. These include the type of material you are drilling into, the depth of the hole, and the type of screw you are using. Different materials and screw types may require different drill bit sizes for optimal results.
Video:


Meet Harrison Clayton, a distinguished author and home remodeling enthusiast whose expertise in the realm of renovation is second to none. With a passion for transforming houses into inviting homes, Harrison's writing at https://thehuts-eastbourne.co.uk/ brings a breath of fresh inspiration to the world of home improvement. Whether you're looking to revamp a small corner of your abode or embark on a complete home transformation, Harrison's articles provide the essential expertise and creative flair to turn your visions into reality. So, dive into the captivating world of home remodeling with Harrison Clayton and unlock the full potential of your living space with every word he writes.


