Choosing the Best Nail Drill Bit for Acrylics: A Guide

When it comes to acrylic nail application, having the right tools is essential. One of the key tools in any nail technician’s arsenal is the nail drill bit. Nail drill bits come in a variety of shapes, sizes, and materials, each designed to perform specific tasks and achieve different results.
Whether you’re a beginner or a seasoned professional, choosing the best nail drill bit for acrylics can be a daunting task. With so many options available, it’s important to understand the different types of drill bits and their functions to ensure you select the right one for your needs.
One of the first considerations when choosing a nail drill bit is the material. Most nail drill bits are made from either ceramic, carbide, or diamond. Ceramic bits are known for their durability and versatility, making them a popular choice for many nail technicians. Carbide bits are incredibly strong and are ideal for removing bulk, while diamond bits are renowned for their precision and longevity.
In addition to the material, the shape and size of the drill bit are also important factors to consider. Nail drill bits come in a variety of shapes, including cone, barrel, flame, and needle. Each shape is designed to perform specific tasks, from shaping the nail to removing product. It’s important to choose a drill bit shape that matches the outcome you want to achieve.
With the right nail drill bit, acrylic nail application becomes easier and more efficient. By understanding the different types of drill bits and their functions, you can confidently select the best one for your needs, helping you create beautiful acrylic nails every time.

Choosing the Right Nail Drill Bit for Acrylics: A Comprehensive Guide
Introduction
When it comes to acrylic nail application and maintenance, having the right tools is crucial. One of the most important tools is the nail drill bit, which helps shape and refine the acrylic nails.
Types of Nail Drill Bits
There are various types of nail drill bits available in the market, each designed for specific purposes. Here are some common types:
- Carbide Bits: These are durable bits made from carbide material, which makes them perfect for removing and shaping acrylic nails.
- Diamond Bits: Diamond bits are ideal for refining the surface of acrylic nails. They are known for their durability and ability to create smooth finishes.
- Ceramic Bits: Ceramic bits are gentle on the nails and are often used for buffing and smoothing the acrylic nails.
- Stone Bits: Stone bits are used for removing dead skin and cuticles around the nails. They are not recommended for shaping acrylic nails.
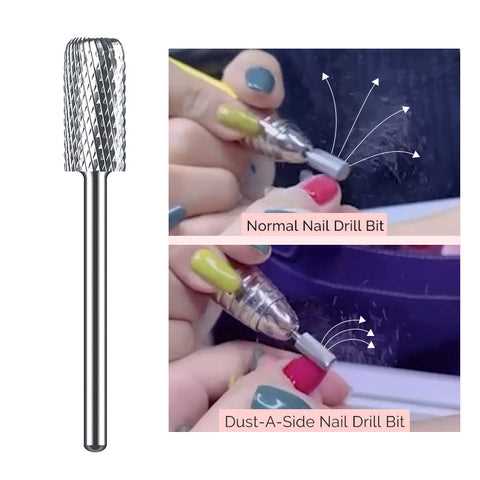
- Brush Bits: Brush bits are designed to clean the nail plate and remove dust and debris generated during the drilling process.
Factors to Consider
When choosing the right nail drill bit for acrylics, there are several factors to consider:
- Bit Size: The size of the drill bit should correspond to the size and shape of the nail you are working on. Smaller bits are suitable for detailed work, while larger bits are better for bulk removal.
- Coarseness: The coarseness of the drill bit determines how much material it can remove. Coarse bits are suitable for fast nail shaping, while finer bits are better for detailing and finishing.
- Quality: It is important to invest in high-quality drill bits that are made from durable materials. Low-quality bits can wear out quickly and may not provide the desired results.
- Compatibility: Ensure that the drill bit you choose is compatible with your nail drill machine. Different nail drill machines might have different shank sizes, so it is essential to check for compatibility.
Tips for Using Nail Drill Bits

- Always start with a lower speed setting on your nail drill machine to prevent overheating and damage to the nail.
- Regularly clean and sanitize your drill bits to prevent the spread of bacteria and fungi.
- Replace your drill bits when they become dull or worn out to maintain optimal performance.
- Practice caution and precision while using nail drill bits to avoid injuries and damage to the natural nail.
Conclusion
Choosing the right nail drill bit for acrylics is essential for achieving desired results in nail shaping and maintenance. Consider the type, size, coarseness, quality, and compatibility of the drill bit to make an informed decision. Remember to always prioritize safety and practice proper maintenance of your drill bits.
Understanding the Importance of Nail Drill Bits
Nail drill bits are essential tools used in the nail industry for various purposes, such as shaping, cleaning, and removing acrylics. They are attachments that fit onto a nail drill machine and come in different shapes, sizes, and materials. Understanding the importance of nail drill bits can help nail technicians achieve better results and ensure the safety and satisfaction of their clients.
1. Efficient and Precise Nail Preparation
Nail drill bits play a crucial role in preparing the nails for acrylic application. They are used to remove the shine and texture from the natural nails, allowing the acrylic to adhere properly. By choosing the right drill bit, nail technicians can efficiently remove any debris, cuticles, or rough edges, ensuring a smooth and clean nail surface.
2. Enhancing Nail Art and Design
Nail drill bits are also valuable tools for creating intricate nail art and designs. Different drill bit shapes, such as cone, flame, or barrel, can be used to carve or etch unique patterns onto acrylic nails. They enable nail technicians to unleash their creativity and offer clients personalized and customized nail art.
3. Removing and Adjusting Acrylics
Another significant function of nail drill bits is the removal and adjustment of acrylic nails. Sometimes, clients may want to change the shape or length of their acrylics without completely removing them. In such cases, drill bits with fine-grit come in handy to file and reshape the acrylics without causing damage to the natural nails.

4. Time-Saving and Efficiency
Using the right nail drill bits can significantly improve efficiency and save time during nail services. For example, coarse-grit drill bits can quickly remove excess acrylics or gel extensions, speeding up the overall process. Additionally, high-quality drill bits are durable and long-lasting, reducing the need for frequent replacements and ultimately saving money.
5. Safety and Client Comfort
The safety and comfort of clients should always be a priority during nail services. Nail drill bits that are designed with precision and smooth edges minimize the risk of accidental injuries, such as cuts or scrapes. It is essential to choose drill bits made with high-quality materials that reduce friction, heat, and vibration, providing a comfortable experience for clients.
6. Versatility and Adaptability
Nail drill bits come in a wide variety of shapes, sizes, and materials, offering versatility and adaptability for different nail services. Nail technicians can choose from coarse to fine-grit bits, depending on the specific task at hand. Additionally, some drill bits are designed for specific purposes, such as removing gel polish or smoothing out ridges, providing enhanced precision and efficiency.
In conclusion, nail drill bits are crucial tools that impact the overall outcome of acrylic nail services. By understanding their importance and selecting the right drill bits for each task, nail technicians can achieve better results, enhance creativity, improve efficiency, ensure safety, and ultimately provide a satisfying experience for their clients.
Factors to Consider When Choosing a Nail Drill Bit
When choosing a nail drill bit for acrylics, it’s important to consider several factors to ensure you select the right one for your needs. Nail drill bits come in different shapes, sizes, and materials, each offering unique benefits and uses. Here are some important factors to consider:

1. Bit Material
The material of the nail drill bit greatly affects its durability and performance. Some common materials include:
- Carbide: Known for its durability and long-lasting sharpness, carbide bits are suitable for heavy-duty use.
- Ceramic: Ceramic bits are ideal for gentle filing and reducing heat build-up during use.
- Diamond: Diamond bits are highly durable and can be used for both natural and artificial nails.
- Steel: Steel bits are a cost-effective option but may not last as long as other materials.
2. Grit Level
The grit level of a nail drill bit determines its filing power. Higher grit levels (100-180) are suitable for removing product quickly, while lower grit levels (180-240) are better for finishing and smoothing.
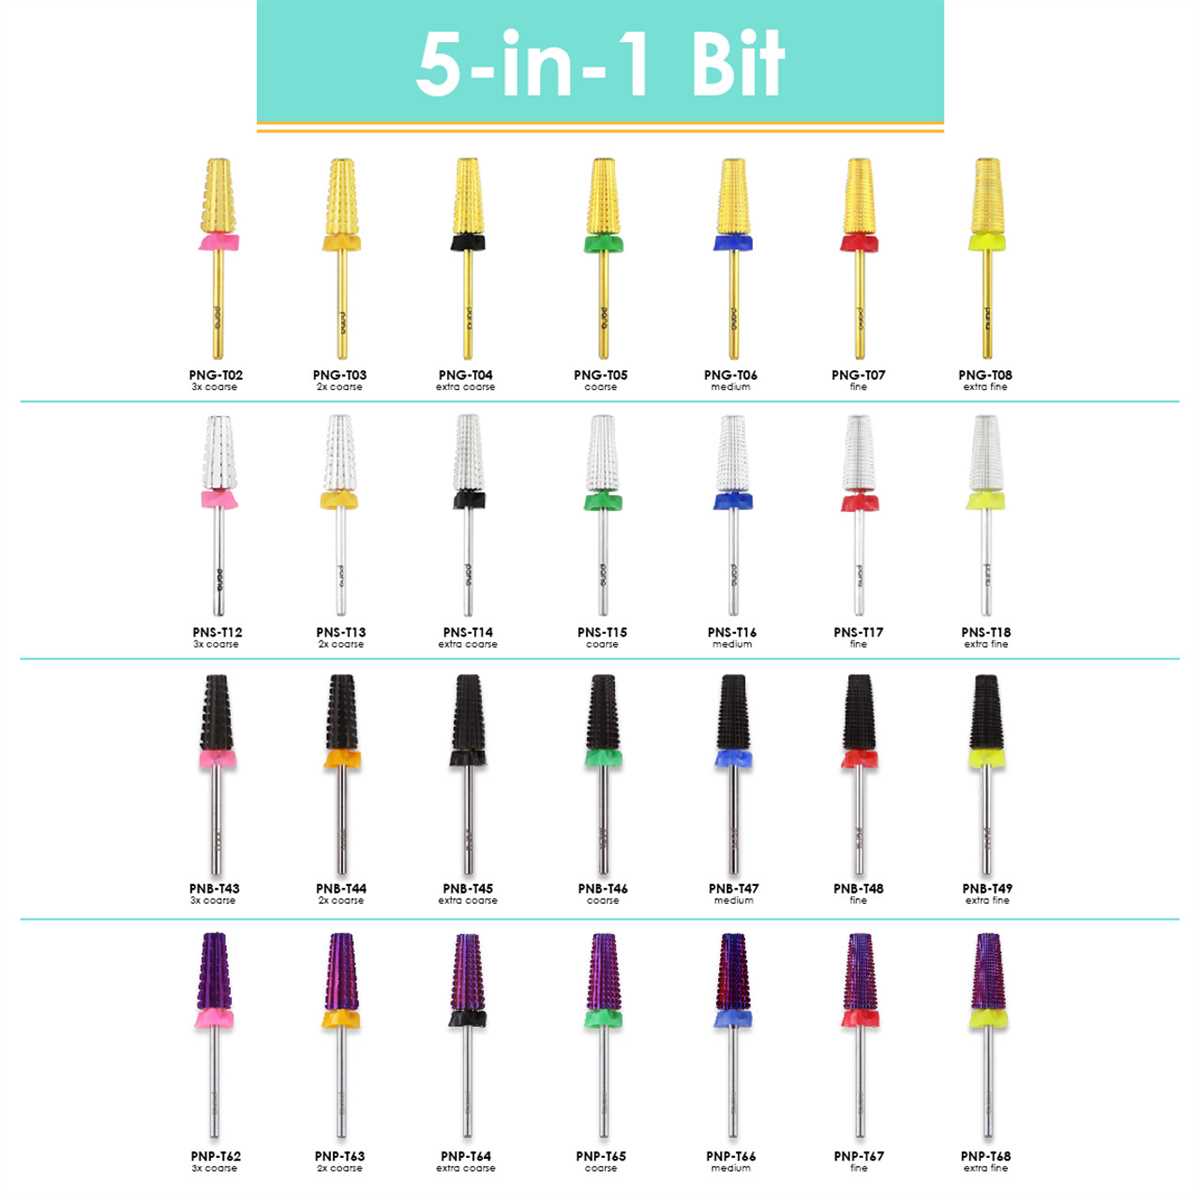
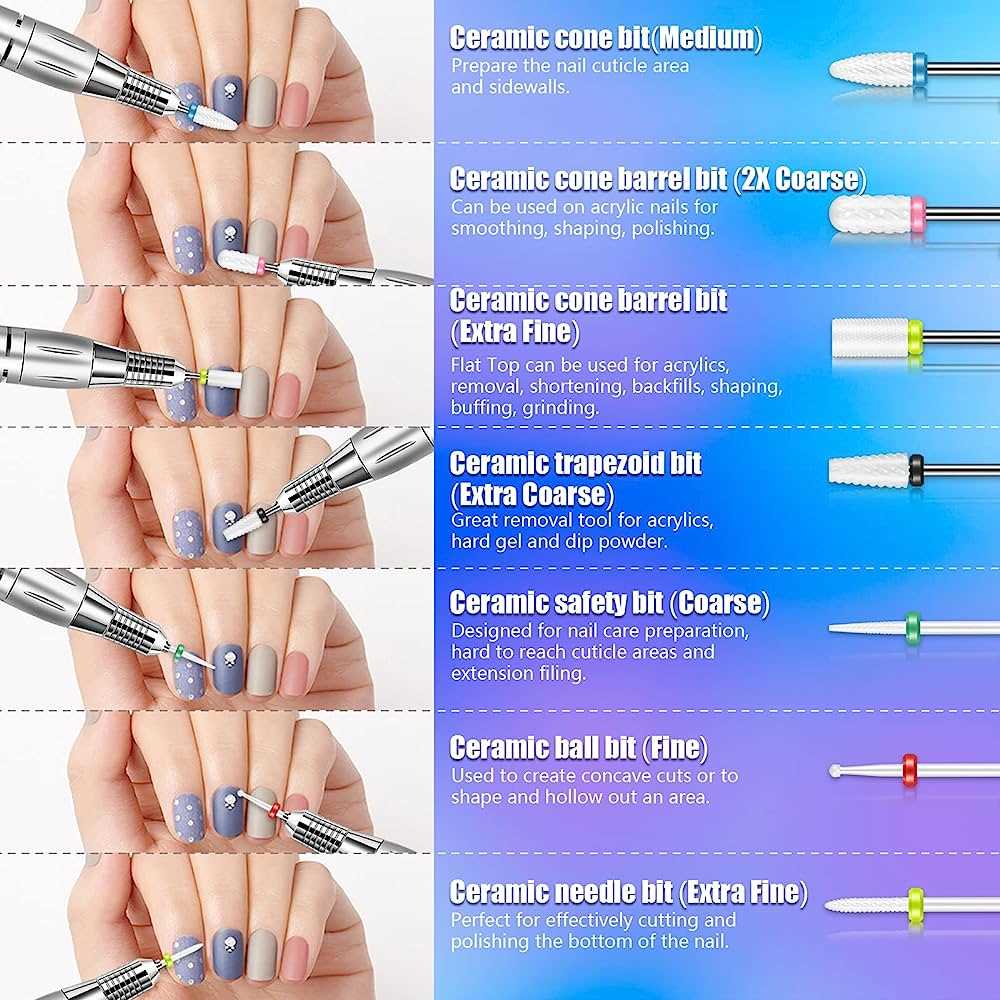
3. Bit Shape
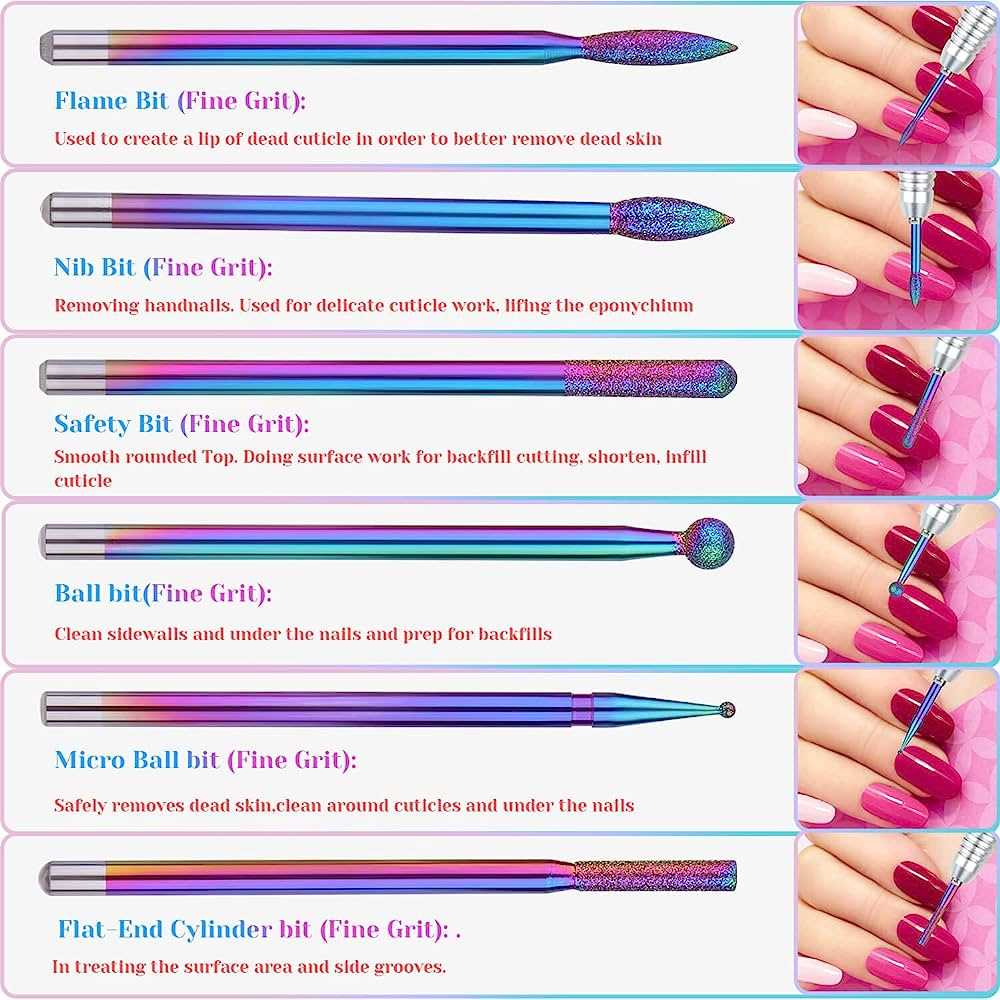
The shape of the nail drill bit determines its functionality. Some common bit shapes include:
- Round: Round bits are versatile and suitable for all nail types. They can be used for filing, shaping, and cuticle work.
- Cone: Cone bits are ideal for removing dead skin and shaping the sidewalls of the nails.
- Cylinder: Cylinder bits are perfect for under the nails and sidewalls filing.
- Flame: Flame bits are great for removing gel and acrylic overlays.
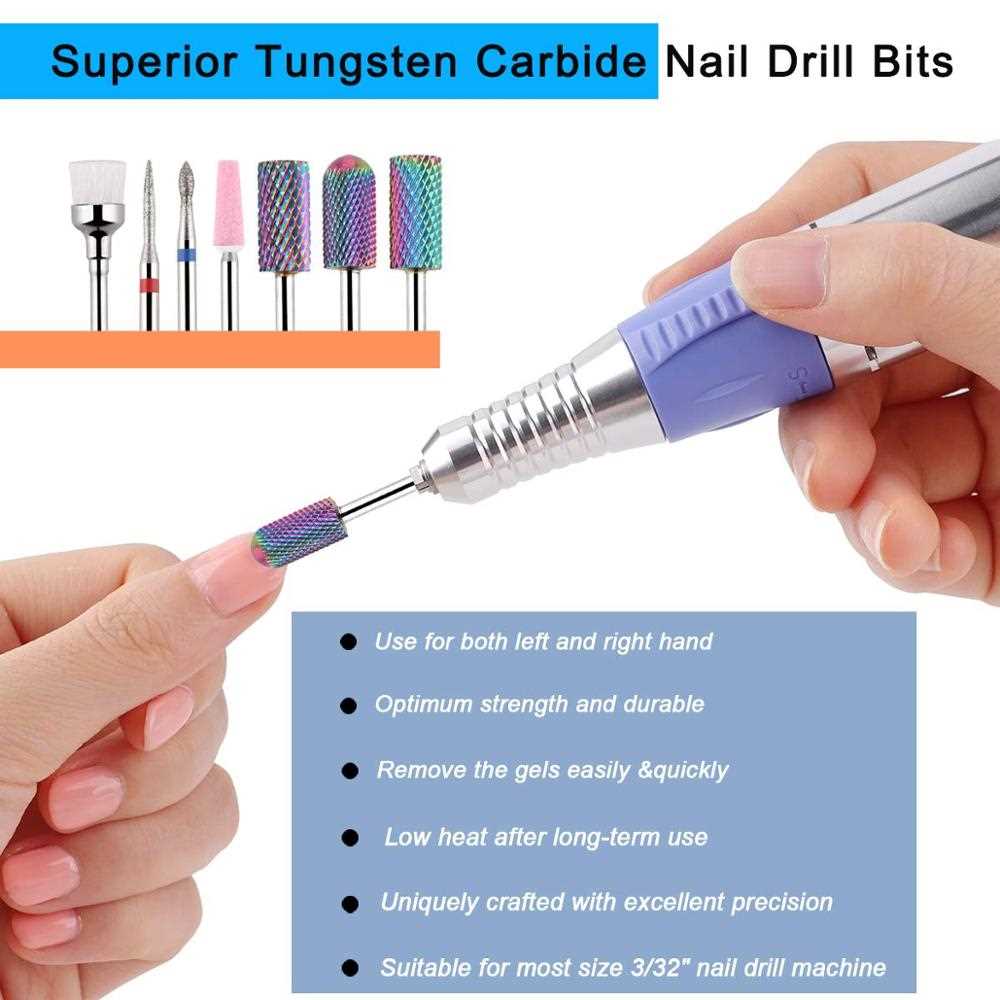
4. Shank Size
The shank size of a nail drill bit determines its compatibility with the nail drill machine. Most nail drills accept standard shank sizes of 3/32 inch, but it’s essential to check the compatibility before purchasing.
5. Safety Considerations
Safety should always be a top priority when choosing a nail drill bit. Look for bits with smooth edges to prevent accidental cuts or scrapes. Additionally, consider bits with ventilation holes to reduce heat build-up and minimize the risk of burning.

6. Price and Brand
Lastly, consider your budget and the reputation of the brand. While it’s tempting to go for cheaper options, investing in high-quality nail drill bits can save you money in the long run as they tend to last longer and perform better.
By considering these factors, you can choose a nail drill bit that suits your specific needs and ensures a safe and efficient acrylic nail application or removal process.
Understanding Different Types of Nail Drill Bits
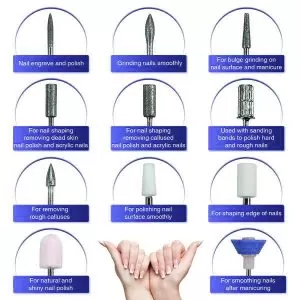
When it comes to choosing the best nail drill bit for acrylics, it is important to understand the different types available and their specific uses. Each type of nail drill bit is designed to perform a specific task and has its own unique features. Here are some of the most common types of nail drill bits:
1. Carbide Bits
Carbide bits are known for their strength and durability. They are made from a combination of carbide metal and other materials, which makes them more resistant to heat and wear. Carbide bits are great for removing bulk acrylic and for shaping the nails. They can also be used to remove gel polish and cuticle work.
2. Diamond Bits
Diamond bits are made with a coating of small diamond particles. They are ideal for smoothing and refining the surface of acrylic nails. Diamond bits are also great for removing dead cuticles and callouses. They are gentler on the nails compared to carbide bits and are suitable for natural nails as well.
3. Ceramic Bits
Ceramic bits are made from ceramic material, which makes them gentle on the nails and less likely to cause damage. They are ideal for delicate work such as shaping and refining the nail edges. Ceramic bits are also great for removing gel polish and for nail art designs.
4. Mandrel Bits
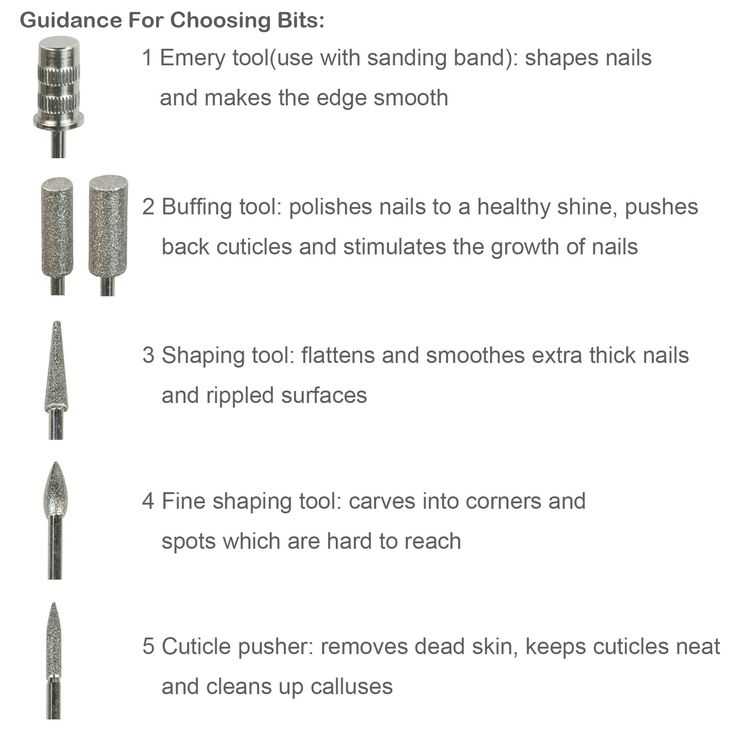
Mandrel bits are made from metal and are commonly used for sanding and buffing the nails. They are available in different grits, allowing you to choose the level of coarseness for your desired finish. Mandrel bits are also used for removing thick overlays and for refining the nail surface.
5. Safety Bits
Safety bits are designed with a rounded tip to prevent accidental injuries and to minimize damage to the nails and cuticles. They are commonly used for cleaning the nail sidewalls, removing excess product, and for finishing touches on the nails. Safety bits are a great option for beginners or for those who prefer a more cautious approach.
6. Specialty Bits
There are also specialty bits available for specific tasks such as removing gel extensions, creating smile lines, and cuticle cleaning. These bits are designed with specific shapes and sizes to help you achieve precise and professional-looking results.
Before choosing a nail drill bit, it is important to consider your skill level, the type of work you will be performing, and the desired outcome. It is also crucial to invest in high-quality bits to ensure safety and longevity.
Choosing the Right Shape for Your Acrylic Nails
When it comes to getting acrylic nails, choosing the right shape is an important decision. The shape of your nails not only affects the overall aesthetic appeal but also impacts the functionality and durability of your nails. Here are some popular nail shapes to consider:
1. Square
The square shape is a classic choice for acrylic nails. It involves filing the nails straight across and then gently rounding the edges. Square nails offer a clean and sophisticated look, while also providing a wider surface area for nail designs.
2. Oval
Oval nails have a rounded shape that resembles an egg. This shape is known for its feminine and elegant appearance. Oval nails are perfect for those who want to create the illusion of longer and slender fingers. They are less prone to breakage compared to other nail shapes.
3. Round
Round nails have a circular shape and are suitable for those who prefer shorter nail lengths. This shape is low-maintenance and ideal for everyday wear. Round nails give your hands a softer and more natural look.
4. Almond
Almond-shaped nails are tapered towards the end and resemble the shape of an almond nut. This shape is perfect for achieving a glamorous and stylish look. Almond nails can visually elongate your fingers and create a slimming effect.
5. Stiletto
Stiletto nails are long and pointed, resembling the shape of a stiletto heel. This extreme nail shape is popular among bold and daring individuals. Stiletto nails require regular maintenance and are not as durable as other shapes.
6. Coffin/Ballerina
The coffin or ballerina shape is a trendy and fashionable choice. This shape features long and tapered nails with squared off tips. Coffin nails provide a sleek and edgy look, making them a popular choice for nail art and designs.
Ultimately, the shape of your acrylic nails should be chosen based on your personal style, preferences, and nail length. It’s important to consider your daily activities and the level of maintenance you are willing to commit to. Consulting with a professional nail technician can help you make an informed decision and achieve the perfect nail shape for your acrylics.
Choosing the Right Grit for Your Nail Drill Bit
The grit of a nail drill bit refers to the coarseness or fineness of the abrasive material on the bit’s surface. The choice of grit is crucial for achieving the desired result while working with acrylics. Here are a few factors to consider when choosing the right grit:
1. Grit Sizes
Nail drill bits come in a variety of grit sizes, ranging from fine to coarse. Each size serves a specific purpose and provides a different level of abrasiveness. The most common grit sizes for nail drill bits are:
- Coarse Grit (80 to 150): Suitable for rapid material removal and shaping the nails.
- Medium Grit (180 to 240): Ideal for refining the shape of the nails and removing product buildup.
- Fine Grit (240 to 600): Used for smoothing the nail surface and achieving a polished finish.
2. Nail Condition
The condition of your client’s nails should also influence your choice of grit. If the nails are healthy and strong, a medium or fine grit bit may be sufficient. However, if the nails are fragile or damaged, it’s recommended to use a finer grit to minimize the risk of further damage.
3. Task at Hand
The specific task you are performing with the nail drill bit will also determine the appropriate grit. For example:
- For bulk removal: Coarse grit bits are more effective at quickly removing layers of product or shaping the nails.
- For refining shape: Medium grit bits provide better control and precision, allowing you to refine the shape of the nails.
- For finishing touches: Fine grit bits are ideal for buffing and achieving a smooth, glossy finish on the nails.
4. Experience Level
Consider your experience level when choosing the right grit. Beginners may find it easier to work with medium or fine grit bits due to their lower abrasiveness. As you gain more experience, you can experiment with coarser grits to achieve desired effects.
5. Personal Preference
Finally, take your personal preference into account. Some nail technicians may find that they prefer a specific grit size for certain tasks or clients. Experiment with different grits to find what works best for you.
Remember, the choice of grit depends on the specific needs of the client and the task at hand. By considering these factors, you can select the right grit for your nail drill bit and achieve optimal results when working with acrylics.
Taking Safety Precautions When Using Nail Drill Bits
When using nail drill bits for acrylics or any other nail service, it is important to prioritize safety to prevent accidents and injuries. Here are some essential safety precautions to keep in mind:
1. Wear appropriate protective gear
Always wear protective gear such as safety glasses and a dust mask to protect your eyes and respiratory system from any flying debris or dust particles. You should also consider wearing gloves to protect your hands from potential injuries.
2. Choose the right drill bit
Using the correct drill bit for the task at hand is crucial for ensuring safe and effective results. Make sure to choose a drill bit that is suitable for acrylics and follow the manufacturer’s recommendations for speed and pressure.
3. Start with low speed and gentle pressure
When starting to use a nail drill bit, always begin with a low speed setting and apply gentle pressure. This allows you to have better control and reduces the risk of causing damage to the natural nail or cuticle.
4. Avoid excessive heat
Excessive heat can cause discomfort and even damage the client’s nails. To prevent this, periodically dip the drill bit in water or a cooling gel to keep it from overheating.
5. Take breaks and allow nails to cool down
During longer sessions, it is important to take breaks to allow the nails and drill bits to cool down. This helps to prevent overheating and reduces the risk of potential damage to the client’s nails.
6. Practice proper sanitation
Regularly clean and sanitize your nail drill bits to prevent the spread of bacteria and infections. Follow the manufacturer’s instructions for proper cleaning and disinfection techniques.
7. Keep the drill bit perpendicular to the nail
When using a nail drill bit, make sure to keep it perpendicular to the nail surface. Holding it at an angle increases the risk of slipping and causing damage.
8. Be cautious around sensitive areas
Exercise extra caution when working around sensitive areas such as the cuticle and sidewalls. These areas are more delicate and prone to damage, so it’s essential to proceed with care.
By following these safety precautions, you can ensure a safe and successful nail service using nail drill bits.
Budget-Friendly Options for Nail Drill Bits
If you’re looking for a cost-effective option when it comes to nail drill bits for acrylics, there are several budget-friendly options available. These options may not have all the bells and whistles of more expensive bits, but they can still get the job done effectively.
1. Carbide Drill Bits
Carbide drill bits are a popular choice among nail technicians on a budget. These bits are made from tungsten carbide, which is a strong and durable material. They are great for removing product and shaping the nails. Carbide bits are available in different shapes and sizes to suit various nail styles.
2. Ceramic Drill Bits
Ceramic drill bits are another affordable option to consider. They are made from zirconia ceramic, which is not as strong as carbide but still durable enough for regular use. Ceramic bits are gentle on the nails and can be used for filing and shaping. They are also great for removing gel polish.
3. Diamond Coated Drill Bits
Diamond coated drill bits are a cost-effective alternative to full diamond bits. These bits are made from stainless steel with a layer of diamond coating. They are great for removing gel polish, shortening nails, and shaping. Diamond coated bits are available in different grits, allowing you to choose the level of abrasiveness.
4. Sanding Bands
Sanding bands are the most affordable option for nail drill bits. These bands are made from abrasive material and are great for removing product, shaping, and refining the nails. While sanding bands may not last as long as other options, they are easily replaceable and can be a practical choice for beginners or those on a tight budget.
Final Thoughts
While investing in high-quality nail drill bits is always recommended for professional use, there are budget-friendly options available that can still produce satisfactory results. Consider your needs and budget when choosing the best nail drill bits for acrylics, and remember to prioritize safety and proper technique to achieve the best outcome.
Tips and Tricks for Maintaining and Cleaning Your Nail Drill Bits
Maintaining and cleaning your nail drill bits is essential to ensure their longevity and efficiency. Here are some useful tips and tricks to keep your drill bits in excellent condition:
1. Regularly clean your nail drill bits:
- After each use, remove any acrylic dust or debris from the drill bits using a clean, dry brush.
- For a deeper clean, soak the drill bits in warm soapy water for a few minutes. Use a soft brush to gently scrub away any remaining residue. Rinse thoroughly and dry well before storing.
- Never use harsh chemicals or abrasive cleaners, as they can damage the drill bits.
2. Store your nail drill bits properly:
- Avoid leaving your drill bits exposed to dust or moisture. Store them in a clean, dry container or a dedicated drill bit organizer.
- If you have multiple drill bits, consider using color-coded caps or labels to easily identify and organize them.
- Keep your drill bits away from direct sunlight or heat sources, as excessive heat can cause damage.
3. Sharpen or replace your nail drill bits when necessary:
- Over time, drill bits may become dull or worn out. If you notice a decrease in performance or difficulty in shaping acrylics, it may be time to sharpen or replace the drill bit.
- Refer to the manufacturer’s instructions for sharpening or replacing the specific drill bit you are using.
4. Use a drill bit cleaner:
- Consider investing in a drill bit cleaner specifically designed for removing residue and buildup from nail drill bits.
- Follow the instructions provided with the cleaner to effectively remove any stubborn debris and maintain the sharpness of your drill bits.
5. Avoid excessive pressure and heat:
- Using excessive pressure or heat while using your nail drill can cause damage to both the drill bits and your natural nails.
- Always use a gentle and controlled motion, allowing the drill bit to do the work without applying too much pressure.
- Monitor the heat generated by the drill bit during use. If it becomes uncomfortably hot, give it a break to cool down.
By following these tips and tricks, you can maintain the quality and performance of your nail drill bits, ensuring a smooth and efficient acrylic application process.
FAQ:
What should I consider when choosing a nail drill bit for acrylics?
When choosing a nail drill bit for acrylics, there are several factors to consider. First, consider the type of acrylic you’ll be working with. Different types of acrylic require different drill bits. Also, consider the size and shape of the drill bit. The size should be appropriate for the size of the nails you’ll be working on, and the shape should be compatible with the shape you want to achieve. Finally, consider the material of the drill bit. Carbide drill bits are durable and long-lasting, while ceramic bits are gentle on the nails.
What are the different types of drill bits available for acrylics?
There are several types of drill bits available for acrylics. One common type is the diamond bit, which is coated with tiny diamonds and is ideal for shaping and filing acrylic nails. Another type is the carbide bit, which is durable and long-lasting, making it great for removing acrylics. Ceramic bits are also popular, as they are gentle on the nails and can be used for both shaping and removing acrylics. There are also sanding bands, which are disposable and come in different grits for various tasks.
How do I choose the right size drill bit for acrylics?
Choosing the right size drill bit for acrylics depends on the size of the nails you’ll be working on. The drill bit should be small enough to maneuver around the nail bed comfortably, but large enough to remove acrylic efficiently. It’s recommended to have a few different sizes on hand, so you can switch them out depending on the task at hand. Additionally, some drill bits come with adjustable bands that can be tightened or loosened to achieve the desired size.
What shape of drill bit should I use for acrylics?
The shape of the drill bit you should use for acrylics depends on the shape you want to achieve. For example, if you want a square-shaped nail, a square-shaped drill bit would be ideal. If you want a round-shaped nail, a rounded drill bit would work best. Additionally, there are cone-shaped drill bits that can be used for both shaping and removing acrylics. It’s important to choose a shape that matches the desired end result and allows for precise and controlled work.
Which material is better for a nail drill bit: carbide or ceramic?
Both carbide and ceramic nail drill bits have their advantages. Carbide drill bits are known for their durability and long-lasting performance. They are great for removing acrylics efficiently. On the other hand, ceramic drill bits are gentle on the nails and generate less heat, making them a good choice for those with sensitive nails. Ultimately, the choice between carbide and ceramic comes down to personal preference and the specific needs of the individual.
Video:


Meet Harrison Clayton, a distinguished author and home remodeling enthusiast whose expertise in the realm of renovation is second to none. With a passion for transforming houses into inviting homes, Harrison's writing at https://thehuts-eastbourne.co.uk/ brings a breath of fresh inspiration to the world of home improvement. Whether you're looking to revamp a small corner of your abode or embark on a complete home transformation, Harrison's articles provide the essential expertise and creative flair to turn your visions into reality. So, dive into the captivating world of home remodeling with Harrison Clayton and unlock the full potential of your living space with every word he writes.


