Beginner’s Guide: How to Use a Square Hole Drill Bit

Are you interested in woodworking or DIY projects? If so, then you need to learn about the square hole drill bit. This versatile tool is essential for creating square holes for dowels, nuts, and bolts. In this beginner’s guide, we will walk you through the steps of using a square hole drill bit, from selecting the right size to drilling the hole accurately.
Selecting the Right Size
Before you can start using a square hole drill bit, you need to determine the size of the hole you want to create. Square hole drill bits come in a range of sizes, so you need to choose one that matches the dimensions of your project. Measure the width and depth of the hole you want to create, and then select a drill bit that matches those measurements. It’s also a good idea to have a backup drill bit in case you need to make adjustments.
Preparing the Material
Once you have the right size square hole drill bit, it’s time to prepare the material you will be drilling into. If you are working with wood, make sure it is securely clamped to a work surface to prevent it from moving while you drill. For other materials, such as metal or plastic, use clamps or vices to secure them in place. It’s important to ensure that the material is stable and won’t shift during the drilling process.

Drilling the Hole
Now that everything is set up, it’s time to start drilling. Begin by making a pilot hole using a regular drill bit. This will help guide the square hole drill bit and prevent it from drifting off course. Once the pilot hole is created, switch to the square hole drill bit. Hold the drill perpendicular to the material and apply steady pressure as you drill. Be sure to keep the drill bit straight and avoid applying too much force, as this can result in a rough or damaged hole. Slow and steady is the key.
Tip: To prevent the drill bit from overheating, periodically withdraw it from the hole to clear the chips and cool it down.
Using a square hole drill bit may seem intimidating at first, but with the right preparation and technique, you can create precise and clean square holes for your woodworking or DIY projects. Follow the steps outlined in this beginner’s guide and practice on scrap material before starting on your actual project. Soon enough, you’ll be confidently drilling square holes like a pro!
Selecting the Right Drill Bit
When using a square hole drill bit, it is important to select the right drill bit for the job. The type of material you’re working with and the desired results will determine the type of drill bit you should use.
1. Wood Drill Bits
- Spade Bits: These are the most commonly used drill bits for wood. They have a flat, paddle-like shape and are designed for drilling large holes quickly.
- Forstner Bits: These are ideal for drilling clean and precise flat-bottomed holes. They are often used for mounting hinges and making furniture.
2. Metal Drill Bits
- Titanium-coated HSS (High-Speed Steel) Bits: These drill bits are known for their durability and can be used for drilling through metal and other tough materials. The titanium coating helps reduce heat and friction.
- Cobalt Bits: These are similar to HSS bits, but the cobalt alloy used in their construction makes them even more resistant to heat and wear. They are suitable for drilling through hardened steel and stainless steel.
3. Masonry Drill Bits
- Carbide-Tipped Bits: These are designed for drilling into concrete, masonry, and other hard materials. The carbide tip provides excellent durability and helps maintain the sharpness of the bit.
- SDS Bits: These specialized bits are designed for use with SDS (Slotted Drive System) drills. They feature a unique shank design that allows for easy and secure bit changes.
4. Ceramic and Glass Drill Bits
- Diamond-coated Bits: These are specifically designed for drilling into ceramics, glass, and porcelain. The diamond coating provides excellent durability and allows for precise drilling.
Regardless of the type of drill bit you choose, it is important to use proper safety precautions when operating power tools. Always wear safety glasses, work gloves, and appropriate clothing to protect yourself from any potential hazards.

Preparing the Workpiece
Before you begin using a square hole drill bit, it’s important to properly prepare the workpiece to ensure successful and accurate drilling.
1. Mark the Hole Location
Start by marking the location of the square hole on the workpiece. Use a pencil or marking tool to make a clear and precise mark. Double-check the measurements and ensure that the hole is positioned correctly.
2. Secure the Workpiece
Next, secure the workpiece in place using clamps or a vise. This will prevent it from moving or vibrating during the drilling process, providing greater stability and precision.
3. Use a Center Punch
To create a starting point for the drill bit, use a center punch to make a small indentation at the center of the marked hole. This will help prevent the drill bit from wandering or slipping during drilling.
4. Choose the Right Drill Bit Size
Select a square hole drill bit that matches the desired size of the hole. It’s essential to choose the correct size to ensure a snug fit for any joinery or hardware that will be inserted into the hole.

5. Wear Safety Gear
Always wear appropriate safety gear when working with power tools. This includes safety goggles to protect your eyes from any flying debris or chips, as well as hearing protection to reduce the noise from drilling.
6. Clear the Work Area

Clear the work area of any obstructions or clutter that could interfere with the drilling process. This will help ensure a smooth and uninterrupted drilling operation.
By following these steps to prepare the workpiece, you’ll be ready to start using a square hole drill bit with confidence and precision.
Securing the Workpiece
When using a square hole drill bit, it’s important to secure the workpiece properly to ensure accuracy and safety. Here are a few methods you can use to secure your workpiece:

Clamping
Clamping the workpiece is one of the most common and effective ways to secure it. You can use a variety of clamps such as bar clamps, C-clamps, or quick clamps. Make sure that the clamps are tightened securely and that the workpiece is held firmly in place. This will prevent any movement or shifting while drilling.
Double-Sided Tape
If you don’t have clamps or the workpiece is too small to be clamped, you can use double-sided tape to secure it. Apply the tape to the bottom of the workpiece and then press it firmly onto a stable surface, such as a workbench or a piece of plywood. This will provide enough grip to prevent the workpiece from moving during drilling.
Bench Vise
If your workpiece has a flat and stable surface, you can also use a bench vise to secure it. Simply adjust the vise to fit the workpiece and tighten it securely. A bench vise is particularly useful when working with smaller workpieces or when more control is needed.
Workbench Dogs or Holdfasts
One method commonly used in woodworking is using workbench dogs or holdfasts. These are devices that can be inserted into holes in the workbench, providing a secure hold for the workpiece. This method is especially useful when drilling larger or longer workpieces where clamps may not be sufficient.
Overall, the key to securing your workpiece is to ensure that it is stable and immobile during drilling. This will not only help you achieve accurate and precise results but also enhance safety by minimizing the risk of the workpiece shifting or the drill bit wandering off course. Choose the appropriate method based on the size and nature of the workpiece, and always prioritize safety while working with power tools.

Setting Up the Drill
1. Gather the necessary tools and materials
- A square hole drill bit
- A power drill with variable speed settings
- Safety goggles
- Clamps or a vice to secure your workpiece
- Measuring tape or ruler
- Marker or pencil for marking the hole
2. Select the appropriate drill bit size
Before using a square hole drill bit, it’s important to choose the right size for your project. Refer to the instructions or specifications provided by the manufacturer to determine the appropriate size for the square hole you want to create.
3. Secure the workpiece
To ensure accuracy and safety, secure the workpiece that you will be drilling into. Depending on the size and shape of the workpiece, you can use clamps or a vice to hold it in place. Make sure it is stable and will not move during drilling.
4. Mark the location of the hole
Use a measuring tape or ruler to determine the exact location of the square hole you want to create. Mark the position with a marker or pencil so that you have a clear guide when drilling.
5. Prepare the drill
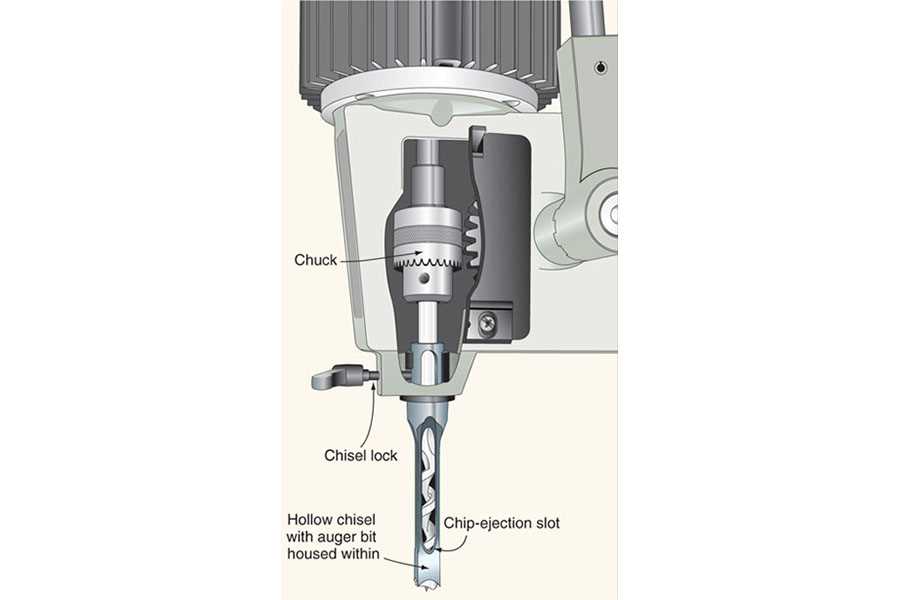
- Insert the square hole drill bit into the chuck of your power drill.
- Tighten the chuck securely to ensure the drill bit is held firmly in place.
- Set the drill to the appropriate speed recommended by the manufacturer for the material you will be drilling into.
6. Begin drilling

With your safety goggles on, position the drill bit on the marked location and apply firm and steady pressure as you start drilling. Keep the drill perpendicular to the work surface to create a straight and clean square hole. Go slow and let the drill bit do the work, allowing it to cut through the material without forcing it.
7. Clean the hole
Once you have drilled the square hole, use a chisel or file to clean up the edges and remove any excess material. This will ensure a neat and precise square hole.
8. Safety precautions
Always wear safety goggles to protect your eyes from flying debris. Additionally, make sure to follow the manufacturer’s instructions and recommendations for using the square hole drill bit.
Drilling the Square Hole
Once you have prepared your workpiece and gathered all the necessary tools and materials, you can proceed with drilling the square hole using a square hole drill bit. Follow these steps to ensure a successful drilling process:
1. Mark the Hole
Begin by marking the center point of the square hole on the surface of your workpiece. Use a pencil or a marker to make a precise mark, as this will serve as a guide for the drilling process.

2. Secure the Workpiece
Place your workpiece securely in a vise or clamp to prevent it from moving during drilling. This will ensure that the hole is drilled accurately and prevent any accidents while drilling.
3. Choose the Right Drill Bit Size
Select a square hole drill bit that matches the size of the square hole you want to create. Square hole drill bits come in a variety of sizes, so choose the one that best suits your needs.
4. Drill Pilot Holes
Before you start drilling the actual square hole, it is recommended to drill pilot holes at the corners of the square. This will help guide the square hole drill bit and prevent any splintering or chipping of the workpiece.
5. Start Drilling
Position the square hole drill bit at one of the pilot holes and start drilling slowly and steadily. Apply even pressure and let the drill bit do the work. Avoid forcing the drill bit, as this may cause the bit to break or damage the workpiece.
6. Clear Out the Waste Material
As you drill, periodically remove the waste material from the hole using a brush or a shop vacuum. This will help prevent clogging of the hole and ensure smooth drilling.
7. Repeat the Process
Continue drilling from one pilot hole to the next until you have drilled all the sides of the square hole. Take your time and be patient, as drilling a square hole can be a time-consuming process.
8. Final Touches
Once you have completed the drilling process, inspect the square hole for any imperfections or rough edges. Use sandpaper or a file to smooth out any rough areas and ensure a clean and precise square hole.
Remember to always wear appropriate safety gear, such as safety goggles and gloves, when drilling to protect yourself from any potential accidents or injuries.
Removing Dust and Debris
When using a square hole drill bit, it’s important to remove any dust and debris that may accumulate during the drilling process. This will help ensure that the bit remains sharp and effective, and also prevent any damage to your workpiece.
Here are some ways to effectively remove dust and debris:
- Use compressed air: After each drilling operation, use compressed air to blow away any dust and debris that may be left in the drilled hole. This will help clear the hole and prevent any interference with subsequent drilling or fitting of hardware.
- Brush away debris: If there is any visible debris or dust on the surface of the workpiece or around the drilled hole, use a stiff brush or a small broom to gently sweep it away. Be careful not to apply too much pressure that may cause damage to the workpiece.
- Vacuum cleaner with a brush attachment: If you have a vacuum cleaner with a brush attachment, you can use it to effectively remove dust and debris from the drilled hole and surrounding area. The bristles of the brush attachment will help agitate and loosen the dust, while the vacuum will suck it away, leaving a clean work surface.
- Use a damp cloth: If dust and debris have accumulated on the surface of the workpiece, you can use a damp cloth to gently wipe it away. This will help prevent the dust from getting into the drilled hole or interfering with the fitting of hardware.
Remember to always wear appropriate safety gear, such as safety glasses and a dust mask, when removing dust and debris. This will help protect your eyes and respiratory system from any airborne particles.
Finishing Touches
Once you have successfully used the square hole drill bit to create your desired holes, it’s time to focus on the finishing touches to ensure a professional and polished look.
Clean the Holes
Start by cleaning out any debris or sawdust that may have accumulated in the holes. Use a brush or a vacuum cleaner to remove any loose particles. This will ensure a clean and smooth surface for your project.
Sand the Edges
Next, sand the edges of the holes to remove any rough or sharp edges. This will not only improve the appearance of the holes but also prevent any potential injury or damage to your materials. Use a fine-grit sandpaper and gently sand the edges until they are smooth to the touch.
Apply a Finish
If desired, you can apply a finish to the holes to further enhance their appearance. This can be a stain, paint, or varnish that matches the rest of your project. Apply the finish evenly and allow it to dry completely before continuing with your project.
Clean and Store the Drill Bit
After you have finished using the square hole drill bit, it is important to clean and store it properly. Remove any remaining debris, oil or lubricant from the drill bit and wipe it dry. Store it in a dry and secure place to protect it from damage and ensure its longevity.
By following these finishing touches, you can achieve professional-looking square holes and ensure the success and quality of your project.
Practice and Experimentation
Using a square hole drill bit may seem daunting at first, but with practice and experimentation, you can quickly become proficient in using this tool. Below are some tips and techniques to help you improve your skills:
1. Start with Small Projects
When first starting out, it’s best to begin with small woodworking projects that require square holes. This will allow you to build your skills gradually and gain confidence in using the square hole drill bit.
2. Choose the Right Drill Bit Size
Ensure that you select the appropriate size of square hole drill bit for your project. Using the wrong size may result in a hole that is either too small or too large, making it difficult to properly fit the desired component.
3. Secure your Workpiece
Before drilling, make sure to securely clamp your workpiece. This will prevent any movement or slippage during the drilling process, ensuring accurate and clean holes.
4. Mark Your Drilling Points
Use a pencil or marking tool to clearly indicate the precise locations where you want to drill your square holes. This will serve as a guide and help you maintain accuracy throughout the drilling process.
5. Take it Slow
It’s important to approach drilling with a square hole drill bit with a slow and steady pace. Rushing the process may result in mistakes or uneven holes. Allow the drill bit to do the work for you, gently applying pressure as you guide it through the material.
6. Experiment with Different Materials
Don’t limit yourself to just one type of material. Try drilling square holes in various materials such as wood, plastic, or metal to expand your skills and understanding of how the drill bit performs.
7. Maintain and Sharpen Your Drill Bit
Regularly clean and sharpen your square hole drill bit to ensure optimal performance. Dull or dirty bits can lead to rough cuts and increased difficulty in drilling square holes.
8. Seek Guidance and Learn from Others
Join online woodworking forums or seek guidance from experienced woodworkers to learn from their experiences and gain valuable tips and tricks. Don’t be afraid to ask questions or seek advice when you encounter challenges.
Remember, practice makes perfect. The more you use a square hole drill bit, the more comfortable and skilled you will become. So don’t be discouraged if you don’t achieve perfection right away. Keep practicing and experimenting, and soon you’ll be able to tackle more complex projects with ease!
FAQ:
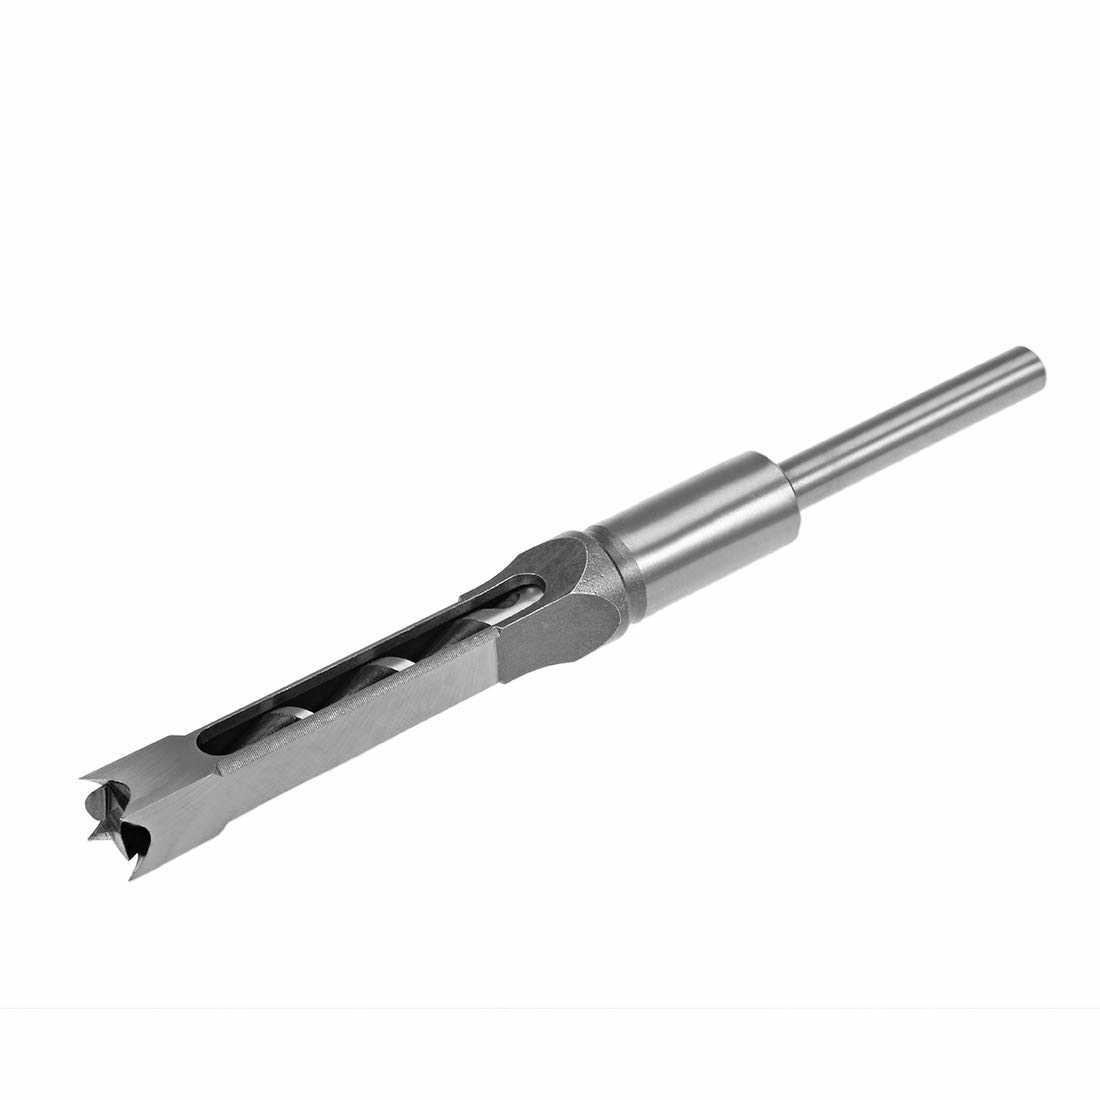
What is a square hole drill bit?
A square hole drill bit is a specialized tool that is used to drill square-shaped holes in various materials, such as wood or metal. It consists of a square-shaped cutting edge with sharp edges that allows it to remove material in the shape of a square.
How does a square hole drill bit work?
A square hole drill bit works by using its sharp cutting edges to remove material in the shape of a square. When the drill bit is rotated at high speeds, the cutting edges come into contact with the material and cut through it, creating a square-shaped hole.
What are the advantages of using a square hole drill bit?
The main advantage of using a square hole drill bit is that it allows for the creation of square-shaped holes, which can be useful in certain applications, such as when working with square-shaped fasteners or when creating mortise and tenon joints in woodworking. Additionally, square holes can provide a more secure fit for certain types of joints.
Can a square hole drill bit be used on any material?
A square hole drill bit can be used on various materials, such as wood, metal, or plastic. However, the specific type of drill bit and the drilling speed may need to be adjusted depending on the material being drilled.
What are some tips for using a square hole drill bit?
When using a square hole drill bit, it is important to secure the material being drilled in place to prevent it from moving. Additionally, it is important to use the proper drilling speed and apply consistent pressure to avoid overheating the drill bit or damaging the material.
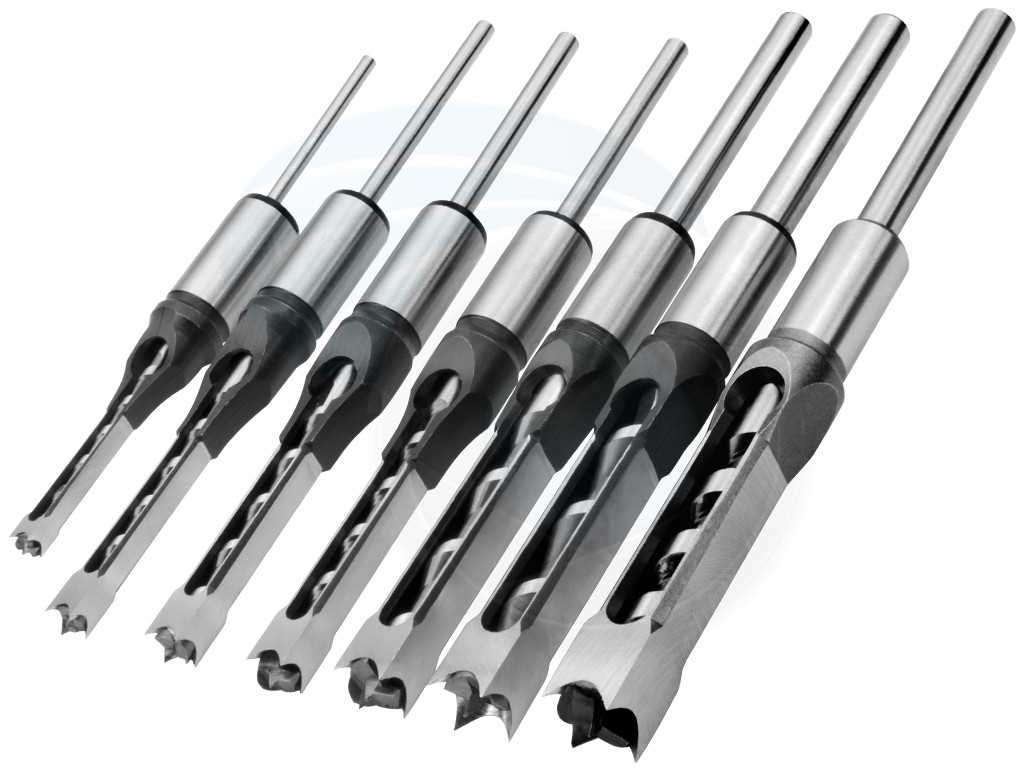
Are there different sizes of square hole drill bits available?
Yes, square hole drill bits come in various sizes to accommodate different needs. The size of the drill bit needed will depend on the desired size of the square hole being drilled.
Can a square hole drill bit be used with a regular drill?
Yes, a square hole drill bit can be used with a regular drill as long as the drill has enough power and torque to handle the drilling process. However, it is important to check the compatibility of the drill bit with the drill before using it.
Video:


Meet Harrison Clayton, a distinguished author and home remodeling enthusiast whose expertise in the realm of renovation is second to none. With a passion for transforming houses into inviting homes, Harrison's writing at https://thehuts-eastbourne.co.uk/ brings a breath of fresh inspiration to the world of home improvement. Whether you're looking to revamp a small corner of your abode or embark on a complete home transformation, Harrison's articles provide the essential expertise and creative flair to turn your visions into reality. So, dive into the captivating world of home remodeling with Harrison Clayton and unlock the full potential of your living space with every word he writes.


