5 Steps to Drill a Hole in a Magnet: A Comprehensive Guide

If you’ve ever tried to drill a hole in a magnet, you know it can be a daunting task. Magnets are made of hard materials that can be difficult to penetrate, and drilling through them incorrectly can result in damage to the magnet or the drill bit. However, with the right tools and technique, drilling a hole in a magnet is possible. In this comprehensive guide, we will walk you through the step-by-step process to successfully drill a hole in a magnet.
Step 1: Gather the necessary tools
Before you start drilling, it’s important to gather all the tools and materials you will need. In order to drill a hole in a magnet, you will need a strong magnet, a drill, a drill bit suitable for drilling through the type of magnet you have, a clamp or vise to hold the magnet securely, and safety gear such as safety glasses and gloves.
Step 2: Secure the magnet
Once you have all your tools ready, secure the magnet tightly using a clamp or vise. This is crucial because magnets can be slippery and hard to hold onto, especially when drilling. Make sure the magnet is stable and won’t move during the drilling process.

Step 3: Mark the drilling spot
Next, use a permanent marker or a small piece of tape to mark the spot where you want to drill the hole. This will help guide your drilling and ensure that the hole is in the desired location. Take your time with this step to ensure accuracy.
Step 4: Start drilling
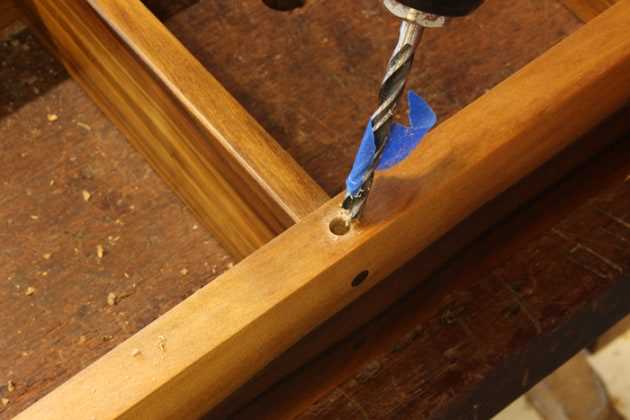
With the magnet securely clamped and the drilling spot marked, it’s time to start drilling. Begin by applying steady pressure to the drill and slowly drill into the magnet at a low speed. Keep the drill bit straight and perpendicular to the surface of the magnet to avoid any unnecessary damage.
Step 5: Finish the drilling process

Continue drilling until you have reached the desired depth for the hole. Be patient and take breaks if needed, as drilling through a magnet can be a slow and challenging process. Once you have drilled the hole, remove the magnet from the clamp or vise and clean off any metal shavings or debris.
Remember to always exercise caution and wear appropriate safety gear when working with tools and magnets. If you are unsure about drilling through a magnet yourself, it may be best to seek the assistance of a professional to avoid any potential damage or injuries.
With these five steps, you can successfully drill a hole in a magnet. Following the proper technique and taking your time will help ensure a clean and precise hole, allowing you to use the magnet for various applications or projects.
Preparing Your Tools
Before you begin drilling a hole in a magnet, it’s important to gather all the necessary tools. Here are the tools you will need:
- Drill: You will need a handheld drill with a chuck size suitable for the drill bit you will be using.
- Drill bit: Choose a drill bit that is specifically designed for drilling through magnets. A diamond-tipped or carbide-tipped drill bit is recommended.
- Workbench or sturdy surface: Find a secure place to work where you can firmly fasten the magnet while drilling. A workbench or sturdy surface is ideal.
- Clamp or vise: You will need a clamp or vise to secure the magnet in place during drilling. This will prevent any movement or spinning of the magnet while drilling.
- Safety goggles: Always wear safety goggles to protect your eyes from any flying debris or metal shards that may occur during the drilling process.
- Lubricant: Using a lubricant, such as cutting oil or a silicone-based lubricant, can help reduce friction and heat buildup while drilling.
- Masking tape: Applying masking tape over the area where you plan to drill can help prevent any chipping or cracking of the magnet’s surface.
Choosing the Right Bit
When it comes to drilling a hole in a magnet, choosing the right bit is crucial. The wrong bit can cause damage to the magnet or produce unsatisfactory results. Here are some factors to consider when selecting a bit for drilling into a magnet:

- Type of magnet: Different types of magnets have different material compositions, which can affect how they react to drilling. It’s important to choose a bit that is suitable for the specific type of magnet you are working with.
- Bit material: The material of the bit can determine its durability and effectiveness when drilling into a magnet. Hardened steel or high-speed steel (HSS) bits are often recommended for drilling into magnets.
- Bit size: The size of the bit should be chosen based on the diameter of the hole you want to drill. It’s important to select a bit that is slightly smaller than the desired hole size to ensure accuracy.
- Point angle: The point angle of the bit refers to the angle at the tip of the bit. For drilling into magnets, a smaller point angle, such as 135 degrees, is typically recommended as it helps to reduce stress on the magnet.
- Coating: Some drill bits come with a coating to reduce friction and improve heat resistance. Consider choosing a bit with a coating, such as titanium nitride (TiN), to enhance the drilling process.
It’s important to remember that drilling into a magnet can be challenging due to the magnet’s magnetic field. Take precautions by securing the magnet firmly and using proper safety measures to avoid accidents or damage. Consulting with an expert or doing additional research specific to your magnet type is recommended before drilling.
Marking the Hole
Before drilling a hole in the magnet, it is important to mark the exact location where the hole should be placed. This will ensure accuracy and prevent any mistakes during the drilling process.
Here are the steps to mark the hole:
- Choose the desired location: Determine where you want to place the hole on the magnet. Consider the purpose of the hole and ensure it is in a suitable position.
- Measure and mark: Use a ruler or measuring tape to measure the distance from the edge of the magnet to the center of the hole. Make a small mark with a pencil to indicate the exact location.
- Double-check the placement: Take a moment to confirm that the mark is in the correct position. Ensure it aligns with your intended purpose for the hole and is centered as desired.
- Use tape for precision: If you are concerned about the drill bit slipping or damaging the magnet, you can use masking tape or painter’s tape to create a protective layer. Place the tape over the marked area and press it down firmly.
- Finalize the marking: Once you have determined the exact location of the hole and taken any necessary precautions, use the pencil to make a slightly larger, more noticeable mark over the tape. This will ensure that the mark is clearly visible during the drilling process.
By following these steps, you can accurately mark the hole on the magnet and proceed with confidence to drill it.
Securing the Magnet
Before you start drilling a hole in a magnet, it is important to secure the magnet properly. This step is crucial to prevent any accidents or damage to the magnet or yourself.

1. Use Clamps or Magnetic Holders
To securely hold the magnet in place, you can use clamps or magnetic holders. These tools will ensure that the magnet remains stable during the drilling process.
2. Choose a Stable Surface
Select a stable surface for your work area. This can be a workbench or any other flat surface that can withstand pressure. Avoid using a surface that is too soft or unstable, as it may affect the drilling process.
3. Wear Safety Gear
Prior to drilling the hole, ensure you are wearing the necessary safety gear. This includes safety goggles to protect your eyes from flying debris and gloves to protect your hands.
4. Position the Magnet Securely
Place the magnet on the chosen stable surface and secure it with clamps or magnetic holders. Make sure it is positioned securely and does not move or shift during drilling.

5. Check Stability
Before you start drilling, double-check that the magnet is secure and stable. Give it a gentle tug or shake to ensure it won’t move during the drilling process.
By taking these precautions and securing the magnet properly, you can proceed with confidence to drill a hole in your magnet.
Using the Drill Correctly
Step 3: Prepare the drill
Before you start drilling, it is important to make sure that your drill is prepared correctly. Follow these steps:
- Choose the appropriate drill bit for the size of the hole you want to create. A diamond-coated bit is recommended for drilling through magnets.
- Insert the chosen drill bit into the chuck of your drill and tighten it securely.
- Adjust the drill speed setting to a moderate level. This will help prevent overheating and potential damage to the magnet.
Step 4: Secure the magnet
Once your drill is prepared, you need to secure the magnet before you start drilling. This will help prevent any unnecessary movement or damage to the magnet. Here are the steps to follow:
- Place the magnet on a stable surface, ensuring that it is flat and secure.
- If necessary, use clamps or a vice to hold the magnet in place. This will provide additional stability and prevent it from moving during the drilling process.
Step 5: Start drilling
Now that everything is prepared, you can start drilling the hole in the magnet. Take the following steps:
- Gently position the drill bit on the desired spot on the magnet.
- Apply gentle pressure and start the drill at a slow speed. Gradually increase the speed as you continue drilling.
- Keep the drill steady and maintain a consistent angle as you drill through the magnet.
- Take occasional breaks to prevent overheating and allow the drill bit to cool down.
- Continue drilling until you have reached the desired depth or created the hole.
By following these steps and using the drill correctly, you can successfully drill a hole in a magnet without causing damage or compromising its magnetic properties.
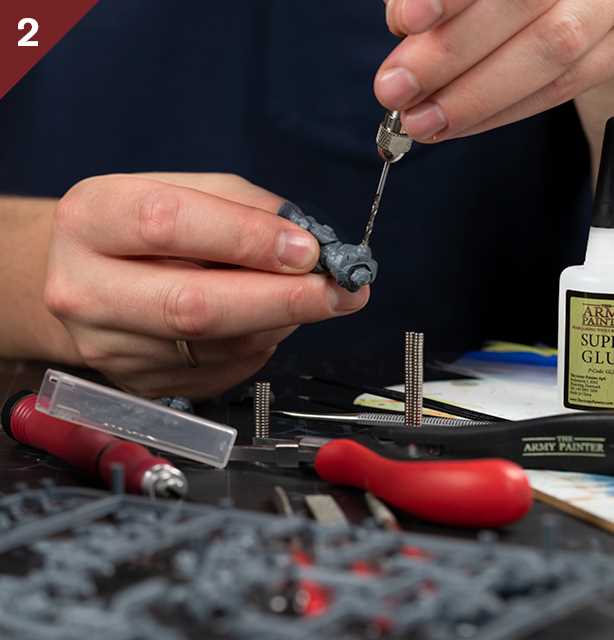
Cleaning Up
Step 1: Remove the Magnet

First, carefully remove the magnet from the drill bit. Make sure to hold the magnet securely to avoid dropping it and causing any damage.
Step 2: Wipe off Excess Debris
After drilling the hole, there may be some debris or metal shavings stuck to the magnet surface. Take a clean cloth or paper towel and gently wipe off any excess debris.
Step 3: Use a Damp Cloth
Dampen a cloth with warm water and mild soap. Gently wipe the magnet surface to remove any remaining debris or dirt. Be cautious not to soak the magnet or use abrasive cleaning materials that might damage the magnet.
Step 4: Dry Thoroughly
After cleaning the magnet with the damp cloth, use a dry cloth to thoroughly dry the magnet surface. It’s important to ensure the magnet is completely dry to prevent any potential rust or corrosion.
Step 5: Store the Magnet Properly
Once the magnet is clean and dry, store it in a safe place where it won’t be exposed to moisture or other magnets. Keep the magnet away from magnetic surfaces to prevent unintentional magnetic attraction which could cause damage.
Safety Precautions
- Wear safety goggles to protect your eyes from any flying debris or particles.
- Use gloves to protect your hands from sharp edges and to ensure a better grip on the magnet.
- Ensure a stable and well-organized working space to prevent accidents or injuries.
- Avoid wearing loose clothing or jewelry that could get caught in the drilling equipment.
- Make sure to use a stable platform or clamp to hold the magnet in place securely while drilling.
- Keep children and pets away from the work area to prevent any accidents.
- Never touch the drill bit or the magnet immediately after drilling, as they can both become hot.
- Always disconnect the power source before changing or removing the drill bit.
- Dispose of any metal shavings properly to avoid injury. Use a magnet or a vacuum to collect the shavings.
- If you have any doubts or concerns about the drilling process, seek professional help or guidance.
Troubleshooting Tips
Problem: The drill bit is slipping on the magnet surface
Solution: This issue often occurs when drilling holes in magnets because the magnetic field can cause the drill bit to slide. To prevent this, you can try the following:
- Use a drill press or vise to hold the magnet securely in place.
- Apply moderate pressure on the drill to maintain stability.
- Use a center punch or small hammer to create a small indentation as a starting point for the drill bit.
- Consider using a smaller drill bit to create a pilot hole before using the desired bit size.
Problem: The drill bit is breaking or getting stuck
Solution: If you experience issues with a broken or stuck drill bit while drilling holes in a magnet, you can try the following troubleshooting tips:
- Make sure you are using a drill bit suitable for drilling into magnets, such as a high-speed steel or cobalt bit.
- Check the drill bit’s sharpness and replace if necessary.
- Reduce the drill speed to prevent overheating, which can cause the drill bit to break or get stuck.
- Use cutting fluid or lubricant to cool the drill bit and reduce friction.
Problem: The drilled hole is not clean or has rough edges
Solution: If the drilled hole in the magnet is not clean or has rough edges, you can try the following troubleshooting tips:
- Use a slower drill speed to allow the bit to cut smoothly and cleanly.
- Apply steady and even pressure while drilling to avoid causing irregularities in the hole.
- Consider using a deburring tool or sandpaper to smooth out any rough edges after drilling.
- If the magnet is coated or plated, ensure that the coating is not interfering with the drilling process.
Problem: The magnet is damaged or cracked during drilling
Solution: Occasionally, magnets can be fragile and prone to damage during the drilling process. If you find that the magnet is cracking or breaking, try the following troubleshooting tips:
- Use a lower drill speed to reduce the impact on the magnet.
- Ensure the magnet is properly supported and secured to minimize the risk of cracking.
- Consider using a smaller drill bit to reduce the stress on the magnet.
- If the magnet is too delicate for drilling, explore alternative methods such as adhesive or mechanical fastening.
FAQ:
What tools do I need to drill a hole in a magnet?
To drill a hole in a magnet, you will need a power drill, a drill bit suitable for your magnet’s material, a clamp or vise to secure the magnet, safety goggles, and lubricating oil.
Is it difficult to drill a hole in a magnet?
Drilling a hole in a magnet can be challenging due to its magnetic properties. However, by following the right steps and using the proper tools, it can be done successfully.
Can any type of drill bit be used to drill a hole in a magnet?
No, not all drill bits can be used to drill a hole in a magnet. The type of drill bit you need depends on the material of your magnet. For example, a cobalt drill bit is suitable for drilling through neodymium magnets.
How do I choose the right drill bit for my magnet?
To choose the right drill bit for your magnet, you need to consider the material of the magnet. Different materials require different types of drill bits. It is recommended to consult the manufacturer’s guidelines or do some research to find the appropriate drill bit.
Why is lubricating oil necessary when drilling a hole in a magnet?
Lubricating oil is necessary when drilling a hole in a magnet to reduce heat and friction. It helps prevent the magnet from overheating and getting damaged during the drilling process.
Can I drill a hole in a magnet without using a clamp or vise?
It is highly recommended to use a clamp or vise to secure the magnet when drilling a hole. This ensures stability and prevents the magnet from moving or spinning while drilling, which can result in accidents or damage to the magnet.
Video:


Meet Harrison Clayton, a distinguished author and home remodeling enthusiast whose expertise in the realm of renovation is second to none. With a passion for transforming houses into inviting homes, Harrison's writing at https://thehuts-eastbourne.co.uk/ brings a breath of fresh inspiration to the world of home improvement. Whether you're looking to revamp a small corner of your abode or embark on a complete home transformation, Harrison's articles provide the essential expertise and creative flair to turn your visions into reality. So, dive into the captivating world of home remodeling with Harrison Clayton and unlock the full potential of your living space with every word he writes.


