3 Ways to Drill a Hole in Ice Without an Auger

When winter comes and the lakes and ponds freeze over, many people take advantage of the opportunity to go ice fishing. However, drilling a hole in the ice can be a challenging task, especially if you don’t have an auger. Fortunately, there are several alternative methods you can use to drill a hole in the ice without an auger. In this article, we will explore three of these methods.
Method 1: Manual Ice Chisel
If you don’t have access to an auger, one of the simplest ways to drill a hole in the ice is by using a manual ice chisel. An ice chisel is a long, narrow tool with a sharp metal blade at the end. To use an ice chisel, you simply place the blade on the ice and apply downward pressure while twisting it back and forth. This motion will gradually chip away at the ice until you have drilled a hole.
Note: Using an ice chisel can be physically demanding and time-consuming, especially if the ice is thick. It is important to take breaks and pace yourself to avoid exhaustion.
Method 2: Hand Auger

If you don’t have a power auger, a hand auger can be a great alternative for drilling a hole in the ice. A hand auger consists of a metal spiral blade attached to a handle. To use a hand auger, you place the blade on the ice and apply downward pressure while rotating the handle in a clockwise direction. The spiral blade will cut through the ice, allowing you to drill a hole.
Note: While a hand auger is easier to use than a manual ice chisel, it still requires some physical effort. It is important to use the proper technique and take breaks if needed.
Method 3: Hot Water
If you don’t have access to any tools, an alternative method for drilling a hole in the ice is by using hot water. To do this, you need to heat a large pot of water until it is almost boiling. Then, pour the hot water onto the ice in the area where you want to drill a hole. The hot water will melt the ice, creating a hole. However, this method can be time-consuming and might not be suitable for thick ice.
Note: Be cautious when handling hot water to avoid burns, and make sure the ice is thick enough to support the weight of a person before attempting this method.

In conclusion, drilling a hole in the ice without an auger is possible using several alternative methods. Whether you choose to use a manual ice chisel, a hand auger, or hot water, it is important to exercise caution and take breaks when needed. Stay safe and enjoy your ice fishing adventures!
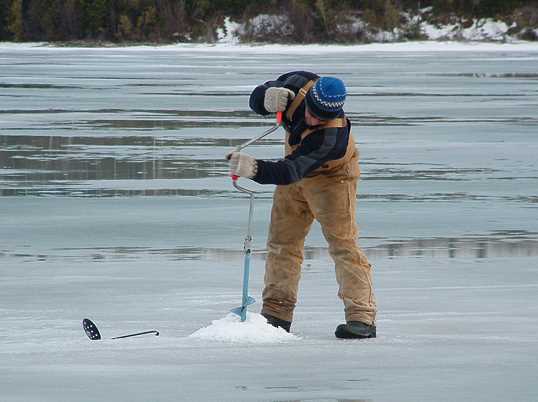
Using a Hand Ice Auger
A hand ice auger is a manual tool that is specifically designed for drilling holes in ice. It consists of a handle, a shaft, and a cutting blade. Here are the steps to use a hand ice auger:
- Select the right spot: Choose a suitable location on the ice where you want to drill a hole. It is important to ensure that the ice is thick enough to support your weight and the equipment.
- Position the auger: Place the blade of the hand ice auger on the desired spot on the ice. Make sure it is completely balanced before proceeding.
- Apply downward force: Start turning the handle of the auger in a clockwise motion while applying downward pressure. The cutting blade will gradually penetrate the ice.
- Continue drilling: Keep rotating the handle and applying pressure until the blade goes through the ice. This process may take some time depending on the thickness of the ice.
- Remove the auger: Once the hole is drilled, lift the hand ice auger out of the hole while keeping the blade clear of any remaining ice. Be careful not to lean on the auger, as it may break.
Using a hand ice auger requires physical strength and endurance, as it can be a labor-intensive task. However, it is a cost-effective and reliable method for drilling holes in ice without the need for electric or gas-powered augers.
Using a Power Drill and Ice Bit
Using a power drill and ice bit is one of the most efficient methods of drilling a hole in ice without an auger. Here’s how you can do it:
Materials You’ll Need:
- Power drill
- Ice bit
- Extension cord (if needed)
- Bucket or container to collect ice shavings
Instructions:
- Make sure your power drill is fully charged or connected to a power source via an extension cord.
- Attach the ice bit to the drill. Ice bits are specifically designed for drilling through ice and have a spiral shape that helps to remove ice shavings.
- Find a suitable spot on the ice where you want to drill your hole. Make sure the ice is thick enough to support your weight and the force of the drill.
- Place your bucket or container underneath the drilling area to collect the ice shavings.
- Hold the power drill firmly and position the ice bit on the spot where you want to drill the hole.
- Begin drilling slowly and apply even pressure. Let the ice bit do the work for you and avoid forcing the drill through the ice. The spiral shape of the ice bit will help to remove the ice shavings as you drill.
- Continue drilling until you have reached your desired depth. If you encounter any resistance or the drill becomes stuck, try applying a little bit of water to lubricate the ice and make drilling easier.
- Once you have drilled the hole, lift the drill out of the hole and turn off the power drill.
- Remove the ice shavings from the bucket or container and clear away any remaining ice debris from the hole.
Using a power drill and ice bit is a quick and efficient method of drilling a hole in ice. It is important to always exercise caution and ensure that the ice is thick and stable enough to support your weight and the equipment you are using.

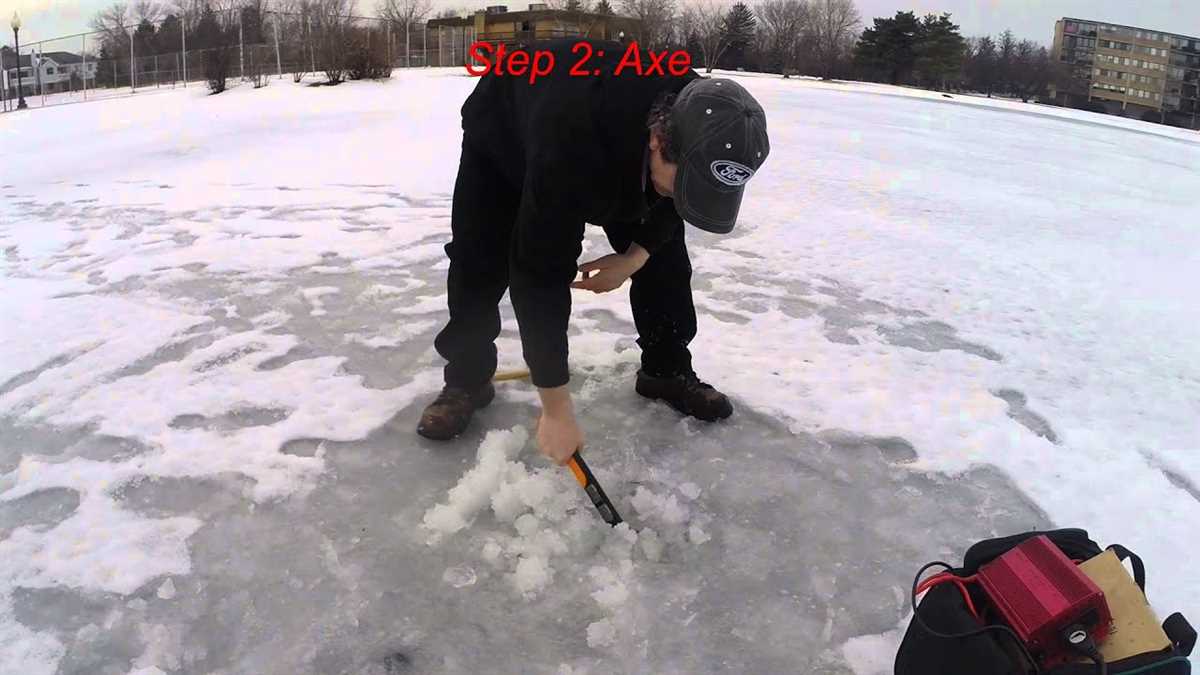
Using a Chisel and Hammer
Using a chisel and hammer is a traditional method of drilling holes in ice when you don’t have an auger. While it may require more effort and skill, it can still be an effective way to create holes for ice fishing or other activities.
Materials You’ll Need
- Chisel
- Hammer
- Ice chippers (optional)
- Safety goggles
- Gloves
Step-by-Step Guide
Follow these steps to drill a hole in the ice using a chisel and hammer:
- Put on your safety goggles and gloves to protect yourself from flying ice chips and accidental injuries.
- Find a suitable location on the ice where you want to drill the hole.
- Using the hammer, gently tap the chisel at a 45-degree angle on the desired spot on the ice. This will create a small indentation or “starter hole”.
- Continue tapping the chisel along the circumference of the starter hole to create a ring-shaped groove. This groove will guide your chisel as you drill deeper into the ice.
- Hold the chisel firmly with both hands and strike it with the hammer to penetrate the ice. Apply controlled force while maintaining the 45-degree angle.
- Rotate the chisel slightly after each strike to break up the ice chips and create more space for drilling. This will help prevent the chisel from getting stuck.
- Continue drilling by repeating steps 5 and 6 until you reach the desired depth.
- To remove the ice chips and slush from the hole, you can use an ice chipper or scoop them out with a ladle or a slotted spoon.
Tips and Precautions
- Be cautious while using a chisel and hammer, as the chisel can slip and cause injuries. Always maintain a firm grip and focus on your movements.
- If you encounter thicker ice, you may need a larger chisel or a stronger hammer to break through the ice. Take breaks if you feel fatigued.
- Consider using ice cleats or studs on your boots to increase traction and prevent slipping on the ice.
- Before you start drilling, it’s important to check the thickness and quality of the ice to ensure it is safe for drilling and your intended activity.
| Chisel | Auger |
|---|---|
| Requires more effort and skill | Easier and faster to use |
| Can be used on thick ice | May struggle with thick ice |
| Provides more control | May require more physical strength |
| Less expensive | Can be costly |
Using a Hot Metal Rod
Another method to drill a hole in ice without an auger is by using a hot metal rod.
To use this method:
- Choose a metal rod that is long enough to reach the desired depth of the hole.
- Heat the metal rod using a heat source, such as a blowtorch or a campfire.
- Once the metal rod is hot, carefully insert it into the ice where you want to drill the hole.
- Push the hot rod down into the ice, applying pressure and twisting it to help melt the ice.
- Continue pushing and twisting the rod until you reach the desired depth.
- Once the hole is complete, remove the hot rod and allow the ice to refreeze.
Note: This method can be dangerous if not done carefully. Make sure to exercise caution and use protective gear, such as gloves, when handling the hot metal rod.
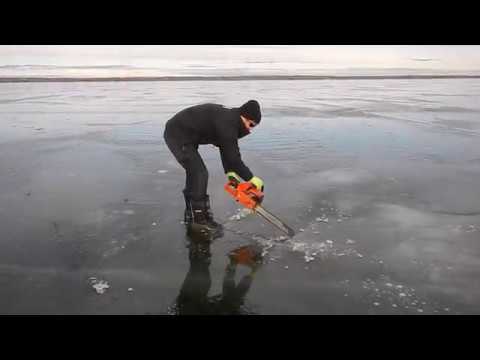
Using a Chainsaw
Using a chainsaw is a more advanced method of drilling a hole in ice, and it requires caution and proper safety equipment. Here are the steps to use a chainsaw to drill a hole in ice:
1. Prepare the Chainsaw
Make sure your chainsaw is in good working condition and properly lubricated. Check the chain tension and ensure the throttle trigger is functioning smoothly. It’s also important to wear appropriate safety gear, including safety goggles, hearing protection, and gloves.
2. Measure and Mark the Hole
Decide on the location of the hole and use a tape measure or other measuring tool to mark the spot on the ice. It’s helpful to use a bright-colored marker or flag to easily locate the spot while operating the chainsaw.
3. Start the Chainsaw
Hold the chainsaw with both hands and firmly grip the handle. Start the chainsaw according to the manufacturer’s instructions. Let the chainsaw warm up for a few moments before proceeding to the next step.

4. Position the Chainsaw
Position the chainsaw near the marked spot on the ice, making sure the blade is vertical. Maintain a steady grip on the chainsaw and position yourself in a stable stance.
5. Begin Drilling
Engage the chainsaw’s throttle and slowly lower the blade into the ice. Apply gentle and consistent pressure to allow the chainsaw to cut through the ice. Keep your hands steady as you guide the chainsaw downwards.
6. Create the Hole
Continue drilling until the chainsaw blade has cut through the ice. Keep in mind that the thickness of the ice may vary, so adjust your drilling technique accordingly. Once the blade has fully penetrated the ice, you can remove the chainsaw from the hole.
7. Clear the Hole
Use a scoop or a slotted ice skimmer to remove any remaining ice chips or slush from the hole. This will allow you to maintain a clear opening for fishing or other activities on the ice.
8. Safety Precautions
Remember to always follow safety procedures when using a chainsaw. Avoid cutting towards yourself, keep your hands away from the chain and blade, and be aware of your surroundings. If you’re not experienced with operating a chainsaw, it’s recommended to seek assistance or training before attempting to drill a hole in the ice.

Using a Manual Ice Saw
Step 1: Gather the necessary equipment
Before you start, make sure you have all the necessary equipment:
- A manual ice saw
- A sturdy ice chisel or ice pick
- A bucket or container to collect the ice shavings
- A measuring tape to ensure you drill at the desired location
- Safety goggles and gloves to protect yourself
Step 2: Measure and mark your desired hole location
Use a measuring tape to determine the exact location where you want to drill the hole in the ice. Mark this spot with a durable marker or tape to serve as your guide.
Step 3: Cut a section of ice around the marked location
- Using the manual ice saw, start cutting a section of ice around the marked location. Always exercise caution and keep your hands and fingers away from the saw’s blade.
- Begin by making shallow cuts, gradually increasing the depth as you progress. Apply steady pressure and let the saw blade do the work.
- Continue cutting until you have completely encircled the marked area, creating a circular groove in the ice.
Step 4: Break through the ice and remove the cut section
- Once you have fully cut around the marked area, use an ice chisel or ice pick to break through the center of the groove you created.
- Insert the chisel or pick into the groove and strike it with a hammer or mallet to break the ice.
- Remove the cut section of ice from the hole using your hands or an ice scoop.
Step 5: Clear any remaining ice shavings
After removing the cut section of ice, use a bucket or container to collect any remaining ice shavings and clear the hole completely.
Step 6: Check the hole’s depth and safety
Measure the hole’s depth using a measuring tape to ensure it meets your desired specifications. Additionally, check the thickness and safety of the ice to ensure it is strong enough to support your intended activities.
Step 7: Remember safety precautions
When using a manual ice saw, always prioritize safety. Wear protective gloves and goggles to safeguard against any potential accidents or injuries.
By following these steps, you can successfully drill a hole in the ice using a manual ice saw. Ensure you abide by all safety guidelines and exercise caution throughout the process.
Using a Portable Ice Drill
1. Prepare the Portable Ice Drill
Before drilling a hole in the ice using a portable ice drill, make sure it is in proper working condition and has a sharpened drill bit. Also, ensure that the drill’s battery is fully charged or it has a full tank of gas, depending on the type of drill you are using.
2. Choose a Suitable Location
Find a suitable location on the ice where you want to drill a hole. Look for a spot that is free from cracks and other potential hazards. It is also important to ensure that the ice is thick enough to support your weight and the weight of your equipment.
3. Position the Drill
Place the drill on the selected location and position it horizontally on the ice. Make sure it is stable and secure before proceeding.
4. Start Drilling
Hold the drill with both hands and press the trigger or start button to turn it on. Apply gentle downward pressure to allow the drill bit to penetrate the ice. It is important not to force the drill or push it too hard, as it can damage the drill or cause it to get stuck in the ice.
5. Maintain Control
As the drill bit goes deeper into the ice, make sure to maintain control over the drill. Keep it upright and apply even pressure to avoid any accidents or injuries. Also, be cautious of any ice shavings that may be expelled from the hole as you drill.
6. Remove the Drill
Once the hole is drilled to the desired depth, turn off the drill and carefully remove it from the hole. Set the drill aside in a safe place.
7. Clear the Hole
Use a skimmer or a slotted spoon to remove any ice shavings or debris from the hole. This will help ensure that your fishing line or other equipment can easily go through the hole without any obstructions.
8. Proceed with Fishing or Other Activities
With the hole successfully drilled, you can now proceed with fishing or any other activities you have planned on the ice. Make sure to follow all safety precautions and regulations while enjoying your time on the ice.
Using a Cordless Drill and Spade Bit
Using a cordless drill and a spade bit is one of the simplest ways to drill a hole in ice without an auger. Here’s how you can do it:
- Gather the materials: To drill a hole in ice using a cordless drill and spade bit, you will need the following materials:
- Cordless drill
- Spade bit
- Ice chisel or ice pick
- Measuring tape or ruler
- Marker or pencil
- Ice fishing rod (optional)
- Measure and mark: Use a measuring tape or ruler to determine the desired location and size of the hole. Mark the spot on the ice with a marker or pencil.
- Prepare the drill and spade bit: Insert the spade bit into the chuck of the cordless drill and tighten it securely.
- Place the spade bit on the ice: Position the spade bit vertically on the marked spot on the ice. Make sure you have a firm grip on the drill.
- Start drilling: Slowly squeeze the trigger of the cordless drill to start drilling into the ice. Apply steady pressure and let the spade bit cut through the ice.
- Clear any ice chips: As you drill, periodically lift the drill and clear any ice chips that accumulate around the hole using an ice chisel or ice pick.
- Drill until desired depth: Continue drilling until you reach the desired depth for ice fishing or other purposes. The length of the spade bit will determine the maximum depth you can drill.
- Remove the drill: Once you have reached the desired depth, release the trigger and carefully remove the cordless drill from the hole.
- Clear any remaining ice: Use an ice chisel or ice pick to remove any remaining ice around the edges of the hole, ensuring a smooth and clean opening.
- Ready to fish: Your hole is now ready for ice fishing! If you plan to use an ice fishing rod, insert it into the hole and set up your gear.
Drilling a hole in ice using a cordless drill and spade bit is a convenient and effective method, especially for smaller holes. Just remember to always exercise caution and follow safety guidelines when operating power tools.
FAQ:
What are some alternative ways to drill a hole in ice without an auger?
There are several alternative ways to drill a hole in ice without an auger. One method is using a chisel and hammer to manually chip away at the ice until a hole is created. Another option is using a hot iron or a heated metal rod to melt through the ice. Lastly, some people have success using an electric drill with a masonry or carbide bit to drill through the ice.
Is it difficult to drill a hole in ice without an auger?
Drilling a hole in ice without an auger can be challenging, especially if the ice is thick. Using a chisel and hammer to chip away at the ice requires physical strength and can be time-consuming. Using a heated metal rod or an electric drill with a masonry bit requires caution and precision to avoid injury. It’s important to take safety precautions and proceed with care when attempting to drill a hole in ice without an auger.
Can I use a regular drill to drill a hole in ice without an auger?
Yes, it is possible to use a regular electric drill to drill a hole in ice without an auger. However, it’s important to use a masonry or carbide drill bit specifically designed for drilling through hard materials like ice. Regular drill bits may not be strong enough or may become damaged when used on ice. It’s also important to keep in mind that ice drilling can put a strain on the drill’s motor, so it’s recommended to use a drill with a high power and torque rating.
Can I use a blowtorch to drill a hole in ice?
Using a blowtorch to drill a hole in ice is not recommended. The high heat from a blowtorch can cause the ice to melt unevenly and create a weak spot, increasing the risk of falling through the ice. Additionally, a blowtorch can be dangerous to use on ice as it can cause the ice to crack or shatter, posing a risk of injury. It’s best to avoid using a blowtorch and opt for safer methods such as using a chisel and hammer or a heated metal rod.
Are there any tools specifically designed for drilling holes in ice without an auger?
Yes, there are tools specifically designed for drilling holes in ice without an auger. One example is an ice spud, which is a long metal rod with a sharp point at one end and a flat blade at the other. Ice spuds are used by ice fishermen to manually chip away at the ice and create a hole. Another tool is an ice chisel, which is similar to a regular chisel but specifically designed for breaking through ice. These tools are often more efficient and safer to use compared to improvised methods.
What safety precautions should I take when drilling a hole in ice without an auger?
When drilling a hole in ice without an auger, it’s important to take several safety precautions. First, always wear appropriate cold-weather gear, including waterproof boots and warm clothing. Make sure to test the ice thickness before drilling by using an ice auger or an ice chisel to check for stability. Keep an ice safety pick or ice awl on hand to help pull yourself out of the water in case of an emergency. It’s also a good idea to let someone know about your plans and never go alone on the ice. Lastly, always be cautious and aware of your surroundings to reduce the risk of accidents.
Video:

Meet Harrison Clayton, a distinguished author and home remodeling enthusiast whose expertise in the realm of renovation is second to none. With a passion for transforming houses into inviting homes, Harrison's writing at https://thehuts-eastbourne.co.uk/ brings a breath of fresh inspiration to the world of home improvement. Whether you're looking to revamp a small corner of your abode or embark on a complete home transformation, Harrison's articles provide the essential expertise and creative flair to turn your visions into reality. So, dive into the captivating world of home remodeling with Harrison Clayton and unlock the full potential of your living space with every word he writes.


