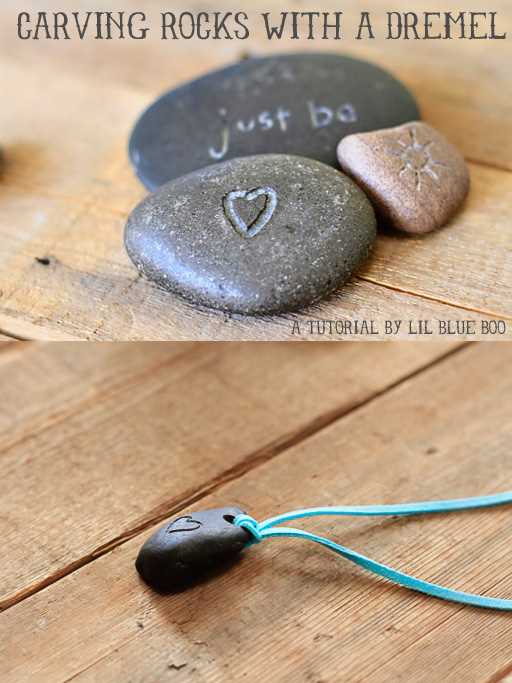
10 Steps to Drill a Hole in a Rock with a Dremel: A Comprehensive Guide

Drilling a hole in a rock may seem like a daunting task, but with the right tools and techniques, it can be a manageable and rewarding project. One tool that is highly recommended for this job is a Dremel rotary tool, which offers precision and control for drilling into hard materials like rocks. In this comprehensive guide, we will take you through the step-by-step process of drilling a hole in a rock using a Dremel, ensuring success and a beautifully finished result.
Step 1: Safety first
Before you begin drilling, it’s important to prioritize safety. Make sure to wear eye protection, as there is a risk of small rock fragments flying off during the drilling process. Additionally, consider wearing gloves to protect your hands from any sharp edges. Safety should always be the top priority when working with power tools.
Step 2: Choose the right drill bit
The next step is to select the appropriate drill bit for your project. For drilling into rocks, a diamond-tipped drill bit is recommended. These specialized bits are designed to handle hard materials and provide precise results. Make sure the drill bit is securely attached to the Dremel before proceeding.

Step 3: Mark the drilling spot
Using a pencil or marker, mark the exact spot on the rock where you want to drill the hole. This will serve as a guide throughout the drilling process, ensuring accuracy. If you’re drilling multiple holes, it may be helpful to use a template or guide to maintain consistent spacing.
Step 4: Start with a pilot hole
Before diving into the full-sized hole, it’s recommended to start with a smaller pilot hole. This will help guide the drill bit and prevent it from wandering on the surface of the rock. Begin drilling at a low speed and gradually increase as you go.
Pro tip: To prevent the rock from cracking, place a piece of scrap wood underneath it as you drill. This will help absorb some of the pressure and provide stability.
Step 1: Gathering the necessary materials
Before you can start drilling a hole in a rock with a Dremel, it’s important to gather all the necessary materials. Having the right tools and equipment will make the process easier and more efficient. Here is a list of items you will need:

- Dremel rotary tool: This is the main tool you will be using to drill the hole. Make sure you have a Dremel with a suitable drilling attachment.
- Safety goggles: It’s important to protect your eyes while drilling, as rock fragments can fly off and cause injury.
- Dust mask: Drilling into a rock can create a lot of dust, so wearing a dust mask is recommended to avoid inhaling any particles.
- Gloves: To protect your hands from sharp edges and to provide a better grip, wear a pair of gloves.
- Marker or pencil: This is used to mark the spot where you want to drill the hole.
- Tape measure or ruler: To ensure accurate measurements, use a tape measure or ruler to mark the exact location for the hole.
- Clamp or vise: To secure the rock in place and prevent it from moving while drilling, use a clamp or vise.
- Spray bottle or bucket of water: Keeping the rock and drill bit cool is crucial to prevent overheating, so have a spray bottle or bucket of water nearby to continuously cool the rock and bit.
- Drill bits: You will need a suitable drill bit for the type of rock you are drilling into. Diamond-tipped drill bits are recommended for drilling into hard rocks.
- Lubricant: Using a lubricant while drilling can help speed up the process and reduce wear on the drill bit. Water or cutting oil can be used as a lubricant.
- Protective covering for work surface: To protect the surface you are working on from damage, use a protective covering such as a piece of plywood or a thick rubber mat.
Once you have gathered all these materials, you are ready to move on to the next step, which is preparing the rock for drilling.
Step 2: Choosing the right type of rock
Choosing the right type of rock is crucial when it comes to drilling a hole with a Dremel. Not all rocks are suitable for this task, as their hardness and composition can greatly affect the drilling process.
Factors to consider
Here are some factors to consider while choosing the right type of rock:
- Hardness: Rocks can vary greatly in terms of hardness. It’s important to choose a rock that is hard enough to withstand the drilling process without crumbling or breaking.
- Composition: Different types of rocks have different compositions, such as sedimentary, igneous, and metamorphic. Some rocks may have a higher density or contain more minerals, which can affect the drilling process.
- Porosity: Rocks with high porosity may absorb water, making them more susceptible to cracking or breaking during drilling.
- Size and shape: The size and shape of the rock should also be considered. It’s easier to drill a hole in a flat, smooth surface rather than an irregular or uneven rock.
Recommended rocks for drilling
While there is no definitive list of rocks that are suitable for drilling with a Dremel, some rocks are generally easier to work with. Here are a few examples:
- Quartz: Quartz is a hard and durable rock that is often used for jewelry and decorative purposes. It can be drilled with a Dremel, but caution should be taken as it can be brittle.
- Granite: Granite is a popular choice for drilling as it is a dense and durable rock. It may require using a diamond-tipped bit for best results.
- Sandstone: Sandstone is a softer rock that can be drilled with relative ease. It’s important to use a steady hand and start with a small pilot hole before enlarging it.
- Jasper: Jasper is a type of quartz that is known for its hardness. It can be drilled with a Dremel, but it’s recommended to use a diamond-coated bit for better results.
Keep in mind that each rock is unique, and it’s always a good idea to practice drilling on a small, inconspicuous area before working on your desired project.

Step 3: Selecting the appropriate Dremel bit
Before you start drilling a hole in a rock with a Dremel, it is crucial to select the appropriate Dremel bit for the task. The right bit will ensure that you achieve the desired results and avoid damaging the rock or the tool itself.
Here are some factors to consider when selecting a Dremel bit:
- Material of the rock: Different rocks have different hardness levels, so it’s important to choose a bit that is compatible with the rock you are working with. Diamond-tipped bits are suitable for hard rocks like granite and quartz, while carbide or high-speed steel bits work well for softer rocks like sandstone and limestone.
- Size of the hole: Determine the size of the hole you want to drill. Dremel bits come in various sizes, so choose one that matches your desired hole size. Keep in mind that larger holes may require multiple passes or a different drilling technique.
- Type of bit: Consider the type of bit that will work best for your project. Some common types include grinding bits, engraving bits, and drilling bits. Grinding bits are ideal for shaping or smoothing the hole, while engraving bits are used for creating intricate designs. Drill bits, on the other hand, are designed specifically for drilling holes.
- Speed and power of the Dremel: The speed and power of your Dremel tool will also affect the selection of the bit. Higher speeds are usually needed for harder rocks, while lower speeds are suitable for softer rocks. Additionally, ensure that your Dremel has sufficient power to handle the drilling task.
Once you have considered all these factors, you can choose the appropriate Dremel bit for your specific project. It is always a good idea to have a few different bits on hand to accommodate different rock types and sizes of holes needed.
Step 4: Preparing the rock for drilling
Before you begin drilling your rock, it’s important to properly prepare it to ensure successful and safe drilling. Follow these steps to prepare your rock:

1. Choose the right rock
Make sure you select a rock that is suitable for drilling. Rocks such as granite, quartz, and basalt are commonly used for drilling. Avoid rocks that are too soft or brittle, as they may crack or break during the drilling process.
2. Clean the rock
Thoroughly clean the rock to remove any dirt, dust, or debris. Use a brush or cloth to scrub the surface of the rock and rinse it with water to ensure it is clean and free from any loose particles that may interfere with the drilling process.
3. Mark the drilling location
Use a pencil or marker to mark the exact spot where you want to drill the hole. This will help you stay focused and avoid any unnecessary drilling mistakes.
4. Secure the rock
Place the rock on a sturdy surface or secure it in a vise to prevent it from moving or rolling while you drill. This will ensure precision and prevent accidents.

5. Wear safety gear
Put on safety goggles to protect your eyes from any flying debris and wear gloves to protect your hands from any potential injuries or cuts.
6. Prepare the drilling area
Lay down a clean and flat surface, such as a piece of plywood or a rubber mat, to catch any debris or dust that may be produced during the drilling process. This will make cleanup easier and keep your workspace organized.
7. Determine drill bit size
Select the appropriate drill bit size for your desired hole diameter. Measure the drill bit against the marking on your rock to ensure accurate drilling.
8. Apply masking tape
Place a strip of masking tape over the drilling location on the rock. This will help prevent the rock from cracking or chipping during the drilling process and provide a smooth surface for the drill bit to grip.
9. Start with a pilot hole
Begin by drilling a small pilot hole at the marked location. This will help guide the larger drill bit and prevent it from slipping or wandering off course.
10. Lubricate the drill bit
Apply a small amount of water or cutting oil to the drill bit to lubricate it and keep it cool during drilling. This will prevent the drill bit from overheating and extend its lifespan.
By following these steps, you will effectively prepare your rock for drilling and increase your chances of successfully drilling a hole without any damage to the rock or the drill bit.
Step 5: Marking the drilling spot
Before beginning the drilling process, it is important to mark the exact spot where you want to drill the hole in the rock. This will ensure precise placement and prevent any mistakes.
To mark the drilling spot:
- Clean the surface of the rock using a brush or towel to remove any dirt or debris. This will allow for better visibility when marking.
- Take a permanent marker and carefully place a dot or small X on the area where you want the hole. Make sure to choose a spot that is flat and can provide stability during the drilling process.
- If you are drilling multiple holes, use a ruler or measuring tape to ensure they are evenly spaced and aligned.
It is important to note that the marking should be done on the surface of the rock that will be facing you during the drilling process. This will help you maintain visibility and control during the drilling.
Once the drilling spot is marked, you are ready to move on to the next step of the process: preparing the drill and bit for drilling.
Step 6: Securely fixing the rock
Before you begin drilling, it is important to securely fix the rock in place. This will ensure stability and prevent accidents during the drilling process. Here are a few methods you can use to fix the rock:
- Clamping: One option is to use clamps to hold the rock in place. This works well for rocks of smaller sizes. Make sure to use clamps that are strong enough to securely hold the rock without damaging it.
- Vise: If you have access to a vise, it can be a great tool to hold the rock firmly. Place the rock in the jaws of the vise and tighten it until it is snugly held in place. This method provides a stable base for drilling.
- Custom-made holder: If you have woodworking skills or access to a 3D printer, you can create a custom-made holder for the rock. This will allow you to secure the rock in a specific position, ensuring precise drilling.
- Sandbag: Another option is to use a sandbag to support the rock. Place the rock on a flat surface and position the sandbag around it to provide stability. This method works well for irregularly shaped rocks.
- Rubber mat: A rubber mat can be used to prevent the rock from slipping during drilling. Place the mat underneath the rock to provide traction and stability.
Choose the method that works best for the size and shape of your rock, ensuring that it is securely fixed before proceeding to the next step.
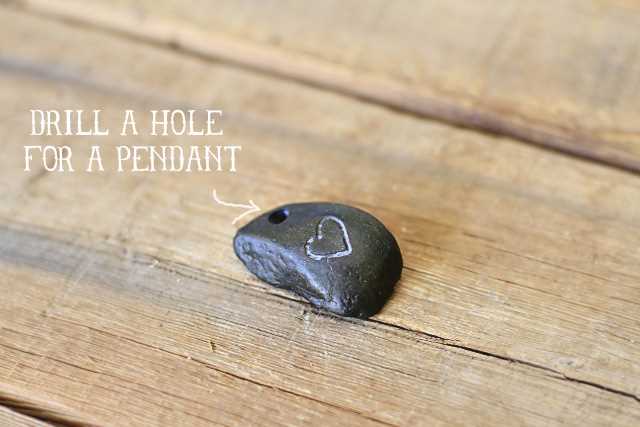
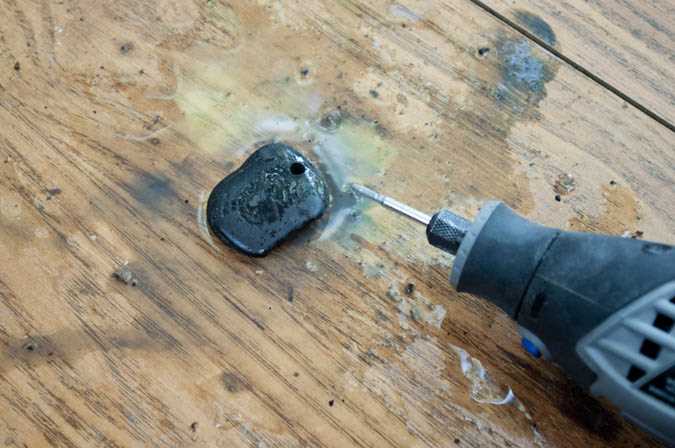
Step 7: Drilling the hole
Now that you have prepared the rock and secured it in place, it’s time to start drilling the hole. Follow these steps to ensure successful drilling:
- Put on safety gear: Before starting, make sure to put on safety goggles and a dust mask to protect your eyes and lungs from any debris.
- Choose the right bit: Select a diamond-tipped drill bit designed for drilling through rocks. This type of bit is durable and can withstand the hardness of the rock.
- Mark the drilling spot: Use a marker or tape to mark the exact spot on the rock where you want to drill the hole. This will help you maintain accuracy throughout the drilling process.
- Start drilling: Position the tip of the drill bit on the marked spot and apply gentle pressure to start drilling. It’s important to keep a steady hand and maintain a consistent drilling speed.
- Keep the drill cool: Drilling through rocks generates heat, which can damage the drill bit or cause the rock to crack. To prevent this, periodically dip the drill bit into water to keep it cool.
- Control the depth: Drill at a slow and steady pace, periodically checking the depth of the hole to ensure it meets your requirements.
- Clear away debris: As you drill, debris will accumulate in the hole. Use a brush or compressed air to periodically clear away the debris and keep the hole clean.
- Take breaks: Drilling through rock can be a time-consuming process. To avoid overheating the drill or exhausting yourself, take regular breaks to rest and allow the drill bit to cool down.
- Finish drilling: Continue drilling until you have reached the desired depth for your hole. Once finished, turn off the drill and carefully remove the rock from the drilling setup.
- Clean up: Dispose of any debris properly and clean up your work area. Store your tools and equipment in a safe place for future use.
With these steps, you’ll be able to successfully drill a hole in a rock using your Dremel tool. Remember to always prioritize safety and take your time to ensure accurate and clean drilling.
Step 8: Finishing and polishing the hole
After successfully drilling a hole in the rock using your Dremel, it’s time to finish and polish the hole to achieve a smooth and professional-looking result. This step is crucial as it not only enhances the appearance of the hole but also ensures its functionality.
Here’s how to finish and polish the hole:
- Remove any debris: Start by cleaning the hole, removing any loose debris or dust that may have accumulated during the drilling process. You can use a brush or compressed air to accomplish this task.
- Smooth the edges: Use a sanding attachment or sandpaper to smooth the edges of the hole. This will prevent any sharp or rough edges that may be present as a result of drilling.
- Choose your polishing method: There are various methods available for polishing the hole, such as using a polishing wheel, polishing compound, or diamond paste. Choose the method that best suits the type of rock you are working with.
- Apply the polishing agent: If you are using a polishing wheel, apply a small amount of polishing compound or diamond paste to the wheel. For other methods, follow the manufacturer’s instructions for applying the polishing agent.
- Start polishing: Gently run the polishing tool over the surface of the hole, applying even pressure. Move the tool in circular motions to ensure all areas are polished evenly.
- Check your progress: Periodically stop and check the progress of the polishing. If necessary, apply more polishing agent and continue until you achieve the desired level of smoothness and shine.
- Clean the hole: Once you are satisfied with the polishing, clean the hole thoroughly to remove any residue from the polishing agent. This can be done using a brush, water, or compressed air.
Finishing and polishing the hole not only enhances its appearance but also improves its functionality. A smooth and polished hole will be less likely to snag or fracture any items that pass through it. Take your time during this step to ensure a professional result.
FAQ:
What is a Dremel?
A Dremel is a versatile rotary tool that can be used for various tasks such as cutting, sanding, grinding, and drilling. It is a popular tool among DIY enthusiasts and professionals.
Is it possible to drill a hole in a rock using a Dremel?
Yes, it is possible to drill a hole in a rock using a Dremel. However, it requires some specific steps and techniques to ensure successful results.
What are the materials needed to drill a hole in a rock with a Dremel?
To drill a hole in a rock with a Dremel, you will need the following materials: a Dremel rotary tool, a diamond core drill bit, a small container with water, safety goggles, and a clamp or vice to hold the rock in place.
Video:


Meet Harrison Clayton, a distinguished author and home remodeling enthusiast whose expertise in the realm of renovation is second to none. With a passion for transforming houses into inviting homes, Harrison's writing at https://thehuts-eastbourne.co.uk/ brings a breath of fresh inspiration to the world of home improvement. Whether you're looking to revamp a small corner of your abode or embark on a complete home transformation, Harrison's articles provide the essential expertise and creative flair to turn your visions into reality. So, dive into the captivating world of home remodeling with Harrison Clayton and unlock the full potential of your living space with every word he writes.


