Step-by-Step Guide on How to Change an Angle Grinder Blade

Angle grinders are versatile power tools that are commonly used for cutting, grinding, and polishing various materials. Over time, the blade of an angle grinder may become dull or damaged, and it will need to be replaced. Changing the blade of an angle grinder may seem like a daunting task, but with the right tools and knowledge, it can be done safely and easily.
To change an angle grinder blade, you will need a few essential tools. These include a pair of safety gloves, safety glasses, a wrench or spanner, and a new blade that is compatible with your angle grinder. It is crucial to wear the appropriate safety gear to protect yourself from any potential accidents or injuries during the blade changing process.
The first step in changing the blade is to unplug the angle grinder from the power source to prevent any accidental starts. It is important to ensure that the grinder is completely switched off and that the blade has come to a complete stop before proceeding. Next, locate the blade lock button or the spindle lock, which is usually located on the top or side of the grinder. Depress this button to immobilize the blade.
Once the blade is immobilized, you can use a wrench or spanner to loosen the nut or bolt that holds the blade in place. This nut or bolt is usually located in the center of the blade. Be sure to turn it in the opposite direction of the arrow indicated on the angle grinder to loosen it. Once the nut or bolt is loose enough, it can be removed entirely, and the old blade can be taken off.
Gather the Necessary Tools
Before you begin changing the blade on your angle grinder, make sure you have all the necessary tools. Having everything ready before you start will help you complete the task efficiently and safely. Here is a list of the tools you will need:

- Angle grinder: Make sure you have an angle grinder that is compatible with the blade you intend to use.
- New blade: Ensure you have a new, sharp blade that is appropriate for the material you will be cutting.
- Wrench: A wrench is needed to loosen and remove the nut that holds the current blade in place.
- Safety glasses: Always wear safety glasses to protect your eyes from any debris that may be released during the blade replacement process.
- Gloves: Gloves provide an additional layer of protection for your hands while handling the angle grinder and the blade.
- Protective clothing: Wear appropriate clothing, such as long sleeves and long pants, to protect yourself from any sparks or debris.
- Workbench or table: Find a sturdy workbench or table to secure the angle grinder while you work on it to ensure stability.
Having all these tools on hand will allow you to change the angle grinder blade smoothly and safely. Double-check that you have everything before beginning the process to avoid any interruptions or delays.
Turn off and unplug the Angle Grinder
Before you start changing the blade on your angle grinder, it is crucial to ensure that the tool is turned off and unplugged from the power source. This will help prevent any accidental starts or injuries during the process. Take a moment to locate the power switch on the grinder and turn it to the “off” position. Then, unplug the power cord from the electrical outlet to completely eliminate any risk of electric shock.
It is important to note that angle grinders are powerful tools, and their blades can spin at high speeds. Therefore, taking precautions and following safety measures is essential to minimize the risk of accidents and injuries.
Once the angle grinder is turned off and unplugged, you can proceed with confidence to the next step of changing the blade.
Remove the Existing Blade
Changing the blade on an angle grinder is an essential task that every user should know how to do. Whether you need to replace a worn-out blade or switch to a different type, it’s important to follow the proper steps to ensure your safety and the integrity of the tool.

To begin, make sure the angle grinder is turned off and unplugged from the power source. This will prevent any accidental starts or injuries during the blade removal process. You should also wear protective gloves and goggles to protect your hands and eyes.
Next, locate the blade lock button on the angle grinder. This button is usually located on the top or side of the tool, and it is used to lock the blade in place while you remove the retaining nut. Press and hold the blade lock button to prevent the blade from spinning.
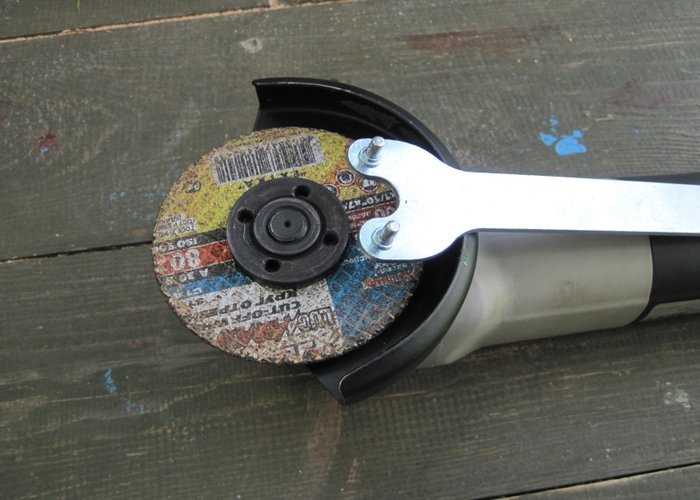
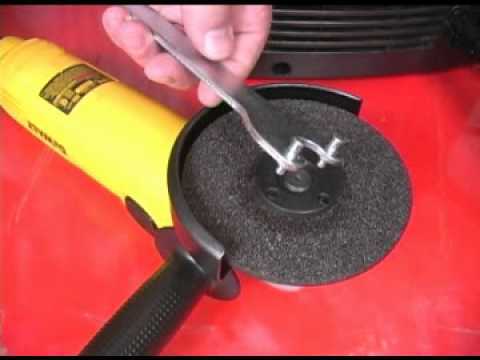
Once the blade is locked in place, use a wrench or spanner to loosen the retaining nut on the blade. Turn the nut counterclockwise to loosen it, and then remove it completely. Be careful as you remove the nut, as it may be hot from the friction of the grinder.
With the retaining nut removed, you can now slide the existing blade off the spindle of the angle grinder. Be sure to hold onto the blade securely to prevent it from falling or causing any injuries. Once the old blade is removed, you can dispose of it properly and prepare to install the new blade.
Examine the New Blade
Before installing the new blade on your angle grinder, it is important to carefully examine it to ensure its quality and suitability for the task at hand.

1. Check for any visible damage: Inspect the blade for any signs of cracks, chips, or warping. These can significantly affect the blade’s performance and pose a safety hazard.
2. Verify the compatibility: Ensure that the new blade is compatible with your angle grinder. Check the blade’s diameter and arbor size to match those specified in your grinder’s manual or previous blade.
3. Assess the blade’s condition: Look for any signs of wear or dullness. A worn-out blade may not cut effectively and can be dangerous to use. Consider sharpening the blade or buying a new one if necessary.
4. Refer to the manufacturer’s instructions: Familiarize yourself with the manufacturer’s guidelines for installing and using the blade. This will ensure that you handle the blade correctly and maximize its lifespan.
5. Consider the blade’s application: Determine whether the new blade is suitable for the specific task you have in mind. Different blades are designed for cutting different materials, such as metal, wood, or concrete. Using the right blade for the job will improve both efficiency and safety.

By carefully examining the new blade before installation, you can ensure that it is in good condition and compatible with your angle grinder. This will help you achieve optimal performance and safety during your cutting tasks.
Attach the New Blade to the Angle Grinder
Now that you have removed the old blade from your angle grinder, it’s time to attach the new one. Follow these steps to ensure a safe and secure attachment:
- Inspect the new blade: Before attaching the new blade, take a close look at it to make sure there are no visible damages or defects. If you notice any issues, it’s best to replace the blade with a new one.
- Match the arbor size: Check the arbor size of the new blade to make sure it matches the arbor size of your angle grinder. This is important for a secure fit and safe operation. The arbor size is usually printed on the blade itself or mentioned in its packaging.
- Align the blade: Place the new blade on the flange of the angle grinder, making sure the mounting holes on the blade align with the holes on the flange. The blade should sit flush against the flange.
- Tighten the nut: Once the blade is properly aligned, use the wrench provided with your angle grinder to tighten the nut. Make sure to hold the spindle lock button (if your angle grinder has one) to prevent the spindle from rotating while you tighten the nut.
- Double-check the tightness: After tightening the nut, give it a final check to ensure it’s secure. Wiggle the blade gently to make sure there is no play. If the blade feels loose, re-tighten the nut.
Remember to always wear appropriate safety gear, such as safety glasses and work gloves, when working with power tools like angle grinders. It’s also a good idea to consult the user manual provided with your angle grinder for any specific instructions or precautions. Now you’re ready to use your angle grinder with the new blade securely attached!
Secure the Blade with a Wrench
Once you have positioned yourself and gathered the necessary tools, the next step is to secure the blade with a wrench. This will ensure that the blade does not move while you are changing it.
1. Disconnect the Power: Before securing the blade, it is crucial to disconnect the power source to prevent any accidental starts. Unplug the angle grinder or remove the battery, depending on the type of grinder you are using.

2. Locate the Spindle Lock Button: Look for the spindle lock button, usually located on the top or side of the grinder near the blade. This button is used to lock the spindle in place, making it easier to loosen and tighten the blade.
3. Depress the Spindle Lock Button: Press and hold the spindle lock button while rotating the blade until it stops turning. This will lock the spindle and prevent it from moving while you loosen or tighten the blade.
4. Loosen the Blade: Use a wrench to turn the blade nut counterclockwise to loosen it. The wrench should fit securely onto the nut and provide enough leverage to loosen it without too much force. Slowly loosen the nut until it is loose enough to remove by hand.
5. Remove the Blade: Once the nut is loose enough, remove it by hand and carefully slide the old blade off the spindle. Be cautious as the blade may still be sharp. Set the old blade aside in a safe place.
6. Install the New Blade: Take the new blade and place it onto the spindle, ensuring that it is positioned correctly. Line up the holes on the blade with the flange holes on the spindle.
7. Secure the Blade: With the new blade in place, use the wrench to tighten the blade nut clockwise. Make sure to tighten it securely, but be cautious not to overtighten as this could damage the blade or the grinder.
8. Release the Spindle Lock: Once the blade is securely in place, release the spindle lock button. You should be able to rotate the blade freely without any resistance. This indicates that the blade is properly secured and ready for use.
By following these steps, you can safely and effectively secure the blade with a wrench on your angle grinder, ensuring that it is ready for use in your next project.
Test the Angle Grinder with the New Blade
After you have successfully changed the blade on your angle grinder, it is important to test it to ensure it is working properly and safely. Testing the angle grinder with the new blade is an important step to ensure that the blade is securely fastened and aligned correctly.
Step 1: Power on the Angle Grinder
Turn on the power switch of the angle grinder and make sure it is plugged into a power source. Observe if the grinder powers on smoothly without any unusual sounds or vibrations. This indicates that the new blade has been installed correctly.
Step 2: Run the Angle Grinder Without Load
With the angle grinder turned on, run it without any load initially. Listen for any abnormal noises or vibrations coming from the grinder. A properly installed blade should run smoothly without any issues.
Step 3: Test on a Suitable Material
Select a suitable material to test the angle grinder with the new blade. This could be a piece of scrap metal or any other material that the grinder is intended to be used on. Carefully position the grinder and make a few test cuts or grinding motions. Assess the performance of the grinder, ensuring that it cuts smoothly and efficiently.
Step 4: Evaluate the Results
Once you have tested the angle grinder with the new blade, evaluate the results. Pay attention to the quality of the cuts or grinding motions, as well as any signs of excessive heat or wear on the blade. If the performance is satisfactory and there are no signs of issues, then you can confidently use the angle grinder with the new blade for your intended tasks.
Testing the angle grinder with the new blade is a crucial step to ensure its proper functioning and your safety. Always exercise caution and follow the manufacturer’s instructions when operating an angle grinder.
Clean up and Store Tools
After you have successfully changed the angle grinder blade, it is important to clean up the tools and store them properly. This will help prolong the life of your tools and ensure that they are ready for use the next time you need to use them.
Clean the Angle Grinder
Start by cleaning the angle grinder itself. Use a clean cloth or a brush to remove any dust or debris from the tool. Pay special attention to the blade housing, as this area can accumulate a lot of dirt and grime. Wipe down the tool with a damp cloth to remove any remaining residue.
Clean the Blade

Next, clean the blade that you have removed from the angle grinder. Use a wire brush or a cloth to remove any built-up debris from the blade. Take care to remove any rust or corrosion that may have formed on the blade. Once the blade is clean, you can apply a thin coat of oil to help prevent rusting.
Organize and Store
Finally, organize and store your tools in a proper manner. This will help keep them safe and prevent damage. Consider using a tool box or a designated storage area for your angle grinder and its accessories. Make sure that the tools are stored in a dry and secure location to prevent any moisture damage.
Additionally, it is a good idea to label and categorize your tools for easy access. This will save you time in the future when you need to find a specific tool. Consider using a pegboard or a tool cabinet to keep your tools organized and easily accessible.
By taking the time to clean up and store your tools properly, you can ensure that they last longer and remain in good working condition. This will save you time and money in the long run, as you won’t have to replace your tools as frequently.
FAQ:
What is an angle grinder?
An angle grinder is a power tool used for cutting, grinding, and polishing various materials. It consists of a motor, a spindle, and a disc that rotates at high speeds.
Why would I need to change the blade on my angle grinder?
You may need to change the blade on your angle grinder if the current blade is damaged, dull, or if you need a blade that is better suited for a specific task.
What tools do I need to change the blade on my angle grinder?
To change the blade on your angle grinder, you will need a wrench or a spanner to remove the nut that holds the current blade in place. You may also need a screwdriver or an Allen key, depending on the type of angle grinder you have.
How do I safely remove the old blade from my angle grinder?
To safely remove the old blade from your angle grinder, make sure the grinder is unplugged from the power source. Then, use a wrench or a spanner to hold the spindle in place while you loosen and remove the nut that holds the blade. Once the nut is removed, the old blade should easily slide off the spindle.
What precautions should I take when changing the blade on my angle grinder?
When changing the blade on your angle grinder, it is important to wear protective gloves and safety glasses to protect yourself from any potential injuries. Additionally, always make sure the grinder is unplugged from the power source before attempting to change the blade.
Video:


Harrison Clayton
Meet Harrison Clayton, a distinguished author and home remodeling enthusiast whose expertise in the realm of renovation is second to none. With a passion for transforming houses into inviting homes, Harrison's writing at https://thehuts-eastbourne.co.uk/ brings a breath of fresh inspiration to the world of home improvement. Whether you're looking to revamp a small corner of your abode or embark on a complete home transformation, Harrison's articles provide the essential expertise and creative flair to turn your visions into reality. So, dive into the captivating world of home remodeling with Harrison Clayton and unlock the full potential of your living space with every word he writes.


