How to Change Angle Grinder Blade Without Tool: Step-by-Step Guide

Angle grinders are incredibly versatile tools used in various industries, from construction to metalworking. These power tools are designed to cut, grind, and polish different materials with ease. One crucial aspect of using an angle grinder is knowing how to change the blade. While most angle grinders come with a specialized tool for blade changing, it’s not always convenient to have it on hand. Fortunately, there is a way to change the angle grinder blade without a tool, and we’ll guide you through the process step by step.
Before you begin, it’s essential to ensure that your angle grinder is unplugged and that the power switch is in the off position. Safety should always be a priority when working with power tools. Once you’ve taken the necessary precautions, follow these steps to change the blade without a tool:
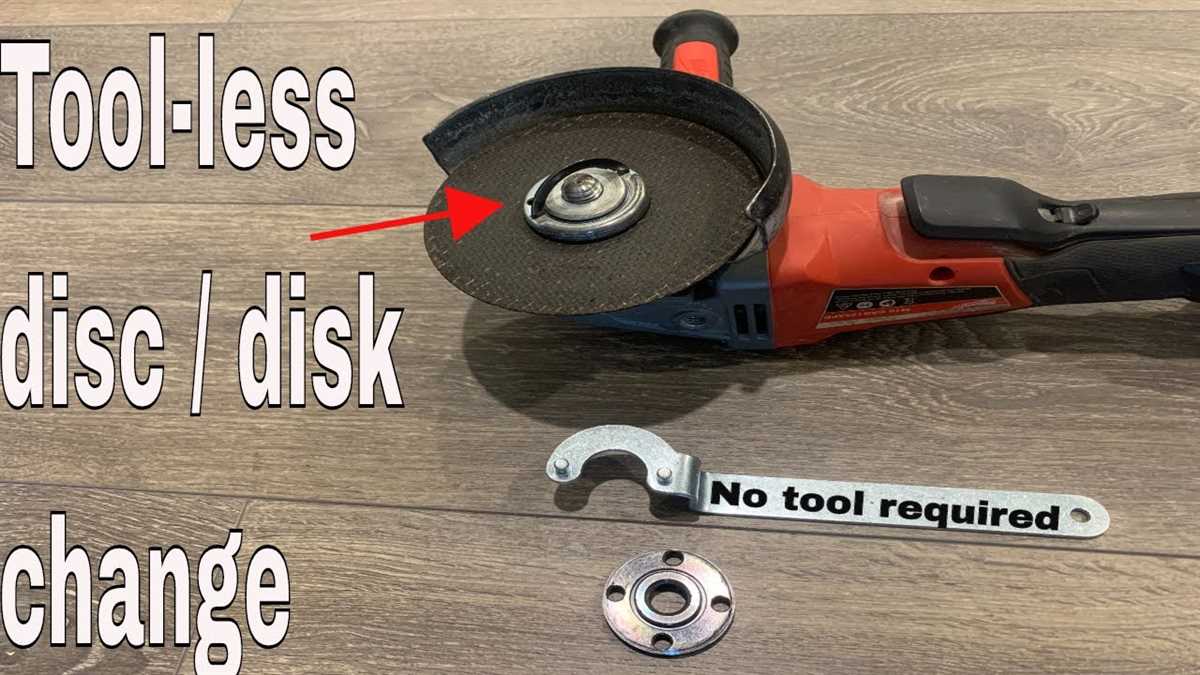
- Remove the blade guard: The blade guard is the protective cover that shields the user from sparks and debris. Use your hand to rotate and push back the blade guard, exposing the blade.
- Secure the spindle: Locate the spindle lock, a small button or switch near the angle grinder’s disc. While pressing the spindle lock, use your free hand to rotate the blade counter-clockwise until you feel resistance. This action will secure the spindle in place, preventing it from turning.
- Loosen the blade: With the spindle locked, you can now loosen the blade nut or bolt holding the blade in place. Most angle grinders have a spindle wrench that fits the blade nut. However, you can also use an adjustable wrench or a pair of pliers to turn the nut counterclockwise until it’s loose enough to remove by hand.
- Remove the old blade: Once the blade nut is loose, carefully remove it and set it aside. You can then slide the old blade off the spindle, taking note of its orientation to ensure proper installation of the new blade.
- Install the new blade: Take the new blade and align it with the spindle, making sure it sits flush against any washers or spacers present. Once aligned, push the blade onto the spindle until it’s snugly in place.
- Tighten the blade nut: Rotate the blade nut clockwise using the spindle wrench or an adjustable wrench until it’s securely tightened. Ensure that the blade is firmly held in place but be cautious not to overtighten, as this can damage the blade or the angle grinder.
- Replace the blade guard: Once the new blade is installed and secure, push the blade guard back into place. Ensure that it locks into its original position and covers the blade entirely. The blade guard is an essential safety feature that should never be omitted.
Now that you know how to change an angle grinder blade without a tool, you can confidently switch blades whenever the need arises. Remember to always prioritize safety and follow the manufacturer’s instructions for your specific angle grinder model. With proper knowledge and care, your angle grinder will continue to serve you well in a variety of applications.
Step 1: Prepare the Angle Grinder
Before changing the angle grinder blade, it is important to prepare the tool properly to ensure safety and efficiency. Follow these steps to get started:
Gather necessary materials
Before beginning the process, make sure you have all the necessary materials on hand. This includes a new blade that is compatible with your angle grinder, safety gloves, safety glasses, and a wrench or spanner to loosen the bolt holding the blade in place.

Power off the grinder
Before starting any work on the angle grinder, it is crucial to ensure that the grinder is powered off and unplugged. This will prevent any accidental activation of the tool while handling the blade.
Secure the angle grinder
Next, find a stable surface or workbench to secure the angle grinder. This will help to ensure that it does not move or tip over while you are working on it.
Remove the battery or disconnect the power source
If your angle grinder is cordless and powered by a rechargeable battery, remove the battery before proceeding. If it is corded, make sure to unplug it from the power source. This step is essential for safety to avoid any accidental start-ups.
Inspect the grinder
Before changing the blade, take a moment to inspect the angle grinder. Ensure that there are no visible damages or issues that could affect the blade replacement process or compromise its performance.

Step 1.1: Turn off the Angle Grinder

Before attempting to change the angle grinder blade, it is crucial to turn off the tool to prevent any accidents or injuries. Locate the switch or button to power off the angle grinder, typically found near the handle or on top of the tool.
Ensure that the switch is in the “off” position before proceeding with the blade replacement process. This step is essential for your safety and to prevent any potential damage to the tool.
Tip: It is recommended to unplug the angle grinder from the power source or remove the battery if it is cordless, to further minimize any chances of accidental activation during the blade changing process.
Step 1.2: Disconnect the Angle Grinder from Power Source
Before changing the angle grinder blade, it is crucial to disconnect the tool from its power source to ensure safety.

To do this, find the power switch on the angle grinder and switch it to the “off” position. If your angle grinder is corded, unplug it from the power outlet. If it is a battery-powered tool, remove the battery pack.
Make sure to verify that the angle grinder is completely powered off by checking the power indicator light or by testing the tool’s power button. It is important not to skip this step to prevent any potential accidents or injuries.
Once the angle grinder is disconnected from its power source, you can proceed to the next step of changing the blade.
Step 2: Remove the Current Blade
To remove the current blade of your angle grinder, you will need to follow a few simple steps. Before you begin, make sure the grinder is unplugged and the power switch is in the “off” position. Safety should always be the top priority when working with power tools.
1. Locate the blade locking button on the angle grinder. It is usually located near the blade guard and is used to lock the spindle in place.

2. Press and hold down the blade locking button to keep the spindle from rotating. This will prevent any accidental movement while changing the blade.
3. While holding down the blade locking button, use the spanner wrench that came with your grinder to loosen the bolt that holds the blade in place. Insert the wrench into the holes on the blade’s center hub and turn it counterclockwise to loosen the bolt.
4. Once the bolt is loose, you can remove it completely by hand. Take care not to drop the bolt or any other small parts that may have come loose during the process.
5. With the bolt removed, you can now carefully slide off the old blade from the spindle. Make sure to handle the blade with caution, as the edges may be sharp or hot from previous use.
6. Set the old blade aside and prepare the new blade for installation. Make sure the new blade is compatible with your angle grinder and that it is the correct size and type for the job you are planning to do.

Step 2.1: Secure the Blade Using a Wrench
To secure the blade of your angle grinder, you will need to use a wrench. The wrench will allow you to tighten the nut that holds the blade in place. Before you begin, make sure that the grinder is powered off and unplugged.
First, locate the nut that secures the blade on the spindle. It is typically located near the handle of the grinder. Once you have located the nut, use the wrench to turn it in a clockwise direction. This will tighten the nut and secure the blade in place.
It is important to ensure that the blade is securely fastened to the spindle before using the angle grinder. A loose blade can be dangerous and may result in injury. To test the tightness of the nut, try gently pulling on the blade. If it moves or feels loose, use the wrench to tighten the nut further.
Once you have secured the blade, you can proceed with using the angle grinder for your intended task. Remember to always exercise caution and wear appropriate safety gear when operating power tools.
Step 2.2: Loosen the Flange Nut
Once you have secured the spindle lock, it’s time to loosen the flange nut. This nut holds the current blade in place and needs to be loosened in order to remove it. Here’s how to do it:
- Using the wrench or spanner provided with the angle grinder, locate the flange nut on the outer edge of the blade.
- Place the wrench or spanner on the flat sides of the flange nut.
- Hold the angle grinder steady with one hand while using the other hand to turn the wrench or spanner counterclockwise.
- Apply steady pressure to the wrench or spanner, making sure not to force it or overtighten.
- Continue turning the wrench or spanner until the flange nut is loose enough to be unscrewed by hand.
- Once the flange nut is sufficiently loosened, remove it from the angle grinder.
If the flange nut is difficult to loosen, you can try using a pair of pliers or gripping gloves for additional leverage. Be cautious not to damage the flange nut or the angle grinder’s spindle while loosening it.
With the flange nut removed, you are now ready to proceed to the next step of changing the angle grinder blade.
Step 2.3: Remove the Flange Nut
Now it’s time to remove the flange nut that holds the old blade in place. The flange nut is a small, round, metal piece that sits on the spindle and secures the blade. Removing the flange nut will allow you to take off the old blade and replace it with a new one.
To remove the flange nut, you’ll need to use the adjustable wrench again. Place the wrench on the flat sides of the flange nut, making sure it’s securely tightened. Then, turn the wrench counterclockwise to loosen the nut. Be sure to hold the blade still with your other hand to prevent it from spinning while you loosen the nut.
Once the flange nut is loose enough, you can use your fingers to unscrew it the rest of the way. Turn it counterclockwise until it comes off the spindle completely. Be careful not to drop the flange nut, as it can be easily lost or misplaced.
After removing the flange nut, set it aside in a safe place. You’ll need it later when you’re ready to install the new blade. Now, you can proceed to the next step in the process of changing the angle grinder blade.
Step 2.4: Take off the Current Blade
To remove the current blade from the angle grinder, follow these steps:
- Ensure that the angle grinder is switched off and unplugged from the power source for safety.
- Locate the spindle lock button, usually located near the disc guard or on the top of the motor housing. Press and hold the spindle lock button to immobilize the spindle.
- Using the wrench provided with the angle grinder or a adjustable wrench, loosen the spindle nut by turning it counterclockwise. The spindle nut is the large nut that holds the blade in place.
- Once the spindle nut is loose, you should be able to remove it by hand. Be careful as the blade may still be under tension.
- With the spindle nut removed, gently pull the current blade away from the angle grinder. Be cautious of any residual sharpness or debris on the blade.
If the blade is difficult to remove, you can tap it lightly with a rubber mallet to loosen it before attempting to pull it off. However, be careful not to damage the angle grinder or the blade.
Once the current blade is removed, place it in a safe location away from the work area. It is recommended to clean or replace the blade if it is worn out or damaged before proceeding to install a new blade.
Step 3: Install the New Blade
Now that you have removed the old blade, it’s time to install the new one. Follow these steps to safely and properly install the new blade on your angle grinder:
- Make sure the grinder is turned off and unplugged before you begin.
- Inspect the new blade for any damage or defects. Check for any cracks or chips in the blade, as these can cause it to break during use.
- Align the center hole of the new blade with the spindle of the angle grinder. Make sure it fits securely and sits flush against the grinder’s flange.
- Tighten the blade by hand, turning it clockwise until it is securely in place. Use your wrench to give it an extra quarter turn to ensure it is tight.
- Double-check that the blade is correctly installed and securely tightened by gently tugging on it. It should not move or come loose.
- Once you are confident that the new blade is properly installed, you can safely turn on the angle grinder and test it out.
Remember to always wear appropriate safety gear, such as safety glasses and work gloves, when using an angle grinder. These precautions will help protect you from any potential accidents or injuries.
Step 3.1: Align the Hole on the New Blade
When replacing the angle grinder blade without a tool, it is important to align the hole on the new blade with the spindle of the grinder. This step ensures that the blade will fit securely onto the grinder and prevents any potential accidents or damage.
Start by inspecting the hole on the new blade to ensure that it is clean and free from any debris or obstructions. Use a brush or a cloth to remove any dirt or dust that may have accumulated during storage or transport.
Next, position the new blade near the spindle of the angle grinder, making sure that the hole on the blade is lined up with the spindle. Take your time to ensure that the alignment is accurate, as a misaligned blade can cause vibrations or wobbling during operation.
If necessary, you can gently rotate the blade to help align the hole with the spindle. Avoid using excessive force, as this can damage the blade or the grinder. Take care to handle the blade with caution, as the edges may be sharp.
Once the hole on the new blade is aligned with the spindle, you can proceed to the next step of securing the blade onto the grinder. This will ensure that the blade is properly attached and ready for use.
FAQ:
Can I change the angle grinder blade without using a tool?
Yes, it is possible to change the angle grinder blade without using a tool. There are a few simple steps you can follow to do this.
What should I do if I can’t find the blade lock button on my angle grinder?
If you cannot find the blade lock button on your angle grinder, refer to the instruction manual that came with your tool. The location of the blade lock button may vary depending on the make and model of your angle grinder.
Is it necessary to unplug the angle grinder from the power source before changing the blade?
Yes, it is crucial to unplug the angle grinder from the power source before changing the blade. This is to ensure your safety and prevent any accidental start-ups that could cause injury.
Video:

Best German Shears

Harrison Clayton
Meet Harrison Clayton, a distinguished author and home remodeling enthusiast whose expertise in the realm of renovation is second to none. With a passion for transforming houses into inviting homes, Harrison's writing at https://thehuts-eastbourne.co.uk/ brings a breath of fresh inspiration to the world of home improvement. Whether you're looking to revamp a small corner of your abode or embark on a complete home transformation, Harrison's articles provide the essential expertise and creative flair to turn your visions into reality. So, dive into the captivating world of home remodeling with Harrison Clayton and unlock the full potential of your living space with every word he writes.


