Tips for Cleaning Reed Valves on an Air Compressor

If you own an air compressor, you know how important it is to keep it properly maintained. One of the key components that requires regular cleaning is the reed valves. Reed valves play a crucial role in the function of an air compressor by controlling the airflow and ensuring efficient operation. Over time, these valves can become clogged with dirt, debris, and oil, which can cause a decrease in performance or even complete failure. Fortunately, cleaning reed valves is a relatively simple process that can be done with a few basic tools and some cleaning solution.
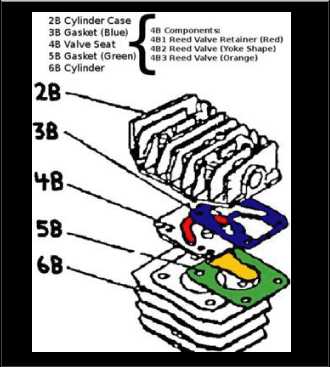
To start cleaning the reed valves on your air compressor, you will need to first locate them. Reed valves are typically found on the cylinder head, which is the top part of the compressor. They are usually made of thin metal strips that open and close to allow air to flow in and out of the cylinder. Once you have located the reed valves, you can begin the cleaning process.
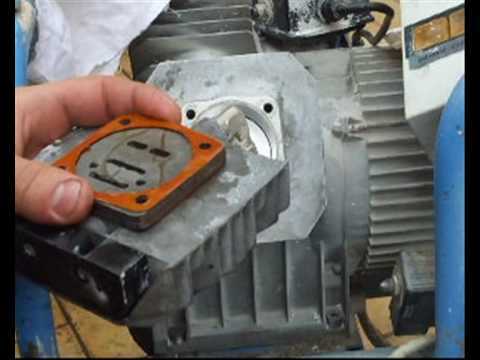
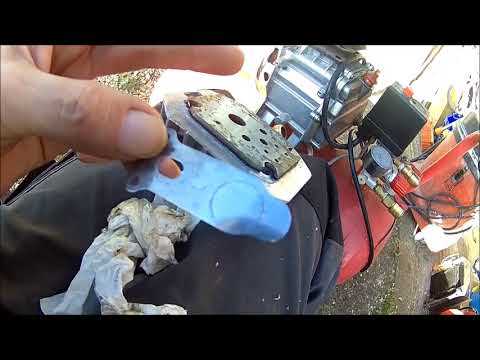
First, remove the cylinder head from the compressor. This can usually be done by loosening a few screws or bolts that are holding it in place. Once the cylinder head is removed, you will be able to access the reed valves. Carefully remove the reed valves, being careful not to damage them in the process. Inspect them for any signs of damage or wear, and replace them if necessary.
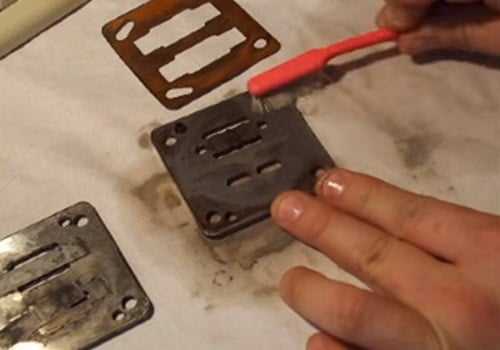
Once the reed valves are removed, you can clean them using a cleaning solution. Mix a small amount of the solution with water and use a brush or cloth to scrub away any dirt, debris, or oil that may have accumulated on the valves. Be sure to clean both the top and bottom surfaces of the reed valves thoroughly. After cleaning, rinse the valves with clean water to remove any residue from the cleaning solution. Allow the reed valves to dry completely before reassembling them back into the cylinder head.
The Importance of Cleaning
Regular cleaning of reed valves on an air compressor is crucial for maintaining optimal performance and prolonging the lifespan of the equipment. Reed valves play a vital role in regulating the airflow and ensuring smooth operation of the compressor. Over time, these valves can become dirty and clogged with debris, which can lead to decreased efficiency and potential damage.

Efficient Airflow: The reed valves are responsible for controlling the flow of air into and out of the compressor. When these valves are dirty or obstructed, they cannot open and close properly, resulting in reduced airflow. This can lead to decreased compressor efficiency and lower output pressure.
Preventing Damage: Dirty reed valves can also lead to overheating of the compressor. When the valves are clogged, the compressor has to work harder to push air through, causing increased friction and heat. This can result in premature wear and tear on the equipment, leading to costly repairs or even complete failure.
Extended Lifespan: Regular cleaning of the reed valves can help extend the lifespan of the air compressor. By removing dirt, debris, and other contaminants, the valves can operate smoothly and efficiently. This reduces the strain on other components of the compressor, helping to prevent unnecessary wear and tear.
Improved Performance: Clean reed valves contribute to better overall performance of the air compressor. When the valves are free from debris, they can open and close without restrictions, ensuring a consistent and steady airflow. This not only improves the compressor’s efficiency but also allows for more reliable operation.
In conclusion, cleaning reed valves on an air compressor is essential for maintaining optimal performance and preventing damage. Regular cleaning can improve airflow, prevent overheating, extend the equipment’s lifespan, and enhance overall performance. It is recommended to follow the manufacturer’s guidelines and clean the reed valves periodically to ensure the continued efficiency and reliability of the air compressor.

Understanding Reed Valves
Reed valves are an important component in an air compressor, as they control the flow of air into and out of the compressor’s cylinder. These valves are made up of thin, flexible metal reeds that open and close with each stroke of the piston. When the piston moves down, the reed valves open, allowing air to enter the cylinder. When the piston moves up, the reed valves close, trapping the air in the cylinder. This trapped air is then compressed and released when needed.
Reed valves play a crucial role in ensuring the efficient operation of an air compressor. They need to be clean and free from any obstructions to properly function. Over time, these valves can become coated with dirt, dust, and oil, which can hinder their performance. Regular cleaning of reed valves is therefore necessary to maintain the optimal performance and longevity of an air compressor.
When the reed valves are dirty or clogged, they may not seal properly, leading to a decrease in the compressor’s efficiency. This can result in reduced air pressure and volume, as well as increased power consumption. Cleaning reed valves involves removing them from the compressor, inspecting them for any damage, and then using a suitable solvent or cleaning solution to dissolve the dirt and grime. After cleaning, the reed valves should be thoroughly dried and reinstalled in the compressor.
It’s important to note that reed valves are delicate and can be easily damaged if not handled properly. Care should be taken when removing them from the compressor and during the cleaning process. It’s also recommended to refer to the manufacturer’s instructions or consult a professional if you are unsure about how to properly clean and maintain reed valves.
Overall, understanding reed valves and their importance in an air compressor is key to ensuring the reliable and efficient operation of the equipment. Regular cleaning and maintenance of these valves will help extend the life of the compressor and prevent any potential issues or breakdowns.

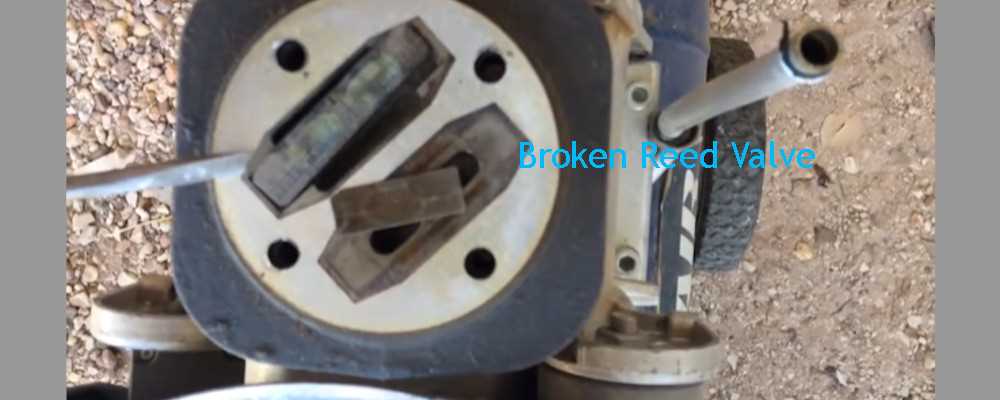
Signs of Dirty Reed Valves
Reed valves are an important component of an air compressor and play a crucial role in its functioning. However, over time, these valves can become dirty and clogged with debris, which can negatively impact the performance of the compressor. It is important to recognize the signs that indicate dirty reed valves so that they can be cleaned or replaced in a timely manner.
1. Reduced Air Pressure
A clear indication that reed valves may be dirty is a noticeable reduction in air pressure generated by the compressor. If you find that your air tools are not receiving the same amount of compressed air as before, it may be due to dirty reed valves hindering the flow of air.
2. Difficulty Starting the Compressor
If you are experiencing difficulties starting your air compressor, it could be an indication of dirty reed valves. When the valves become fouled with dirt and debris, it becomes harder for the compressor to intake and compress air, leading to startup issues.
3. Increased Noise Level
If your air compressor is suddenly making more noise than usual, it could be a result of dirty reed valves. The debris and dirt on the valves can disrupt the smooth operation of the compressor, causing it to make louder noises during compression.

4. Poor Performance
Dirty reed valves can significantly impact the overall performance of the air compressor. You may notice a decrease in the speed and efficiency of the compressor, as well as a decrease in the volume of compressed air produced. This can affect the functionality of your air tools and other connected equipment.
5. Air Leaks
Another sign of dirty reed valves is air leaks. If you notice any air escaping from the valves or any unusual hissing sounds, it can indicate that the valves are dirty or damaged. This can lead to decreased air pressure and inefficient operation of the compressor.
It is important to regularly inspect and clean the reed valves of your air compressor to ensure optimal performance. By recognizing these signs of dirty reed valves, you can take the necessary steps to maintain and prolong the lifespan of your air compressor.
Tools and Materials Needed

To clean the reed valves on an air compressor, you will need the following tools and materials:
- Adjustable wrench: This tool will be used to loosen and tighten the nuts and bolts on the air compressor.
- Socket set: A socket set is essential for removing and installing various components of the air compressor, such as the cylinder head.
- Screwdriver: A screwdriver will be used to remove screws holding the reed valves in place.
- Cleaning solution: You will need a cleaning solution to soak the reed valves and remove any dirt, debris, or carbon buildup.
- Brush: A small brush, such as a toothbrush, can be used to scrub the reed valves and remove any stubborn dirt or buildup.
- Lubricant: After cleaning the reed valves, a lubricant should be applied to ensure smooth operation and prevent future buildup.
- Shop towels: Shop towels or rags will be needed to wipe away any excess cleaning solution or lubricant.
Having these tools and materials on hand will make the process of cleaning the reed valves on your air compressor much easier and more effective. Remember to follow proper safety precautions and consult your air compressor’s manual for specific instructions before attempting any maintenance or repairs.
Step-by-Step Cleaning Process
1. Gather the necessary tools
Before beginning the cleaning process, gather all the necessary tools, including a screwdriver, a clean cloth or sponge, a cleaning solution (such as mild soap and water), a brush with soft bristles, and a can of compressed air.
2. Turn off and unplug the air compressor
For safety reasons, make sure to turn off the air compressor and unplug it from the power source before starting the cleaning process.
3. Remove the reed valve covers

Using a screwdriver, carefully remove the reed valve covers from the air compressor. Keep track of any screws or bolts that are removed, as they will need to be reinstalled later.
4. Clean the reed valves
Using a brush with soft bristles and a cleaning solution, gently scrub the reed valves to remove any dirt, debris, or residue. Be careful not to damage the valves or their surrounding areas.
5. Rinse the valves with water
After cleaning the reed valves, rinse them with water to remove any remaining cleaning solution. This will help prevent any potential damage to the valves or the air compressor.
6. Dry the valves thoroughly
Using a clean cloth or sponge, carefully dry the reed valves to ensure they are completely dry before reinstalling them. Avoid leaving any moisture behind, as it can lead to rust or corrosion.
7. Inspect and lubricate the valves
Before reinstalling the reed valve covers, inspect the valves for any signs of damage. If necessary, replace any worn or damaged valves. Additionally, apply a small amount of lubricant to the valves to ensure smooth operation.
8. Reinstall the reed valve covers
Once the reed valves are clean, dry, and lubricated, carefully reinstall the reed valve covers using the screws or bolts that were previously removed. Ensure they are securely fastened to prevent any air leaks.
9. Test the air compressor
After completing the cleaning process, turn on the air compressor and test it to ensure it is functioning properly. Listen for any unusual noises or air leaks, and observe the pressure gauge to ensure it reaches the desired level.
10. Regular maintenance
To prevent the reed valves from becoming dirty or clogged in the future, it is important to regularly inspect and clean them. Follow the manufacturer’s recommendations for maintenance intervals and procedures.
Precautions to Take
When cleaning the reed valves on an air compressor, it is important to take certain precautions to ensure safety and avoid damage to the equipment.
1. Disconnect the Power
Before starting the cleaning process, always disconnect the power supply to the air compressor. This will prevent any accidental start-up or electrocution.
2. Wear Protective Gear
When working with an air compressor, it is recommended to wear protective gear such as gloves and safety goggles. This will protect your hands and eyes from any potential injuries.
3. Release the Pressure
Prior to cleaning the reed valves, make sure to release the pressure from the air compressor. This can be done by turning off the compressor and following the manufacturer’s instructions to bleed the pressure.
4. Use Proper Tools
Ensure that you have the proper tools for cleaning the reed valves. This may include a screwdriver, pliers, and a cleaning solution. Using the correct tools will make the cleaning process more effective and prevent any damage to the valves.
5. Follow Manufacturer’s Instructions
It is important to follow the manufacturer’s instructions for cleaning the reed valves. Different types of air compressors may have specific cleaning procedures and requirements. Failure to follow these instructions could result in damage to the valves or voiding the warranty.
By taking these precautions when cleaning the reed valves on an air compressor, you can ensure a safe and effective cleaning process, prolong the life of your equipment, and maintain optimal performance.
Maintenance Tips
Regular Cleaning
To ensure optimal performance of your air compressor and extend its lifespan, regular cleaning is essential. Cleaning the reed valves should be a part of your regular maintenance routine. Remove any dirt, debris, or buildup that may accumulate on the valves. Use a soft cloth or brush to gently clean the valves, being careful not to scratch or damage them.
Inspecting for Damage
Regularly inspect the reed valves for any signs of damage or wear. Look for cracks, chips, or bends that may affect their functionality. If you notice any damage, it is important to replace the valves promptly to prevent further damage to the compressor and ensure optimal performance.
Lubrication
Proper lubrication is crucial for the smooth operation of the reed valves. Regularly check the lubrication levels and add oil if necessary. Use a high-quality lubricant recommended by the compressor manufacturer to ensure optimal performance and prevent premature wear of the valves. Refer to the manufacturer’s instructions for the correct lubrication procedure.
Replacement
Over time, reed valves may become worn or damaged beyond repair. It is important to replace them when necessary to maintain the performance of your air compressor. Consult the manufacturer’s guidelines or seek professional assistance to ensure proper installation and compatibility with your specific compressor model.
Regular Maintenance Schedule
To ensure the longevity and reliability of your air compressor, it is important to establish a regular maintenance schedule. This should include regular cleaning, inspection, and lubrication of the reed valves, as well as other necessary maintenance tasks recommended by the manufacturer. By following a consistent maintenance schedule, you can prevent costly repairs, downtime, and extend the lifespan of your air compressor.
FAQ:
What are reed valves in an air compressor?
Reed valves are small metal flaps that allow the flow of air in one direction in an air compressor. They are usually made of spring steel and are vital for the proper functioning of the compressor.
Why is cleaning reed valves important?
Cleaning reed valves is important to ensure optimal performance of the air compressor. Over time, dirt, dust, and debris can accumulate on the valves, causing them to stick or not close properly, which can lead to decreased efficiency and potential damage to the compressor.
How often should reed valves be cleaned?
The frequency of reed valve cleaning depends on the usage and environment conditions. In general, it is recommended to clean the reed valves every 3-6 months or whenever you notice a decrease in the compressor’s performance.
What is the process for cleaning reed valves?
The process for cleaning reed valves involves several steps. First, you will need to disconnect the air compressor from the power source and release any air pressure. Then, remove the valve cover and carefully take out the reed valves. Clean them using a mild detergent or solvent and a soft brush. Rinse them thoroughly and dry them completely before reinstalling them.
Can I use any cleaning solution for reed valves?
No, you should not use just any cleaning solution for reed valves. It is important to use a mild detergent or solvent that is safe for the metal material of the valves. Avoid using harsh chemicals or abrasive cleaners, as they can damage the valves.
Are there any precautions to take when cleaning reed valves?
Yes, there are a few precautions to keep in mind when cleaning reed valves. Always make sure to follow the manufacturer’s instructions and safety guidelines. Wear protective gloves and goggles to prevent contact with the cleaning solution or any debris. Additionally, be careful when handling the reed valves to avoid bending or damaging them.
What are some signs that indicate reed valves need cleaning?
Some signs that indicate reed valves need cleaning include decreased air pressure, increased noise or vibration from the compressor, longer running time, and reduced airflow. If you notice any of these signs, it is a good idea to inspect and clean the reed valves.
Video:


Harrison Clayton
Meet Harrison Clayton, a distinguished author and home remodeling enthusiast whose expertise in the realm of renovation is second to none. With a passion for transforming houses into inviting homes, Harrison's writing at https://thehuts-eastbourne.co.uk/ brings a breath of fresh inspiration to the world of home improvement. Whether you're looking to revamp a small corner of your abode or embark on a complete home transformation, Harrison's articles provide the essential expertise and creative flair to turn your visions into reality. So, dive into the captivating world of home remodeling with Harrison Clayton and unlock the full potential of your living space with every word he writes.


