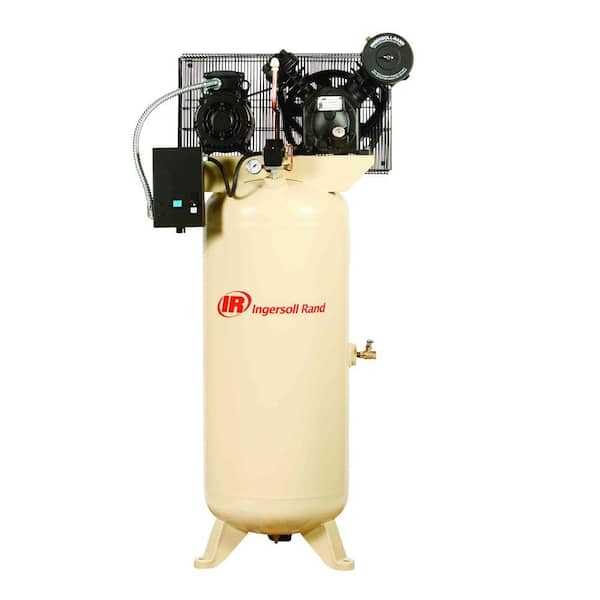
Step-by-Step Guide: Wiring an Ingersoll Rand Air Compressor

If you have recently purchased an Ingersoll Rand air compressor or are looking to replace the wiring for your existing unit, this step-by-step guide will walk you through the process. Wiring an air compressor can seem intimidating, but with the right tools and instructions, it can be done easily and safely. Proper wiring is crucial for the efficient operation of your compressor, so it’s important to take the time to do it correctly.
Before you begin, gather all the necessary tools and materials. You will need wire strippers, wire nuts, electrical tape, a screwdriver, and a volt meter. It is also important to refer to the user manual of your specific Ingersoll Rand model for any unique instructions or specifications.
To start, make sure the compressor is unplugged and all power sources are turned off. This is for your safety and the safety of your equipment. Next, identify the incoming power source and the power requirements of your compressor. This information can usually be found on the motor plate.
Once you have identified the power requirements, you will need to select the appropriate wire size. The wire size will depend on the length of the wire run and the amperage requirements of your compressor. Consult a wire size chart to determine the correct wire gauge. Using a wire that is too small can result in poor performance and potential damage to the compressor.
With the wire size determined, it’s time to wire the compressor. Begin by removing the electrical cover panel on the compressor motor. Locate the incoming power wires and strip the ends to expose the bare copper wires. Connect the wires using wire nuts, matching the color of the wires together (e.g., black to black, white to white). Secure the wire nuts with electrical tape to ensure a tight connection.

After the wires are connected, test the voltage using a volt meter to confirm that the wiring has been done correctly. Turn on the power source and measure the voltage at the compressor motor connections. The voltage should match the power requirements stated on the motor plate. If the voltage is incorrect, double-check the wiring connections and consult the user manual for troubleshooting.
With the wiring complete and the voltage confirmed, replace the electrical cover panel on the compressor motor. Double-check all connections and make sure everything is secure. Now you can plug in the compressor and test it to ensure it is functioning properly. If you encounter any issues, refer to the troubleshooting section of the user manual or contact Ingersoll Rand customer support for assistance.
By following this step-by-step guide, you can confidently wire your Ingersoll Rand air compressor and ensure its safe and efficient operation. Remember to always prioritize safety and consult the user manual for specific instructions related to your model. With proper wiring, your compressor will be ready to power your air tools and tackle any task.
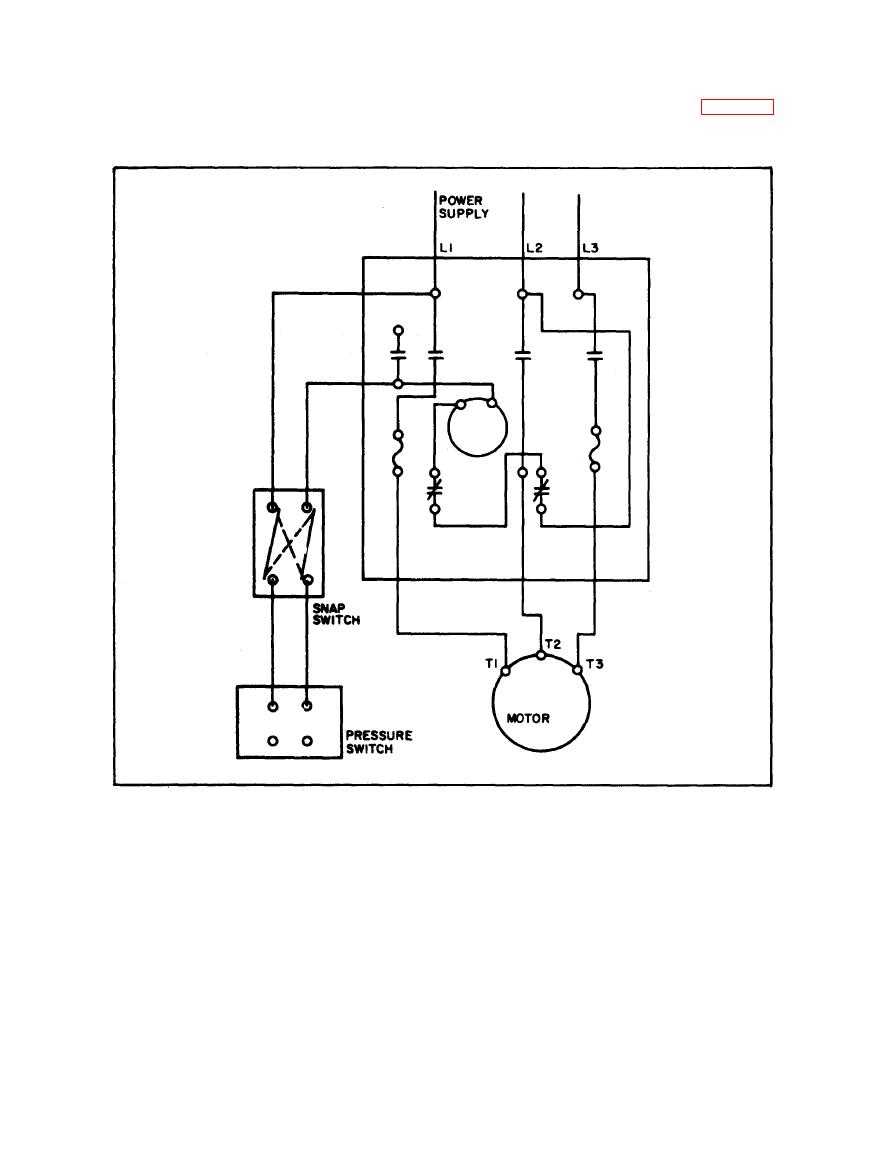
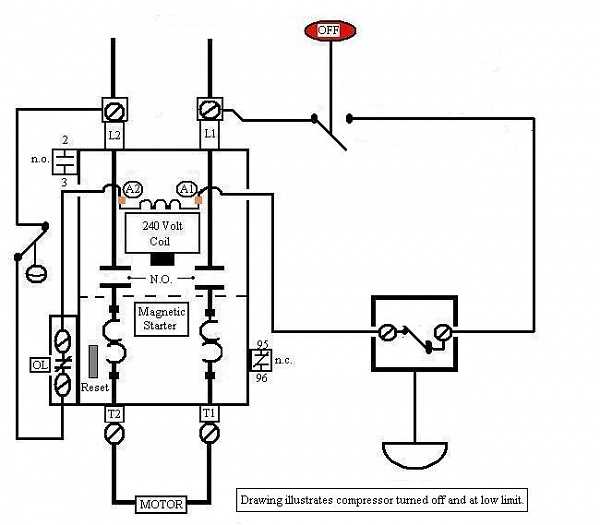
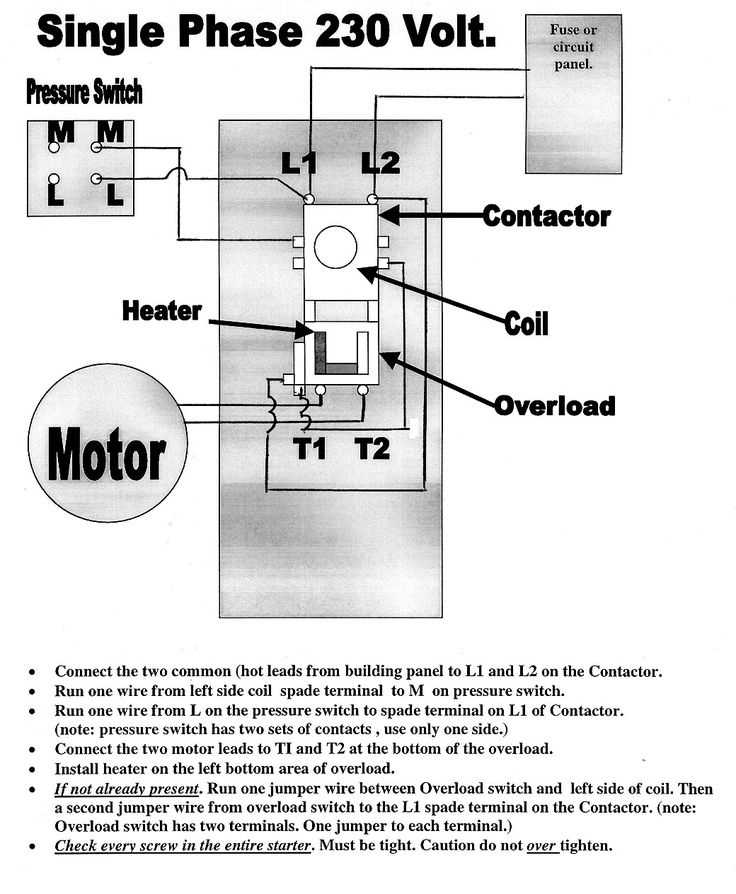
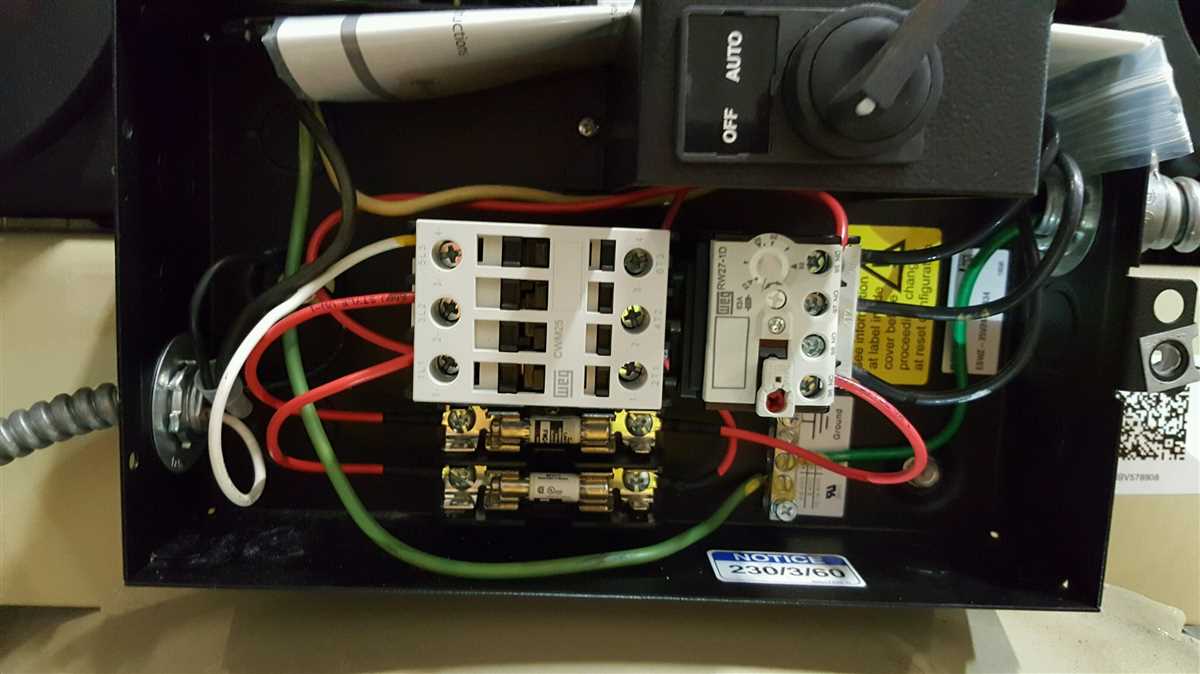
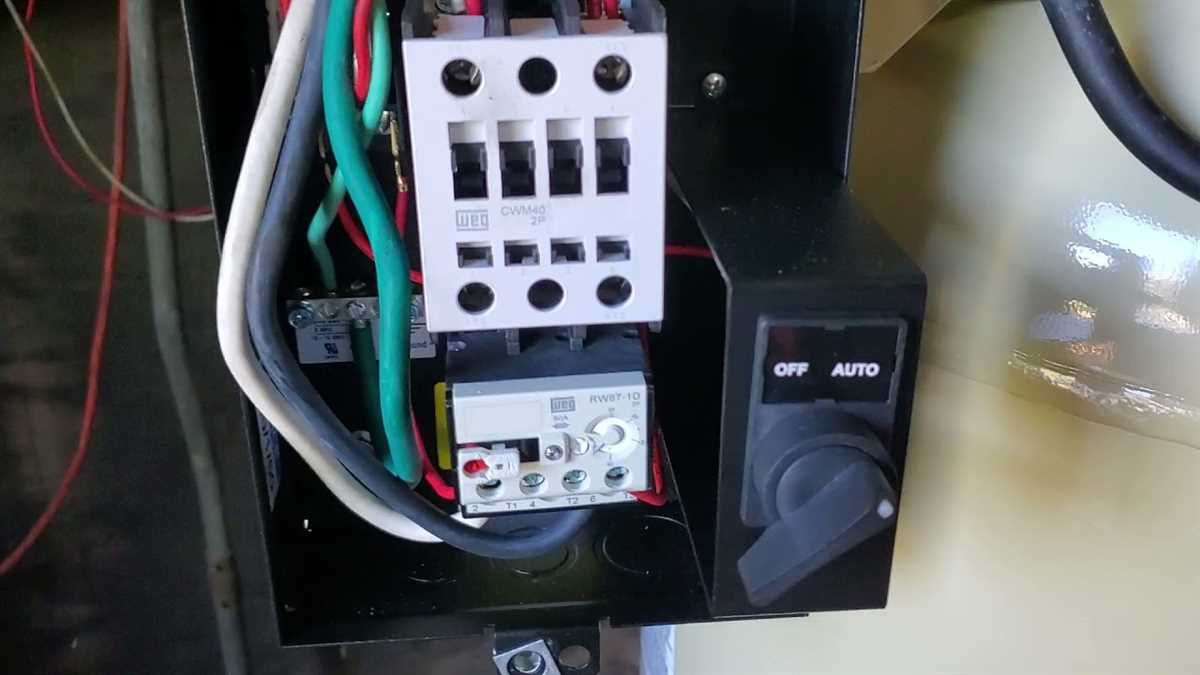
Understanding the Wiring Diagram
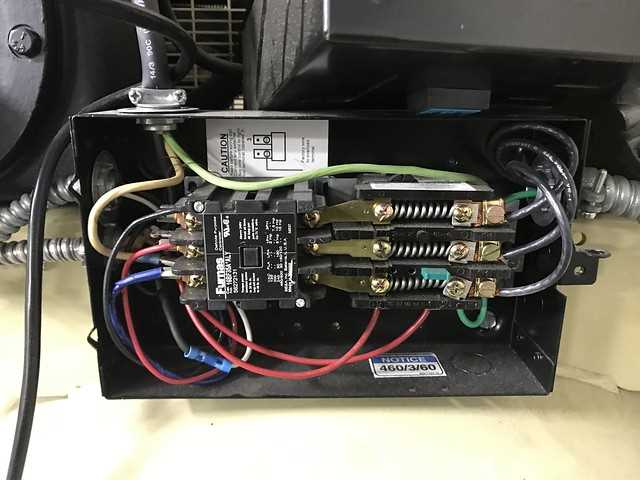
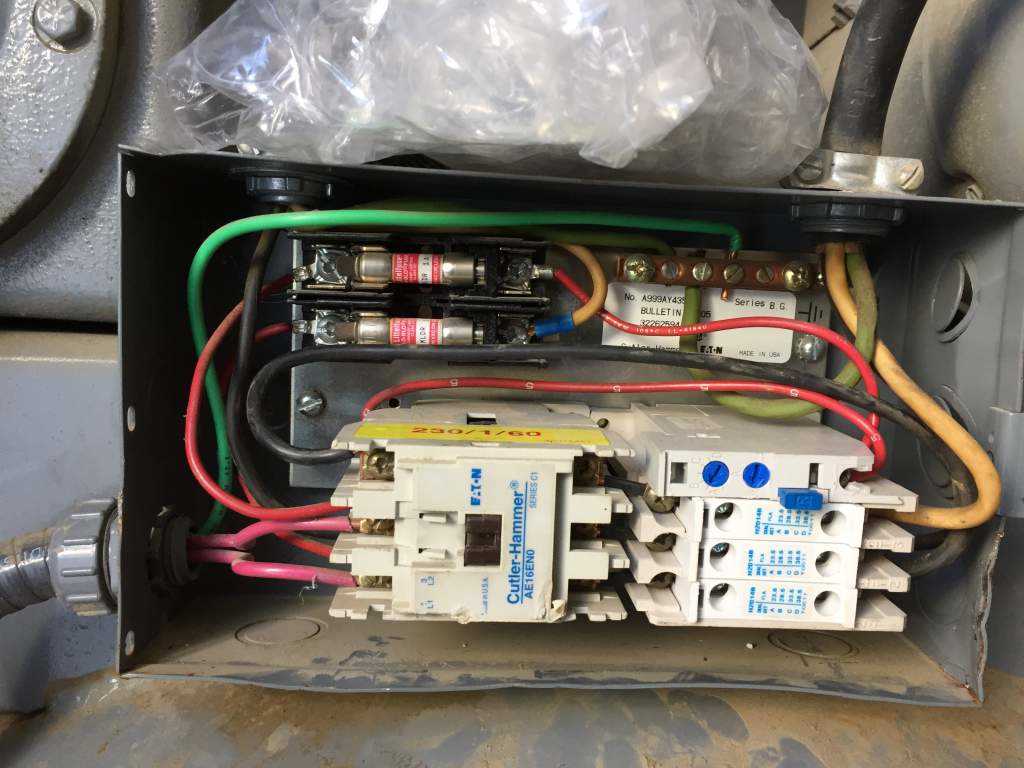
When it comes to wiring an Ingersoll Rand air compressor, it is important to understand the wiring diagram provided by the manufacturer. This diagram shows the various components and how they are connected in the electrical circuit of the compressor.
The wiring diagram can be divided into several sections. It typically includes a power supply section, a motor section, a control section, and a safety section. Each section contains specific information about the wiring and connections for that particular component.

The power supply section of the diagram shows how the compressor is connected to the electrical supply. It includes details about the voltage and current requirements, as well as the type and size of the power cable that should be used.
The motor section outlines the wiring connections for the compressor’s motor. This includes the main power leads, the start and run capacitors, and any overload protection devices that may be installed. It is important to follow the manufacturer’s instructions carefully when connecting the motor to ensure proper operation and to prevent damage.
The control section of the diagram shows the wiring for any control devices, such as pressure switches or relays, that are used to start and stop the compressor. It also includes any control circuitry that may be required, such as timers or pressure sensors.
The safety section outlines any safety devices or features that are included in the compressor’s wiring. This can include things like emergency stop buttons, overload protection devices, or thermal cutouts. It is important to ensure that these safety features are properly connected and functioning to prevent accidents or damage to the compressor.
Overall, understanding the wiring diagram is crucial for properly wiring an Ingersoll Rand air compressor. It provides detailed information about the electrical connections and components, ensuring that the compressor operates safely and efficiently. It is important to consult the manufacturer’s instructions and adhere to local electrical codes when wiring the compressor.

Required Tools and Materials
Tools:
- Wire strippers
- Wire cutters
- Screwdrivers (Phillips and flathead)
- Pliers
- Needle-nose pliers
- Tape measure
- Drill
- Electrical tape
- Wire connectors
Materials:
- Electrical wire
- Electrical conduit
- Electrical boxes
- Wire nuts
- Cable ties
- Grounding wire
- Fuse box
- Fuses
- Power switch
- Outlet
Before starting the wiring process for your Ingersoll Rand air compressor, you will need to gather the necessary tools and materials. These tools will help ensure that the wiring is done correctly and safely. Some of the tools you will need include wire strippers, wire cutters, screwdrivers (both Phillips and flathead), pliers, needle-nose pliers, a tape measure, a drill, electrical tape, and wire connectors.
In addition to the tools, you will also need various materials for the wiring process. These materials include electrical wire, electrical conduit, electrical boxes, wire nuts, cable ties, grounding wire, a fuse box, fuses, a power switch, and an outlet. These materials will be used to properly route and connect the electrical wires, protect the wiring from damage, and ensure proper electrical functioning of the air compressor.
By having all of the required tools and materials on hand before starting the wiring process, you can ensure a smooth and efficient installation of your Ingersoll Rand air compressor. This will help prevent delays and potential issues caused by missing or inadequate tools and materials.

Safety Precautions
1. Read the Manual
Before attempting to wire an Ingersoll Rand air compressor, it is essential to read and understand the instruction manual provided by the manufacturer. The manual contains important safety information, specific instructions, and diagrams that will guide you through the wiring process.
2. Disconnect Power
Prior to working on the electrical wiring of the air compressor, it is crucial to disconnect the power source. This can be done by turning off the circuit breaker or unplugging the compressor from the electrical outlet. It is also recommended to use a lockout/tagout device to ensure that others do not accidentally restore power while you are working.
3. Wear Personal Protective Equipment
To minimize the risk of injury, always wear appropriate personal protective equipment (PPE) when working with electricity. This includes safety goggles, insulated gloves, and protective clothing. PPE will protect you from electrical shocks, burns, and other potential hazards.

4. Check for Damaged Wires
Before starting the wiring process, inspect all wires for signs of damage such as fraying, exposed copper, or loose connections. Damaged wires should be replaced to prevent electrical malfunctions or safety hazards.
5. Use Proper Tools
Always use the correct tools for the job to ensure safe and secure wiring connections. This may include wire strippers, electrical tape, wire nuts, and a voltage tester. Using improper tools can lead to faulty connections and increased risk of electrical accidents.
6. Follow Local Electrical Codes
When wiring an air compressor, it is important to adhere to the electrical codes and regulations set by your local authorities. These codes ensure that the wiring is done safely and up to standard. If you are unsure of the requirements, consult a qualified electrician.

7. Test Before Use
After completing the wiring process, double-check all connections and ensure that everything is properly secured. Before using the air compressor, it is recommended to perform a test run to check for any electrical issues or abnormal behavior.
8. Perform Regular Maintenance
To maintain the safety and performance of your Ingersoll Rand air compressor, it is important to conduct regular maintenance. This includes inspecting the wiring connections, cleaning the compressor, and checking for any signs of wear or damage. A well-maintained compressor will reduce the risk of electrical accidents and extend the lifespan of the equipment.
9. Only Authorized Personnel
Lastly, only individuals who are trained and authorized to work with electrical systems should attempt to wire an air compressor. If you do not have the necessary skills or knowledge, it is recommended to seek professional assistance to ensure the task is done safely and correctly.
Step 1: Turn Off the Power
To safely wire an Ingersoll Rand air compressor, the first step is to turn off the power to the compressor. This is an important safety precaution to prevent any electrical shocks or accidents. Locate the circuit breaker or switch that controls the power supply to the compressor and switch it off. If necessary, use a voltage detector to ensure that the power is completely turned off.
Caution: Always make sure to follow proper safety procedures when working with electrical equipment. If you are unsure about how to turn off the power or if you feel uncomfortable doing it yourself, it’s best to consult a qualified electrician.
![Wiring Bible: [6 IN 1] The Complete Guide With Step-by-Step Projects and Money-Saving Strategies | Expert Advice to Handle and Fix the Most Common Home Wiring Problems](https://m.media-amazon.com/images/I/51oXLtFBaZL._SL160_.jpg)
Once the power is off, it is also recommended to lock out and tag the circuit breaker or switch to ensure that no one inadvertently turns it back on while you are working on the wiring.
If your compressor is connected to a larger electrical system, such as a panel or control box, you may need to turn off the power to the entire system. In such cases, it is important to consult the appropriate documentation or seek professional assistance to ensure that the power is safely disconnected.
Step 2: Remove the Cover
Once you have verified that the power is disconnected, it is time to remove the cover of the Ingersoll Rand air compressor.
To do this, locate the screws or fasteners that are securing the cover in place. Use the appropriate tools, such as a screwdriver or wrench, to loosen and remove these screws.
Once all the screws are removed, carefully lift the cover off the compressor. Be cautious as the cover may be heavy or have sharp edges.
Set the cover aside in a safe location to prevent any damage or injuries.
With the cover removed, you will have better access to the inner components of the air compressor, making it easier to proceed with the wiring process.
Step 3: Identify and Disconnect Wires
When wiring an Ingersoll Rand air compressor, it is important to identify and disconnect the necessary wires before proceeding. This step is crucial to ensure the safety of the individual working on the compressor and to prevent any damage to the equipment.
1. Power off the compressor: Before identifying and disconnecting the wires, it is essential to turn off the power supply to the compressor. This can be done by flipping the designated switch or unplugging the compressor from the power source.
2. Locate the wire terminals: Once the power is off, locate the wire terminals on the compressor. These terminals are typically labeled with letters or numbers to indicate their specific function. Consult the owner’s manual or wiring diagram for the compressor to help you locate the correct terminals.
3. Identify the wires: After locating the wire terminals, identify the wires that need to be disconnected. These wires may be color-coded or labeled to indicate their purpose. It is essential to have a clear understanding of which wires need to be disconnected to avoid any confusion during the reconnection process.
4. Disconnect the wires: To disconnect the wires, gently remove any wire connections or terminal screws securing them in place. Take care not to damage the wires or terminals in the process. If unsure of how to disconnect the wires, consult the owner’s manual or seek professional assistance.
5. Label the disconnected wires: To ensure easy reconnection later, it is a good practice to label each wire as it is disconnected. This can be done by attaching small adhesive labels or using a marker to write directly on the wire. Clearly label each wire with its corresponding terminal or function to avoid any confusion when reconnecting.
6. Secure the disconnected wires: Once the wires are disconnected and labeled, secure them in a safe location away from any moving parts or potential hazards. Use tape or cable ties to keep the wires organized and prevent them from getting tangled or damaged during the wiring process.
7. Proceed with the next wiring steps: With the wires safely disconnected and labeled, you can now proceed with the next steps of wiring the Ingersoll Rand air compressor. Follow the wiring diagram or instructions provided in the owner’s manual to ensure the proper and safe connection of the wires.
Step 4: Connect New Wiring
Gather the necessary materials
Before you begin connecting the new wiring for your Ingersoll Rand air compressor, make sure you have all the necessary materials. This includes wire strippers, wire connectors, electrical tape, and any additional wiring or conduits that may be required.
Turn off the power
Before working with any electrical components, it is crucial to turn off the power supply. Locate the appropriate circuit breaker or fuse and switch it off to ensure your safety.
Strip the ends of the wires
Using wire strippers, carefully strip off the insulation from the ends of the new wiring. This will expose the bare wire strands, allowing for proper electrical connections.
Note: Be cautious when stripping the wires to avoid damaging the underlying metal strands.
Connect the wires
Match the colors of the wires from your Ingersoll Rand air compressor to the corresponding wires in your electrical system. Use wire connectors to join the wires together, ensuring a secure and tight connection.
Secure the connections
After connecting the wires, wrap each individual connection with electrical tape to provide insulation and protection. This step helps to prevent potential electrical hazards or short circuits.
Note: Make sure the connections are properly secured and insulated to avoid any possible accidents or malfunctions.
Test the connections
Once all the new wiring is securely connected and insulated, turn on the power supply and test the connections. Check for proper functioning of the Ingersoll Rand air compressor and ensure that there are no electrical issues or abnormalities.
Remember to always prioritize safety when working with electrical components. If you are unsure or uncomfortable with any aspect of the wiring process, consult a professional electrician for assistance.
Step 5: Test and Reassemble
Once you have completed the wiring process, it is time to test the Ingersoll Rand air compressor and reassemble it. Follow these steps to ensure that the compressor is working properly:
- Check the power source: Make sure that the power source is connected and supplying the necessary voltage for the compressor to run. Use a voltage meter to confirm the voltage.
- Turn on the compressor: Press the power button or switch to turn on the air compressor. Listen for any unusual sounds or vibrations that could indicate a problem.
- Monitor the pressure levels: Keep an eye on the pressure gauge to see if the compressor is building pressure. The pressure should steadily increase until it reaches the desired level.
- Check for leaks: Inspect all the connections and fittings for any signs of air leaks. A hissing sound or visible air escaping could indicate a leak. If there are any leaks, tighten or replace the necessary components.
- Test the safety features: Ensure that the safety features of the compressor, such as the pressure relief valve and automatic shutdown, are functioning properly. This is important for the safe operation of the compressor.
- Reassemble the compressor: If everything is working as expected, reassemble any disassembled components of the compressor. Make sure that all screws, bolts, and fittings are securely tightened to prevent any issues during operation.
Following these steps will help ensure that your Ingersoll Rand air compressor is wired correctly and functioning properly. By testing and reassembling the compressor, you can have confidence in its reliability and performance.
FAQ:
What is an Ingersoll Rand air compressor?
An Ingersoll Rand air compressor is a machine that compress air in order to provide power for various tools and equipment.
Why is wiring an air compressor important?
Wiring an air compressor is important because it allows the compressor to operate safely and efficiently, and ensures that it is connected correctly to a power source.
What tools and materials are needed for wiring an Ingersoll Rand air compressor?
The tools and materials needed for wiring an Ingersoll Rand air compressor include a screwdriver, wire cutters, wire strippers, electrical tape, wire connectors, and a power supply cord.
Can I wire my Ingersoll Rand air compressor myself, or should I hire a professional?
It is recommended to hire a professional electrician to wire your Ingersoll Rand air compressor, as they have the knowledge and experience to ensure proper wiring and electrical connections.
What are the main steps involved in wiring an Ingersoll Rand air compressor?
The main steps involved in wiring an Ingersoll Rand air compressor include turning off the power supply, removing the compressor cover, connecting the power supply cord, connecting the ground wire, connecting the motor wires, securing the wiring connections, and testing the compressor.
Are there any specific safety precautions to be aware of when wiring an air compressor?
Yes, there are several safety precautions to be aware of when wiring an air compressor. These include wearing protective gloves and goggles, ensuring that the power is turned off before working on the compressor, and following the manufacturer’s instructions and guidelines for installation and wiring.
Video:


Harrison Clayton
Meet Harrison Clayton, a distinguished author and home remodeling enthusiast whose expertise in the realm of renovation is second to none. With a passion for transforming houses into inviting homes, Harrison's writing at https://thehuts-eastbourne.co.uk/ brings a breath of fresh inspiration to the world of home improvement. Whether you're looking to revamp a small corner of your abode or embark on a complete home transformation, Harrison's articles provide the essential expertise and creative flair to turn your visions into reality. So, dive into the captivating world of home remodeling with Harrison Clayton and unlock the full potential of your living space with every word he writes.


