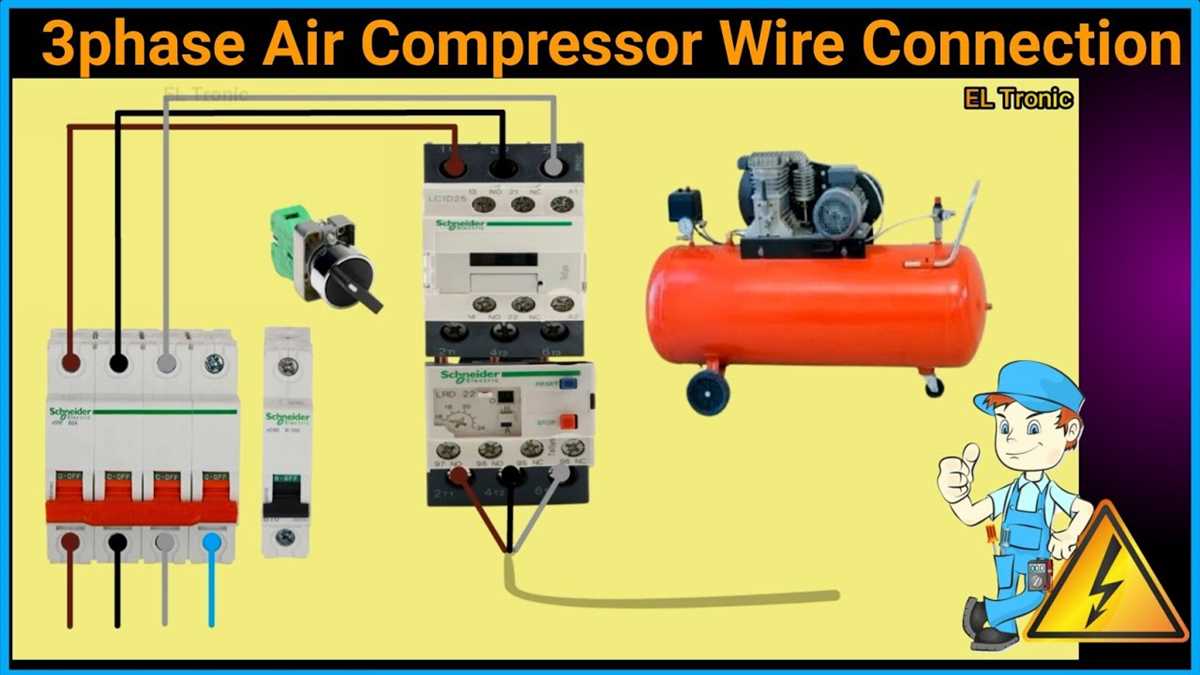
Step-by-Step Guide: Wiring a 3 Phase Air Compressor Pressure Switch

Wiring a 3 phase air compressor pressure switch may seem like a daunting task, but with the right tools and knowledge, it can be a relatively simple process. A pressure switch is an integral part of an air compressor, as it controls the operation of the compressor by monitoring the air pressure. It ensures that the compressor turns on and off at the correct pressure levels and protects it from damage due to over-pressurization.
The first step in wiring a 3 phase air compressor pressure switch is to gather the necessary tools and materials. This includes a pressure switch with the appropriate voltage rating for your compressor, a wire stripper, wire nuts, electrical tape, and a screwdriver. It is important to choose a pressure switch that is compatible with your specific compressor model and voltage requirements.
Once you have the necessary tools and materials, the next step is to shut off the power to the air compressor. This can be done by turning off the circuit breaker or unplugging the compressor from the power source. Safety should always be a top priority when working with electricity, so make sure to follow all necessary precautions.
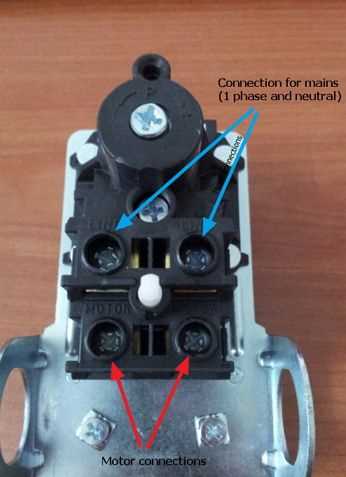
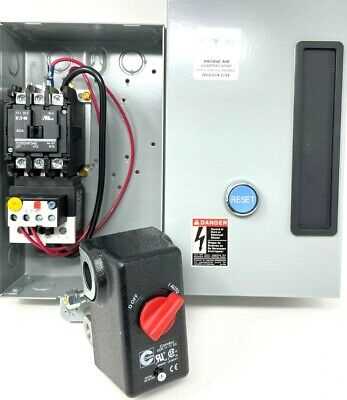
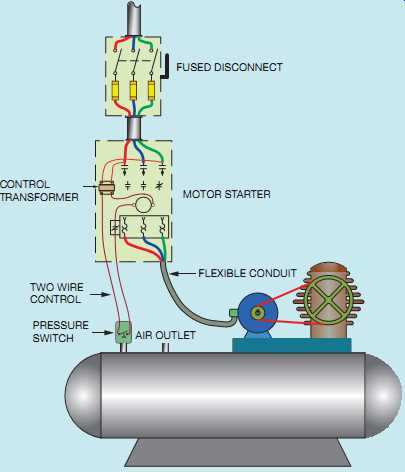
Next, locate the pressure switch on your air compressor. It is typically mounted near the tank and may have a small cover or panel that needs to be removed in order to access the wiring connections. Once the cover is removed, you will see several terminals on the pressure switch, labeled with letters or numbers.
Step 1: Gather the necessary tools and materials

Before you begin wiring a 3 phase air compressor pressure switch, you will need to gather a few tools and materials to ensure a smooth installation process. Here are the items you will need:
Tools
- Wire Strippers
- Wire Cutters
- Screwdrivers (Phillips and flathead)
- Electrical Tape
- Wire Connectors
- Voltage Tester
Materials
- 3 Phase Air Compressor Pressure Switch
- Electrical Wiring
- Junction Box
- Cable Clips
- Wire Nuts
- Terminal Blocks
Having these tools and materials on hand will ensure that you have everything you need to wire the pressure switch correctly and safely. It’s always a good idea to double-check that you have everything before starting the installation process to avoid any delays or complications.
Step 2: Turn off the power

Before beginning any electrical work, it is crucial to turn off the power to the air compressor. This step is essential to ensure your safety and the proper installation of the pressure switch. Failure to do so can result in electrical shock or damage to equipment.
To turn off the power, locate the breaker or electrical disconnect switch that controls the circuit supplying electricity to the air compressor. It is typically located near the air compressor or in the main electrical panel of your building. Refer to the manufacturer’s instructions or consult an electrician if you are unsure about the location of the breaker or switch.
Once you have located the correct breaker or switch, use caution to turn it off. It is recommended to double-check that the power is indeed off by attempting to start the air compressor or using a voltage tester to ensure that no power is flowing to the air compressor. Do not proceed with the installation until you are certain that the power is off.
Turning off the power is an important safety precaution that should not be skipped. It protects both you and the equipment from the risk of electrical accidents. Take the time to ensure that the power is off before proceeding to the next steps of the pressure switch installation.
Step 3: Identify the wires
![Wiring Bible: [6 IN 1] The Complete Guide With Step-by-Step Projects and Money-Saving Strategies | Expert Advice to Handle and Fix the Most Common Home Wiring Problems](https://m.media-amazon.com/images/I/51oXLtFBaZL._SS520_.jpg)
Before proceeding with the wiring process, you need to identify the different wires present in the 3 phase air compressor pressure switch. These wires play a crucial role in connecting the switch to the air compressor motor.
There are typically three different wires that you will need to identify: the power supply wires, the motor wires, and the ground wire.
Power supply wires:
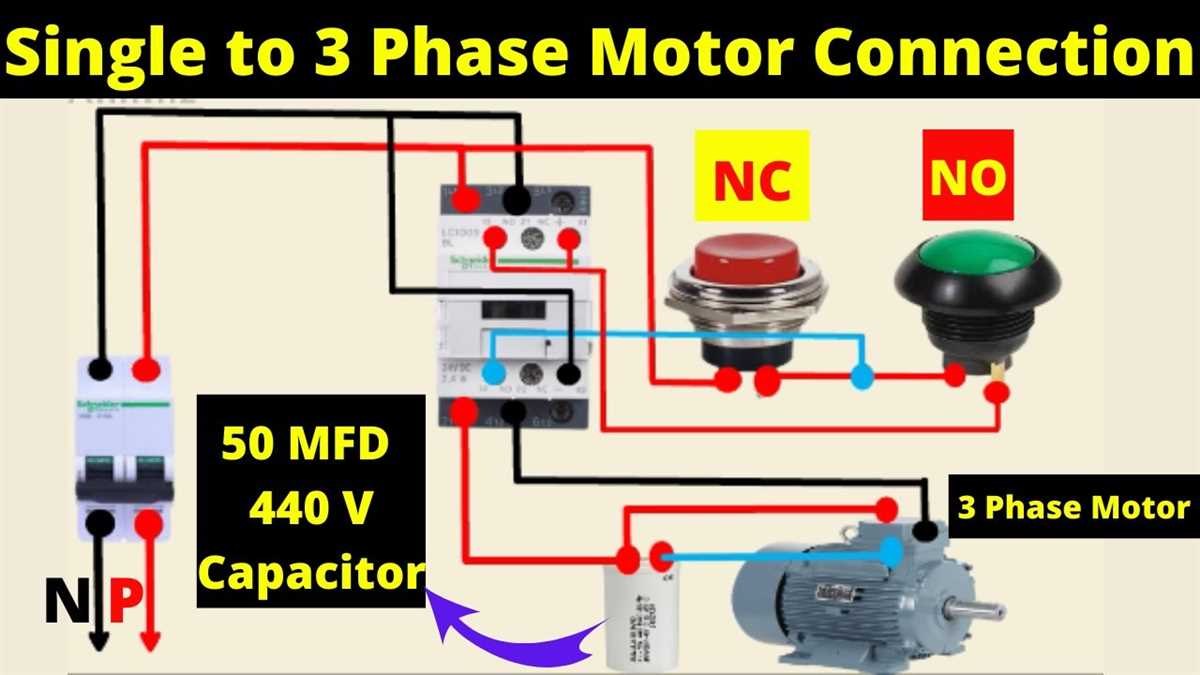
The power supply wires are responsible for delivering the electrical power to the air compressor pressure switch. These wires are usually colored black and white, but it is important to check the manufacturer’s instructions or the wiring diagram to confirm the correct wire colors for your specific model.
Motor wires:
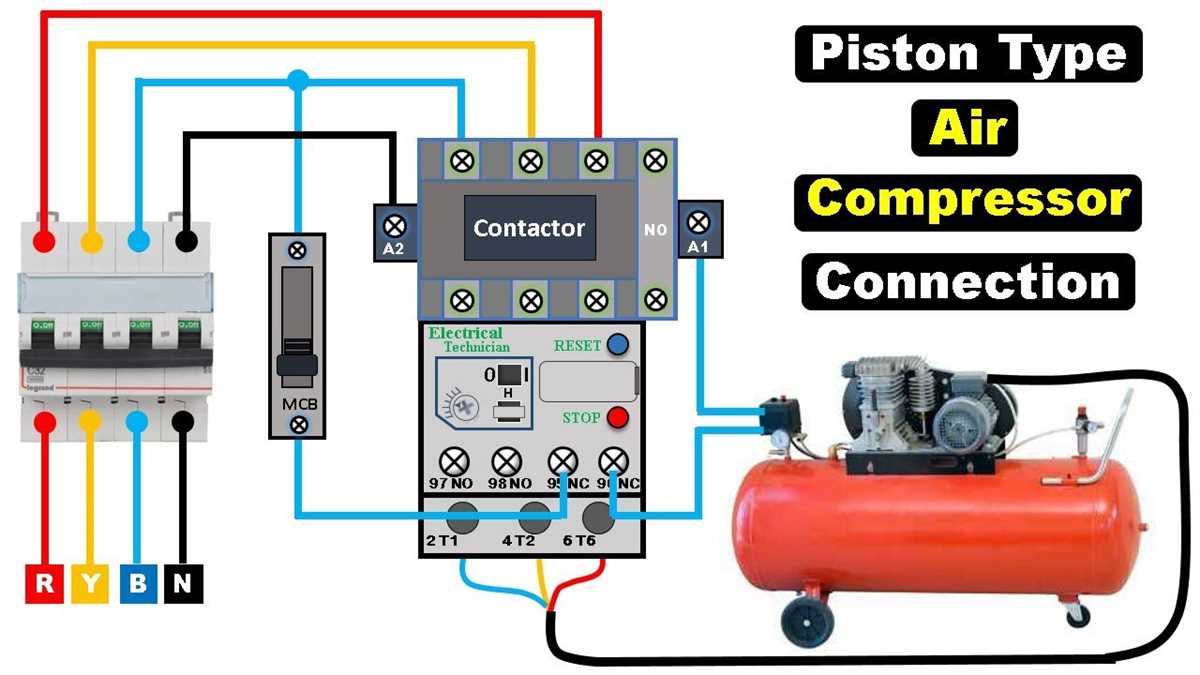
The motor wires are necessary for connecting the air compressor pressure switch to the motor. These wires are usually colored red, yellow, and blue, but once again, it is essential to check the manufacturer’s instructions for your specific model to confirm the correct wire colors.

Ground wire:

The ground wire is a safety feature that provides a pathway for electrical current in case of a short circuit. It is typically colored green or bare copper and connects to the grounding terminal on the air compressor pressure switch.
Once you have identified the different wires, ensure that the power supply is disconnected before proceeding to the next step.
Step 4: Connect the ground wire
After connecting the power wires, it’s important to also connect the ground wire for safety purposes. The ground wire is typically a green or bare copper wire that provides a path for electrical current in case of a fault or short circuit.

To connect the ground wire, locate the ground terminal on the pressure switch. This terminal is usually marked with the letter “G” or the word “Ground.” Strip the insulation off the end of the ground wire to expose the bare copper. Insert the end of the wire into the ground terminal and tighten the screw to secure it.
After connecting the ground wire to the pressure switch, make sure to also connect the other end of the ground wire to a suitable ground source. This can often be a designated ground lug on the air compressor itself. Securely tighten the ground wire to ensure a solid connection.
It’s important to note that the ground wire should never be used as a conductor for power. Its sole purpose is to provide a safe path for electrical current in case of a fault, protecting both the equipment and the user from potential harm.
Step 5: Connect the power wires
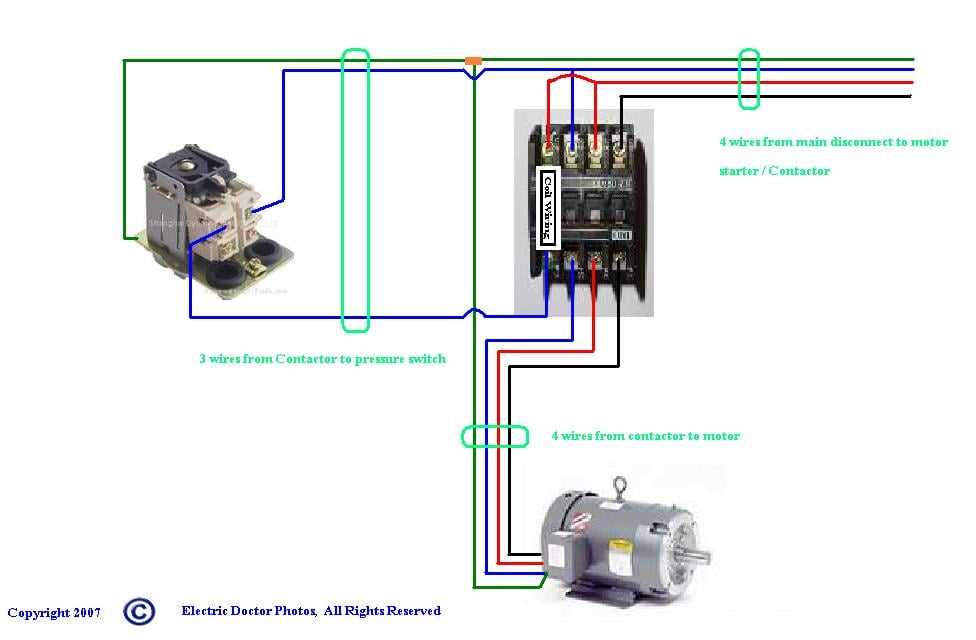
After wiring the control wires, the next step is to connect the power wires to the pressure switch. This step will provide the necessary electrical power to the air compressor.

1. Identify the power wires: Before connecting the power wires, identify the incoming power wires from your power source. These wires are typically colored black, red, or blue.
2. Match the wires: Locate the corresponding terminals on the pressure switch for the power wires. The pressure switch will have designated terminals for the power wires.
3. Strip the wires: Use a wire stripper to remove a small portion of the insulation from the ends of the power wires. This will expose the bare copper wire.
4. Connect the wires: Attach the power wires to the appropriate terminals on the pressure switch. Ensure that the wires are securely connected by tightening the terminal screws.
5. Check the connections: After connecting the power wires, double-check the connections to ensure that they are tight and secure. Loose connections can lead to electrical issues and potentially be dangerous.

6. Insulate the connections: Once the connections are confirmed, use electrical tape or wire nuts to insulate the exposed wire ends to prevent any accidental contact with live wires.
7. Test the power: After completing the wiring, it is important to test the power supply to ensure that the air compressor receives the necessary electrical power. Turn on the power source and check if the compressor starts up.
Following these steps will ensure that the power to the air compressor is safely and properly connected to the pressure switch.
Step 6: Connect the pressure switch
Connecting the pressure switch is an important step in wiring a 3 phase air compressor. The pressure switch is responsible for monitoring the air pressure in the tank and turning the compressor on and off accordingly.
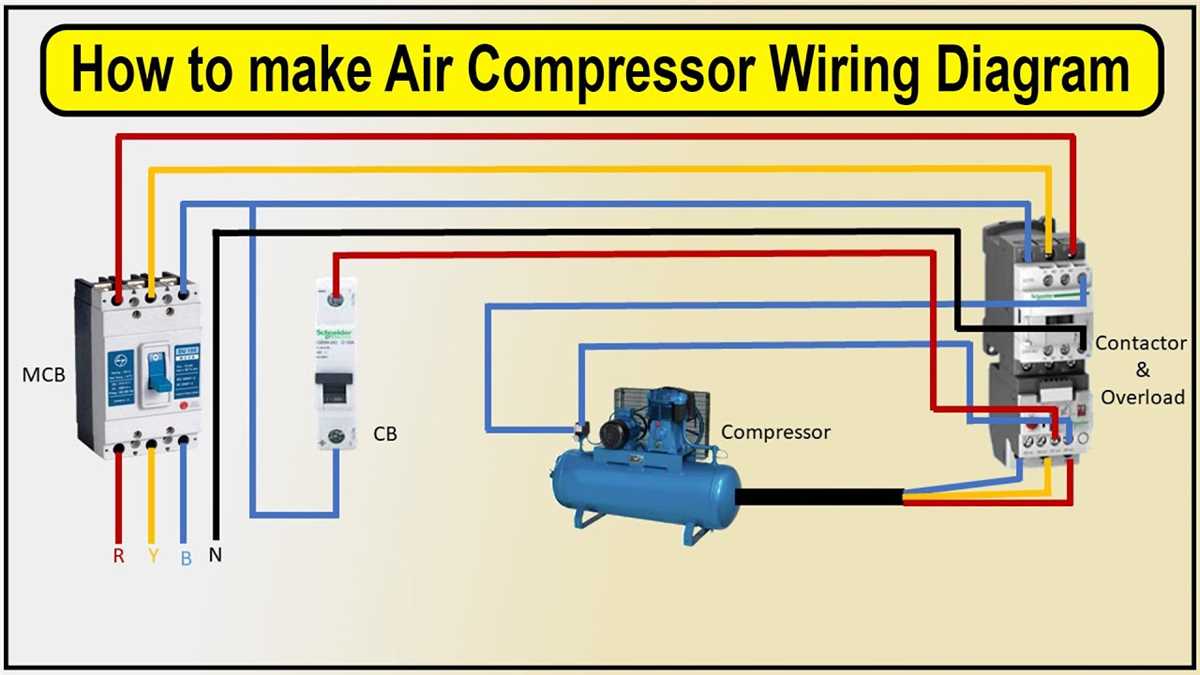
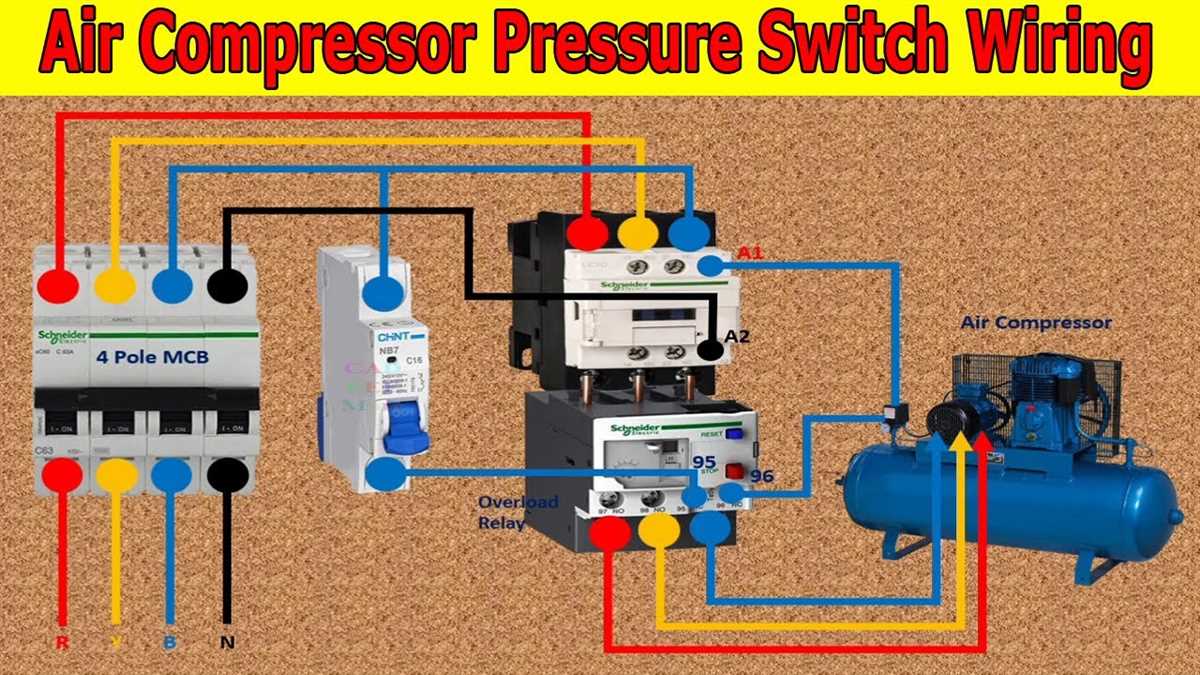
To connect the pressure switch, start by identifying the terminals on the switch. Most pressure switches have three terminals: one for power supply, one for the motor, and one for the pressure sensor. Refer to the manufacturer’s instructions or the wiring diagram for your specific pressure switch to determine which terminal is which.
Once you have identified the terminals, use appropriately sized electrical cables to connect the pressure switch to the power supply and the motor. Make sure to use the correct wire gauge to handle the amperage of the compressor motor. Incorrectly sized wires can lead to overheating and electrical hazards.
Next, connect the pressure sensor terminal to the appropriate wire that leads to the pressure sensor. This wire is responsible for detecting the air pressure in the tank and sending the signal to the pressure switch to turn the compressor on or off. Make sure to securely tighten the connection to ensure proper operation.
After connecting all the terminals, double-check the wiring to ensure that everything is properly connected and there are no loose or exposed wires. Once you are satisfied with the connections, you can move on to the next step in wiring your 3 phase air compressor.
Step 7: Test the connections
Once you have completed the wiring connections for your 3-phase air compressor pressure switch, it is important to test the connections to ensure they are working correctly. Follow these steps to test the connections:
- Switch on the power to the air compressor.
- Observe the pressure gauge on the compressor to ensure it is functioning properly.
- Maintain a safe distance from the compressor and listen for any unusual sounds or vibrations.
- Observe the pressure switch and check if it is activating and deactivating at the correct pressure levels.
- If the pressure switch is not activating or deactivating as expected, double-check your wiring connections and troubleshoot any issues.
- Ensure that the pressure relief valve is working properly by releasing any built-up pressure.
- Check all other components of the air compressor system, such as the motor and tank, to ensure they are functioning correctly.
By thoroughly testing the connections, you can ensure the safe and efficient operation of your 3-phase air compressor pressure switch. If any issues are detected, it is important to address them promptly to avoid any potential hazards or damage to the system.
Step 8: Turn on the power and check for proper functionality
After completing all the wiring connections, it is now time to turn on the power and check if the 3 phase air compressor pressure switch is working properly. Follow the steps below to ensure proper functionality:
- Make sure the power source to the pressure switch is turned off.
- Double-check all the wiring connections to ensure they are secured and properly connected.
- Turn on the power source to the pressure switch.
- Listen for any unusual sounds coming from the compressor motor or pressure switch. If you hear any strange noises, immediately turn off the power and recheck the wiring.
- Observe the pressure gauge on the compressor. It should start to rise as the compressor builds up pressure.
- Monitor the pressure switch to ensure it cuts off the power supply to the motor once the desired pressure setting is reached.
- If the pressure switch does not cut off the power supply, turn off the power source immediately and recheck the wiring connections.
- If everything is working properly, turn off the power source and proceed with any additional steps or adjustments needed for your specific air compressor setup.
It is important to exercise caution when working with electrical connections and equipment. If you are unsure or unfamiliar with electrical work, it may be best to consult a professional electrician for assistance.
FAQ:
Why do I need to wire a 3 phase air compressor pressure switch?
A 3 phase air compressor pressure switch is necessary for controlling the operation of the air compressor motor and maintaining the desired pressure levels within the system. It ensures that the compressor starts and stops at the proper pressure points.
Can I wire a 3 phase air compressor pressure switch myself, or should I hire a professional?
Wiring a 3 phase air compressor pressure switch can be done by an experienced DIYer, but if you are not familiar with electrical work or are unsure about any aspect of the process, it is recommended to hire a professional electrician to ensure the job is done safely and correctly.
Video:


Meet Harrison Clayton, a distinguished author and home remodeling enthusiast whose expertise in the realm of renovation is second to none. With a passion for transforming houses into inviting homes, Harrison's writing at https://thehuts-eastbourne.co.uk/ brings a breath of fresh inspiration to the world of home improvement. Whether you're looking to revamp a small corner of your abode or embark on a complete home transformation, Harrison's articles provide the essential expertise and creative flair to turn your visions into reality. So, dive into the captivating world of home remodeling with Harrison Clayton and unlock the full potential of your living space with every word he writes.


