Step-by-Step Guide on Wiring a 220 Air Compressor Pressure Switch

Wiring a 220 air compressor pressure switch is a necessary step in setting up an air compressor system. The pressure switch controls the on/off function of the compressor motor and regulates the pressure inside the air tank. Properly wiring the pressure switch ensures that the compressor operates efficiently and safely.
The first step in wiring a 220 air compressor pressure switch is to gather the necessary tools and materials. You will need wire strippers, electrical tape, a screwdriver, and the pressure switch itself. It is important to ensure that the pressure switch is compatible with your air compressor model.
Once you have the necessary tools and materials, you can begin wiring the pressure switch. Start by turning off the power to the air compressor system at the main electrical panel. This is important to prevent any electrical accidents during the installation process.
Next, locate the wire connections on the pressure switch. There should be three terminals labeled Line, Load, and Ground. Use the wire strippers to remove about half an inch of insulation from the ends of the wires that will be connected to the pressure switch. Then, connect the wires to the appropriate terminals on the pressure switch, ensuring a tight and secure connection.
Choose the Right Pressure Switch


When wiring a 220 air compressor pressure switch, it is important to choose the right pressure switch for your specific needs. The pressure switch is responsible for automatically turning the air compressor on and off based on the set pressure levels. Here are some factors to consider when choosing the right pressure switch:
- Pressure range: Determine the appropriate pressure range for your air compressor. The pressure switch should be able to handle the maximum and minimum pressure levels that your compressor operates at.
- Cut-in and cut-out pressure: The cut-in pressure is the pressure at which the air compressor starts running, while the cut-out pressure is the pressure at which the compressor stops. Make sure the pressure switch you choose has the appropriate cut-in and cut-out pressure settings for your compressor.
- Compatibility: Ensure that the pressure switch is compatible with your air compressor’s motor and electrical system. Check the voltage and current ratings of the pressure switch to ensure they match the specifications of your compressor.
- Adjustability: Some pressure switches allow you to adjust the cut-in and cut-out pressure settings. This can be useful if you need to fine-tune the pressure levels for specific applications.
- Reliability and durability: Look for a pressure switch that is reliable and durable, as it will be subjected to frequent on/off cycles and potentially harsh operating conditions. Read reviews and choose a reputable brand or model.
By considering these factors, you can choose the right pressure switch for wiring your 220 air compressor. This will ensure that your compressor operates efficiently and effectively, providing the right amount of pressure for your needs.
Gather the Necessary Tools
Having these tools readily available will make the process of wiring a 220 air compressor pressure switch much easier. Make sure to gather all the necessary tools before beginning the installation to ensure a smooth and efficient process.
Turn Off the Power to the Compressor
Before starting any electrical work, it’s important to ensure that the power to the compressor is turned off. This is necessary to prevent any accidents or injuries while working on the wiring.

To turn off the power, locate the circuit breaker or disconnect switch that controls the power supply to the compressor. This may be located near the compressor or in the main electrical panel of the building.
Once you have located the circuit breaker or disconnect switch, switch it to the “off” position. This will cut off the power supply to the compressor and ensure that it is safe to work on.
It is also recommended to test the power supply to the compressor with a voltage tester to ensure that no electricity is present before proceeding with the wiring process.
Remember, working with electrical components can be dangerous, so always take the necessary precautions and follow the manufacturer’s instructions when working on your air compressor.
Disconnect the Existing Wires
Before you can begin wiring the new 220 air compressor pressure switch, you’ll need to disconnect the existing wires from the old pressure switch. This will ensure that you have a clean slate to work with and prevent any confusion or potential electrical hazards.

Step 1: Start by unplugging the air compressor from the power source to ensure your safety.
Step 2: Locate the existing pressure switch and identify the wires that are connected to it. There may be multiple wires, including those coming from the power source and those going to the motor.
Step 3: Depending on the type of connections used, you may need to unscrew terminal screws or remove nuts to disconnect the wires. Use a screwdriver or pliers as necessary.
Step 4: Once all the wires are disconnected, use a label maker or masking tape to mark each wire with its corresponding terminal or connection point. This will help you during the re-wiring process.
Step 5: Carefully remove any wire nuts or electrical tape that may be securing the wires together. This will allow you to easily separate the individual wires.

Step 6: Once the wires are disconnected and labeled, you can safely remove the old pressure switch from its mounting location. This will make it easier to install the new switch later on.
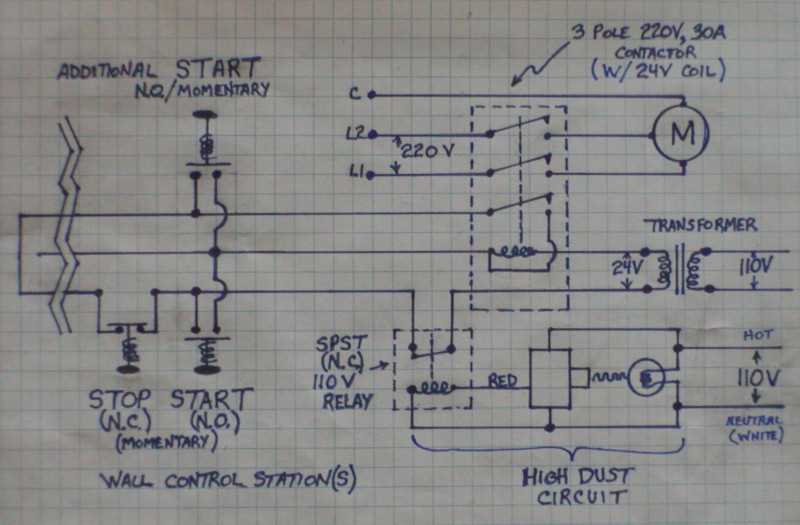
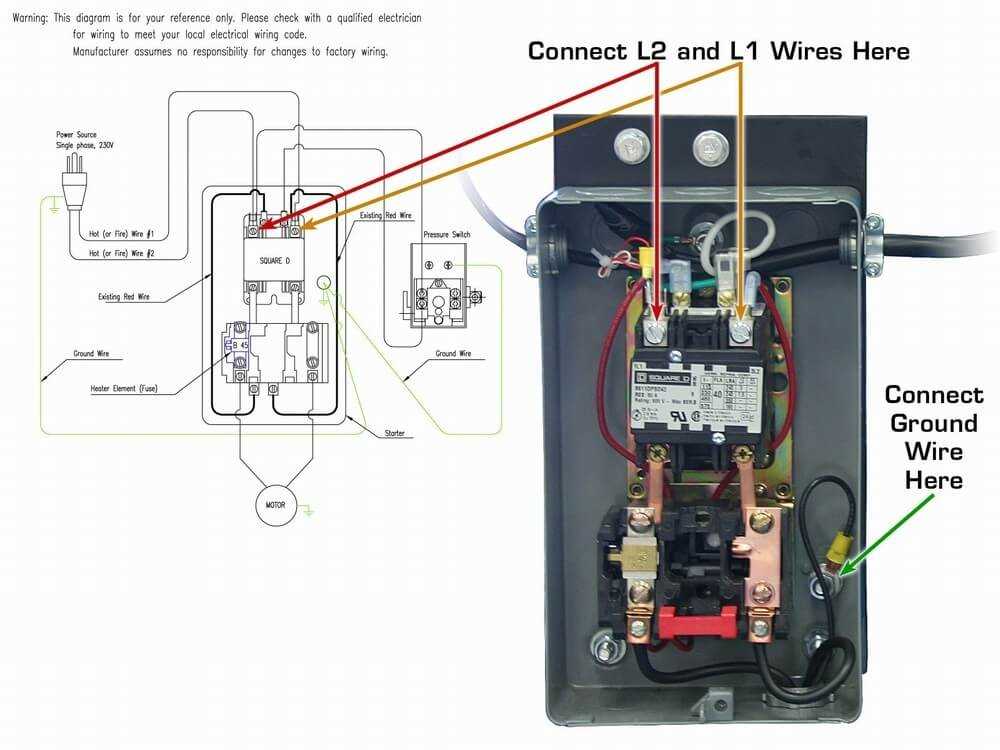
Identify the Line and Load Connections
When wiring a 220 air compressor pressure switch, it is important to identify the line and load connections. The line connections refer to the power supply, while the load connections refer to the air compressor circuit.
To identify the line connections, look for the incoming power supply cables. These cables will typically be labeled “Line” or “L” and will be connected to the terminals on the pressure switch that are marked as such. It is important to follow the manufacturer’s instructions to ensure proper wiring.
The load connections, on the other hand, refer to the circuit that supplies power to the air compressor. These connections are labeled “Load” or “Ld” and will be connected to the terminals on the pressure switch that are marked as such. Again, it is crucial to follow the manufacturer’s instructions to ensure correct wiring.
When connecting the line and load wires, it is important to make sure that the power supply is disconnected. This can be done by turning off the main power switch or by unplugging the power cord. Failure to do so can result in electric shock or damage to the equipment.

After identifying the line and load connections, it is recommended to double-check the wiring before powering on the air compressor. This can be done by reviewing the manufacturer’s instructions, using a multimeter to test for continuity, or consulting an electrician if needed.
Connect the Wires to the Pressure Switch
Once you have the correct pressure switch for your 220 air compressor, it’s time to connect the wires. Here is a step-by-step guide on how to do it:
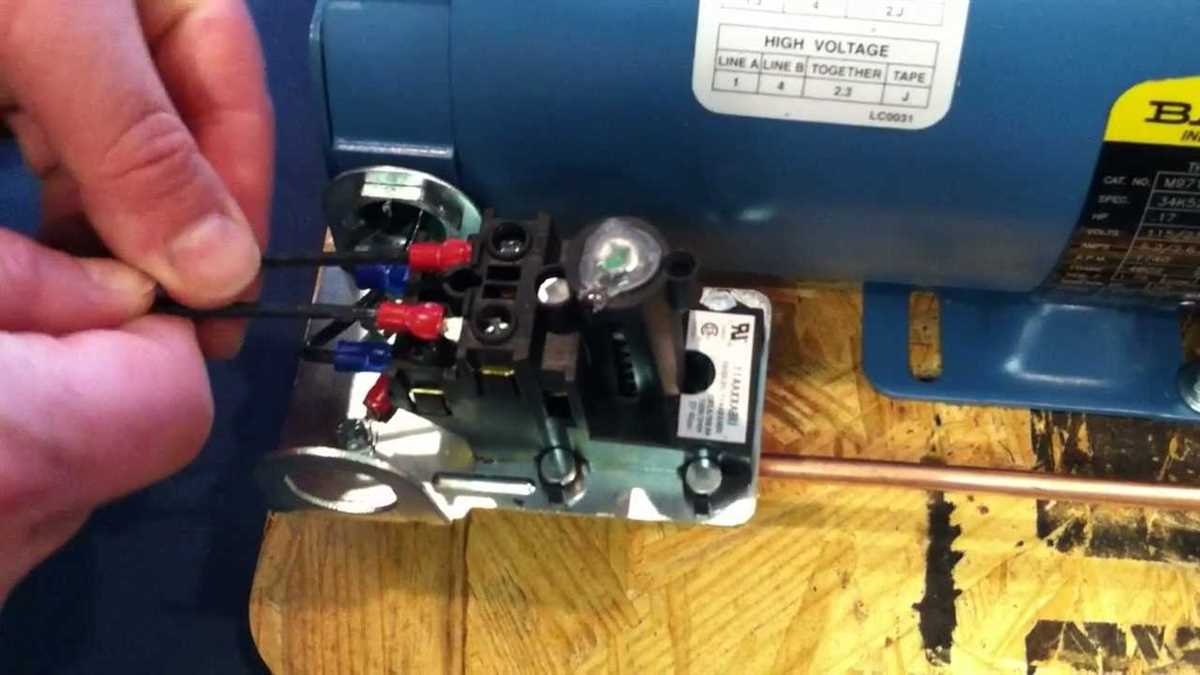
- Start by identifying the different terminals on your pressure switch. There will typically be three terminals labeled “Line,” “Motor,” and “Ground.”
- Next, strip the insulation off the ends of the wires that you will be connecting to the pressure switch. Make sure to strip an appropriate length of insulation so that there is enough wire exposed to make a secure connection.
- Connect the line wire, which carries the power supply, to the “Line” terminal on the pressure switch. This wire is usually colored black.
- Connect the motor wire, which supplies power to the air compressor’s motor, to the “Motor” terminal on the pressure switch. This wire is usually colored red or blue.
- Finally, connect the ground wire, which provides a path for electrical faults, to the “Ground” terminal on the pressure switch. This wire is usually colored green or bare copper.
Make sure all the connections are secure and tight. It is also important to double-check that the wires are connected to the correct terminals to avoid any electrical issues or damage to the air compressor.
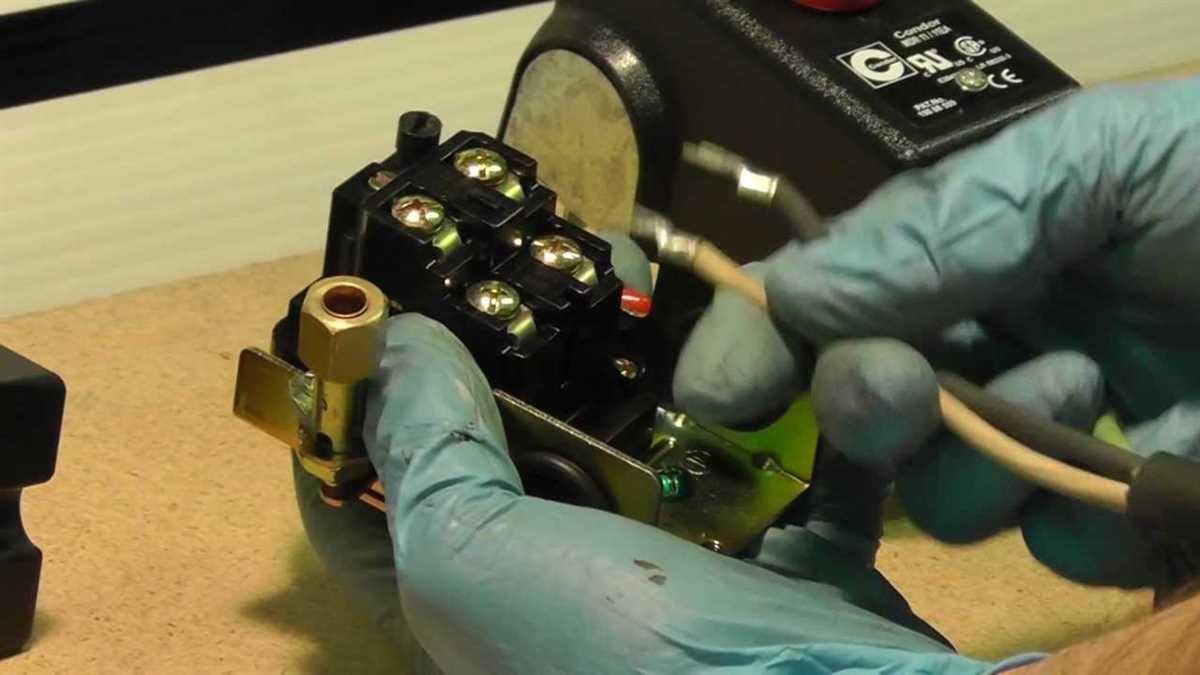
Secure the Connections
1. Tightly Screw the Wires

After connecting the wires to the appropriate terminals on the pressure switch, make sure to tightly screw them in place using a screwdriver or pliers. Loose connections can lead to electrical problems or even short circuits, so it’s important to ensure that the wires are securely fastened.
2. Use Wire Nuts or Electrical Tape
To provide extra security and prevent any accidental disconnections, you can use wire nuts or electrical tape to secure the wire connections. This will help keep the wires in place and reduce the risk of any faulty connections or exposed wires.
3. Organize the Wires
Once the connections are securely fastened, it’s a good practice to organize the wires neatly to avoid any tangling or confusion. You can use zip ties or cable clamps to bundle the wires together and keep them in place. This will make it easier to manage and troubleshoot any future issues with the wiring.
4. Check for Loose Screws
Before finalizing the setup, double-check all the screws on the pressure switch and ensure they are tightened properly. Loose screws can affect the overall performance and stability of the switch, so it’s crucial to tighten them securely.
5. Inspect for Any Damage

Lastly, inspect the entire wiring system for any signs of damage or wear. Look for frayed wires, exposed metal, or any other abnormalities that could potentially cause electrical hazards. If you spot any issues, it’s essential to address them immediately before operating the air compressor.
In conclusion, securing the connections of your air compressor pressure switch ensures a safe and reliable operation. By properly tightening the wires, using wire nuts or electrical tape, organizing the wires, checking for loose screws, and inspecting for any damage, you can maintain a well-functioning wiring system for your 220 air compressor.
Test the Pressure Switch
After wiring the pressure switch, it is essential to test its functionality before connecting it to the air compressor. Testing the pressure switch ensures that it is working correctly and will effectively regulate the air compressor’s pressure.
To test the pressure switch, you will need a multimeter. Start by setting the multimeter to measure resistance (ohms). Next, disconnect the power supply to the pressure switch to ensure your safety during the testing process.
Using the multimeter, touch the black probe to one of the pressure switch’s terminal screws and the red probe to the other terminal screw. The multimeter should display a reading of infinite resistance, indicating that the switch is open and not making electrical contact.
Next, apply pressure to the diaphragm of the pressure switch by turning the adjustment screw clockwise. As you do this, you should hear a click, indicating that the switch has closed and made electrical contact. Additionally, the multimeter should now display a resistance reading close to zero, confirming that the switch is closed.
If the pressure switch does not click or display the appropriate resistance readings, there may be a problem with the wiring or the switch itself. Double-check the wiring connections and ensure they are secure and correctly connected. If the issue persists, consider consulting a professional electrician or pressure switch technician for further assistance.
FAQ:
What is a pressure switch?
A pressure switch is an electrical device that controls the operation of an air compressor by monitoring the pressure in the tank and turning the compressor on or off accordingly.
How does a pressure switch work?
A pressure switch works by using a diaphragm or a spring mechanism to sense the pressure in the air tank. When the pressure drops below a certain level, the switch turns the compressor on. When the desired pressure is reached, the switch turns the compressor off.
Can I wire a 220 air compressor pressure switch myself?
Yes, you can wire a 220 air compressor pressure switch yourself if you have basic electrical knowledge and safety precautions. However, it is recommended to consult a professional electrician if you are unsure about the wiring process.
What tools do I need to wire a 220 air compressor pressure switch?
To wire a 220 air compressor pressure switch, you will need a screwdriver, wire strippers, wire nuts, electrical tape, and a voltage tester.
Video:


Harrison Clayton
Meet Harrison Clayton, a distinguished author and home remodeling enthusiast whose expertise in the realm of renovation is second to none. With a passion for transforming houses into inviting homes, Harrison's writing at https://thehuts-eastbourne.co.uk/ brings a breath of fresh inspiration to the world of home improvement. Whether you're looking to revamp a small corner of your abode or embark on a complete home transformation, Harrison's articles provide the essential expertise and creative flair to turn your visions into reality. So, dive into the captivating world of home remodeling with Harrison Clayton and unlock the full potential of your living space with every word he writes.


