Step-by-Step Guide on Setting up an Air Compressor

Setting up an air compressor may seem like a daunting task for those who are new to using this equipment. However, with the right guidance and step-by-step instructions, the process can be simplified and easily accomplished. In this article, we will provide you with a comprehensive guide on setting up an air compressor.
Step 1: Choose the right location
The first step in setting up an air compressor is choosing the right location for it. The location should be well-ventilated and away from any potential hazards or sources of ignition. It should also have sufficient space for the compressor and its accessories.
Step 2: Prepare the power source
Before setting up the air compressor, make sure you have a suitable power source. Check the voltage requirements of the compressor and ensure that the power source matches. It is also important to have a dedicated circuit for the compressor to prevent any power fluctuations.
Step 3: Install the compressor
Once you have a suitable location and power source, it’s time to install the air compressor. Begin by ensuring that the compressor is secured to a stable surface or mounting bracket. Then, connect the compressor to the power source using a proper power cord or electrical connection.
Step 4: Connect the air hose and accessories

After the compressor is securely installed, it’s time to connect the air hose and any other accessories. Start by attaching the air hose to the compressor’s outlet port. Make sure the connection is tight and secure. Then, attach any additional accessories such as air filters, pressure regulators, or quick-connect couplers.
Step 5: Test and adjust
Once everything is connected, it’s important to test the setup and make any necessary adjustments. Turn on the compressor and check for any leaks or abnormal noises. Adjust the pressure settings if needed and ensure that the compressor is functioning properly.
By following these step-by-step instructions, you can easily set up an air compressor and start using it for various tasks such as inflating tires, powering pneumatic tools, or operating machinery. Remember to always refer to the manufacturer’s instructions and consult a professional if you have any doubts or concerns.
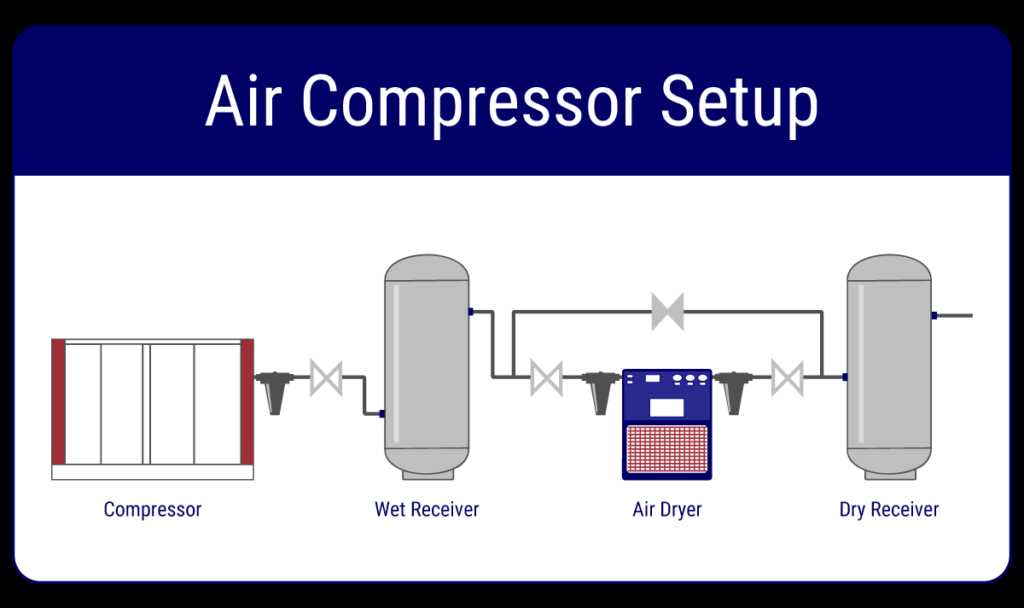
The Ultimate Air Compressor Setup Guide
Step 1: Choose the Right Location
Before setting up your air compressor, it’s important to choose the right location. Find a well-ventilated area away from flammable materials and sources of ignition. Make sure there’s enough space for the compressor to operate without any obstructions.
Step 2: Assemble the Air Compressor
Begin by assembling the different components of your air compressor. This may include attaching the motor, the tank, and any additional accessories. Follow the instructions provided by the manufacturer to ensure proper assembly.
Step 3: Install the Air Filter and Regulator
Once the air compressor is assembled, install the air filter and regulator. The air filter helps remove contaminants from the air, while the regulator allows you to control the pressure of the compressed air. Ensure that these components are securely connected to the compressor.

Step 4: Connect the Air Hose
Next, connect the air hose to the compressor. Make sure the hose is the appropriate length and diameter for your needs. Use hose clamps or fittings to securely attach the hose to the compressor and any tools or equipment you’ll be using.
Step 5: Check for Leaks
Before using the air compressor, check for any leaks. Apply a soapy water solution to all connections and look for any bubbles, which would indicate a leak. Tighten any loose fittings or connections as necessary.
Step 6: Power On and Test
Finally, power on the air compressor and test its functionality. Adjust the regulator to the desired pressure and listen for any unusual noises or vibrations. Test the compressor with different tools or equipment to ensure everything is working properly.
By following this step-by-step guide, you can set up your air compressor effectively and safely. Remember to regularly maintain and inspect your compressor to ensure optimal performance and longevity.
Choose the Right Location
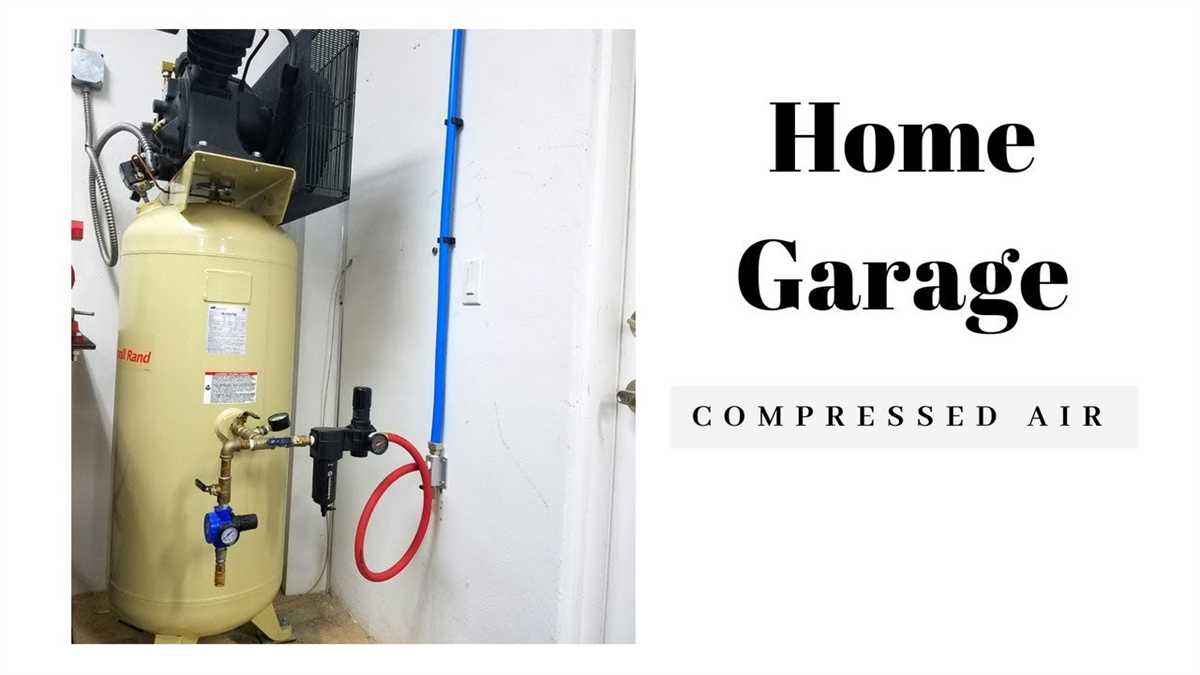
When setting up an air compressor, it is crucial to choose the right location for it. The location should provide enough space for the compressor and allow for proper ventilation to prevent overheating. Additionally, it should be a clean and dry area to protect the compressor from moisture and debris that could potentially damage it.

Consider placing the compressor in a well-ventilated area, such as a garage or a designated workshop space. Make sure the location is easily accessible and provides enough room for maintenance and repairs if needed. Avoid placing the compressor near flammable materials or in areas with excessive humidity, as this can pose a safety risk.
It is also important to check the electrical requirements of the compressor and ensure that the chosen location has the necessary power supply. Make sure the location is equipped with the appropriate outlets and that there are no obstacles that could interfere with the power cord.
Furthermore, consider the noise levels produced by the air compressor. If noise is a concern, look for a location that is away from living areas or consider investing in noise reduction measures such as soundproofing or insulation. This will help minimize disruptions and create a more comfortable working environment.
Gather the Necessary Tools
Before you begin setting up your air compressor, it is important to gather all the necessary tools to ensure a smooth installation process. Here are the tools you will need:

- A wrench or socket set
- A screwdriver
- A tape measure
- Pipe sealant or Teflon tape
- A pressure gauge
- A regulator
- A safety relief valve
- A hose
- Mounting brackets or screws
Having these tools on hand will make it easier to complete each step of the installation process and ensure that everything is properly installed and securely mounted. It is always better to have all the necessary tools before starting the installation, as it can be frustrating to have to stop and search for a tool in the middle of the process.
Prepare the Air Compressor
Before setting up your air compressor, it is important to prepare it properly. This will ensure that it functions efficiently and safely.
1. Find a suitable location
First, choose a well-ventilated area with enough space to accommodate the size of your air compressor. Ensure that the area is clear of any obstructions or flammable materials.
2. Check the power source
Next, make sure that you have a reliable power source for your air compressor. Check the voltage requirements and ensure that you have the appropriate outlet or generator available.
3. Set up the compressor stand
If your air compressor is not already mounted on a stand or platform, set it up on a sturdy surface to prevent vibrations. Use a level to ensure that the compressor is positioned correctly.

4. Inspect the air filters and oil levels
Check the air filters and clean or replace them if necessary. Also, check the oil levels and add oil if needed. Refer to the manufacturer’s instructions for the proper maintenance procedures.
5. Connect hoses and fittings
Connect the hoses and fittings according to the air compressor’s instructions. Make sure they are securely fastened to prevent any air or pressure leaks.
By following these steps, you will properly prepare your air compressor for use. This will ensure that it operates efficiently and safely, allowing you to complete your tasks effectively. Remember to consult the manufacturer’s instructions for any specific requirements or recommendations.
Install the Air Compressor
1. Choose a suitable location for the air compressor
When installing an air compressor, it is important to choose a suitable location. The chosen location should have enough space to accommodate the compressor, allowing for proper ventilation and easy access for maintenance. Consider factors such as noise, vibration, and airflow when selecting the location.

2. Prepare a sturdy foundation
Before installing the air compressor, make sure to prepare a sturdy foundation. This will help reduce vibrations and provide stability for the compressor. Use a level to ensure that the foundation is even and secure.
3. Connect the air compressor to a power source
To install the air compressor, connect it to a suitable power source. Make sure that the power source can handle the electrical requirements of the compressor. Use a grounded electrical outlet to ensure safety.
4. Install the intake and exhaust systems
Properly installing the intake and exhaust systems is essential for the efficient operation of the air compressor. Install the intake filter to prevent debris from entering the compressor. Connect the exhaust pipe to direct the expelled air away from the compressor.
5. Test the air compressor
Once the installation is complete, it is important to test the air compressor to ensure that it is functioning properly. Turn on the compressor and listen for any unusual noises or vibrations. Check for any leaks in the air line connections and adjust the pressure settings if necessary.
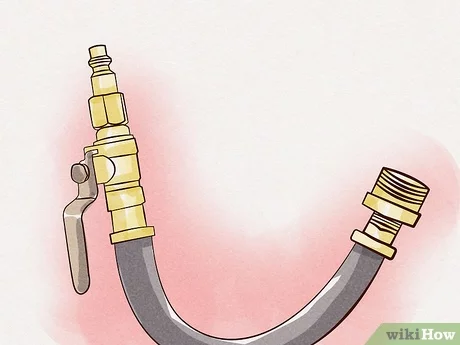
Connect the Air Hose
Connecting the air hose to your air compressor is an essential step in the setup process. The air hose is responsible for carrying the compressed air from the compressor to your tools or equipment.

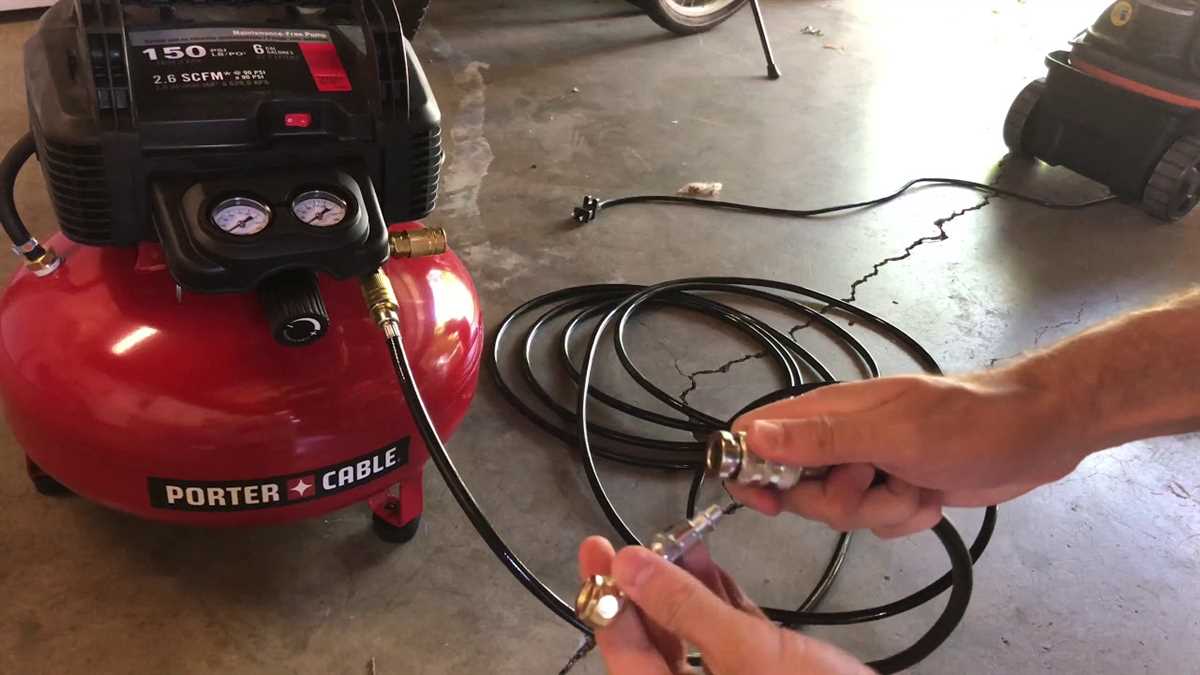
1. Choose the right air hose: There are different types and sizes of air hoses available in the market. Select an air hose that is compatible with your air compressor and the tools you will be using.
2. Attach the fittings: Most air hoses come with fittings already attached, but if not, you will need to attach them yourself. The fittings will allow you to connect the air hose to the compressor and your tools.
3. Secure the connections: Once you have attached the fittings, ensure that they are securely tightened. Loose connections can result in air leaks, which can affect the performance of your air compressor.
4. Route the hose: Determine the best route to run the air hose from the compressor to your work area. Avoid any sharp bends or kinks in the hose, as this can restrict the airflow.
5. Store the hose properly: When not in use, it is important to store the air hose properly. Coiling it up and hanging it on a hose reel or hook will help prevent tangles and keep it in good condition.
Power Up the Air Compressor
Once you have properly set up your air compressor, it’s time to power it up and get it running. Here are the steps to power up your air compressor:
- Check the power source: Before plugging in your air compressor, make sure the power source is compatible with the voltage requirements of the compressor. Check the specifications on the compressor and ensure that the power source can supply the necessary power.
- Connect the power cord: Plug the power cord of the air compressor into a grounded electrical outlet. Ensure that the outlet is capable of providing the required power and is in good working condition.
- Turn on the power switch: Locate the power switch on the air compressor and turn it on. This will supply power to the motor and other components of the compressor.
- Check for proper operation: Once the air compressor is powered up, listen for any abnormal noises or vibrations. Additionally, check the pressure gauges and other indicators to ensure that the compressor is functioning correctly.
It is important to follow the manufacturer’s instructions and guidelines when powering up the air compressor. Failure to do so can result in damage to the compressor or potential safety hazards. If you encounter any issues or are unsure about any steps, consult the user manual or contact the manufacturer for assistance.
Adjust the Settings
Once you have set up your air compressor, it is important to properly adjust the settings before using it. Adjusting the settings will ensure that the compressor operates at the optimal level and produces the desired results. Here are the steps to adjust the settings:
1. Pressure Setting
First, determine the appropriate pressure setting for your specific application. This will depend on factors such as the tools or equipment you will be using and the desired level of performance. Consult the manufacturer’s guidelines or equipment specifications to determine the recommended pressure range.
Using the pressure regulator, adjust the pressure setting to the desired level. Use caution not to exceed the maximum pressure rating of the compressor or the tools that will be connected to it. It is recommended to start with a lower pressure setting and gradually increase if necessary.
2. Air Flow Setting
Next, adjust the air flow setting to ensure a steady and reliable flow of compressed air. This can be done using the air flow control valve or the regulator knob, depending on the compressor model.
Turn the regulator knob or valve clockwise to increase the air flow, and counterclockwise to decrease it. It is important to strike a balance between having enough airflow for your tools or equipment while not wasting excess compressed air.
If you are unsure about the optimal air flow setting, refer to the manufacturer’s guidelines or the equipment specifications for guidance.
3. Safety Settings
Lastly, check and adjust any safety settings on the air compressor. This may include features such as an automatic shut-off system or pressure relief valve. Ensure that these safety mechanisms are properly set and in good working condition for safe operation.
Additionally, it is important to follow all safety precautions and guidelines provided by the manufacturer. This may include wearing appropriate protective gear such as safety glasses or earplugs, ensuring proper ventilation in the workspace, and keeping the compressor away from flammable materials.
By properly adjusting the settings of your air compressor, you can ensure optimal performance, efficiency, and safety during operation.
Perform Routine Maintenance
Regular maintenance is essential for the long-term performance and durability of your air compressor. By following a routine maintenance schedule, you can prevent costly repairs and prolong the lifespan of your equipment.
Check the Oil Level
One important aspect of routine maintenance is checking the oil level in your air compressor. Insufficient oil can lead to overheating and damage to the moving parts. To check the oil level, consult the manufacturer’s instructions and ensure that the compressor is turned off and cooled down. Remove the oil cap or dipstick and wipe it clean. Then, reinsert it and remove it again to examine the oil level. If the oil level is low, add the recommended type and volume of oil.
Inspect the Air Filter
The air filter is responsible for removing dust, dirt, and other contaminants from the air before it enters the compressor. Over time, the filter can become clogged, restricting the airflow and reducing the efficiency of the compressor. Regularly inspect the air filter and clean or replace it as needed. Cleaning can typically be done by gently tapping the filter to remove loose debris or using compressed air to blow out the collected dirt.
Check for Leaks
Leaks can significantly impact the performance of your air compressor by reducing its ability to maintain consistent pressure. Regularly inspect all connections, hoses, and fittings for any signs of leakage. Use a soap and water solution or a commercial leak detection solution to identify any leaks. If a leak is detected, tighten the connections or replace any damaged components to ensure air-tightness.
Drain the Moisture
Moisture can accumulate in the air compressor tank and cause corrosion and damage to the internal components. It is important to regularly drain the moisture from the tank to maintain optimal performance. To do this, turn off the compressor and release the air pressure. Locate the drain valve at the bottom of the tank, attach a hose or container, and open the valve to allow the moisture to drain out. Close the valve once all the moisture has been removed.
Inspect and Tighten Bolts
Regularly inspect all bolts, nuts, and screws on your air compressor. Vibration and normal wear and tear can cause them to become loose over time. Using appropriate tools, check and tighten any loose fasteners. This will ensure that your compressor remains stable and secure during operation.
By performing routine maintenance on your air compressor, you can ensure its optimal performance and longevity. Consult the manufacturer’s instructions for specific maintenance tasks and intervals, and always prioritize safety when working with compressed air systems.
FAQ:
What is an air compressor?
An air compressor is a device that converts power (using an electric motor, diesel or gasoline engine, etc.) into potential energy stored in pressurized air.
Why do I need an air compressor?
An air compressor is a versatile tool that can be used for various tasks such as inflating tires, powering pneumatic tools, spraying paint, cleaning surfaces, and more.
What type of air compressor should I choose?
The type of air compressor you should choose depends on your specific needs. Factors to consider include the required airflow, tank size, portability, noise level, and power source.
How often should I maintain my air compressor?
Regular maintenance is essential to keep your air compressor in good working condition. It is recommended to check the oil level, clean or replace air filters, inspect hoses and fittings, and drain condensation regularly. Consult the manufacturer’s manual for specific maintenance intervals.
Video:


Harrison Clayton
Meet Harrison Clayton, a distinguished author and home remodeling enthusiast whose expertise in the realm of renovation is second to none. With a passion for transforming houses into inviting homes, Harrison's writing at https://thehuts-eastbourne.co.uk/ brings a breath of fresh inspiration to the world of home improvement. Whether you're looking to revamp a small corner of your abode or embark on a complete home transformation, Harrison's articles provide the essential expertise and creative flair to turn your visions into reality. So, dive into the captivating world of home remodeling with Harrison Clayton and unlock the full potential of your living space with every word he writes.


